Article about loopback and stepzen in relation with GraphQL
This article is under construction, there are many things to discuss further. So far, the topics explored are about the use of mongoDB with a loopback layer allowing to expose REST invocations to the mongodb database. Then use those REST APIs described in the Open API specification to generate a GraphQL API.
Author: Arnauld Desprets (arnauld_desprets@fr.ibm.com)
Date last modified: 11 th May 2023
Date created: 25 th October 2021
- Introduction
- MongoDB
- Loopback Development
- GraphQL development
- StepZen Development
- Protection of the GraphQL endpoint with API Connect
- Additional resources
Official loopback documentation: Loopback V4 official documentation
loopback is:
- An open source built on top of NodeJS
- Is based on Model Driven Approach to accelerate development
- While having a componentised approach enabling a lot of flexibility
REST versus GraphQL: You tube video
Official StepZen documentation: StepZen StepZen is a platform that helps creating a unified GraphQL API by combining data from multiple sources, such as databases, RESTful services, and more. With StepZen, you can define your API schema using GraphQL SDL (Schema Definition Language) and map it to the underlying data sources (SQL and NoSQL databases, RESTful APIs, GraphQL services, or custom data sources). It offers features like automatic caching, pagination, and authentication.
How to design the model Wikipedia on associations
Types of associations Article on associations
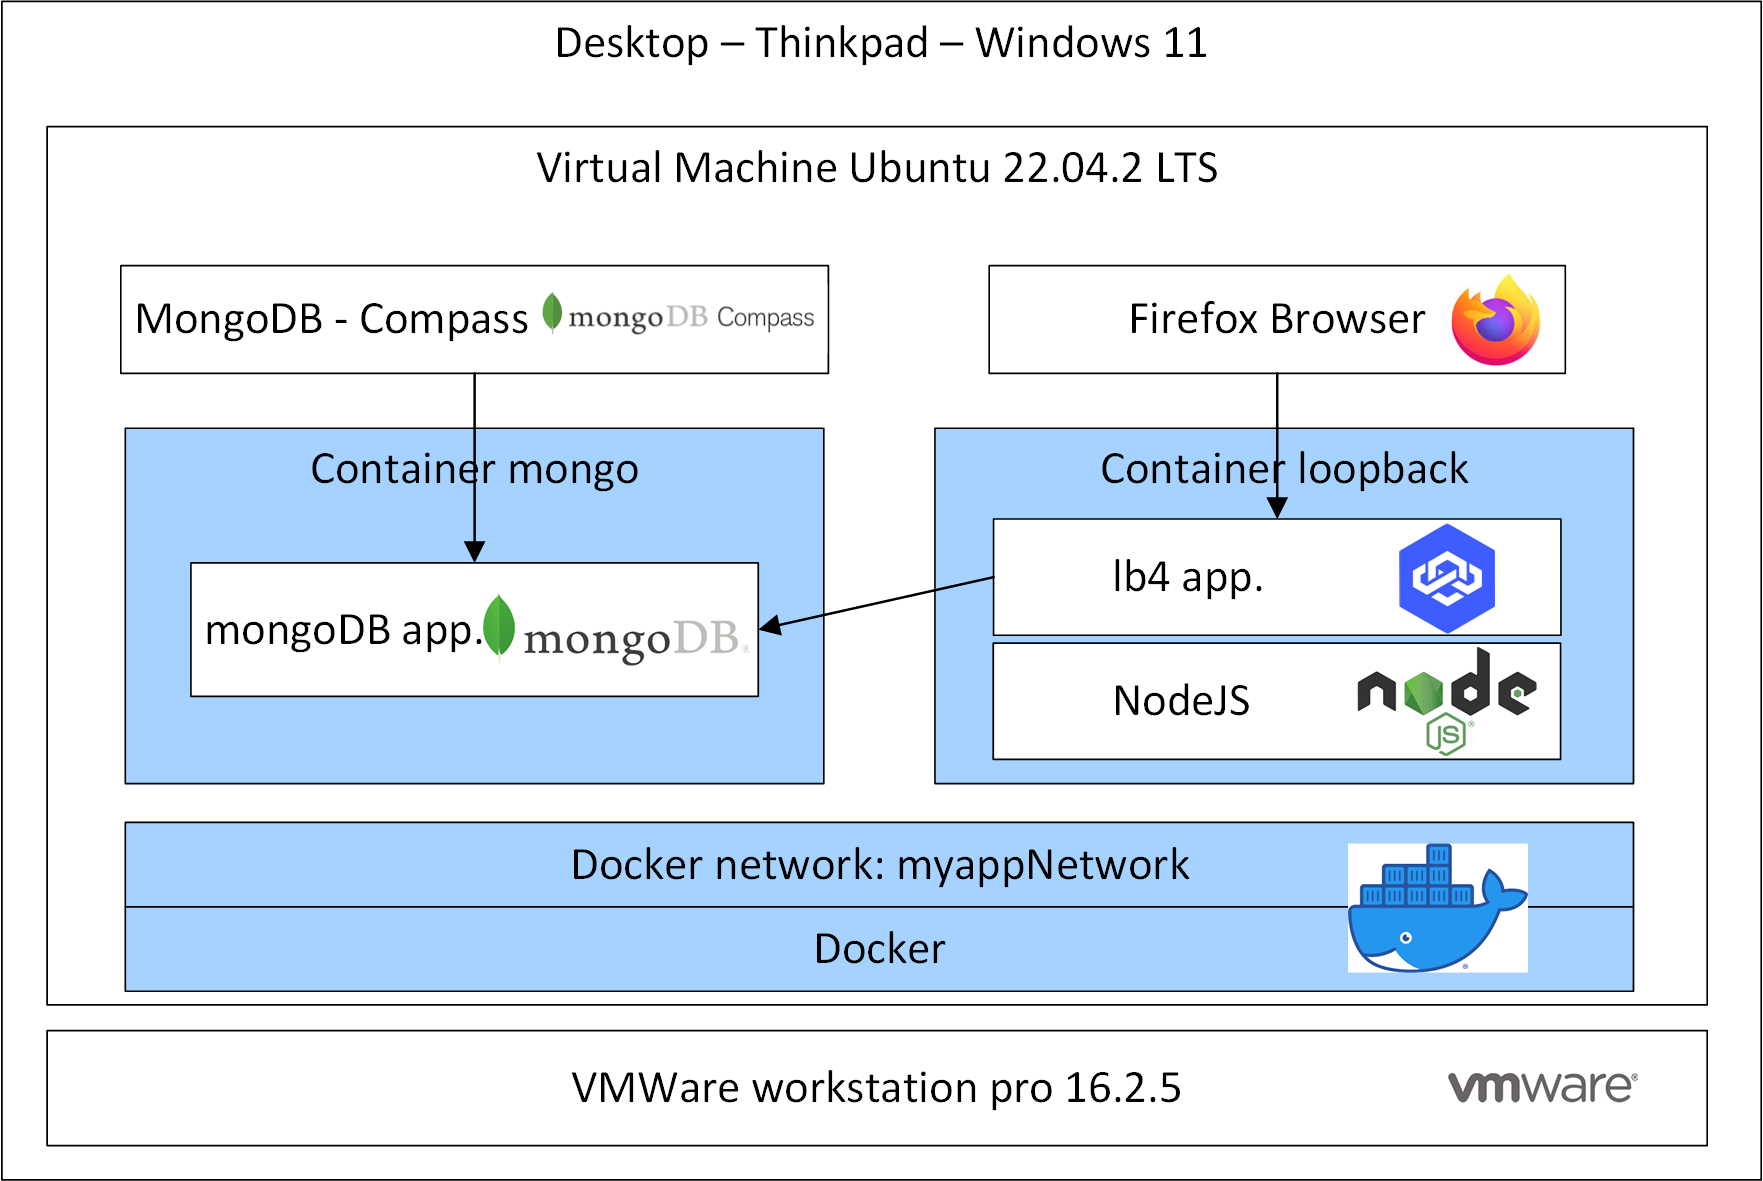
All the applications are running locally. To facilitate the installation, I'm going to use docker as much as possible. I'm using a virtual machine on Ubuntu. In this VM docker is installed. I'm going to use two containers, one for mongoDB and one that I built for the loopback application which will also contains the graphQL layer. In order to have the two containers communicating each other I create a docker network named myappNetwork.
In this article we use mongodb as the source of data. We spend a few chapters to explain how to use it. It should probably be a separated article, but we kept it here because it was the foundation of the sample used in this article.
I have created a docker network previously with the command.
docker network create myappNetworkGetting the image of mongoDB and the run the container
docker pull mongo
docker run --network=myappNetwork --name mongodb -d mongo
Hint: to stop/restart the containers:
 docker ps -a | grep -e mongodb -e country
 docker start <mongodb container id> <country.img container id>
To check the IP needed to access mongoDB, you issue the following command (mongodb is the name of the container)
docker inspect -f '{{range .NetworkSettings.Networks}}{{.IPAddress}}{{end}}' mongodbHint: I'm using the IP, I had the choice of using the container name or also use network aliases with the option --network-alias used at startup of the container.
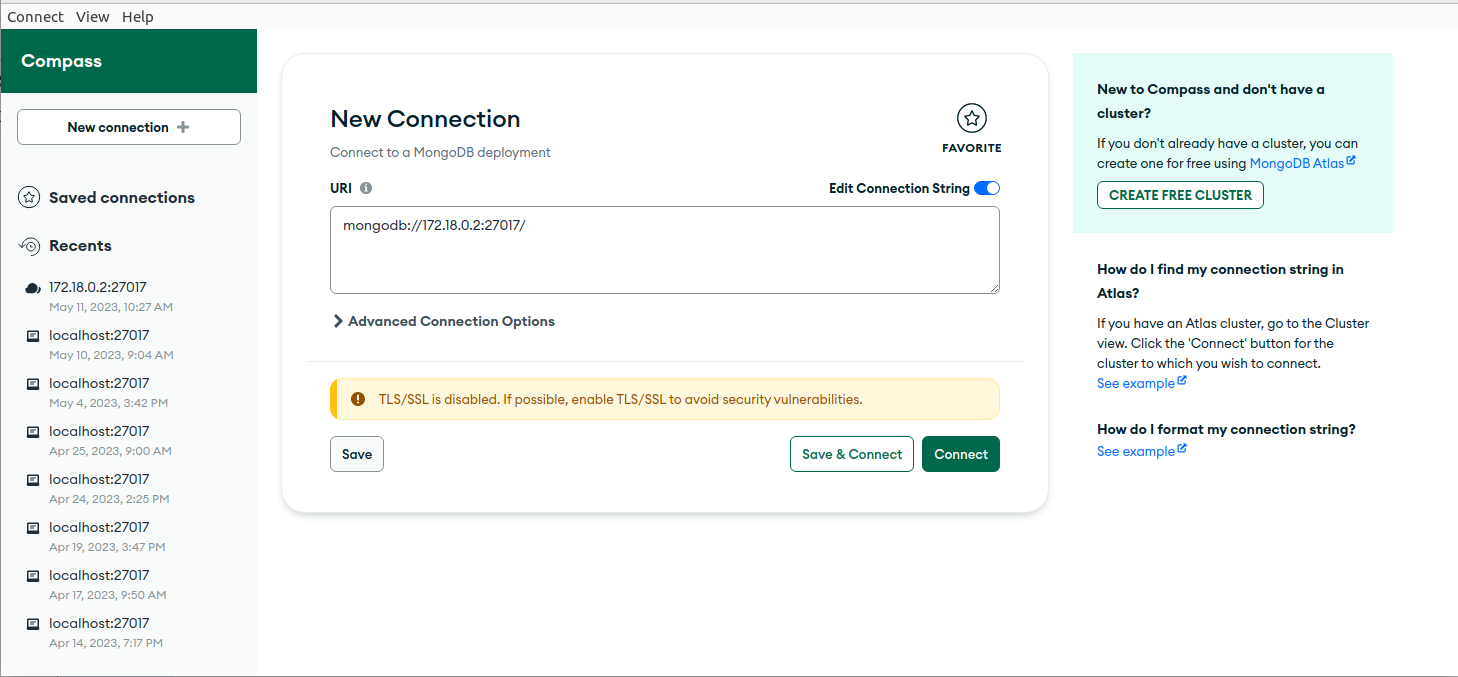
In my case it returns 172.18.0.2
For reference, if you do not use a docker network : docker run --name mongodb -d -p 27017:27017 mongo. p means that you expose (publish) the port on the host.
For reference only because I'm not using a local installation but a container.
wget -qO - https://www.mongodb.org/static/pgp/server-4.4.asc | sudo apt-key add
sudo apt-get install gnupg
wget -qO - https://www.mongodb.org/static/pgp/server-4.4.asc | sudo apt-key add -
echo "deb [ arch=amd64,arm64 ] https://repo.mongodb.org/apt/ubuntu focal/mongodb-org/4.4 multiverse" | sudo tee /etc/apt/sources.list.d/mongodb-org-4.4.list
sudo apt-get update
sudo apt-get install -y mongodb-org
echo "mongodb-org hold" | sudo dpkg --set-selections
echo "mongodb-org-server hold" | sudo dpkg --set-selections
echo "mongodb-org-shell hold" | sudo dpkg --set-selections
echo "mongodb-org-mongos hold" | sudo dpkg --set-selections
echo "mongodb-org-tools hold" | sudo dpkg --set-selections
ps --no-headers -o comm 1
sudo systemctl start mongod
sudo systemctl status mongodFor reference, I'm going to use loopback to populate the database.
db.createUser({user: "nono", pwd: "Passw0rd!", roles:[{db:"test"}]})
db.createUser( {user: "nono", pwd: "Passw0rd", roles:[ { role: "readWrite" , db:"countriesDS"} ] })
You can access it at: mongodb://nono:Passw0rd@192.168.246.171:27017/test
Add data in mongodb from csv
mongoimport --db myDb --collection myCollection --type csv --headerline --file /path/to/myfile.csv`MongoDB Compass is a graphical user interface (GUI) to make it easier for developers and database administrators to interact with MongoDB databases. Key features of MongoDB Compass includes Data Exploration, Query Building, Index Management, Aggregation Pipeline Builder, Data Validation, Geospatial Data Visualization, and Schema Analysis.
wget https://downloads.mongodb.com/compass/mongodb-compass_1.35.0_amd64.deb
sudo dpkg -i mongodb-compass_1.35.0_amd64.deb
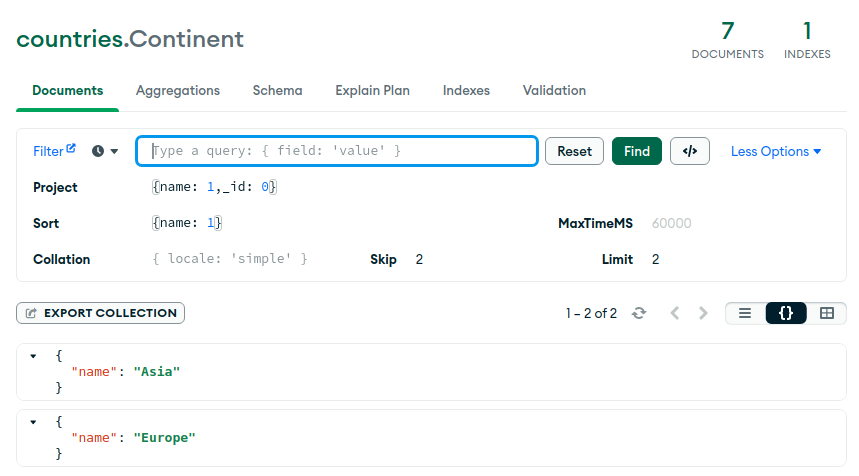
mongodb-compassHere is a simple query, find the continents, ordered by name, with an offset (skip) 2 and only return 2. Just display the name and note the _id. Only Asia and Europe are returned.
MongoDB Aggregation is used to process and analyze data within MongoDB collections. It allows you to perform complex data transformations, aggregations, and computations on large datasets, similar to SQL's GROUP BY and aggregate functions. It consists of a sequence of stages, where each stage performs a specific operation on the input documents and passes the result to the next stage.
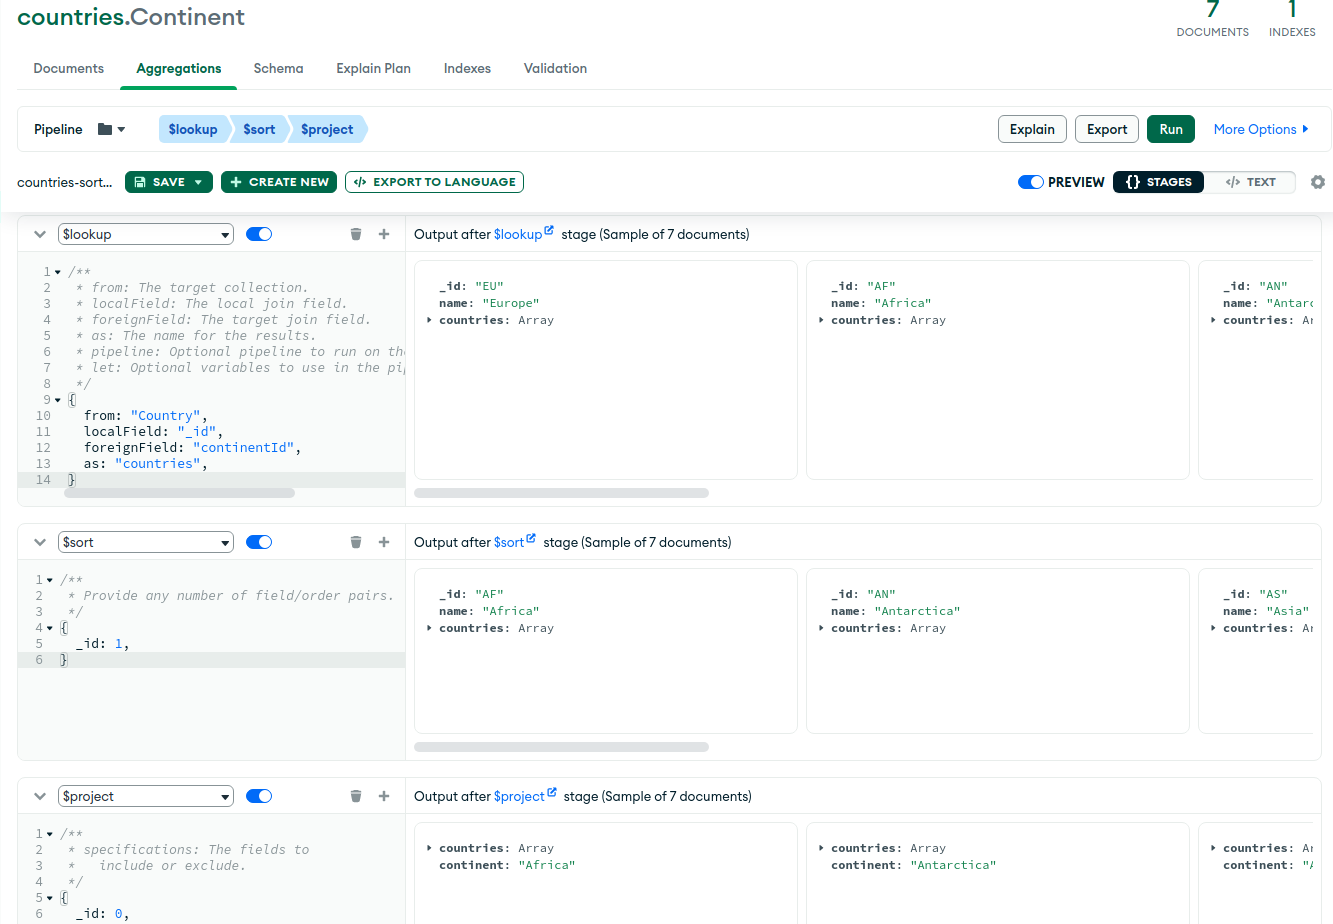
Aggregation pipelines run with the db.collection.aggregate() method do not modify documents in a collection, unless the pipeline contains a $merge or $out stage. In the following aggregation, I have created 3 stages:
- Perform the left outer join
- Sort by continent
- Specify only some fields (projection)
[
  {
    $lookup:
      /**
       * from: The target collection.
       * localField: The local join field.
       * foreignField: The target join field.
       * as: The name for the results.
       * pipeline: Optional pipeline to run on the foreign collection.
       * let: Optional variables to use in the pipeline field stages.
       */
      {
        from: "Country",
        localField: "_id",
        foreignField: "continentId",
        as: "countries",
      },
  },
  {
    $sort:
      /**
       * Provide any number of field/order pairs.
       */
      {
        _id: 1,
      },
  },
  {
    $project:
      /**
       * specifications: The fields to
       *   include or exclude.
       */
      {
        _id: 0,
        continent: "$name",
        "countries.name": 1,
      },
  },
]To install the CLI globally
npm i -g @loopback/cliBelow a quick overview of the arguments of the lb4 CLI matching with the various concepts in loopback.
| Option | Description |
|---|---|
| app | Central class for setting up all module's components, controllers, servers and bindings |
| datasource | Create the source of data, where store/fetch data from. (in-memory, file, MongoDB, and many other databases). Connectors: here |
| model | Create entity in a Model. Use to model the formats of the data |
| repository | Create the abstraction layer between your model and your controller. Model defines the format of the data, the repository add the type of behavior you can do with the model. |
| relation | Create relation between the entities in the Model |
| controller | Where you put your API endpoint logic and handle requests/responses to your API. |
| interceptor | Interceptors are reusable functions to provide extra logic around method invocations (validate/log/catch errors/...) |
| extension | A common functionality that the framework depends on and interacts with, such as, booting the application, parsing http request bodies, and handling life cycle events. Documentation |
| observer | A LoopBack application has its own life cycles at runtime. Documentation |
| discover | Handles adding artifacts to the application Documentation |
| example | Create a full sample |
lb4 --help
But what does it mean?
Building blocks as explained in the official documentation: Loopback concepts
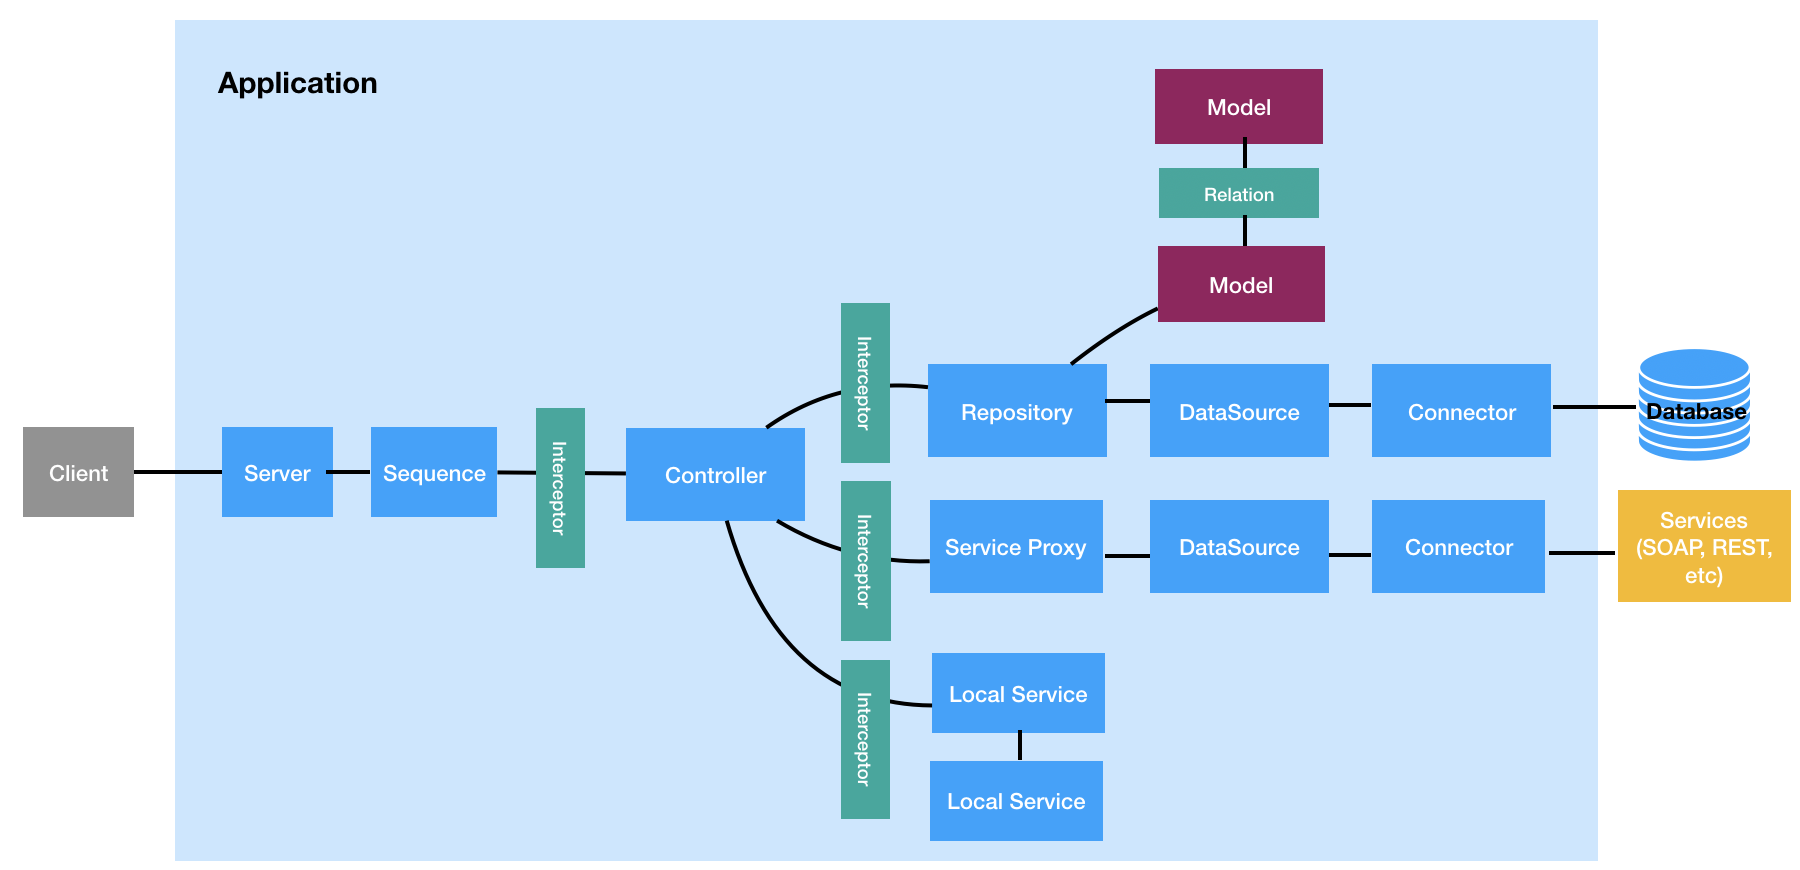
We start with a very simple model. This is a sample with Continents
The following steps will be followed and are well documented:
- create app scaffolding
- create datasource
- create model
- create repository
- create relationships
- create controller
$ cd countries
($ npm start)
lb4 datasource
Datasource name: CountriesAPI
Select the connector for CountriesAPI:  MongoDB (supported by StrongLoop)
Connection String url to override other settings (eg: mongodb://username:password@hostname:port/database): mongodb://localhost:27017/countries
host: localhost
port: 27017
user:
password: [hidden]
database: countries
Feature supported by MongoDB v3.1.0 and above: Yeslb4 model for each entity
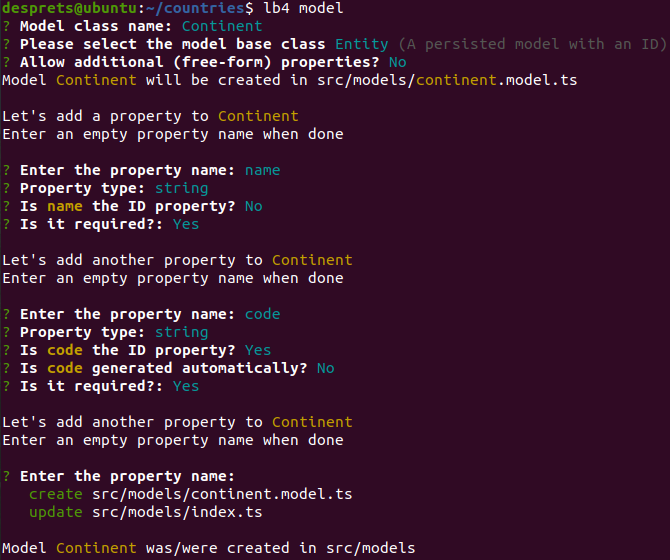
lb4 model
? Model class name: Continent
? Please select the model base class Entity (A persisted model with an ID)
? Allow additional (free-form) properties? No
? Enter the property name: code
? Property type: string
? Is code the ID property? Yes
? Is code generated automatically? No
? Is it required?: Yes
? Enter the property name: name
? Property type: string
? Is it required?: Yes
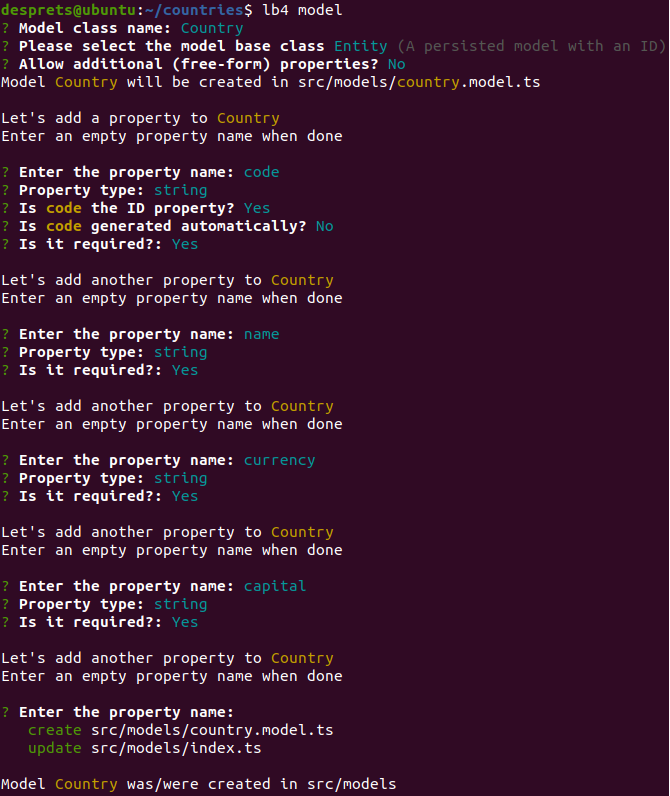
lb4 model
? Model class name: Country
? Please select the model base class Entity (A persisted model with an ID)
? Allow additional (free-form) properties? No
? Enter the property name: code
? Property type: string
? Is code the ID property? Yes
? Is code generated automatically? No
? Is it required?: Yes
? Enter the property name: name
? Property type: string
? Is it required?: Yes
lb4 repository
? Select the datasource CountriesApiDatasource
? Select the model(s) you want to generate a repository for Continent, Country
This chapter is largely inspired by ACtive Record associations See also wikipedia article on associations
It is important to understand what lb4 is supporting and what does it means. At this time lb4 supports:
- belongsTo
- hasMany
- hasManyThrough
- hasOne
Other types of relationship are not supported:
- has_one :through
- has_and_belongs_to_many
lb4 relation
? Please select the relation type hasMany
? Please select source model Continent
? Please select target model Country
? Foreign key name to define on the target model code
? Source property name for the relation getter (will be the relation name) countries
? Allow Continent queries to include data from related Country instances?  Yes
lb4 controllerFirst we build the image, let's call the image name countries-app. The Dockerfile is provided by Loopback.
docker build -t country.img .We test with the two docker containers.
docker run --network=myappNetwork --name countries country.imgFor reference (not used)
docker run -it -p 3000:3000 countries-app(Ensure access to db): db.createUser( {user: "nono", pwd: "Passw0rd", roles:[ { role: "readWrite" , db:"countriesDS"} ] })
Populate with some data:
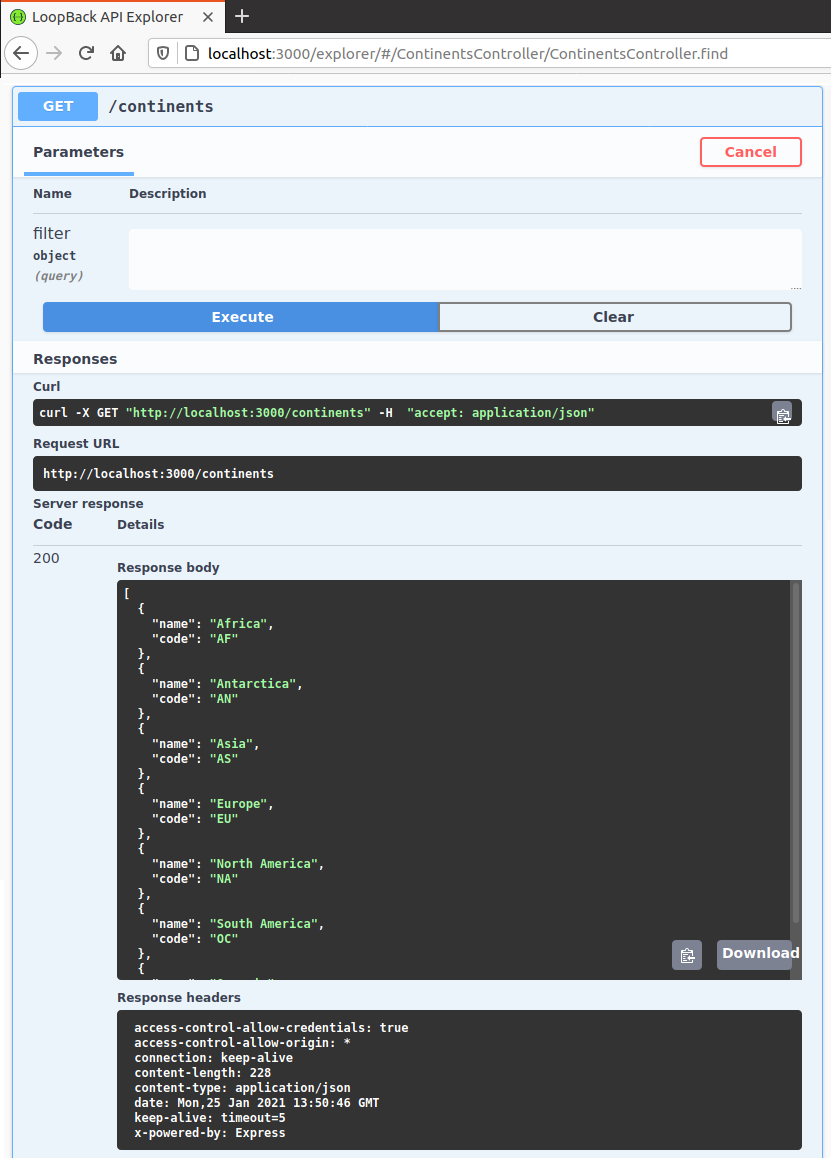
curl -X POST "http://localhost:3000/continents" -H  "accept: application/json" -H  "Content-Type: application/json" -d "{\"name\":\"Africa\",\"code\":\"AF\"}"
curl -X POST "http://localhost:3000/continents" -H  "accept: application/json" -H  "Content-Type: application/json" -d "{\"name\":\"Antarctica\",\"code\":\"AN\"}"
curl -X POST "http://localhost:3000/continents" -H  "accept: application/json" -H  "Content-Type: application/json" -d "{\"name\":\"Asia\",\"code\":\"AS\"}"
curl -X POST "http://localhost:3000/continents" -H  "accept: application/json" -H  "Content-Type: application/json" -d "{\"name\":\"Europe\",\"code\":\"EU\"}"
curl -X POST "http://localhost:3000/continents" -H  "accept: application/json" -H  "Content-Type: application/json" -d "{\"name\":\"North America\",\"code\":\"NA\"}"
curl -X POST "http://localhost:3000/continents" -H  "accept: application/json" -H  "Content-Type: application/json" -d "{\"name\":\"Oceania\",\"code\":\"SA\"}"
curl -X POST "http://localhost:3000/continents" -H  "accept: application/json" -H  "Content-Type: application/json" -d "{\"name\":\"South America\",\"code\":\"OC\"}"

curl -X POST "http://localhost:3000/countries" -H  "accept: application/json" -H  "Content-Type: application/json" -d "{\"code\":\"FR\",\"name\":\"France\",\"currency\":\"EUR\",\"capital\":\"Paris\",\"continentId\":\"EU\"}"
curl -X POST "http://localhost:3000/countries" -H  "accept: application/json" -H  "Content-Type: application/json" -d "{\"code\":\"GB\",\"name\":\"United Kingdom\",\"currency\":\"GBP\",\"capital\":\"London\",\"continentId\":\"EU\"}"
You can also find the commands for the creation of all the countries and continents here
Reference: loopback on docker
In this chapter we study the use of the filter
Loopback provides a high level of control in the queries. A filter is defined by default as such:
{
  "offset": 0,
  "limit": 100,
  "skip": 0,
  "order": "name ASC",
  "where": {
    "additionalProp1": {}
  },
  "fields": {
    "code": true,
    "name": true,
    "continentId": true
  },
  "include": [
    {
      "relation": "countries",
      "scope": {
        "offset": 0,
        "limit": 100,
        "skip": 0,
        "order": "string",
        "where": {
          "additionalProp1": {}
        },
        "fields": {},
        "include": [
          {
            "additionalProp1": {}
          }
        ]
      }
    },
    "name"
  ]
}
Explanations on the various part of the filter
| filter | Explanation | Sample |
|---|---|---|
| offset | Set offset | 100 |
| limit | Set limit | 5 |
| skip | Alias to offset | 5 |
| order | Describe the sorting order | "name ASC" |
| where | Where clause ({property: value} or {property: {op: value}}) | "where": {"name": "France"} |
| fields | Describe what fields to be included/excluded | "name": true |
| include | To join several models | "relation": "countries" |
Some samples:
Sample below retrieves 5 countries starting at the 100 position with an ascending sorting on the name and only return the name of the country
{
  "offset": 100,
  "limit": 5,
  "order": "name ASC",
  "fields": {
    "name": true
  }
}
Sample where clauses
Without an operator (simple)
{"property": "value"}With an operator
{"property": {"op": "value"}}Where op is the operator, possibles values are : = / and / or / gt, gte / lt, lte / between / inq, nin /near / neq / like, nlike / ilike, nilike / regexp. Documentation is here
Simple sample
{
"where": {"name": "France"}
}
With an operator (like) sample
Sample to retrieve all the countries containing the letter F in te name
{
 "where": {"name": {"like": "F"}}
}
Sample to retrieve all the countries starting with the letter F with a regex. Notice the caret to make sure this is the first letter.
{
 "where": {"name": {"regexp": "^F.*"}}
}Use the include filter to specify the related models that you want to join. Here's an example of how you can perform a left outer join using the include filter in LoopBack:
{
 "include": [
  {
   "relation": "countries"
  }
 ]
}
In this example, we're performing a left outer join between Continent and Country. This sample will return all the countries associated with each continents.
A more complex sample:
{
  "offset": 0,
  "limit": 5,
  "order": "name ASC",
  "fields": {"code":true, "name":true},
  "include": [
    {
      "relation": "countries",
      "scope": {
        "offset": 0,
        "limit": 5,
        "fields": {"code":false, "name":true, "continentId":true},
        "order": "name ASC"
      }
    }
  ]
}Official documentation is here.
Under the cover we are going to use an application, openapi-to-graphql, to generate GraphQL schemas from Open API specifications, see source documentation here
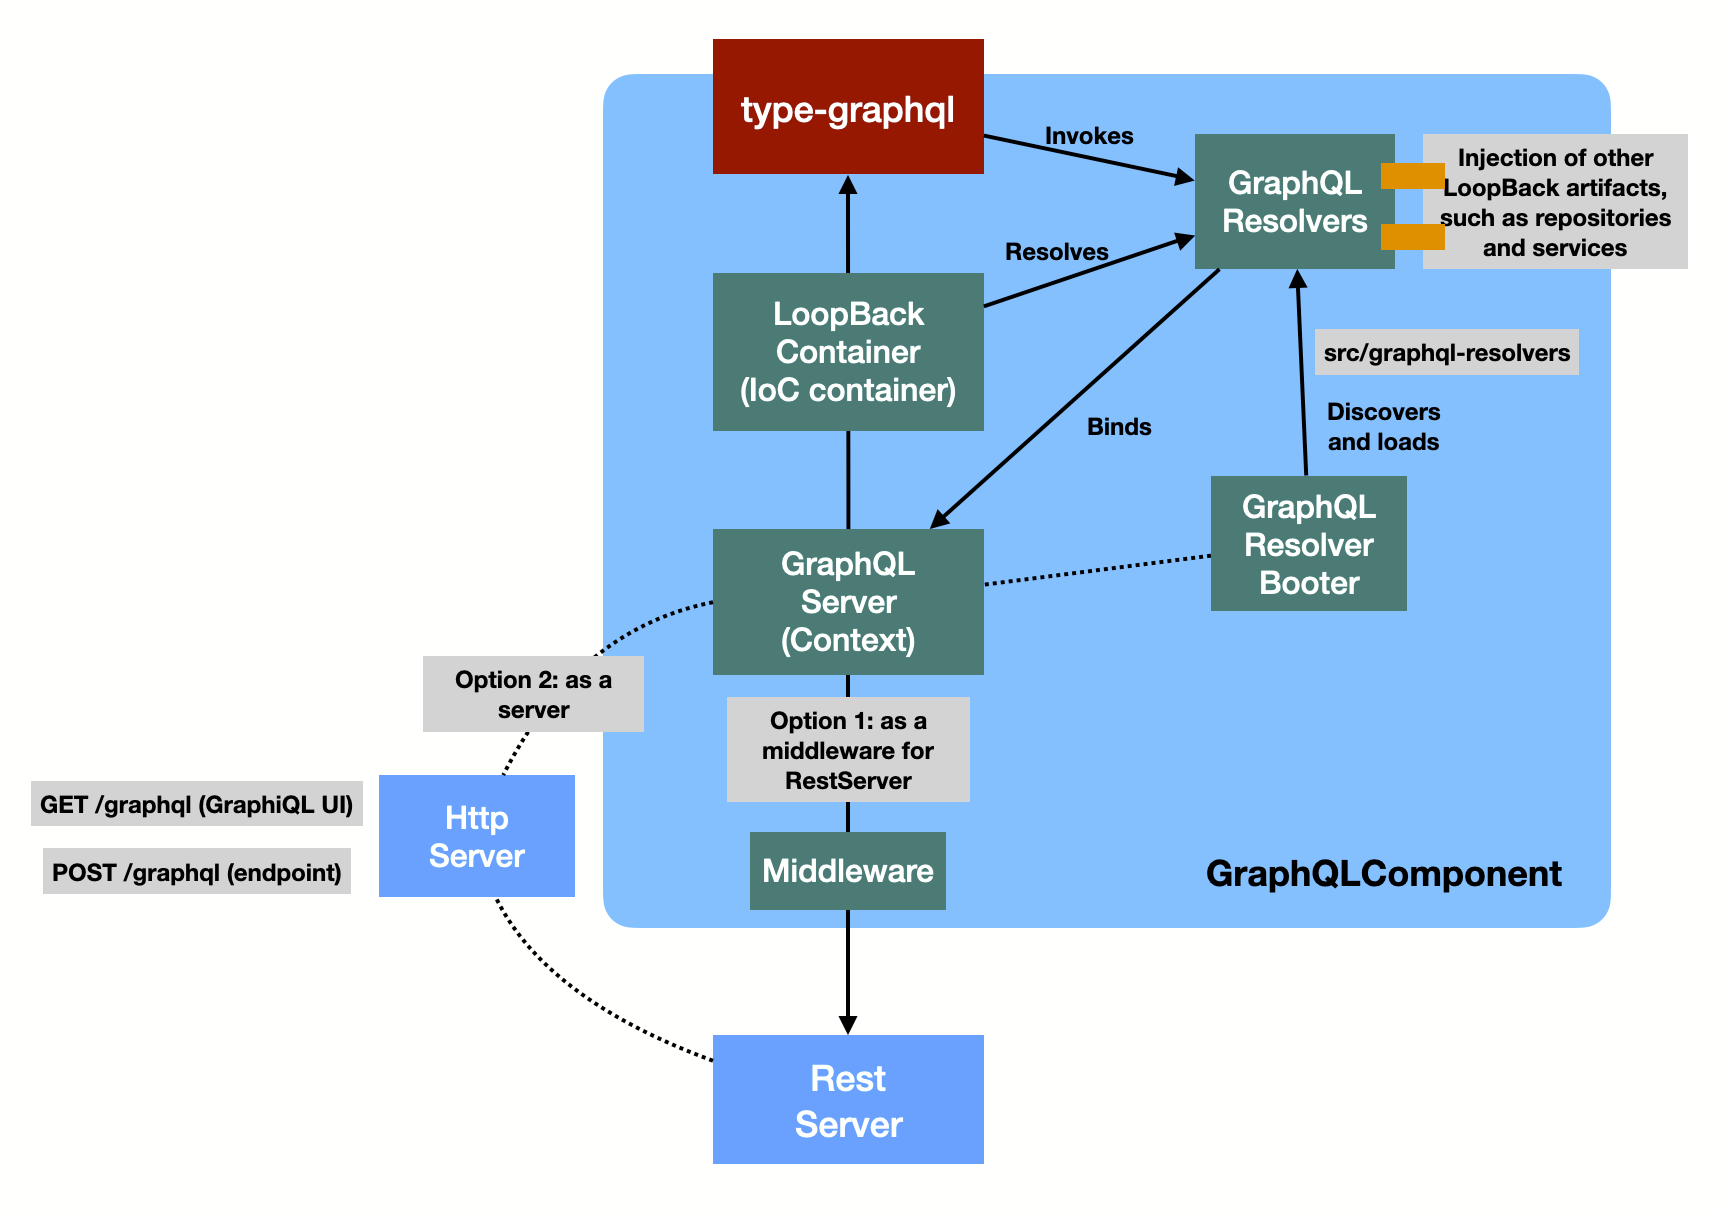
npm install --save @loopback/graphql
Modify it a little for GraphQL support
npx openapi-to-graphql-cli --port=3010 http://localhost:3000/openapi.json
{
  ...
  "numOps": 21,
  "numOpsQuery": 8,
  "numOpsMutation": 13,
  "numOpsSubscription": 0,
  "numQueriesCreated": 8,
  "numMutationsCreated": 13,
  "numSubscriptionsCreated": 0
}
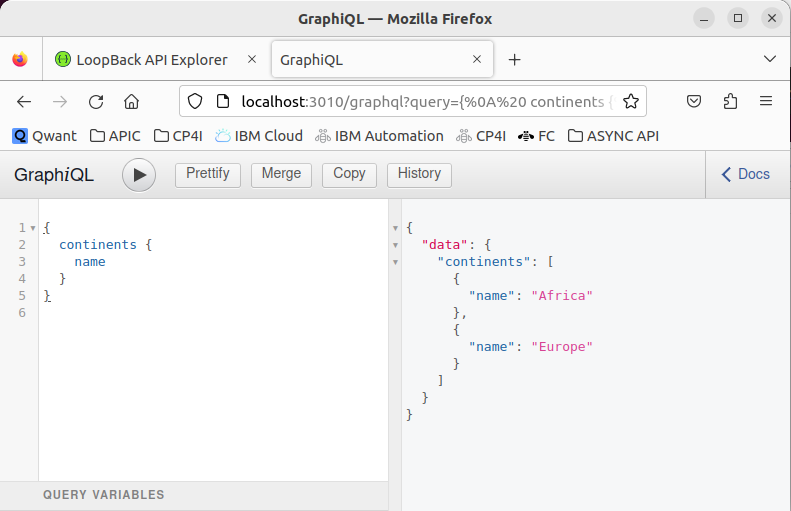
GraphQL accessible at: http://localhost:3010/graphql
Get continents
{
  continents {
    code
    name
  }
}
Get countries of a continent
{
  continentCountries(id: "EU") {
    name
  }
}
Adding a filter
{
  continents(filter: {limit: 2, offset:0, order: "code ASC"}) {
    code
  }
}
Sample mutation
mutation {
  continentControllerCreate(newContinentInput: {code: "OC", name: "Oceania"}) {
    code
    name
  }
}
Introspection call to the GraphLQ API (on Linux)
curl 'http://localhost:3010/graphql?' -X POST -H 'User-Agent: Mozilla/5.0 (X11; Ubuntu; Linux x86_64; rv:109.0) Gecko/20100101 Firefox/112.0' -H 'Accept: application/json' -H 'Accept-Language: en-US,en;q=0.5' -H 'Accept-Encoding: gzip, deflate, br' -H 'Referer: http://localhost:3010/' -H 'Content-Type: application/json' -H 'Origin: http://localhost:3010' -H 'DNT: 1' -H 'Connection: keep-alive' -H 'Sec-Fetch-Dest: empty' -H 'Sec-Fetch-Mode: cors' -H 'Sec-Fetch-Site: same-origin' --data-raw '{"query":"\nquery IntrospectionQuery {\n__schema {\n\nqueryType { name }\nmutationType { name }\nsubscriptionType { name }\ntypes {\n...FullType\n}\ndirectives {\nname\ndescription\n\nlocations\nargs {\n...InputValue\n}\n}\n}\n}\n\nfragment FullType on __Type {\nkind\nname\ndescription\nfields(includeDeprecated: true) {\nname\ndescription\nargs {\n...InputValue\n}\ntype {\n...TypeRef\n}\nisDeprecated\ndeprecationReason\n}\ninputFields {\n...InputValue\n}\ninterfaces {\n...TypeRef\n}\nenumValues(includeDeprecated: true) {\nname\ndescription\nisDeprecated\ndeprecationReason\n}\npossibleTypes {\n...TypeRef\n}\n}\n\nfragment InputValue on __InputValue {\nname\ndescription\ntype { ...TypeRef }\ndefaultValue\n}\n\nfragment TypeRef on __Type {\nkind\nname\nofType {\nkind\nname\nofType {\nkind\nname\nofType {\nkind\nname\nofType {\nkind\nname\nofType {\nkind\nname\nofType {\nkind\nname\nofType {\nkind\nname\n}\n}\n}\n}\n}\n}\n}\n}\n","operationName":"IntrospectionQuery"}' -o sdl.json
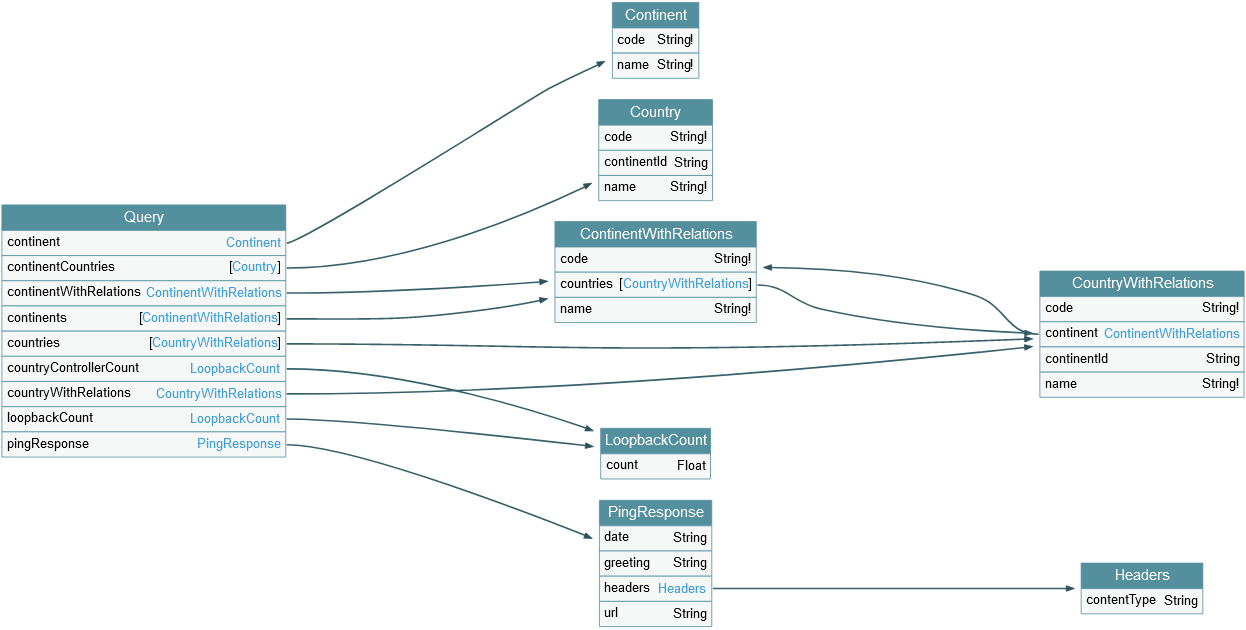
You can then use the GraphQL Voyager to visualize the API using the introspection tab.
Instruction to deploy in Kubernetes here
ibmcloud login –sso
ibmcloud cr login

OPT ibmcloud cr namespace-list
OPT ibmcloud cr namespace-add lb4ad

docker tag countries-app:latest de.icr.io/lb4ad/countries-app:1.0.0
docker push de.icr.io/lb4ad/countries-app:1.0.0

OPT ibmcloud cr image-list
OPT ibmcloud cr vulnerability-assessment --extended de.icr.io/lb4ad/countries-app:1.0.0

ibmcloud cr build -t de.icr.io/lb4ad/countries-app:1.0.0 .

ibmcloud ks cluster config --cluster bu7aeuff0l32lp0k2rv0

OPT kubectl get nodes

** Attention changer le namespace car sinon default **
No kubectl run countries-app-deployment --image=de.icr.io/lb4ad/countries-app:1.0.0
kubectl create ns lb4app

kubectl create deployment countries-app --image=de.icr.io/lb4ad/countries-app:1.0.0 -n lb4app

kubectl expose deployment/countries-app --type=NodePort --port=3000 --name=countries-app-service --target-port=3000 -n lb4app


kubectl describe service countries-app-service -n lb4app

ibmcloud ks cluster get -c bu7aeuff0l32lp0k2rv0
kubectl get svc -o wide

kubectl delete -n default pod countries-app-deployment

OPT export POD_NAME=$(kubectl get pods -o go-template --template '{{range .items}}{{.metadata.name}}{"\n"}}{{end}}')
OPT echo Name of the Pod: $POD_NAME
?? kubectl proxy ??The CLI is used to build and deploy the GraphQL API
Note: I'm using npm -version => 9.6.5 and node --version => v14.17.6
npm install -g stepzenStart stepzen service in docker
stepzen service startIt has started two containers and created a network
docker ps
CONTAINER ID   IMAGE                                                         COMMAND                CREATED         PORTS                                                                        NAMES
aaa15f97eac7   us-docker.pkg.dev/stepzen-public/images/stepzen:production    "/szbin/services"      3 minutes ago   8080/tcp, 8087-8088/tcp, 8443/tcp, 0.0.0.0:9000->9000/tcp, :::9000->9000/tcp stepzen-local
f284fd0d254d   postgres:14                                                   "docker-entrypoint.s…" 4 minutes ago   5432/tcp                                                                     stepzen-metadata
docker network ls
NETWORK ID     NAME              DRIVER    SCOPE
c4e560284572   stepzen-network   bridge    local
We can now login to stepzen
stepzen login --config ~/.stepzen/stepzen-config.local.yamlYou have successfully logged in with the graphQL account.
GraphQL resources:
- StepZen
- Web site containing interesting data and graphQL playground, I have tried this filter:
{continents (where: {code: {equalTo : "EU"}}){results { name countries (where: {code: {equalTo : "FR"}}){results{name cities {results {name}}}}}}} - GraphQL.org
- GraphQL voyager
- Accessing MongoDB Using a GraphQL Interface
Other resources:
