Installation Instructions for Making a Nexus DR-X Raspberry Pi Image Suitable for WECG Remote Access
VERSION 20201230
- A Raspberry Pi 3B, 3B+ or 4B running the Nexus DR-X image and connected to the Internet
- A Kenwood TM-D710G or TM-V71A radio attached via serial cable to the Pi
- The RMSGW or APRS (
dw_aprs_gui.sh) apps are configured and operating normally. - You are a WECG administrator setting up the Pi for remote access by other WECG members
If you've already run the install_wecg.sh script on the Pi, skip to step 3.
-
Use the Updater in the Hamradio menu to update to the latest
nexus-utilites. -
Open a Terminal and run this command:
install_wecg.shRun it without arguments for instructions, then run it again with the appropriate arguments. When that completes, a browser will open and bring you to this page.
-
Open the Main Menu editor: Raspberry > Preferences > Main Menu editor and arrange the items in the Hamradio menu as desired. WARNING: Do not click Cancel even if you make no changes! Click OK instead. Clicking Cancel will restore the menu to default settings.
Before continuing proceeding to the Configure rigCAT in FLdigi step, please read the following warnings:
IMPORTANT! The 710.sh script will not work while Fldigi is running with rigCAT enabled because rigCAT has control of the serial port to the radio. Once Fldigi is stopped, you can again use 710.sh.
IMPORTANT! The 710.py GUI will not work while Fldigi is running with rigCAT enabled because rigCAT has control of the serial port to the radio. Once Fldigi is stopped, you can again use 710.py.
Now that you've read those warnings, you can decide whether or not to enable rigCAT in FLdigi. In other words, you have the choice of using rig control via rigCAT in FLdigi to control the radio's frequency or you can use 710.sh or 710.py to control the radio, but you cannot use either of these if rigCAT is enabled in FLdigi and FLdigi is running.
NOTE: If FLdigi is configured to use RigCAT and you run the Start script while 710.py is running, RigCAT will be temporarily disabled in FLDigi. When you stop FLdigi/FLmsg with the Stop script, RigCAT will be re-enabled in the FLdigi configuration.
-
Configure rigCAT in FLdigi (Optional)
-
Start FLdigi: Raspberry > Hamradio > START FLdigi+FLmsg.
-
Select View > Rig/Log Controls > Full.
-
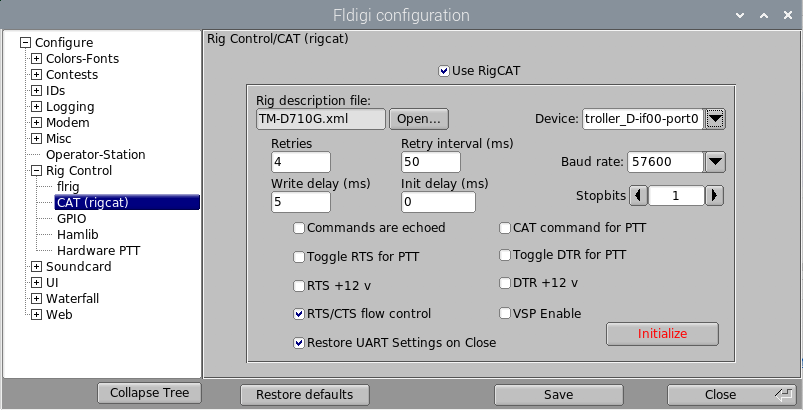
Click Configure > Config dialog > Rig Control > CAT (rigcat).
-
Click Open and go to
.fldigi/rigsand select theTM-D710G.xmlfile. Click Open. -
In the Device dropdown, select the serial port that starts with
/dev/serial/by-id/.... -
Select Baud rate
57600and make sure the radio is set the same. It should be if you use the710.shor710.pyscripts. -
Uncheck CAT command for PTT.
-
Check RTS/CTS flow control and Restore UART Settings on Close.
-
Check the Use rigCAT box.
-
Leave other settings as-is.
The configuration should look like this:
-
Make sure the radio is on and it's serial cable is connected to the Pi.
-
Click Initialize. The radio's frequency should appear in the upper left corner of FLdigi.
-
Click Save, then Close to close the configuration screen.
-
You can change the frequency in FLdigi in a number of ways. The easiest is to click on the leftmost digit in the frequency display, then type your desired frequency in KHz, then press RETURN.
If you decide to switch off RigCAT at a later time (for example, if you want to use either of the 710 scripts instead), simply uncheck the Use RigCAT box in Fldigi configuration window (Rig Control > CAT (rigcat))
-
-
Test the START Fldigi+Flmsg and STOP Fldigi+Flmsg and KILL Fldigi+Flmsg menu items to make sure they work as desired.

dwagent is the software that allows remote access to the Pi using DWService.
-
Open a browser on any computer and log in to DWService as user
w7ecg.wecg@gmail/com. -
Click Agents.
-
Click + at the top of the screen.
-
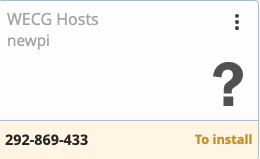
Select WECG Hosts in the Group dropdown.
-
Enter the Pi's hostname in the Name field. This is usually the call sign. It does not have to exactly match the Pi's actual hostname and you can change the name later.
-
Enter a description. Include the location and any other information that users might find helpful.
-
Click Confirm.
-
A new screen will appear containing a 9 digit number. Write this number down. It will look something like this:
-
Back on the Pi, open the Chromium browser and go to the DWservice download page.
-
Click the Raspberry ARM (Linux) icon.
-
Click Download.
-
Open a Terminal and run these commands:
cd Downloads chmod +x dwagent.sh ./dwagent.sh -
Select
1. Installwhen prompted. -
Accept default for Path.
-
Select
1. Yesfor the "Do you want to install..." question. -
Select
1. Entering the installation code. -
Enter the install code you wrote down earlier.
-
The script should finish the installation and start the DWAgent. Close the Chromium browser window.

By default, the dwagent runs as root, so that when you start a shell in the DWService web interface, you get a root shell. That's not good. Here's how to run the dwagent as another user.
-
Stop and disable the service:
sudo systemctl stop dwagent.service sudo systemctl disable dwagent.service -
Make a folder for user level services and move the service file into it. Run these commands:
cd ~ mkdir -p .config/systemd/user cd .config/systemd/user/ sudo mv /etc/systemd/system/dwagent.service . sudo chown pi:pi dwagent.service -
Open
dwagent.servicein an text editor and change this line:WantedBy=multi-user.targetto:
WantedBy=default.target -
Change the ownership of the
/usr/share/dwagentfolder and everything in it to userpi:cd /usr/share sudo chown -R pi:pi dwagent/ -
Allow user
pito autostart services even if not logged in:sudo loginctl enable-linger pi -
Enable and start the user service as user
pi(not asroot):systemctl --user enable dwagent.service systemctl --user start dwagent.serviceIf you get an error message that says
Failed to connect to bus: No such file or directory, then run the abovesystemctlcommands like this instead:XDG_RUNTIME_DIR=/run/user/$UID systemctl --user enable dwagent.service XDG_RUNTIME_DIR=/run/user/$UID systemctl --user start dwagent.serviceFrom now on, the
dwagent.servicewill start as userpiat bootup.
-
If this Pi is being deployed on a network used by others (like WWU, BTECH), remove the
avahi-daemonandlibnss-mdnsservices so the Pi doesn't advertise itself on those networks:sudo apt -y remove pulseaudio-module-zeroconf avahi-daemon libnss-mdns sudo apt -y autoremove systemctl --user restart pulseaudio