French Version for Angular Interview Questions & Answers
|75| What is Angular Universal?| |76| What are different types of compilation in Angular?| |82| What are the restrictions of metadata?| |85| What is the purpose of metadata json files?| |86| Can I use any javascript feature for expression syntax in AOT?| |87| What is folding?| |88| What are macros?| |89| Give an example of few metadata errors?| |90| What is metadata rewriting?| |91| How do you provide configuration inheritance?| |92| How do you specify angular template compiler options?| |93| How do you enable binding expression validation?| |94| What is the purpose of any type cast function?| |95| What is Non null type assertion operator?| |96| What is type narrowing?| |97| How do you describe various dependencies in angular application?| |98| What is zone?| |99| What is the purpose of common module?| |100| What is codelyzer?| |101| What is angular animation?| |102| What are the steps to use animation module?| |103| What is State function?| |104| What is Style function?| |105| What is the purpose of animate function?| |106| What is transition function?| |107| How to inject the dynamic script in angular?| |108| What is a service worker and its role in Angular?| |109| What are the design goals of service workers?| |110| What are the differences between AngularJS and Angular with respect to dependency injection?| |114| What is Angular Language Service?| |115| How do you install angular language service in the project?| |116| Is there any editor support for Angular Language Service?| |117| Explain the features provided by Angular Language Service?| |118| How do you add web workers in your application?| |119| What are the limitations with web workers?| |120| What is Angular CLI Builder?| |121| What is a builder?| |122| How do you invoke a builder?| |123| How do you create app shell in Angular?| |124| What are the case types in Angular?| |125| What are the class decorators in Angular?| |126| What are class field decorators?| |127| What is declarable in Angular?| |128| What are the restrictions on declarable classes?| |132| What is Bazel tool?| |133| What are the advantages of Bazel tool?| |134| How do you use Bazel with Angular CLI?| |135| How do you run Bazel directly?| |136| What is platform in Angular?| |138| How do you select an element with in a component template?| |144| What are workspace APIs?| |145| How do you upgrade angular version?| |146| What is Angular Material?| |147| How do you upgrade location service of angularjs?| |148| What is NgUpgrade?| |149| How do you test Angular application using CLI?| |150| How to use polyfills in Angular application?| |151| What are the ways to trigger change detection in Angular?| |152| What are the differences of various versions of Angular?| |153| What are the security principles in angular?| |154| What is the reason to deprecate Web Tracing Framework?| |155| What is the reason to deprecate web worker packages?| |156| How do you find angular CLI version?| |157| What is the browser support for Angular?| |158| What is schematic| |159| What is rule in Schematics?| |160| What is Schematics CLI?| |161| What are the best practices for security in angular?| |162| What is Angular security model for preventing XSS attacks?| |163| What is the role of template compiler for prevention of XSS attacks?| |164| What are the various security contexts in Angular?| |165| What is Sanitization? Is angular supports it?| |166| What is the purpose of innerHTML?| |167| What is the difference between interpolated content and innerHTML?| |168| How do you prevent automatic sanitization?| |169| Is safe to use direct DOM API methods in terms of security?| |170| What is DOM sanitizer?| |171| How do you support server side XSS protection in Angular application? |172| Is angular prevents http level vulnerabilities?| |173| What are Http Interceptors?| |174| What are the applications of HTTP interceptors?| |175| Is multiple interceptors supported in Angular?| |176| How can I use interceptor for an entire application?| |177| How does Angular simplifies Internationalization?| |178| How do you manually register locale data?| |179| What are the four phases of template translation?| |180| What is the purpose of i18n attribute?| |181| What is the purpose of custom id?| |182| What happens if the custom id is not unique?| |183| Can I translate text without creating an element?| |184| How can I translate attribute?| |185| List down the pluralization categories?| |186| What is select ICU expression?| |187| How do you report missing translations?| |188| How do you provide build configuration for multiple locales?| |189| What is an angular library?| |191| How do you select an element in component template?| |192| What is TestBed?| |193| What is protractor?| |194| What is collection?| |195| How do you create schematics for libraries?| |137| What happens if I import the same module twice?| |196| How do you use jquery in Angular?| |197| What is the reason for No provider for HTTP exception?| |199| How can I use SASS in angular project?| |200| What is the purpose of hidden property?| |201| What is the difference between ngIf and hidden property?| |203| What is index property in ngFor directive?| |204| What is the purpose of ngFor trackBy?| |206| Is it possible to do aliasing for inputs and outputs?| |207| What is safe navigation operator?| |208| Is any special configuration required for Angular9?| |209| What are type safe TestBed API changes in Angular9?| |210| Is mandatory to pass static flag for ViewChild?| |211| What are the list of template expression operators? |213| What is an entry component?| |214| What is a bootstrapped component?| |215| How do you manually bootstrap an application?| |216| Is it necessary for bootstrapped component to be entry component?| |217| What is a routed entry component?| |218| Why is not necessary to use entryComponents array every time?| |219| Do I still need to use entryComponents array in Angular9?| |220| Is it all components generated in production build?| |221| What is Angular compiler?| |205| What is the purpose of ngSwitch directive?| |222| What is the role of ngModule metadata in compilation process?| |224| Give few examples for NgModules?| |225| What are feature modules?| |226| What are the imported modules in CLI generated feature modules?| |227| What are the differences between ngmodule and javascript module?| |228| What are the possible errors with declarations?| |229| What are the steps to use declaration elements?| |230| What happens if browserModule used in feature module?| |231| What are the types of feature modules?| |232| What is a provider?| |233| What is the recommendation for provider scope?| |234| How do you restrict provider scope to a module?| |235| How do you provide a singleton service?| |236| What are the different ways to remove duplicate service registration?| |238| What is a shared module?| |239| Can I share services using modules?| |240| How do you get current direction for locales??| |241| What is ngcc?| |242| What classes should not be added to declarations?| |243| What is ngzone?| |244| What is NoopZone?| |245| How do you create displayBlock components?| |246| What are the possible data change scenarios for change detection?| |247| What is a zone context?| |248| What are the lifecycle hooks of a zone?| |249| Which are the methods of NgZone used to control change detection?| |250| How do you change the settings of zonejs?| |251| How do you trigger an animation?| |252| How do you configure injectors with providers at different levels?| |253| Is it mandatory to use injectable on every service class?| |254| What is an optional dependency?| |255| What are the types of injector hierarchies?| |269| How to set ngFor and ngIf on the same element?| |270| What is host property in css?| |272| What is Component Test Harnesses?| |273| What is the benefit of Automatic Inlining of Fonts?| |274| What is content projection?| |275| What is ng-content and its purpose?| |276| What is standalone component?| |277| How to create a standalone component uing CLI command? |278| How to create a standalone component manually? |279| What is hydration ? |279|
-
Angular est un framework Front-end open-source basée sur TypeScript qui facilite la création d'applications web, mobiles et de bureau. Les principales caractéristiques de ce framework incluent des modèles déclaratifs, l'injection de dépendances et des outils de bout en bout qui simplifient le développement d'applications.
-
AngularJS et Angular sont deux frameworks de développement web créés par Google,ils sont diffèrent considérablement dans leur conception, leurs fonctionnalités et leur architecture.
- Langage de programmation : AngularJS utilise JavaScript classique, tandis qu'Angular est construit en utilisant TypeScript.
- Architecture : Angular utilise une architecture basée sur des composants qui favorise une séparation claire entre la logique métier et l'interface utilisateur, ce qui facilite la réutilisation des composants. par contre AngularJs basé sur MVC
- Modularité : Angular encourage l'utilisation de modules et de services pour organiser et structurer le code de manière plus modulaire et maintenable.
- Concept : Angular adopte un certain nombre de concepts modernes de développement web, tels que les composants, les modules, les services, le routage et la gestion avancée de l'état, entre autres.
- Performances : En raison de sa conception modernisée, Angular a généralement de meilleures performances que AngularJS, notamment en ce qui concerne la manipulation du DOM.
Et voici quelques-unes des principales différences sous forme de tableau :-
AngularJS Angular It is based on MVC architecture This is based on Service/Controller It uses JavaScript to build the application Uses TypeScript to build the application Based on controllers concept This is a component based UI approach No support for mobile platforms Fully supports mobile platforms Difficult to build SEO friendly application Ease to build SEO friendly applications
-
TypeScript est un langage de programmation fortement typé qui s'appuie sur JavaScript et offre de meilleurs outils à n'importe quelle échelle. créé par Microsoft qui ajoute des types optionnels, des classes, des async/await et de nombreuses autres fonctionnalités, et se compile en JavaScript standard. Angular est entièrement écrit en TypeScript en tant que langage principal
You can install TypeScript globally as
exemple of TypeScript usage:-
npm install -g typescript
The greeter method allows only string type as argument.function greeter(person: string) { return "Hello, " + person; } let user = "Sudheer"; document.body.innerHTML = greeter(user);
-
Angular a les composants clés ci-dessous :
- Component: Ce sont les blocs de construction fondamentaux d'une application Angular. Ils contrôlent les vues HTML et encapsulent à la fois la logique et la présentation..
- Modules: Les modules sont utilisés pour organiser et structurer l'application. Ils regroupent des composants, des directives, des services et d'autres fonctionnalités liées.. Une application est divisée en morceaux logiques et chaque morceau de code est appelé "module" qui effectue une tâche unique. Chaque application Angular a au moins un module racine, généralement appelé
AppModule - Templates: Ils représentent les vues d'une application Angular. Ils sont généralement écrits en HTML avec des balises et des directives spécifiques à Angular.
- Services: Les services fournissent des fonctionnalités réutilisables et logiques pour les composants qui peuvent être partagés dans toute l'application. Ils gèrent généralement les opérations liées aux données, aux appels HTTP, à la gestion des états, etc.
- Metadata: Cela peut être utilisé pour ajouter plus de données à une classe Angular. Elles sont fournies sous forme d'annotations de décorateur, comme @Component et @Directive.
- Directives : les directives d'Angular sont des classes qui ajoutent un comportement supplémentaire aux éléments du DOM. Les directives personnalisées peuvent être créées pour ajouter des fonctionnalités spécifiques.
- Structural directives : directive est structurelle lorsqu'elle modifie la structure du DOM, c'est-à-dire lorsqu'on ajoute, supprime ou déplace une balise.(*NgIf,*NgFor,*NgSwitch)
- Structural directives : une directive d'attribut, on parle d'une directive qui change un attribut de l'élément du DOM, sans modifier la structure du DOM dans son ensemble. (NgClass,NgStyle,NgModel...)
- Router : Le router permet de gérer la navigation entre différentes vues et composants en fonction des URL et des actions de l'utilisateur. permet la navigation d’une vue à l’autre de l’application lorsque l’utilisateur interagit avec le DOM.
- router-outlet : indiquer l'emplacement d'insertion du composant:
<router-outlet></router-outlet> - routerLink : permet d'intercepter l'événement click sur les liens et de changer de "route" sans recharger toute l'application. (href).
- router-outlet : indiquer l'emplacement d'insertion du composant:
- Observables : Les observables sont utilisés pour gérer les flux de données asynchrones. Ils jouent un rôle clé dans la gestion des opérations asynchrones telles que les appels HTTP.
- Dependency Injection (DI) : Angular utilise le DI pour injecter des dépendances dans les composants et les services. Cela facilite la gestion des dépendances et améliore la testabilité.
-
Les directives ajoutent un comportement à un élément DOM existant ou à une instance de composant existante.
import { Directive, ElementRef, Input } from '@angular/core';

@Directive({ selector: '[myHighlight]' })
export class HighlightDirective {
    constructor(el: ElementRef) {
       el.nativeElement.style.backgroundColor = 'yellow';
    }
}
Maintenant, cette directive étend le comportement de l'élément HTML avec un arrière-plan jaune comme ci-dessous :
<p myHighlight>Highlight me!</p>
-
Les composants sont les éléments de base les plus fondamentaux pour construire l'interface utilisateur d'une application Angular. Ils forment une hiérarchie en arbre de composants Angular. Ces composants sont un sous-ensemble des directives. Contrairement aux directives, les composants ont toujours un template et un seul composant peut être instancié par élément dans un template. Exemple :
import { Component } from '@angular/core';

@Component ({
   selector: 'my-app',
   template: ` <div>
      <h1>{{title}}</h1>
      <div>Learn Angular6 with examples</div>
   </div> `,
})

export class AppComponent {
   title: string = 'Welcome to Angular world';
}
-
Service : une classe qui fournit des fonctionnalités réutilisables à d'autres composants. Il est responsable de l'isolation des données et des logiques métier de l'application. Les services sont injectés dans les composants à l'aide de l'injection de dépendances.
Let's create a repoService which can be used across components,
import { Injectable } from '@angular/core';
import { Http } from '@angular/http';

@Injectable({ // The Injectable decorator is required for dependency injection to work
  // providedIn option registers the service with a specific NgModule
  providedIn: 'root',  // This declares the service with the root app (AppModule)
})
export class RepoService{
  constructor(private http: Http){
  }

  fetchAll(){
    return this.http.get('https://api.github.com/repositories');
  }
}
The above service uses Http service as a dependency.
Voici quelques avantages de l'utilisation des services Angular :
- Modularité : Les services sont des classes indépendantes qui peuvent être injectées dans n'importe quel composant. Cela permet de rendre votre application plus modulaire et facile à tester.
- Maintenabilité : Les services séparent les données et la logique métier de l'application. Cela permet de garder votre code plus propre et plus facile à maintenir.
- Réutilisation : Les services peuvent être réutilisés dans plusieurs composants. Cela permet de réduire la duplication de code et de rendre votre application plus agile.
- Testabilité : Les services sont des classes indépendantes qui peuvent être facilement testées. Cela permet de garantir la qualité de votre code.
-
Template est une vue HTML où vous pouvez afficher des données en liant des contrôles aux propriétés d'un composant Angular. Vous pouvez stocker le template de votre composant dans l'un des deux emplacements. Vous pouvez le définir en ligne à l'aide de la propriété template, ou vous pouvez définir le template dans un fichier HTML séparé et le lier dans les metadata du composant à l'aide de la propriété templateUrl du décorateur @Component.
Using inline template with template syntax,
import { Component } from '@angular/core';

@Component ({
   selector: 'my-app',
   template: '
      <div>
         <h1>{{title}}</h1>
         <div>Learn Angular</div>
      </div>
   '
})

export class AppComponent {
   title: string = 'Hello World';
}
Using separate template file such as app.component.html
import { Component } from '@angular/core';

@Component ({
   selector: 'my-app',
   templateUrl: 'app/app.component.html'
})

export class AppComponent {
   title: string = 'Hello World';
}
-
Les modules sont des limites logiques (logical boundaries) dans votre application et l'application est divisée en modules distincts pour séparer la fonctionnalité de votre application. Prenons l'exemple du module racine app.module.ts déclaré avec le décorateur @NgModule ci-dessous
import { NgModule }      from '@angular/core';
import { BrowserModule } from '@angular/platform-browser';
import { AppComponent }  from './app.component';
import { DynamicComponent } from './dynamic.component';
@NgModule ({
   imports:      [ BrowserModule ],
   declarations: [ AppComponent, DynamicComponent ],
   bootstrap:    [ AppComponent ],
   providers: [],
   entryComponents: [DynamicComponent]
})
export class AppModule { }
Le décorateur @NgModule a cinq options importantes :
- imports : Cette option est utilisée pour importer d'autres modules dépendants. Le module BrowserModule est requis par défaut pour toute application Angular basée sur le Web.
- declarations : Cette option est utilisée pour définir les composants dans le module respectif.
- bootstrap : Cette option indique à Angular quel composant bootstrapper dans l'application.
- providers : Cette option est utilisée pour configurer un ensemble d'objets injectables qui sont disponibles dans l'injecteur de ce module.
- entryComponents : Cette option est un ensemble de composants chargés dynamiquement dans la vue. (Angular will not instantiate it when the application starts. Instead, Angular will wait until the component is needed and then dynamically load it into the view. This can improve the performance of your application by reducing the number of components that are loaded at startup.)
Les modules sont un concept important dans Angular car ils permettent de séparer la fonctionnalité de votre application. Cela rend votre application plus facile à comprendre, à tester et à maintenir.
-
En bref, un composant (@Component) est une directive avec un template.
Voici certaines des principales différences mentionnées sous forme de tableau.
Component Directive Pour enregistrer un composant, nous utilisons l'annotation de meta-data @Component Pour enregistrer une directive, nous utilisons l'annotation de meta-data @Directive Les composants sont généralement utilisés pour créer des widgets d'interface utilisateur Directives are used to add behavior to an existing DOM element Le composant est utilisé pour diviser l'application en composants plus petits (smart composants) La directive est utilisée pour concevoir des composants réutilisables Un seul composant peut être présent par élément DOM De nombreuses directives peuvent être utilisées par élément DOM Le décorateur @View ou les attributs templateurl/template sont obligatoires La directive n'utilise pas de vue
-
Chaque application a au moins un module Angular, le module racine que vous initialisez pour lancer(bootstrap) l'application est appelé (bootstrapping module). Il est communément connu sous le nom de AppModule. La structure par défaut de l'AppModule générée par Angular CLI serait la suivante :
    import { BrowserModule } from '@angular/platform-browser';
    import { NgModule } from '@angular/core';
    import { FormsModule } from '@angular/forms';
    import { HttpClientModule } from '@angular/common/http';

    import { AppComponent } from './app.component';

    /* the AppModule class with the @NgModule decorator */
    @NgModule({
      declarations: [
        AppComponent
      ],
      imports: [
        BrowserModule,
        FormsModule,
        HttpClientModule
      ],
      providers: [],
      bootstrap: [AppComponent]
    })
    export class AppModule { }
-
Les hooks de cycle de vie Angular sont des méthodes que les développeurs peuvent utiliser pour intercepter des moments importants dans le cycle de vie d'un composant ou d'une directive. The representation of lifecycle in pictorial representation as follows,
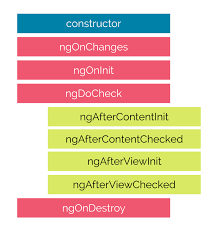
The description of each lifecycle method is as below,
- ngOnChanges: appelée lorsque la valeur d'une propriété liée aux données change.
- ngOnInit: appelée après que Angular a initialisé le composant ou la directive.
- ngDoCheck: appelée après chaque cycle de détection de changement.
- ngAfterContentInit: appelée après qu'Angular a initialisé le contenu du composant.
- ngAfterContentChecked: appelée après qu'Angular a vérifié le contenu du composant.
- ngAfterViewInit: appelée après que Angular a initialisé la vue du composant.
- ngAfterViewChecked: appelée après que Angular a vérifié la vue du composant.
- ngOnDestroy: appelé lorsque le composant ou directive est détruit. Vous pouvez l'utiliser pour effectuer des tâches de nettoyage avant que le composant soit détruit

-
Permet de définir la communication entre un composant et le DOM, ce qui rend très facile la creation d'applications interactives sans se soucier de pousser ou de tirer des données. Il existe quatre formes de liaison de données (divisées en 3 catégories) qui diffèrent dans la façon dont les données circulent.
-
From the Component to the DOM:
Interpolation: {{ value }}: permet d'afficher une valeur de variable dans le DOM
<li>Name: {{ user.name }}</li>
<li>Address: {{ user.address }}</li>
Property binding: [property]=”value”: The value is passed from the component to the specified property or simple HTML attribute
<input type="email" [value]="user.email">
-
From the DOM to the Component :
Event binding: (event)=”function”: When a specific DOM event happens (eg.: click, change, keyup), call the specified method in the component
<button (click)="logout()"></button>
-
Two-way data binding: **[(ngModel)]=”value” **: Two-way data binding allows to have the data flow both ways. For example, in the below code snippet, both the email DOM input and component email property are in sync
<input type="email" [(ngModel)]="user.email">
-
-
Les types de liaison(Binding types) peuvent être regroupés en trois catégories distinguées par la direction du flux de données. Ils sont énumérés comme suit :
- From the source-to-view
- From view-to-source
- View-to-source-to-view.
Details :
- Liaison de propriété (One-Way Binding) : Cette liaison permet de transférer les données du composant vers le template. Les changements dans le composant sont reflétés dans le template, mais les changements dans le template n'affectent pas le composant. Les types de liaisons de propriété incluent :
- {{ expression }} (Interpolation) : Affiche la valeur d'une expression dans le template.
- [property]="expression" : Lie la valeur d'une expression à une propriété de l'élément HTML ou d'un composant.
- [attr.attribute-name]="expression" : Lie la valeur d'une expression à un attribut HTML.
- Liaison d'événement (Event Binding) : Cette liaison permet de transférer les données du template vers le composant. Elle réagit aux événements déclenchés par l'utilisateur et déclenche des actions dans le composant. Les types de liaisons d'événement incluent :
- (event)="expression" : Associe une expression du composant à un événement HTML, comme un clic de bouton.
- Liaison bidirectionnelle (Two-Way Binding) : Cette liaison permet un flux de données dans les deux sens, à la fois du composant vers le template et du template vers le composant. Les changements dans le composant ou dans le template sont synchronisés instantanément. Le type de liaison bidirectionnelle inclut :
- [(ngModel)]="property" : Lie la propriété du composant à un champ de formulaire et permet une mise à jour automatique des deux côtés.
The possible binding syntax can be tabularized as below,
Data direction Syntax Type From the source-to-view(One-way) 1. {{expression}} 2. [target]="expression" 3. bind-target="expression" Interpolation, Property, Attribute, Class, Style From view-to-source(One-way) 1. (target)="statement" 2. on-target="statement" Event View-to-source-to-view(Two-way) 1. [(target)]="expression" 2. bindon-target="expression" Two-way
-
Metadata utilisées pour configurer un composant ou une directive. Elles peuvent être utilisées pour spécifier le nom du composant, le sélecteur HTML, les directives à utiliser, les services à injecter, et bien plus encore. sont définies à l'aide de décorateurs
- Class decorators, e.g. @Component and @NgModule
import { NgModule, Component } from '@angular/core';

@Component({
  selector: 'my-component',
  template: '<div>Class decorator</div>',
})
export class MyComponent {
  constructor() {
    console.log('Hey I am a component!');
  }
}

@NgModule({
  imports: [],
  declarations: [],
})
export class MyModule {
  constructor() {
    console.log('Hey I am a module!');
  }
}
- Property decorators Used for properties inside classes, e.g. @Input and @Output
import { Component, Input } from '@angular/core';

@Component({
    selector: 'my-component',
    template: '<div>Property decorator</div>'
})

export class MyComponent {
    @Input()
    title: string;
}
- Method decorators Used for methods inside classes, e.g. @HostListener
import { Component, HostListener } from '@angular/core'; @Component({ selector: 'my-component', template: '<div>Method decorator</div>' }) export class MyComponent { @HostListener('click', ['$event']) onHostClick(event: Event) { // clicked, `event` available } } - Parameter decorators Used for parameters inside class constructors, e.g. @Inject, @Optional
import { Component, Inject } from '@angular/core';
import { MyService } from './my-service';

@Component({
    selector: 'my-component',
    template: '<div>Parameter decorator</div>'
})
export class MyComponent {
    constructor(@Inject(MyService) myService) {
        console.log(myService); // MyService
    }
}
- Class decorators, e.g. @Component and @NgModule
-
Angular CLI(Command Line Interface) est une interface de ligne de commande pour créer et structurer des applications Angular à l'aide de modules de style Node.js (CommonJS). Vous pouvez l'installer à l'aide de la commande npm suivante :
npm install @angular/cli@latestBelow are the list of few commands, which will come handy while creating angular projects
-
Creating New Project: ng new
-
Generating Components, Directives & Services: ng generate/g The different types of commands would be,
- ng generate class my-new-class: add a class to your application
- ng generate component my-new-component: add a component to your application
- ng generate directive my-new-directive: add a directive to your application
- ng generate enum my-new-enum: add an enum to your application
- ng generate module my-new-module: add a module to your application
- ng generate pipe my-new-pipe: add a pipe to your application
- ng generate service my-new-service: add a service to your application
-
Running the Project: ng serve
-
-
The Constructor est une méthode par défaut de la classe qui est exécutée lorsque la classe est instanciée et assure l'initialisation correcte des champs dans la classe et ses sous-classes. Angular, ou le Dependency Injector (DI), analyse les paramètres du constructeur et lorsqu'il crée une nouvelle instance en appelant new MyClass(), il tente de trouver des fournisseurs qui correspondent aux types des paramètres du constructeur, les résout et les passe au constructeur.
ngOnInit est un hook de cycle de vie appelé par Angular pour indiquer qu'Angular a terminé la création du composant. Nous utilisons généralement ngOnInit pour toutes les initialisations/déclarations et évitons de faire du travail dans le constructeur. Le constructeur ne doit être utilisé que pour initialiser les membres de la classe mais ne doit pas faire de « travail » réel. Vous devez donc utiliser constructor() pour configurer l'injection de dépendances et pas grand-chose d'autre. ngOnInit() est un meilleur endroit pour "commencer" - c'est where/when -là/quand- les liaisons(bindings) des composants sont résolues.
Le constructeur est appelé en premier, avant que les données liées au composant ne soient initialisées. Il est utilisé pour initialiser les propriétés du composant et pour injecter les dépendances nécessaires.
ngOnInit est appelé après que les données liées au composant ont été initialisées. Il est utilisé pour effectuer l'initialisation du composant proprement dite, comme la récupération de données à partir d'une API ou l'initialisation d'un service.
En général, vous devriez utiliser le constructeur pour initialiser les propriétés du composant et pour injecter les dépendances nécessaires. Vous devriez utiliser ngOnInit pour effectuer l'initialisation du composant proprement dite.
export class App implements OnInit{
  constructor(private myService: MyService){
     //called first time before the ngOnInit()
  }

  ngOnInit(){
     //called after the constructor and called  after the first ngOnChanges()
     //e.g. http call...
  }
}
- L'injection de dépendances, ou DI, est l'un des concepts fondamentaux d'Angular. La DI est intégrée au framework Angular et permet aux classes avec des décorateurs Angular, tels que les composants, les directives, les pipes et les injectables, de configurer les dépendances dont elles ont besoin.
-
Injectors in Angular have rules that can be leveraged to achieve the desired visibility of injectables in your applications. By understanding these rules, you can determine in which NgModule, Component, or Directive you should declare a provider.

When angular starts, it creates a root injector where the services will be registered, these are provided via injectable annotation. All services provided in the
ng-modelproperty are called providers (if those modules are not lazy-loaded).Angular recursively goes through all models which are being used in the application and creates instances for provided services in the root injector. If you provide some service in an eagerly-loaded model, the service will be added to the root injector, which makes it available across the whole application.
During application bootstrapping angular creates a few more injectors, above the root injector goes the platform injector, this one is created by the platform browser dynamic function inside the
main.tsfile, and it provides some platform-specific features likeDomSanitizer.At the very top, the next parent injector in the hierarchy is the
NullInjector().The responsibility of this injector is to throw the error if something tries to find dependencies there, unless you've used@Optional()because ultimately, everything ends at theNullInjector()and it returns an error or, in the case of@Optional(),null.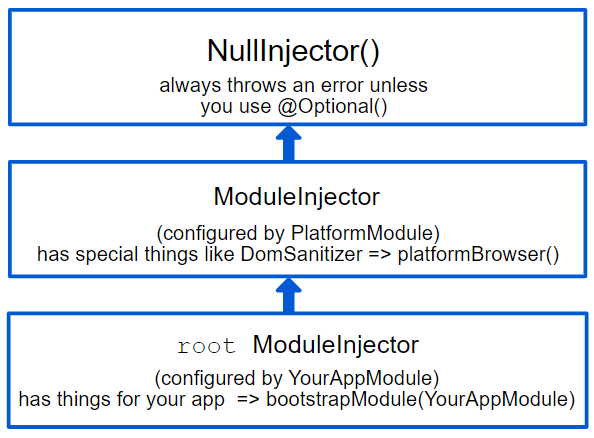
Angular creates
ElementInjectorhierarchies implicitly for each DOM element.ElementInjectorinjector is being created for any tag that matches the angular component, or any tag on which directive is applied, and you can configure it in component and directive annotations inside the provider's property, thus, it creates its own hierarchy likewise the upper one.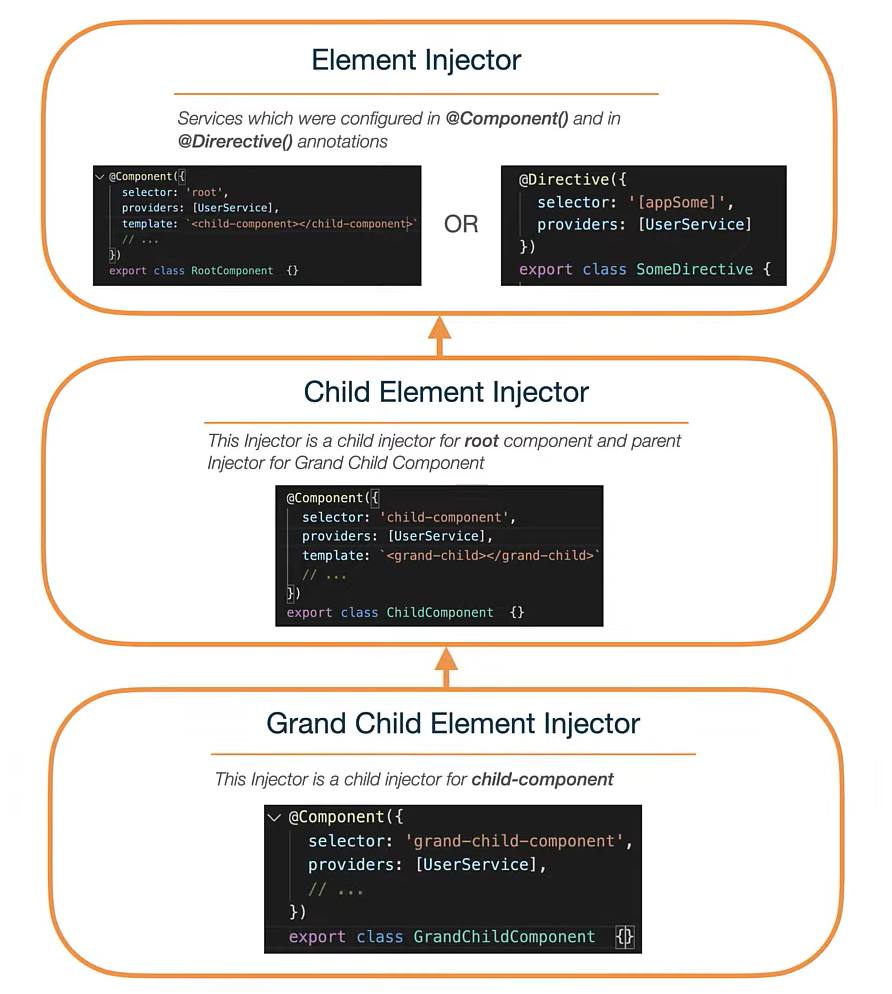


-
Vous pouvez stocker le template de votre composant dans l'un des deux emplacements. Vous pouvez le définir inline à l'aide de la propriété template, ou vous pouvez définir le template dans un fichier HTML séparé et le lier dans les metadata du composant à l'aide de la décorateur @Component propriété templateUrl.
Le choix entre l'HTML inline et l'HTML séparé est une question de goût, de circonstances et de politique d'organisation. Cependant, nous utilisons généralement le template en ligne pour une petite partie du code et le fichier séparé de template externe pour des vues plus grandes. Par défaut, le CLI Angular génère des composants avec un fichier de modèle. Mais vous pouvez le modifier avec la commande ci-dessous,
ng generate component hero -it
ng generate component my-component --inline-template=false
-
Elle est utilisée pour itérer sur une liste d'éléments et générer du contenu HTML répété pour chaque élément de la liste.
Très utile pour afficher des listes, des tableaux et d'autres types de données itérables dans une application Angular. Example, list users:The user variable in the<li *ngFor="let user of users"> {{ user }} </li>
*ngFordouble-quoted instruction is a template input variable.
-
Elle est utilisée pour conditionnellement ajouter ou supprimer des éléments du DOM en fonction d'une expression booléenne. Cela permet de gérer facilement la visibilité des éléments en fonction de l'état de l'application.
Example to display a message if the user age is more than 18:
Note: Angular ne montre(show) pas et ne cache(hide) pas le text. Il ajoute et supprime l'élément(la balise) du DOM. Cela améliore les performances, notamment dans les projets larges avec de nombreuses liaisons de données (data bindings).
<p *ngIf="user.age > 18">You are not eligible for student pass!</p>
-
Angular reconnaît la valeur comme non sécurisée et la désinfecte automatiquement, ce qui supprime la balise script tout en conservant le contenu sûr tel que le contenu texte de la balise script. De cette manière, cela élimine le risque d'attaques par injection de scripts. Si vous continuez à l'utiliser, il sera ignoré et un avertissement apparaîtra dans la console du navigateur.
Let's take an example of innerHtml property binding which causes XSS vulnerability,
export class InnerHtmlBindingComponent {
  // For example, a user/attacker-controlled value from a URL.
  htmlSnippet = 'Template <script>alert("0wned")</script> <b>Syntax</b>';
}
Plus : Dans le contexte d'Angular, vous ne devriez généralement pas utiliser
<script>directement dans les templates HTML. Les templates Angular sont conçus pour gérer la logique et l'interface utilisateur en utilisant les directives, les composants et les liaisons de données. Les balises<script>ne sont pas nécessaires dans les templates car Angular gère la compilation et l'interprétation du code.
-
L'interpolation dans Angular est une fonctionnalité qui vous permet d'insérer des valeurs dynamiques dans votre template HTML en utilisant la syntaxe (avec double curky braces) {{ expression }}. Cette expression peut être une variable, une propriété d'objet ou une expression plus complexe. Angular évalue l'expression et affiche la valeur résultante dans le DOM.
Example :
<h3>
  {{title}}
  <img src="{{url}}" style="height:30px">
</h3>
In the example above, Angular evaluates the title and url properties and fills in the blanks, first displaying a bold application title and then a URL.
-
Une expression de template produit une valeur similaire à n'importe quelle expression JavaScript. Angular exécute l'expression et l'assigne à une propriété d'une binding target; la target peut être un élément HTML, un composant ou une directive. Dans la liaison(binding) de propriété, une expression de template apparaît entre guillemets à droite du symbole = comme dans
[propriété]="expression". Dans la syntaxe d'interpolation, l'expression de template est entourée de doubles accolades. Par exemple, dans l'interpolation ci-dessous, l'expression de template est {{username}}.<h3>{{username}}, welcome to Angular</h3>
Elles sont principalement utilisées pour manipuler et afficher des données dynamiques.
Les expressions de template sont généralement utilisées avec des interpolations ({{ expression }}), des propriétés de liaison ([property]="expression"), et d'autres directives Angular telles que *ngIf, *ngFor, etc.
The below javascript expressions are prohibited in template expression
- assignments (=, +=, -=, ...)
- new
- chaining expressions with ; or ,
- increment and decrement operators (++ and --)
-
Les "template statements" permettent de lier des actions aux événements déclenchés par l'interaction de l'utilisateur avec l'interface utilisateur de l'application. référence à une action déclenchée par un événement dans le template HTML d'un composant. Ces instructions sont généralement utilisées pour gérer les interactions utilisateur, telles que les clics de boutons, les soumissions de formulaires, les survols de souris, etc.
Un template statement est défini en utilisant la syntaxe d'événement entre parenthèses, comme (event)="action()". Voici un exemple simple pour illustrer :
<button (click)="editProfile()">Edit Profile</button>
Dans l'expression ci-dessus, editProfile est une template statements.
Les expressions JavaScript de syntaxe ci-dessous ne sont pas autorisées.
- new
- increment and decrement operators, ++ and --
- operator assignment, such as += and -=
- the bitwise operators | and &
- the template expression operators
-
Pipes sont des fonctionnalités qui permettent de transformer les données affichées dans les templates. Les pipes sont utilisés pour formater, filtrer et manipuler les valeurs avant qu'elles ne soient affichées à l'utilisateur.
Exemples :
- DatePipe :
<p>La date actuelle est {{ currentDate | date }}</p>
- CurrencyPipe :
<p>La date actuelle est {{ price | currency }}</p>
- UpperCasePipe && LowerCasePipe :
  <p>La date actuelle est {{ text | uppercase }}</p>
  <p>La date actuelle est {{ text | lowercase }}</p>
- SlicePipe : Extrait une partie d'une chaîne.
<p>La date actuelle est {{ longText | slice:0:5 }}</p>
- AsyncPipe : Gère la souscription aux observables asynchrones.
<p> Données asynchrones : {{ asyncData | async }}</p>
-
Type de pipe qui accepte des arguments ou des paramètres pour personnaliser la façon dont il transforme les données. Cela permet de rendre les pipes plus flexibles et réutilisables, car vous pouvez ajuster leur comportement en fonction des paramètres fournis.
<p>Prix en euros : {{ price | currency:'EUR':'symbol':'1.2-2' }}</p>
Dans cet exemple, currency pipe accepte trois paramètres : la devise (EUR), le symbole (€) et le format de décimales (1.2-2).
Note: The parameter value can be any valid template expression, such as a string literal or a component property.
-
Référence à l'utilisation successive de plusieurs pipes pour appliquer des transformations successives aux données. Cela permet de combiner plusieurs opérations de formatage ou de manipulation sur une seule valeur.
Le chaînage de pipes se fait en utilisant le caractère | pour séparer les différents pipes. Chaque pipe dans la chaîne prend le résultat du pipe précédent comme entrée. Voici un exemple :
<p>Date formatée : {{ currentDate | date:'long' | uppercase }}</p>
-
En plus des pipes intégrés(built-in pipes), vous pouvez écrire votre propre pipe personnalisé avec les caractéristiques clés suivantes :
- A pipe est une classe décorée avec les metadata de filtre du décorateur @Pipe, que vous importez depuis la bibliothèque principale d'Angular. Par exemple :
For example,
@Pipe({name: 'myCustomPipe'})
- The pipe class implémente la méthode
transformde l'interfacePipeTransformqui accepte une valeur d'entrée suivie de paramètres optionnels et renvoie la valeur transformée. La structure dePipeTransformserait la suivante :,interface PipeTransform { transform(value: any, ...args: any[]): any }
- Le décorateur @Pipe vous permet de définir le nom du pipe que vous utiliserez dans les expressions de template. Il doit être un identifiant JavaScript valide.
template: `{{someInputValue | myCustomPipe: someOtherValue}}`
- A pipe est une classe décorée avec les metadata de filtre du décorateur @Pipe, que vous importez depuis la bibliothèque principale d'Angular. Par exemple :
For example,
-
Create Custom Pipes with exemple
Creation :
  import { Pipe, PipeTransform } from '@angular/core';
  /*
  * Raise the value exponentially
  * Takes an exponent argument that defaults to 1.
  * Usage:
  *   value | exponentialStrength:exponent
  * Example:
  *   {{ 2 | exponentialStrength:10 }}
  *   formats to: 1024
  */
  @Pipe({name: 'exponentialStrength'})
  export class ExponentialStrengthPipe implements PipeTransform {
    transform(value: number, exponent = 1): number {
      return Math.pow(value, exponent);
    }
  }
Usage :
import { Component } from '@angular/core';

@Component({
  selector: 'app-power-booster',
  template: `
    <h2>Power Booster</h2>
    <p>Super power boost: {{2 | exponentialStrength: 10}}</p>
  `
})
export class PowerBoosterComponent { }
Result :
Power Booster
Superpower boost: 1024
-
The AsyncPipe permet de gérer les observables et les promesses de manière asynchrone. Il s'abonne(subscribe) à l'observable ou à la promesse et renvoie la dernière valeur qu'il a émise. Lorsqu'une nouvelle valeur est émise, le pipe marque le composant pour être vérifié pour les modifications.
Let's take a time observable which continuously updates the view for every 2 seconds with the current time.
@Component({
  selector: 'async-observable-pipe',
  template: `<div><code>observable|async</code>:
       Time: {{ time | async }}</div>`
})
export class AsyncObservablePipeComponent {
  time: Observable<string>;
  constructor() {
    this.time = new Observable((observer) => {
      setInterval(() => {
        observer.next(new Date().toString());
      }, 2000);
    });
  }
}
-
Un pipe pur est appelé uniquement lorsque Angular détecte un changement dans la valeur ou les paramètres transmis à un pipe. Par exemple, tout changement dans une valeur d'entrée primitive (String, Number, Boolean, Symbol) ou une référence d'objet modifiée (Date, Array, Function, Object). Un pipe impur est appelé à chaque cycle de détection de changement, peu importe que la valeur ou les paramètres changent. Autrement dit, un pipe impur est appelé fréquemment, aussi souvent que chaque (keystroke or mouse-move) touche de clavier ou mouvement de souris.
Pour spécifier si un pipe est pur ou impur, vous pouvez utiliser l'option pure dans le décorateur @Pipe. Par défaut, tous les pipes sont purs. Pour créer un pipe impur, définissez l'option pure sur false.
@Pipe({
  name: 'monPipeImpur',
  pure: false
})
-
Angular HttpClient est un module fourni par Angular qui facilite les requêtes HTTP et la communication avec les serveurs. Il remplace l'ancien module Http de Angular, on top of
XMLHttpRequestinterface, offrant une interface plus moderne et des fonctionnalités avancées pour gérer les appels réseau dans les applications Angular.import { HttpClientModule } from '@angular/common/http';
Les major avantages d'utiliser Angular HttpClient incluent :
- Fonctionnalités de testabilité : Angular HttpClient est conçu pour être hautement testable. Vous pouvez facilement créer des mock ou des spies pour simuler les appels réseau dans vos tests unitaires.
- Objets de requête et de réponse typés : Avec HttpClient, vous pouvez définir le type des données de requête et de réponse, ce qui facilite la manipulation des données renvoyées par le serveur.
- Gestion des intercepteurs : Vous pouvez utiliser des intercepteurs pour modifier ou manipuler les requêtes et les réponses HTTP de manière globale. Cela facilite l'ajout d'en-têtes, l'authentification, la gestion des erreurs, etc.
- Support des APIs basées sur des observables : HttpClient utilise des observables pour gérer les réponses asynchrones. Cela permet de gérer efficacement les données asynchrones et de les manipuler de manière réactive dans les composants Angular.
- Gestion simplifiée des erreurs : HttpClient gère automatiquement les erreurs et renvoie des observables d'erreur en cas de problème. Vous pouvez utiliser l'opérateur catchError pour personnaliser la gestion des erreurs.
- Gestion de la mise en cache : HttpClient prend en charge la mise en cache des réponses HTTP, ce qui peut améliorer les performances en évitant de refaire des appels inutiles.
-
Voici les étapes à suivre pour utiliser
HttpClient.- Import
HttpClientinto root module:import { HttpClientModule } from '@angular/common/http'; @NgModule({ imports: [ BrowserModule, // import HttpClientModule after BrowserModule. HttpClientModule, ], ...... }) export class AppModule {}
- Inject the
HttpClientinto the application: Let's create a userProfileService(userprofile.service.ts) as an example. It also defines get method ofHttpClient:import { Injectable } from '@angular/core'; import { HttpClient } from '@angular/common/http'; const userProfileUrl: string = 'assets/data/profile.json'; @Injectable() export class UserProfileService { constructor(private http: HttpClient) { } getUserProfile() { return this.http.get(this.userProfileUrl); } }
- Create a component for subscribing service:
Let's create a component called UserProfileComponent(
userprofile.component.ts), which injectsUserProfileServiceand invokes the service method:fetchUserProfile() { this.userProfileService.getUserProfile() .subscribe((data: User) => this.user = { id: data['userId'], name: data['firstName'], city: data['city'] }); }
- Import
-
Le corps de la réponse ne renvoie pas ou peut ne pas renvoyer les données de réponse complètes, car parfois les serveurs renvoient également des en-têtes spéciaux ou des codes d'état importants pour le flux de travail de l'application. Pour obtenir la réponse complète, vous devriez utiliser l'option
observedeHttpClient:getUserResponse(): Observable<HttpResponse<User>> { return this.http.get<User>( this.userUrl, { observe: 'response' }); }
Now
HttpClient.get()method returns an Observable of typedHttpResponserather than just theJSONdata.
-
Si la requête échoue sur le serveur ou ne parvient pas au serveur en raison de problèmes réseau, alors
HttpClientrenverra un objet d'erreur au lieu d'une réponse réussie. Dans ce cas, vous devez le gérer dans le composant en passant l'objet error en tant que deuxième callback à la méthode subscribe().fetchUser() { this.userService.getProfile() .subscribe( (data: User) => this.userProfile = { ...data }, // success path error => this.error = error // error path ); }
-
Les observables sont déclaratifs et fournissent un mécanisme de communication entre les éditeurs (publishers) et les abonnés (subscribers) dans votre application. Ils sont principalement utilisés pour la gestion d'événements, la programmation asynchrone et la manipulation de multiples valeurs. Dans ce cas, vous définissez une fonction pour émettre des valeurs, mais celle-ci n'est pas exécutée tant qu'un consommateur ne s'y abonne pas. Le consommateur abonné reçoit ensuite des notifications jusqu'à ce que la fonction soit terminée ou jusqu'à ce qu'il se désabonne.
L'utilisation d'observables facilite la gestion des flux de données asynchrones de manière plus propre et prédictible, en évitant les problèmes liés aux callbacks imbriqués et en offrant des fonctionnalités avancées pour la transformation et la manipulation des données. La bibliothèque RxJS est généralement utilisée pour mettre en œuvre les observables dans Angular.
Les observables sont largement utilisés dans Angular pour gérer des opérations asynchrones telles que les appels HTTP, les interactions avec les événements DOM, les animations et bien plus encore. Ils fournissent des fonctionnalités telles que la composition, la transformation et la manipulation de flux de données de manière élégante.
-
RxJS est une bibliothèque permettant de composer du code asynchrone et basé sur des callback de manière fonctionnelle et réactive en utilisant des observables. De nombreuses APIs telles que
HttpClientproduisent et consomment des observables RxJS et utilisent également des opérateurs pour traiter les observables.Example, import observables && operators for using HttpClient as below,
import { Observable, throwError } from 'rxjs';
import { catchError, retry } from 'rxjs/operators';
-
Une instance d'Observable commence à publier des valeurs uniquement lorsqu'une personne s'y abonne. Vous devez donc vous abonner en appelant la méthode
subscribe()de l'instance, en passant un objet observateur pour recevoir les notifications.En d'autres termes, lorsqu'un observable est créé, il n'émet pas de valeurs par défaut. Pour commencer à recevoir des valeurs émises par l'observable, vous devez explicitement vous y abonner en fournissant un objet observateur qui spécifie comment réagir aux valeurs émises.
Let's take an example of creating and subscribing to a simple observable, with an observer that logs the received message to the console.
// Creates an observable sequence of 5 integers, starting from 1
const source = range(1, 5);

// Create observer object
const myObserver = {
  next: x => console.log('Observer got a next value: ' + x),
  error: err => console.error('Observer got an error: ' + err),
  complete: () => console.log('Observer got a complete notification'),
};

// Execute with the observer object and Prints out each item
source.subscribe(myObserver);
// => Observer got a next value: 1
// => Observer got a next value: 2
// => Observer got a next value: 3
// => Observer got a next value: 4
// => Observer got a next value: 5
// => Observer got a complete notification
-
Un Observable est un objet unique similaire à une promesse (Promise).les observables ne sont pas natifs à JavaScript, mais plutôt une construction fournie par la bibliothèque RxJS pour gérer de manière avancée et réactive les opérations asynchrones et les flux de données. Les observables sont créés en utilisant le keyword
new.Let see the simple example of observable,
import { Observable } from 'rxjs';

const observable = new Observable(observer => {
  setTimeout(() => {
    observer.next('Hello from a Observable!');
  }, 2000);
});
-
Un Observer est une interface pour un consommateur de notifications basées sur le push (poussées) délivrées par un Observable. Voici la structure de cette interface :
interface Observer<T> {
  closed?: boolean;
  next: (value: T) => void; // Méthode appelée pour traiter une nouvelle valeur émise par l'Observable.
  error: (err: any) => void; // Méthode appelée en cas d'erreur.
  complete: () => void; // Méthode appelée lorsque l'Observable a terminé l'émission de valeurs.
}
A handler qui implémente l'interface Observer pour recevoir les notifications d'un observable sera passé en tant que paramètre pour l'observable de la manière suivante :
myObservable.subscribe(myObserver);
Exemple Global :
import { Observer } from 'rxjs';

const myObserver: Observer<number> = {
  next: value => console.log('Received value:', value),
  error: error => console.error('Error:', error),
  complete: () => console.log('Observable completed')
};

const myObservable = new Observable<number>(observer => {
  observer.next(1);
  observer.next(2);
  observer.complete();
});

myObservable.subscribe(myObserver);
Dans cet exemple, myObserver est un gestionnaire qui implémente l'interface
Observer<number>, ce qui signifie qu'il s'attend à recevoir des valeurs de type number. Ensuite, nous créons un observable myObservable qui émet deux valeurs(1 et 2)avant de se terminer aveccomplete(). En utilisant la méthodesubscribe()de l'observable, nous passons myObserver en tant qu'observateur pour recevoir les notifications émises par l'observable.Lorsque l'observable émet des valeurs, l'observateur réagit en conséquence en appelant les méthodes
next().Si une erreur survient, la méthodeerror()est appelée, et lorsque l'observable est terminé, la méthodecomplete()est appelée.Note: Si vous ne fournissez pas un Handler pour un type de notification, l'observateur ignore les notifications de ce type.
-
Below are the list of differences between promise and observable:
Observable Promise Declarative: Computation does not start until subscription, so they can run whenever you need the result Executes immediately on creation Provides multiple values over time Provides only one Subscribe method is used for error handling that facilitates centralized and predictable error handling Push errors to the child promises Provides chaining and subscription to handle complex applications Uses only .then()clause
-
Le "multicasting" est la pratique de diffuser à une liste de plusieurs abonnés en une seule exécution.
RxJS offre plusieurs opérateurs de multicasting pour gérer ces scénarios, tels que publish, share, shareReplay, multicast, etc. Ces opérateurs vous permettent de contrôler comment les valeurs sont partagées entre les observateurs et comment l'abonnement et le désabonnement sont gérés.
Let's demonstrate the multi-casting feature:
var source = Rx.Observable.from([1, 2, 3]);
var subject = new Rx.Subject();
var multicasted = source.multicast(subject);

// These are, under the hood, `subject.subscribe({...})`:
multicasted.subscribe({
  next: (v) => console.log('observerA: ' + v)
});
multicasted.subscribe({
  next: (v) => console.log('observerB: ' + v)
});

// This is, under the hood, `s
-
Il existe plusieurs façons de gérer les erreurs dans les observables Angular. Une façon consiste à utiliser le pipe catchError(), en spécifiant un error callback sur l'observateur ou le pipe retry().
For example,
- RxJs subscribe and error callbacks:
myObservable.subscribe({
  next(num) { console.log('Next num: ' + num)},
  error(err) { console.log('Received an errror: ' + err)}
});
- The catchError Operator :
  import { Component } from '@angular/core';
  import { HttpClient } from '@angular/common/http';

  @Component({
    selector: 'my-component',
    template: `
      <h1>{{ title }}</h1>
    `
  })
  export class MyComponent {

    title = 'My title';

    constructor(private http: HttpClient) {}

    getProducts() {
      return this.http.get('https://my-api.com/products');
    }

    ngOnInit() {
      this.getProducts().pipe(
        catchError((error: any) => {
          console.log(error);
          /* return anotherObservable; // or return throwError('Custom error'); */
        })
      ).subscribe((products: any) => {
        this.title = products[0].name;
      });
    }

  }
- The Retry Strategy:
import { Component } from '@angular/core';
import { HttpClient } from '@angular/common/http';

@Component({
  selector: 'my-component',
  template: `
    <h1>{{ title }}</h1>
  `
})
export class MyComponent {

  title = 'My title';

  constructor(private http: HttpClient) {}

  getProducts() {
    return this.http.get('https://my-api.com/products').pipe(
      retry(3)
    );
  }

  ngOnInit() {
    this.getProducts().subscribe((products: any) => {
      this.title = products[0].name;
    });
  }

}
-
The
subscribe()method can accept callback function definitions in line, fornext,error, andcompletehandlers. It is known as shorthand notation or Subscribe method with positional arguments.For example, you can define subscribe method as below,
myObservable.subscribe(
  x => console.log('Observer got a next value: ' + x),
  err => console.error('Observer got an error: ' + err),
  () => console.log('Observer got a complete notification')
);
-
The RxJS library also provides below utility functions for creating and working with observables.
- Converting existing code for async operations into observables
- Iterating through the values in a stream
- Mapping values to different types
- Filtering streams
- Composing multiple streams
-
RxJS fournit des fonctions de création pour le processus de création d'observables à partir de promises, events, timers and Ajax requests.
- Create an observable from a promise : RxJS permet de créer un observable à partir d'une promesse existante. Cela peut être utile lorsque vous avez déjà une opération asynchrone encapsulée dans une promesse et que vous souhaitez la gérer en tant qu'observable.
import { from } from 'rxjs'; // from function
const promise = fetch('https://api.example.com/data');
const data = from(promise); //Created from Promise
data.subscribe({
 next(response) { console.log(response); },
 error(err) { console.error('Error: ' + err); },
 complete() { console.log('Completed'); }
});
- Create an observable that creates an AJAX request
import { ajax } from 'rxjs/ajax'; // ajax function
const apiData = ajax('/api/data'); // Created from AJAX request
// Subscribe to create the request
apiData.subscribe(res => console.log(res.status, res.response));
- Create an observable from a counter
import { interval } from 'rxjs'; // interval function
const secondsCounter = interval(1000); // Created from Counter value
secondsCounter.subscribe(n =>
  console.log(`Counter value: ${n}`));
- Create an observable from an event
import { fromEvent } from 'rxjs';
const el = document.getElementById('custom-element');
const mouseMoves = fromEvent(el, 'mousemove');
const subscription = mouseMoves.subscribe((e: MouseEvent) => {
  console.log(`Coordnitaes of mouse pointer: ${e.clientX} * ${e.clientY}`);
  });
- Create an observable from a promise : RxJS permet de créer un observable à partir d'une promesse existante. Cela peut être utile lorsque vous avez déjà une opération asynchrone encapsulée dans une promesse et que vous souhaitez la gérer en tant qu'observable.
- Si vous ne fournissez pas de gestionnaire pour un type de notification, l'observateur ignore simplement les notifications de ce type. C'est pourquoi il est essentiel de fournir des gestionnaires next, error et éventuellement complete lors de l'abonnement à un observable. Ces gestionnaires définissent comment l'observateur réagit aux différentes notifications émises par l'observable : les valeurs, les erreurs et la fin de l'émission.
-
Angular elements are Angular components packaged as custom elements (a web standard for defining new HTML elements in a framework-agnostic way). Angular Elements host an Angular component, providing a bridge between the data and the logic defined in the component and the standard DOM APIs, thus, providing a way to use Angular components in
non-Angular environments.
-
Since Angular elements are packaged as custom elements the browser support of angular elements is same as custom elements support.
This feature is is currently supported natively in a number of browsers and pending for other browsers.
Browser Angular Element Support Chrome Natively supported Opera Natively supported Safari Natively supported Firefox Natively supported from 63 version onwards. You need to enable dom.webcomponents.enabled and dom.webcomponents.customelements.enabled in older browsers Edge Currently it is in progress
-
Custom elements (or Web Components) are a Web Platform feature which extends HTML by allowing you to define a tag whose content is created and controlled by JavaScript code. The browser maintains a
CustomElementRegistryof defined custom elements, which maps an instantiable JavaScript class to an HTML tag. Currently this feature is supported by Chrome, Firefox, Opera, and Safari, and available in other browsers through polyfills.
- No, custom elements bootstrap (or start) automatically when they are added to the DOM, and are automatically destroyed when removed from the DOM. Once a custom element is added to the DOM for any page, it looks and behaves like any other HTML element, and does not require any special knowledge of Angular.
-
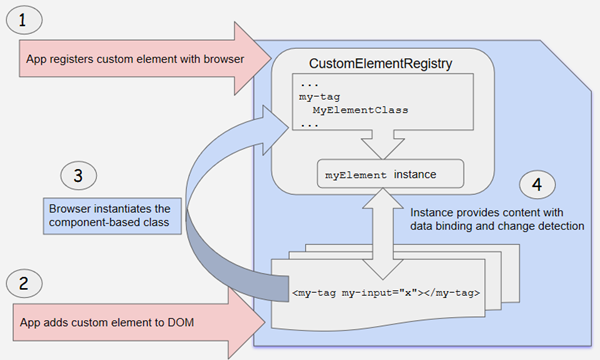
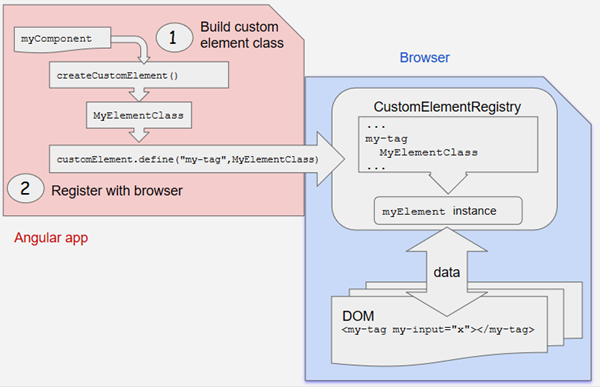
Below are the steps in an order about custom elements functionality,
- App registers custom element with browser: Use the
createCustomElement()function to convert a component into a class that can be registered with the browser as a custom element. - App adds custom element to DOM: Add custom element just like a built-in HTML element directly into the DOM.
- Browser instantiate component based class: Browser creates an instance of the registered class and adds it to the DOM.
- Instance provides content with data binding and change detection: The content with in template is rendered using the component and DOM data. The flow chart of the custom elements functionality would be as follows,
- App registers custom element with browser: Use the

-
Transforming components to custom elements involves two major steps,
- Build custom element class: Angular provides the
createCustomElement()function for converting an Angular component (along with its dependencies) to a custom element. The conversion process implementsNgElementConstructorinterface, and creates a constructor class which is used to produce a self-bootstrapping instance of Angular component. - Register element class with browser: It uses
customElements.define()JS function, to register the configured constructor and its associated custom-element tag with the browser'sCustomElementRegistry. When the browser encounters the tag for the registered element, it uses the constructor to create a custom-element instance.
The detailed structure would be as follows,
- Build custom element class: Angular provides the

-
The Component properties and logic maps directly into HTML attributes and the browser's event system. Let us describe them in two steps,
- The createCustomElement() API parses the component input properties with corresponding attributes for the custom element. For example, component @Input('myInputProp') converted as custom element attribute
my-input-prop. - The Component outputs are dispatched as HTML Custom Events, with the name of the custom event matching the output name. For example, component @Output() valueChanged = new EventEmitter() converted as custom element with dispatch event as "valueChanged".
- The createCustomElement() API parses the component input properties with corresponding attributes for the custom element. For example, component @Input('myInputProp') converted as custom element attribute
-
You can use the
NgElementandWithPropertiestypes exported from @angular/elements.Let's see how it can be applied by comparing with Angular component.
- The simple container with input property would be as below,
@Component(...)
class MyContainer {
  @Input() message: string;
}
- After applying types typescript validates input value and their types,
const container = document.createElement('my-container') as NgElement & WithProperties<{message: string}>;
container.message = 'Welcome to Angular elements!';
container.message = true;  // <-- ERROR: TypeScript knows this should be a string.
container.greet = 'News';  // <-- ERROR: TypeScript knows there is no `greet` property on `container`.
- The simple container with input property would be as below,
- Dynamic components are the components in which the component's location in the application is not defined at build time i.e. they are not used in any angular template. Instead, the component is instantiated and placed in the application at runtime.
-
There are mainly three kinds of directives:
- Components — These are directives with a template.
- Structural directives — These directives change the DOM layout by adding and removing DOM elements.
- Attribute directives — These directives change the appearance or behavior of an element, component, or another directive.
-
You can use CLI command
ng generate directiveto create the directive class file. It creates the source file(src/app/components/directivename.directive.ts), the respective test file.spec.tsand declare the directive class file in root module.
-
Let's take simple highlighter behavior as a example directive for DOM element. You can create and apply the attribute directive using below step:
- Create HighlightDirective class with the file name
src/app/highlight.directive.ts. In this file, we need to import Directive from core library to apply the metadata and ElementRef in the directive's constructor to inject a reference to the host DOM element ,import { Directive, ElementRef } from '@angular/core'; @Directive({ selector: '[appHighlight]' }) export class HighlightDirective { constructor(el: ElementRef) { el.nativeElement.style.backgroundColor = 'red'; } }
- Apply the attribute directive as an attribute to the host element(for example,
)
<p appHighlight>Highlight me!</p>
- Run the application to see the highlight behavior on paragraph element
ng serve
- Create HighlightDirective class with the file name
- Angular Router is a mechanism in which navigation happens from one view to the next as users perform application tasks. It borrows the concepts or model of browser's application navigation. It enables developers to build Single Page Applications with multiple views and allow navigation between these views.
-
The routing application should add element to the index.html as the first child in the tag in order to indicate how to compose navigation URLs. If app folder is the application root then you can set the href value as below
<base href="/">
-
The Angular Router which represents a particular component view for a given URL is not part of Angular Core. It is available in library named
@angular/routerto import required router components. For example, we import them in app module as below,import { RouterModule, Routes } from '@angular/router';
-
The RouterOutlet is a directive from the router library and it acts as a placeholder that marks the spot in the template where the router should display the components for that outlet. Router outlet is used like a component,
<router-outlet></router-outlet>
<!-- Routed components go here -->
-
The RouterLink is a directive on the anchor tags give the router control over those elements. Since the navigation paths are fixed, you can assign string values to router-link directive as below,
<h1>Angular Router</h1>
<nav>
  <a routerLink="/todosList" >List of todos</a>
  <a routerLink="/completed" >Completed todos</a>
</nav>
<router-outlet></router-outlet>
-
RouterLinkActive is a directive that toggles css classes for active RouterLink bindings based on the current RouterState. i.e, The Router will add CSS classes when this link is active and remove when the link is inactive. For example, you can add them to RouterLinks as below.
<h1>Angular Router</h1>
<nav>
  <a routerLink="/todosList" routerLinkActive="active">List of todos</a>
  <a routerLink="/completed" routerLinkActive="active">Completed todos</a>
</nav>
<router-outlet></router-outlet>
-
RouterState is a tree of activated routes. Every node in this tree knows about the "consumed" URL segments, the extracted parameters, and the resolved data. You can access the current RouterState from anywhere in the application using the
Router serviceand therouterStateproperty.@Component({templateUrl:'template.html'}) class MyComponent { constructor(router: Router) { const state: RouterState = router.routerState; const root: ActivatedRoute = state.root; const child = root.firstChild; const id: Observable<string> = child.params.map(p => p.id); //... } }
-
During each navigation, the Router emits navigation events through the Router.events property allowing you to track the lifecycle of the route.
The sequence of router events is as below,
- NavigationStart,
- RouteConfigLoadStart,
- RouteConfigLoadEnd,
- RoutesRecognized,
- GuardsCheckStart,
- ChildActivationStart,
- ActivationStart,
- GuardsCheckEnd,
- ResolveStart,
- ResolveEnd,
- ActivationEnd
- ChildActivationEnd
- NavigationEnd,
- NavigationCancel,
- NavigationError
- Scroll
-
ActivatedRoute contains the information about a route associated with a component loaded in an outlet. It can also be used to traverse the router state tree. The ActivatedRoute will be injected as a router service to access the information. In the below example, you can access route path and parameters,
@Component({...})
class MyComponent {
  constructor(route: ActivatedRoute) {
    const id: Observable<string> = route.params.pipe(map(p => p.id));
    const url: Observable<string> = route.url.pipe(map(segments => segments.join('')));
    // route.data includes both `data` and `resolve`
    const user = route.data.pipe(map(d => d.user));
  }
}
-
A router must be configured with a list of route definitions. You configures the router with routes via the
RouterModule.forRoot()method, and adds the result to the AppModule'simportsarray.const appRoutes: Routes = [ { path: 'todo/:id', component: TodoDetailComponent }, { path: 'todos', component: TodosListComponent, data: { title: 'Todos List' } }, { path: '', redirectTo: '/todos', pathMatch: 'full' }, { path: '**', component: PageNotFoundComponent } ]; @NgModule({ imports: [ RouterModule.forRoot( appRoutes, { enableTracing: true } // <-- debugging purposes only ) // other imports here ], ... }) export class AppModule { }
-
If the URL doesn't match any predefined routes then it causes the router to throw an error and crash the app. In this case, you can use wildcard route. A wildcard route has a path consisting of two asterisks to match every URL.
For example, you can define PageNotFoundComponent for wildcard route as below
{ path: '**', component: PageNotFoundComponent }
- No, the Routing Module is a design choice. You can skip routing Module (for example, AppRoutingModule) when the configuration is simple and merge the routing configuration directly into the companion module (for example, AppModule). But it is recommended when the configuration is complex and includes specialized guard and resolver services.
- Angular Universal is a server-side rendering module for Angular applications in various scenarios. This is a community driven project and available under @angular/platform-server package. Recently Angular Universal is integrated with Angular CLI.
-
Angular offers two ways to compile your application,
- Just-in-Time (JIT)
- Ahead-of-Time (AOT)
- Just-in-Time (JIT) is a type of compilation that compiles your app in the browser at runtime. JIT compilation was the default until Angular 8, now default is AOT. When you run the ng build (build only) or ng serve (build and serve locally) CLI commands, the type of compilation (JIT or AOT) depends on the value of the aot property in your build configuration specified in angular.json. By default, aot is set to true.
-
Ahead-of-Time (AOT) is a type of compilation that compiles your app at build time. This is the default starting in Angular 9. When you run the ng build (build only) or ng serve (build and serve locally) CLI commands, the type of compilation (JIT or AOT) depends on the value of the aot property in your build configuration specified in angular.json. By default, aot is set to true.
ng build
ng serve
- The Angular components and templates cannot be understood by the browser directly. Due to that Angular applications require a compilation process before they can run in a browser. For example, In AOT compilation, both Angular HTML and TypeScript code converted into efficient JavaScript code during the build phase before browser runs it.
-
Below are the list of AOT benefits,
- Faster rendering: The browser downloads a pre-compiled version of the application. So it can render the application immediately without compiling the app.
- Fewer asynchronous requests: It inlines external HTML templates and CSS style sheets within the application javascript which eliminates separate ajax requests.
- Smaller Angular framework download size: Doesn't require downloading the Angular compiler. Hence it dramatically reduces the application payload.
- Detect template errors earlier: Detects and reports template binding errors during the build step itself
- Better security: It compiles HTML templates and components into JavaScript. So there won't be any injection attacks.
-
You can control your app compilation in two ways,
- By providing template compiler options in the
tsconfig.jsonfile - By configuring Angular metadata with decorators
- By providing template compiler options in the
-
In Angular, You must write metadata with the following general constraints,
- Write expression syntax with in the supported range of javascript features
- The compiler can only reference symbols which are exported
- Only call the functions supported by the compiler
- Decorated and data-bound class members must be public.
-
The AOT compiler works in three phases,
- Code Analysis: The compiler records a representation of the source
- Code generation: It handles the interpretation as well as places restrictions on what it interprets.
- Validation: In this phase, the Angular template compiler uses the TypeScript compiler to validate the binding expressions in templates.
-
No, Arrow functions or lambda functions can’t be used to assign values to the decorator properties. For example, the following snippet is invalid:
@Component({
  providers: [{
    provide: MyService, useFactory: () => getService()
  }]
})
To fix this, it has to be changed as following exported function:
function getService(){
  return new MyService();
}

@Component({
  providers: [{
    provide: MyService, useFactory: getService
  }]
})
If you still use arrow function, it generates an error node in place of the function. When the compiler later interprets this node, it reports an error to turn the arrow function into an exported function. Note: From Angular5 onwards, the compiler automatically performs this rewriting while emitting the .js file.
- The metadata.json file can be treated as a diagram of the overall structure of a decorator's metadata, represented as an abstract syntax tree(AST). During the analysis phase, the AOT collector scan the metadata recorded in the Angular decorators and outputs metadata information in .metadata.json files, one per .d.ts file.
- No, the AOT collector understands a subset of (or limited) JavaScript features. If an expression uses unsupported syntax, the collector writes an error node to the .metadata.json file. Later point of time, the compiler reports an error if it needs that piece of metadata to generate the application code.
-
The compiler can only resolve references to exported symbols in the metadata. Where as some of the non-exported members are folded while generating the code. i.e Folding is a process in which the collector evaluate an expression during collection and record the result in the .metadata.json instead of the original expression. For example, the compiler couldn't refer selector reference because it is not exported
let selector = 'app-root';
@Component({
  selector: selector
})
Will be folded into inline selector
@Component({
      selector: 'app-root'
    })
Remember that the compiler can’t fold everything. For example, spread operator on arrays, objects created using new keywords and function calls.
-
The AOT compiler supports macros in the form of functions or static methods that return an expression in a
single return expression. For example, let us take a below macro function,export function wrapInArray<T>(value: T): T[] { return [value]; }
You can use it inside metadata as an expression,
@NgModule({
  declarations: wrapInArray(TypicalComponent)
})
export class TypicalModule {}
The compiler treats the macro expression as it written directly
@NgModule({
  declarations: [TypicalComponent]
})
export class TypicalModule {}
-
Below are some of the errors encountered in metadata,
- Expression form not supported: Some of the language features outside of the compiler's restricted expression syntax used in angular metadata can produce this error.
Let's see some of these examples,
1. export class User { ... }
   const prop = typeof User; // typeof is not valid in metadata
2. { provide: 'token', useValue: { [prop]: 'value' } }; // bracket notation is not valid in metadata
- Reference to a local (non-exported) symbol: The compiler encountered a referenced to a locally defined symbol that either wasn't exported or wasn't initialized.
Let's take example of this error,
You can fix this by either exporting or initializing the value,
// ERROR
let username: string; // neither exported nor initialized

@Component({
  selector: 'my-component',
  template: ... ,
  providers: [
    { provide: User, useValue: username }
  ]
})
export class MyComponent {}
export let username: string; // exported
(or)
let username = 'John'; // initialized
- Function calls are not supported: The compiler does not currently support function expressions or lambda functions. For example, you cannot set a provider's useFactory to an anonymous function or arrow function as below.
You can fix this with exported function
 providers: [
    { provide: MyStrategy, useFactory: function() { ... } },
    { provide: OtherStrategy, useFactory: () => { ... } }
  ]
export function myStrategy() { ... }
export function otherStrategy() { ... }
... // metadata
providers: [
    { provide: MyStrategy, useFactory: myStrategy },
    { provide: OtherStrategy, useFactory: otherStrategy },
- Destructured variable or constant not supported: The compiler does not support references to variables assigned by destructuring.
For example, you cannot write something like this:
You can fix this by non-destructured values
import { user } from './user';

// destructured assignment to name and age
const {name, age} = user;
... //metadata
providers: [
    {provide: Name, useValue: name},
    {provide: Age, useValue: age},
  ]
import { user } from './user';
... //metadata
providers: [
    {provide: Name, useValue: user.name},
    {provide: Age, useValue: user.age},
  ]
- Expression form not supported: Some of the language features outside of the compiler's restricted expression syntax used in angular metadata can produce this error.
Let's see some of these examples,
- Metadata rewriting is the process in which the compiler converts the expression initializing the fields such as useClass, useValue, useFactory, and data into an exported variable, which replaces the expression. Remember that the compiler does this rewriting during the emit of the .js file but not in definition files( .d.ts file).
-
Angular Compiler supports configuration inheritance through extends in the tsconfig.json on angularCompilerOptions. i.e, The configuration from the base file(for example, tsconfig.base.json) are loaded first, then overridden by those in the inheriting config file.
{
  "extends": "../tsconfig.base.json",
  "compilerOptions": {
    "experimentalDecorators": true,
    ...
  },
  "angularCompilerOptions": {
    "fullTemplateTypeCheck": true,
    "preserveWhitespaces": true,
    ...
  }
}
-
The angular template compiler options are specified as members of the angularCompilerOptions object in the tsconfig.json file. These options will be specified adjecent to typescript compiler options.
{
  "compilerOptions": {
    "experimentalDecorators": true,
              ...
  },
  "angularCompilerOptions": {
    "fullTemplateTypeCheck": true,
    "preserveWhitespaces": true,
              ...
  }
}
-
You can enable binding expression validation explicitly by adding the compiler option fullTemplateTypeCheck in the "angularCompilerOptions" of the project's tsconfig.json. It produces error messages when a type error is detected in a template binding expression.
For example, consider the following component:
@Component({
  selector: 'my-component',
  template: '{{user.contacts.email}}'
})
class MyComponent {
  user?: User;
}
This will produce the following error:
my.component.ts.MyComponent.html(1,1): : Property 'contacts' does not exist on type 'User'. Did you mean 'contact'?
-
You can disable binding expression type checking using $any() type cast function(by surrounding the expression). In the following example, the error Property contacts does not exist is suppressed by casting user to the any type.
The $any() cast function also works with this to allow access to undeclared members of the component.
template: '{{ $any(user).contacts.email }}'template: '{{ $any(this).contacts.email }}'
-
You can use the non-null type assertion operator to suppress the Object is possibly 'undefined' error. In the following example, the user and contact properties are always set together, implying that contact is always non-null if user is non-null. The error is suppressed in the example by using contact!.email.
@Component({
  selector: 'my-component',
  template: '<span *ngIf="user"> {{user.name}} contacted through {{contact!.email}} </span>'
})
class MyComponent {
  user?: User;
  contact?: Contact;

  setData(user: User, contact: Contact) {
    this.user = user;
    this.contact = contact;
  }
}
-
The expression used in an ngIf directive is used to narrow type unions in the Angular template compiler similar to if expression in typescript. So *ngIf allows the typeScript compiler to infer that the data used in the binding expression will never be undefined.
@Component({
  selector: 'my-component',
  template: '<span *ngIf="user"> {{user.contact.email}} </span>'
})
class MyComponent {
  user?: User;
}
-
The dependencies section of package.json with in an angular application can be divided as follow,
- Angular packages: Angular core and optional modules; their package names begin @angular/.
- Support packages: Third-party libraries that must be present for Angular apps to run.
- Polyfill packages: Polyfills plug gaps in a browser's JavaScript implementation.
- A Zone is an execution context that persists across async tasks. Angular relies on zone.js to run Angular's change detection processes when native JavaScript operations raise events
- The commonly-needed services, pipes, and directives provided by @angular/common module. Apart from these HttpClientModule is available under @angular/common/http.
-
Codelyzer provides set of tslint rules for static code analysis of Angular TypeScript projects. You can run the static code analyzer over web apps, NativeScript, Ionic etc. Angular CLI has support for this and it can be use as below,
ng new codelyzer
ng lint
- Angular's animation system is built on CSS functionality in order to animate any property that the browser considers animatable. These properties includes positions, sizes, transforms, colors, borders etc. The Angular modules for animations are @angular/animations and @angular/platform-browser and these dependencies are automatically added to your project when you create a project using Angular CLI.
-
You need to follow below steps to implement animation in your angular project,
- Enabling the animations module: Import BrowserAnimationsModule to add animation capabilities into your Angular root application module(for example, src/app/app.module.ts).
import { NgModule } from '@angular/core';
import { BrowserModule } from '@angular/platform-browser';
import { BrowserAnimationsModule } from '@angular/platform-browser/animations';

@NgModule({
  imports: [
    BrowserModule,
    BrowserAnimationsModule
  ],
  declarations: [ ],
  bootstrap: [ ]
})
export class AppModule { }
- Importing animation functions into component files: Import required animation functions from @angular/animations in component files(for example, src/app/app.component.ts).
import {
  trigger,
  state,
  style,
  animate,
  transition,
  // ...
} from '@angular/animations';
- Adding the animation metadata property: add a metadata property called animations: within the @Component() decorator in component files(for example, src/app/app.component.ts)
@Component({
  selector: 'app-root',
  templateUrl: 'app.component.html',
  styleUrls: ['app.component.css'],
  animations: [
    // animation triggers go here
  ]
})
- Enabling the animations module: Import BrowserAnimationsModule to add animation capabilities into your Angular root application module(for example, src/app/app.module.ts).
-
Angular's state() function is used to define different states to call at the end of each transition. This function takes two arguments: a unique name like open or closed and a style() function.
For example, you can write a open state function
state('open', style({
  height: '300px',
  opacity: 0.5,
  backgroundColor: 'blue'
})),
-
The style function is used to define a set of styles to associate with a given state name. You need to use it along with state() function to set CSS style attributes. For example, in the close state, the button has a height of 100 pixels, an opacity of 0.8, and a background color of green.
state('close', style({
  height: '100px',
  opacity: 0.8,
  backgroundColor: 'green'
})),
Note: The style attributes must be in camelCase.
-
Angular Animations are a powerful way to implement sophisticated and compelling animations for your Angular single page web application.
import { Component, OnInit, Input } from '@angular/core';
import { trigger, state, style, animate, transition } from '@angular/animations';

@Component({
selector: 'app-animate',
templateUrl: `<div [@changeState]="currentState" class="myblock mx-auto"></div>`,
styleUrls: `.myblock {
    background-color: green;
    width: 300px;
    height: 250px;
    border-radius: 5px;
    margin: 5rem;
    }`,
animations: [
    trigger('changeState', [
    state('state1', style({
        backgroundColor: 'green',
        transform: 'scale(1)'
    })),
    state('state2', style({
        backgroundColor: 'red',
        transform: 'scale(1.5)'
    })),
    transition('*=>state1', animate('300ms')),
    transition('*=>state2', animate('2000ms'))
    ])
]
})
export class AnimateComponent implements OnInit {

    @Input() currentState;

    constructor() { }

    ngOnInit() {
    }
}
-
The animation transition function is used to specify the changes that occur between one state and another over a period of time. It accepts two arguments: the first argument accepts an expression that defines the direction between two transition states, and the second argument accepts an animate() function.
Let's take an example state transition from open to closed with an half second transition between states.
transition('open => closed', [
  animate('500ms')
]),
-
Using DomSanitizer we can inject the dynamic Html,Style,Script,Url.
import { Component, OnInit } from '@angular/core';
import { DomSanitizer } from '@angular/platform-browser';
@Component({
   selector: 'my-app',
   template: `
       <div [innerHtml]="htmlSnippet"></div>
   `,
})
export class App {
       constructor(protected sanitizer: DomSanitizer) {}
       htmlSnippet: string = this.sanitizer.bypassSecurityTrustScript("<script>safeCode()</script>");
   }
- A service worker is a script that runs in the web browser and manages caching for an application. Starting from 5.0.0 version, Angular ships with a service worker implementation. Angular service worker is designed to optimize the end user experience of using an application over a slow or unreliable network connection, while also minimizing the risks of serving outdated content.
-
Below are the list of design goals of Angular's service workers,
- It caches an application just like installing a native application
- A running application continues to run with the same version of all files without any incompatible files
- When you refresh the application, it loads the latest fully cached version
- When changes are published then it immediately updates in the background
- Service workers saves the bandwidth by downloading the resources only when they changed.
-
Dependency injection is a common component in both AngularJS and Angular, but there are some key differences between the two frameworks in how it actually works.
AngularJS Angular Dependency injection tokens are always strings Tokens can have different types. They are often classes and sometimes can be strings. There is exactly one injector even though it is a multi-module applications There is a tree hierarchy of injectors, with a root injector and an additional injector for each component.
-
Angular Ivy is a new rendering engine for Angular. You can choose to opt in a preview version of Ivy from Angular version 8.
-
You can enable ivy in a new project by using the --enable-ivy flag with the ng new command
ng new ivy-demo-app --enable-ivy
-
You can add it to an existing project by adding
enableIvyoption in theangularCompilerOptionsin your project'stsconfig.app.json.{ "compilerOptions": { ... }, "angularCompilerOptions": { "enableIvy": true } }
-
-
You can expect below features with Ivy preview,
- Generated code that is easier to read and debug at runtime
- Faster re-build time
- Improved payload size
- Improved template type checking
-
Yes, it is a recommended configuration. Also, AOT compilation with Ivy is faster. So you need set the default build options(with in angular.json) for your project to always use AOT compilation.
{
  "projects": {
    "my-project": {
      "architect": {
        "build": {
          "options": {
            ...
            "aot": true,
          }
        }
      }
    }
  }
}
-
The Angular Language Service is a way to get completions, errors, hints, and navigation inside your Angular templates whether they are external in an HTML file or embedded in annotations/decorators in a string. It has the ability to autodetect that you are opening an Angular file, reads your
tsconfig.jsonfile, finds all the templates you have in your application, and then provides all the language services.
-
You can install Angular Language Service in your project with the following npm command,
npm install --save-dev @angular/language-service
After that add the following to the "compilerOptions" section of your project's tsconfig.json
"plugins": [
    {"name": "@angular/language-service"}
]
Note: The completion and diagnostic services works for .ts files only. You need to use custom plugins for supporting HTML files.
- Yes, Angular Language Service is currently available for Visual Studio Code and WebStorm IDEs. You need to install angular language service using an extension and devDependency respectively. In sublime editor, you need to install typescript which has has a language service plugin model.
-
Basically there are 3 main features provided by Angular Language Service,
-
Autocompletion: Autocompletion can speed up your development time by providing you with contextual possibilities and hints as you type with in an interpolation and elements.

-
Error checking: It can also warn you of mistakes in your code.
-
Navigation: Navigation allows you to hover a component, directive, module and then click and press F12 to go directly to its definition.
-


-
You can add web worker anywhere in your application. For example, If the file that contains your expensive computation is
src/app/app.component.ts, you can add a Web Worker usingng generate web-worker appcommand which will createsrc/app/app.worker.tsweb worker file. This command will perform below actions,- Configure your project to use Web Workers
- Adds app.worker.ts to receive messages
addEventListener('message', ({ data }) => {
  const response = `worker response to ${data}`;
  postMessage(response);
});
- The component
app.component.tsfile updated with web worker fileif (typeof Worker !== 'undefined') { // Create a new const worker = new Worker('./app.worker', { type: 'module' }); worker.onmessage = ({ data }) => { console.log('page got message: $\{data\}'); }; worker.postMessage('hello'); } else { // Web Workers are not supported in this environment. }
Note: You may need to refactor your initial scaffolding web worker code for sending messages to and from.
-
You need to remember two important things when using Web Workers in Angular projects,
- Some environments or platforms(like @angular/platform-server) used in Server-side Rendering, don't support Web Workers. In this case you need to provide a fallback mechanism to perform the computations to work in this environments.
- Running Angular in web worker using
@angular/platform-webworkeris not yet supported in Angular CLI.
-
In Angular8, the CLI Builder API is stable and available to developers who want to customize the
Angular CLIby adding or modifying commands. For example, you could supply a builder to perform an entirely new task, or to change which third-party tool is used by an existing command.
-
A builder function is a function that uses the
Architect APIto perform a complex process such as "build" or "test". The builder code is defined in an npm package. For example, BrowserBuilder runs a webpack build for a browser target and KarmaBuilder starts the Karma server and runs a webpack build for unit tests.
-
The Angular CLI command
ng runis used to invoke a builder with a specific target configuration. The workspace configuration file,angular.json, contains default configurations for built-in builders.
-
An App shell is a way to render a portion of your application via a route at build time. This is useful to first paint of your application that appears quickly because the browser can render static HTML and CSS without the need to initialize JavaScript. You can achieve this using Angular CLI which generates an app shell for running server-side of your app.
ng generate appShell [options] (or)
ng g appShell [options]
-
Angular uses capitalization conventions to distinguish the names of various types. Angular follows the list of the below case types.
- camelCase : Symbols, properties, methods, pipe names, non-component directive selectors, constants uses lowercase on the first letter of the item. For example, "selectedUser"
- UpperCamelCase (or PascalCase): Class names, including classes that define components, interfaces, NgModules, directives, and pipes uses uppercase on the first letter of the item.
- dash-case (or "kebab-case"): The descriptive part of file names, component selectors uses dashes between the words. For example, "app-user-list".
- UPPER_UNDERSCORE_CASE: All constants uses capital letters connected with underscores. For example, "NUMBER_OF_USERS".
-
A class decorator is a decorator that appears immediately before a class definition, which declares the class to be of the given type, and provides metadata suitable to the type
The following list of decorators comes under class decorators,
- @Component()
- @Directive()
- @Pipe()
- @Injectable()
- @NgModule()
-
The class field decorators are the statements declared immediately before a field in a class definition that defines the type of that field. Some of the examples are: @input and @output,
@Input() myProperty;
@Output() myEvent = new EventEmitter();
-
Declarable is a class type that you can add to the declarations list of an NgModule. The class types such as components, directives, and pipes comes can be declared in the module. The structure of declarations would be,
declarations: [
  YourComponent,
  YourPipe,
  YourDirective
],
-
Below classes shouldn't be declared,
- A class that's already declared in another NgModule
- Ngmodule classes
- Service classes
- Helper classes
-
A DI token is a lookup token associated with a dependency provider in dependency injection system. The injector maintains an internal token-provider map that it references when asked for a dependency and the DI token is the key to the map. Let's take example of DI Token usage,
const BASE_URL = new InjectionToken<string>('BaseUrl');
const injector =
   Injector.create({providers: [{provide: BASE_URL, useValue: 'http://some-domain.com'}]});
const url = injector.get(BASE_URL);
-
A domain-specific language (DSL) is a computer language specialized to a particular application domain. Angular has its own Domain Specific Language (DSL) which allows us to write Angular specific html-like syntax on top of normal html. It has its own compiler that compiles this syntax to html that the browser can understand. This DSL is defined in NgModules such as animations, forms, and routing and navigation.
Basically you will see 3 main syntax in Angular DSL.
(): Used for Output and DOM events.[]: Used for Input and specific DOM element attributes.*: Structural directives(*ngFor or *ngIf) will affect/change the DOM structure.
-
An RxJS Subject is a special type of Observable that allows values to be multicasted to many Observers. While plain Observables are unicast (each subscribed Observer owns an independent execution of the Observable), Subjects are multicast.
A Subject is like an Observable, but can multicast to many Observers. Subjects are like EventEmitters: they maintain a registry of many listeners.
 import { Subject } from 'rxjs';

   const subject = new Subject<number>();

   subject.subscribe({
     next: (v) => console.log(`observerA: ${v}`)
   });
   subject.subscribe({
     next: (v) => console.log(`observerB: ${v}`)
   });

   subject.next(1);
   subject.next(2);
- Bazel is a powerful build tool developed and massively used by Google and it can keep track of the dependencies between different packages and build targets. In Angular8, you can build your CLI application with Bazel. Note: The Angular framework itself is built with Bazel.
-
Below are the list of key advantages of Bazel tool,
- It creates the possibility of building your back-ends and front-ends with the same tool
- The incremental build and tests
- It creates the possibility to have remote builds and cache on a build farm.
-
The @angular/bazel package provides a builder that allows Angular CLI to use Bazel as the build tool.
- Use in an existing applciation: Add @angular/bazel using CLI
ng add @angular/bazel
- Use in a new application: Install the package and create the application with collection option
npm install -g @angular/bazel
ng new --collection=@angular/bazel
- Use in an existing applciation: Add @angular/bazel using CLI
-
Sometimes you may want to bypass the Angular CLI builder and run Bazel directly using Bazel CLI. You can install it globally using @bazel/bazel npm package. i.e, Bazel CLI is available under @bazel/bazel package. After you can apply the below common commands,
bazel build [targets] // Compile the default output artifacts of the given targets.
bazel test [targets] // Run the tests with *_test targets found in the pattern.
bazel run [target]: Compile the program represented by target and then run it.
-
A platform is the context in which an Angular application runs. The most common platform for Angular applications is a web browser, but it can also be an operating system for a mobile device, or a web server. The runtime-platform is provided by the @angular/platform-* packages and these packages allow applications that make use of
@angular/coreand@angular/commonto execute in different environments. i.e, Angular can be used as platform-independent framework in different environments, For example,- While running in the browser, it uses
platform-browserpackage. - When SSR(server-side rendering ) is used, it uses
platform-serverpackage for providing web server implementation.
- While running in the browser, it uses
- If multiple modules imports the same module then angular evaluates it only once (When it encounters the module first time). It follows this condition even the module appears at any level in a hierarchy of imported NgModules.
-
You can use
@ViewChilddirective to access elements in the view directly. Let's take input element with a reference,<input #uname>
and define view child directive and access it in ngAfterViewInit lifecycle hook
@ViewChild('uname') input;

ngAfterViewInit() {
  console.log(this.input.nativeElement.value);
}
-
In Angular7, you can subscribe to router to detect the changes. The subscription for router events would be as below,
this.router.events.subscribe((event: Event) => {})
Let's take a simple component to detect router changes
import { Component } from '@angular/core';
import { Router, Event, NavigationStart, NavigationEnd, NavigationError } from '@angular/router';

@Component({
    selector: 'app-root',
    template: `<router-outlet></router-outlet>`
})
export class AppComponent {

    constructor(private router: Router) {

        this.router.events.subscribe((event: Event) => {
            if (event instanceof NavigationStart) {
                // Show loading indicator and perform an action
            }

            if (event instanceof NavigationEnd) {
                // Hide loading indicator and perform an action
            }

            if (event instanceof NavigationError) {
                // Hide loading indicator and perform an action
                console.log(event.error); // It logs an error for debugging
            }
        });
   }
}
-
You can directly pass object map for http client or create HttpHeaders class to supply the headers.
constructor(private _http: HttpClient) {}
this._http.get('someUrl',{
   headers: {'header1':'value1','header2':'value2'}
});

(or)
let headers = new HttpHeaders().set('header1', headerValue1); // create header object
headers = headers.append('header2', headerValue2); // add a new header, creating a new object
headers = headers.append('header3', headerValue3); // add another header

let params = new HttpParams().set('param1', value1); // create params object
params = params.append('param2', value2); // add a new param, creating a new object
params = params.append('param3', value3); // add another param

return this._http.get<any[]>('someUrl', { headers: headers, params: params })
-
From Angular8 release onwards, the applications are built using differential loading strategy from CLI to build two separate bundles as part of your deployed application.
- The first build contains ES2015 syntax which takes the advantage of built-in support in modern browsers, ships less polyfills, and results in a smaller bundle size.
- The second build contains old ES5 syntax to support older browsers with all necessary polyfills. But this results in a larger bundle size.
Note: This strategy is used to support multiple browsers but it only load the code that the browser needs.
-
Yes, Angular 8 supports dynamic imports in router configuration. i.e, You can use the import statement for lazy loading the module using
loadChildrenmethod and it will be understood by the IDEs(VSCode and WebStorm), webpack, etc. Previously, you have been written as below to lazily load the feature module. By mistake, if you have typo in the module name it still accepts the string and throws an error during build time.{path: ‘user’, loadChildren: ‘./users/user.module#UserModulee’},
This problem is resolved by using dynamic imports and IDEs are able to find it during compile time itself.
{path: ‘user’, loadChildren: () => import(‘./users/user.module’).then(m => m.UserModule)};
-
Lazy loading is one of the most useful concepts of Angular Routing. It helps us to download the web pages in chunks instead of downloading everything in a big bundle. It is used for lazy loading by asynchronously loading the feature module for routing whenever required using the property
loadChildren. Let's load bothCustomerandOrderfeature modules lazily as below,const routes: Routes = [ { path: 'customers', loadChildren: () => import('./customers/customers.module').then(module => module.CustomersModule) }, { path: 'orders', loadChildren: () => import('./orders/orders.module').then(module => module.OrdersModule) }, { path: '', redirectTo: '', pathMatch: 'full' } ];
-
Angular 8.0 release introduces Workspace APIs to make it easier for developers to read and modify the angular.json file instead of manually modifying it. Currently, the only supported storage3 format is the JSON-based format used by the Angular CLI. You can enable or add optimization option for build target as below,
import { NodeJsSyncHost } from '@angular-devkit/core/node';
import { workspaces } from '@angular-devkit/core';

async function addBuildTargetOption() {
    const host = workspaces.createWorkspaceHost(new NodeJsSyncHost());
    const workspace = await workspaces.readWorkspace('path/to/workspace/directory/', host);

    const project = workspace.projects.get('my-app');
    if (!project) {
      throw new Error('my-app does not exist');
    }

    const buildTarget = project.targets.get('build');
    if (!buildTarget) {
      throw new Error('build target does not exist');
    }

    buildTarget.options.optimization = true;

    await workspaces.writeWorkspace(workspace, host);
}

addBuildTargetOption();
-
The Angular upgrade is quite easier using Angular CLI
ng updatecommand as mentioned below. For example, if you upgrade from Angular 7 to 8 then your lazy loaded route imports will be migrated to the new import syntax automatically.$ ng update @angular/cli @angular/core
-
Angular Material is a collection of Material Design components for Angular framework following the Material Design spec. You can apply Material Design very easily using Angular Material. The installation can be done through npm or yarn,
npm install --save @angular/material @angular/cdk @angular/animations
(OR)
yarn add @angular/material @angular/cdk @angular/animations
It supports the most recent two versions of all major browsers. The latest version of Angular material is 8.1.1
-
If you are using
$locationservice in your old AngularJS application, now you can useLocationUpgradeModule(unified location service) which puts the responsibilities of$locationservice toLocationservice in Angular. Let's add this module toAppModuleas below,// Other imports ... import { LocationUpgradeModule } from '@angular/common/upgrade'; @NgModule({ imports: [ // Other NgModule imports... LocationUpgradeModule.config() ] }) export class AppModule {}
-
NgUpgrade is a library put together by the Angular team, which you can use in your applications to mix and match AngularJS and Angular components and bridge the AngularJS and Angular dependency injection systems.
-
Angular CLI downloads and install everything needed with the Jasmine Test framework. You just need to run
ng testto see the test results. By default this command builds the app in watch mode, and launches theKarma test runner. The output of test results would be as below,10% building modules 1/1 modules 0 active ...INFO [karma]: Karma v1.7.1 server started at http://0.0.0.0:9876/ ...INFO [launcher]: Launching browser Chrome ... ...INFO [launcher]: Starting browser Chrome ...INFO [Chrome ...]: Connected on socket ... Chrome ...: Executed 3 of 3 SUCCESS (0.135 secs / 0.205 secs)
Note: A chrome browser also opens and displays the test output in the "Jasmine HTML Reporter".
-
The Angular CLI provides support for polyfills officially. When you create a new project with the ng new command, a
src/polyfills.tsconfiguration file is created as part of your project folder. This file includes the mandatory and many of the optional polyfills as JavaScript import statements. Let's categorize the polyfills,- Mandatory polyfills: These are installed automatically when you create your project with ng new command and the respective import statements enabled in 'src/polyfills.ts' file.
- Optional polyfills: You need to install its npm package and then create import statement in 'src/polyfills.ts' file.
For example, first you need to install below npm package for adding web animations (optional) polyfill.
bash npm install --save web-animations-jsand create import statement in polyfill file.javascript import 'web-animations-js';
-
You can inject either ApplicationRef or NgZone, or ChangeDetectorRef into your component and apply below specific methods to trigger change detection in Angular. i.e, There are 3 possible ways,
- ApplicationRef.tick(): Invoke this method to explicitly process change detection and its side-effects. It check the full component tree.
- NgZone.run(callback): It evaluate the callback function inside the Angular zone.
- ChangeDetectorRef.detectChanges(): It detects only the components and it's children.
-
There are different versions of Angular framework. Let's see the features of all the various versions,
- Angular 1:
- Angular 1 (AngularJS) is the first angular framework released in the year 2010.
- AngularJS is not built for mobile devices.
- It is based on controllers with MVC architecture.
- Angular 2:
- Angular 2 was released in the year 2016. Angular 2 is a complete rewrite of Angular1 version.
- The performance issues that Angular 1 version had has been addressed in Angular 2 version.
- Angular 2 is built from scratch for mobile devices unlike Angular 1 version.
- Angular 2 is components based.
- Angular 3:
- The following are the different package versions in Angular 2:
- @angular/core v2.3.0
- @angular/compiler v2.3.0
- @angular/http v2.3.0
- @angular/router v3.3.0
- The router package is already versioned 3 so to avoid confusion switched to Angular 4 version and skipped 3 version.
- The following are the different package versions in Angular 2:
- Angular 4:
- The compiler generated code file size in AOT mode is very much reduced.
- With Angular 4 the production bundles size is reduced by hundreds of KB’s.
- Animation features are removed from angular/core and formed as a separate package.
- Supports Typescript 2.1 and 2.2.
- Angular Universal
- New HttpClient
- Angular 5:
- Angular 5 makes angular faster. It improved the loading time and execution time.
- Shipped with new build optimizer.
- Supports Typescript 2.5.
- Service Worker
- Angular 6:
- It is released in May 2018.
- Includes Angular Command Line Interface (CLI), Component Development KIT (CDK), Angular Material Package, Angular Elements.
- Service Worker bug fixes.
- i18n
- Experimental mode for Ivy.
- RxJS 6.0
- Tree Shaking
- Angular 7:
- It is released in October 2018.
- TypeScript 3.1
- RxJS 6.3
- New Angular CLI
- CLI Prompts capability provide an ability to ask questions to the user before they run. It is like interactive dialog between the user and the CLI
- With the improved CLI Prompts capability, it helps developers to make the decision. New ng commands ask users for routing and CSS styles types(SCSS) and ng add @angular/material asks for themes and gestures or animations.
- Angular 8:
- It is released in May 2019.
- TypeScript 3.4
- Angular 9:
- It is released in February 2020.
- TypeScript 3.7
- Ivy enabled by default
- Angular 10:
- It is released in June 2020.
- TypeScript 3.9
- TSlib 2.0
- Angular 1:
-
Below are the list of security principles in angular,
- You should avoid direct use of the DOM APIs.
- You should enable Content Security Policy (CSP) and configure your web server to return appropriate CSP HTTP headers.
- You should Use the offline template compiler.
- You should Use Server Side XSS protection.
- You should Use DOM Sanitizer.
- You should Preventing CSRF or XSRF attacks.
-
Angular has supported the integration with the Web Tracing Framework (WTF) for the purpose of performance testing. Since it is not well maintained and failed in majority of the applications, the support is deprecated in latest releases.
-
Both
@angular/platform-webworkerand@angular/platform-webworker-dynamicare officially deprecated, the Angular team realized it's not good practice to run the Angular application on Web worker -
Angular CLI provides it's installed version using below different ways using ng command,
ng v
ng version
ng -v
ng --version
and the output would be as below,
Angular CLI: 1.6.3
Node: 8.11.3
OS: darwin x64
Angular:
...
-
Angular supports most recent browsers which includes both desktop and mobile browsers.
Browser Version Chrome latest Firefox latest Edge 2 most recent major versions IE 11, 10, 9 (Compatibility mode is not supported) Safari 2 most recent major versions IE Mobile 11 iOS 2 most recent major versions Android 7.0, 6.0, 5.0, 5.1, 4.4 -
It's a scaffolding library that defines how to generate or transform a programming project by creating, modifying, refactoring, or moving files and code. It defines rules that operate on a virtual file system called a tree.
-
In schematics world, it's a function that operates on a file tree to create, delete, or modify files in a specific manner.
-
Schematics come with their own command-line tool known as Schematics CLI. It is used to install the schematics executable, which you can use to create a new schematics collection with an initial named schematic. The collection folder is a workspace for schematics. You can also use the schematics command to add a new schematic to an existing collection, or extend an existing schematic. You can install Schematic CLI globally as below,
npm install -g @angular-devkit/schematics-cli
-
Below are the best practices of security in angular,
- Use the latest Angular library releases
- Don't modify your copy of Angular
- Avoid Angular APIs marked in the documentation as “Security Risk.”
-
Angular treats all values as untrusted by default. i.e, Angular sanitizes and escapes untrusted values When a value is inserted into the DOM from a template, via property, attribute, style, class binding, or interpolation.
-
The offline template compiler prevents vulnerabilities caused by template injection, and greatly improves application performance. So it is recommended to use offline template compiler in production deployments without dynamically generating any template.
-
Angular defines the following security contexts for sanitization,
- HTML: It is used when interpreting a value as HTML such as binding to innerHtml.
- Style: It is used when binding CSS into the style property.
- URL: It is used for URL properties such as
<a href>. - Resource URL: It is a URL that will be loaded and executed as code such as
<script src>.
-
Sanitization is the inspection of an untrusted value, turning it into a value that's safe to insert into the DOM. Yes, Angular suppports sanitization. It sanitizes untrusted values for HTML, styles, and URLs but sanitizing resource URLs isn't possible because they contain arbitrary code.
-
The innerHtml is a property of HTML-Elements, which allows you to set it's html-content programmatically. Let's display the below html code snippet in a
<div>tag as below using innerHTML binding,<div [innerHTML]="htmlSnippet"></div>
and define the htmlSnippet property from any component
export class myComponent {
  htmlSnippet: string = '<b>Hello World</b>, Angular';
}
Unfortunately this property could cause Cross Site Scripting (XSS) security bugs when improperly handled.
-
The main difference between interpolated and innerHTML code is the behavior of code interpreted. Interpolated content is always escaped i.e, HTML isn't interpreted and the browser displays angle brackets in the element's text content. Where as in innerHTML binding, the content is interpreted i.e, the browser will convert < and > characters as HTMLEntities. For example, the usage in template would be as below,
<p>Interpolated value:</p>
<div >{{htmlSnippet}}</div>
<p>Binding of innerHTML:</p>
<div [innerHTML]="htmlSnippet"></div>
and the property defined in a component.
export class InnerHtmlBindingComponent {
  htmlSnippet = 'Template <script>alert("XSS Attack")</script> <b>Code attached</b>';
}
Even though innerHTML binding create a chance of XSS attack, Angular recognizes the value as unsafe and automatically sanitizes it.
-
Sometimes the applications genuinely need to include executable code such as displaying
<iframe>from an URL. In this case, you need to prevent automatic sanitization in Angular by saying that you inspected a value, checked how it was generated, and made sure it will always be secure. Basically it involves 2 steps,-
Inject DomSanitizer: You can inject DomSanitizer in component as parameter in constructor
-
Mark the trusted value by calling some of the below methods
- bypassSecurityTrustHtml
- bypassSecurityTrustScript
- bypassSecurityTrustStyle
- bypassSecurityTrustUrl
- bypassSecurityTrustResourceUrl
For example,The usage of dangerous url to trusted url would be as below,
constructor(private sanitizer: DomSanitizer) {
  this.dangerousUrl = 'javascript:alert("XSS attack")';
  this.trustedUrl = sanitizer.bypassSecurityTrustUrl(this.dangerousUrl);
-
-
No,the built-in browser DOM APIs or methods don't automatically protect you from security vulnerabilities. In this case it is recommended to use Angular templates instead of directly interacting with DOM. If it is unavoidable then use the built-in Angular sanitization functions.
-
DomSanitizeris used to help preventing Cross Site Scripting Security bugs (XSS) by sanitizing values to be safe to use in the different DOM contexts. -
The server-side XSS protection is supported in an angular application by using a templating language that automatically escapes values to prevent XSS vulnerabilities on the server. But don't use a templating language to generate Angular templates on the server side which creates a high risk of introducing template-injection vulnerabilities.
-
Angular has built-in support for preventing http level vulnerabilities such as as cross-site request forgery (CSRF or XSRF) and cross-site script inclusion (XSSI). Even though these vulnerabilities need to be mitigated on server-side, Angular provides helpers to make the integration easier on the client side.
- HttpClient supports a token mechanism used to prevent XSRF attacks
- HttpClient library recognizes the convention of prefixed JSON responses(which non-executable js code with ")]}',\n" characters) and automatically strips the string ")]}',\n" from all responses before further parsing
-
Http Interceptors are part of @angular/common/http, which inspect and transform HTTP requests from your application to the server and vice-versa on HTTP responses. These interceptors can perform a variety of implicit tasks, from authentication to logging.
The syntax of HttpInterceptor interface looks like as below,
interface HttpInterceptor {
  intercept(req: HttpRequest<any>, next: HttpHandler): Observable<HttpEvent<any>>
}
You can use interceptors by declaring a service class that implements the intercept() method of the HttpInterceptor interface.
@Injectable()
export class MyInterceptor implements HttpInterceptor {
    constructor() {}
    intercept(req: HttpRequest<any>, next: HttpHandler): Observable<HttpEvent<any>> {
        ...
    }
}
After that you can use it in your module,
@NgModule({
    ...
    providers: [
        {
            provide: HTTP_INTERCEPTORS,
            useClass: MyInterceptor,
            multi: true
        }
    ]
    ...
})
export class AppModule {}
-
The HTTP Interceptors can be used for different variety of tasks,
- Authentication
- Logging
- Caching
- Fake backend
- URL transformation
- Modifying headers
-
Yes, Angular supports multiple interceptors at a time. You could define multiple interceptors in providers property:
providers: [
  { provide: HTTP_INTERCEPTORS, useClass: MyFirstInterceptor, multi: true },
  { provide: HTTP_INTERCEPTORS, useClass: MySecondInterceptor, multi: true }
],
The interceptors will be called in the order in which they were provided. i.e, MyFirstInterceptor will be called first in the above interceptors configuration.
-
You can use same instance of
HttpInterceptorsfor the entire app by importing theHttpClientModuleonly in your AppModule, and add the interceptors to the root application injector. For example, let's define a class that is injectable in root application.@Injectable() export class MyInterceptor implements HttpInterceptor { intercept( req: HttpRequest<any>, next: HttpHandler ): Observable<HttpEvent<any>> { return next.handle(req).do(event => { if (event instanceof HttpResponse) { // Code goes here } }); } }
After that import HttpClientModule in AppModule
@NgModule({
  declarations: [AppComponent],
  imports: [BrowserModule, HttpClientModule],
  providers: [
    { provide: HTTP_INTERCEPTORS, useClass: MyInterceptor, multi: true }
  ],
  bootstrap: [AppComponent]
})
export class AppModule {}
-
Angular simplifies the below areas of internationalization,
- Displaying dates, number, percentages, and currencies in a local format.
- Preparing text in component templates for translation.
- Handling plural forms of words.
- Handling alternative text.
-
By default, Angular only contains locale data for en-US which is English as spoken in the United States of America . But if you want to set to another locale, you must import locale data for that new locale. After that you can register using
registerLocaleDatamethod and the syntax of this method looks like below,registerLocaleData(data: any, localeId?: any, extraData?: any): void
For example, let us import German locale and register it in the application
import { registerLocaleData } from '@angular/common';
import localeDe from '@angular/common/locales/de';

registerLocaleData(localeDe, 'de');
-
The i18n template translation process has four phases:
-
Mark static text messages in your component templates for translation: You can place i18n on every element tag whose fixed text is to be translated. For example, you need i18n attribue for heading as below,
<h1 i18n>Hello i18n!</h1>
-
Create a translation file: Use the Angular CLI xi18n command to extract the marked text into an industry-standard translation source file. i.e, Open terminal window at the root of the app project and run the CLI command xi18n.
ng xi18n
The above command creates a file named
messages.xlfin your project's root directory.Note: You can supply command options to change the format, the name, the location, and the source locale of the extracted file.
-
Edit the generated translation file: Translate the extracted text into the target language. In this step, create a localization folder (such as
locale)under root directory(src) and then create target language translation file by copying and renaming the default messages.xlf file. You need to copy source text node and provide the translation under target tag. For example, create the translation file(messages.de.xlf) for German language<trans-unit id="greetingHeader" datatype="html"> <source>Hello i18n!</source> <target>Hallo i18n !</target> <note priority="1" from="description">A welcome header for this sample</note> <note priority="1" from="meaning">welcome message</note> </trans-unit>
-
Merge the completed translation file into the app: You need to use Angular CLI build command to compile the app, choosing a locale-specific configuration, or specifying the following command options.
- --i18nFile=path to the translation file
- --i18nFormat=format of the translation file
- --i18nLocale= locale id
-
-
The Angular i18n attribute marks translatable content. It is a custom attribute, recognized by Angular tools and compilers. The compiler removes it after translation.
Note: Remember that i18n is not an Angular directive.
-
When you change the translatable text, the Angular extractor tool generates a new id for that translation unit. Because of this behavior, you must then update the translation file with the new id every time.
For example, the translation file
messages.de.xlf.htmlhas generated trans-unit for some text message as below<trans-unit id="827wwe104d3d69bf669f823jjde888" datatype="html">
You can avoid this manual update of
idattribute by specifying a custom id in the i18n attribute by using the prefix @@.<h1 i18n="@@welcomeHeader">Hello i18n!</h1>
-
You need to define custom ids as unique. If you use the same id for two different text messages then only the first one is extracted. But its translation is used in place of both original text messages.
For example, let's define same custom id
myCustomIdfor two messages,<h2 i18n="@@myCustomId">Good morning</h3> <!-- ... --> <h2 i18n="@@myCustomId">Good night</p>
and the translation unit generated for first text in for German language as
<trans-unit id="myId" datatype="html">
  <source>Good morning</source>
  <target state="new">Guten Morgen</target>
</trans-unit>
Since custom id is the same, both of the elements in the translation contain the same text as below
<h2>Guten Morgen</h2>
<h2>Guten Morgen</h2>
-
Yes, you can achieve using
<ng-container>attribute. Normally you need to wrap a text content with i18n attribute for the translation. But if you don't want to create a new DOM element just for the sake of translation, you can wrap the text in an element.<ng-container i18n>I'm not using any DOM element for translation</ng-container>
Remember that
<ng-container>is transformed into an html comment -
You can translate attributes by attaching
i18n-xattribute where x is the name of the attribute to translate. For example, you can translate image title attribute as below,<img [src]="example" i18n-title title="Internationlization" />
By the way, you can also assign meaning, description and id with the i18n-x="|@@" syntax.
-
Pluralization has below categories depending on the language.
- =0 (or any other number)
- zero
- one
- two
- few
- many
- other
-
ICU expression is is similar to the plural expressions except that you choose among alternative translations based on a string value instead of a number. Here you define those string values.
Let's take component binding with
residenceStatusproperty which has "citizen", "permanent resident" and "foreigner" possible values and the message maps those values to the appropriate translations.<span i18n>The person is {residenceStatus, select, citizen {citizen} permanent resident {permanentResident} foreigner {foreigner}}</span>
-
By default, When translation is missing, it generates a warning message such as "Missing translation for message 'somekey'". But you can configure with a different level of message in Angular compiler as below,
- Error: It throws an error. If you are using AOT compilation, the build will fail. But if you are using JIT compilation, the app will fail to load.
- Warning (default): It shows a 'Missing translation' warning in the console or shell.
- Ignore: It doesn't do anything.
If you use AOT compiler then you need to perform changes in
configurationssection of your Angular CLI configuration file, angular.json."configurations": { ... "de": { ... "i18nMissingTranslation": "error" } }
If you use the JIT compiler, specify the warning level in the compiler config at bootstrap by adding the 'MissingTranslationStrategy' property as below,
import { MissingTranslationStrategy } from '@angular/core';
import { platformBrowserDynamic } from '@angular/platform-browser-dynamic';
import { AppModule } from './app/app.module';

platformBrowserDynamic().bootstrapModule(AppModule, {
  missingTranslation: MissingTranslationStrategy.Error,
  providers: [
    // ...
  ]
});
-
You can provide build configuration such as translation file path, name, format and application url in
configurationsettings of Angular.json file. For example, the German version of your application configured the build as follows,"configurations": { "de": { "aot": true, "outputPath": "dist/my-project-de/", "baseHref": "/fr/", "i18nFile": "src/locale/messages.de.xlf", "i18nFormat": "xlf", "i18nLocale": "de", "i18nMissingTranslation": "error", }
-
An Angular library is an Angular project that differs from an app in that it cannot run on its own. It must be imported and used in an app. For example, you can import or add
service workerlibrary to an Angular application which turns an application into a Progressive Web App (PWA).Note: You can create own third party library and publish it as npm package to be used in an Application.
-
The AOT compiler is part of a build process that produces a small, fast, ready-to-run application package, typically for production. It converts your Angular HTML and TypeScript code into efficient JavaScript code during the build phase before the browser downloads and runs that code.
-
You can control any DOM element via ElementRef by injecting it into your component's constructor. i.e, The component should have constructor with ElementRef parameter,
constructor(myElement: ElementRef) {
   el.nativeElement.style.backgroundColor = 'yellow';
}
-
TestBed is an api for writing unit tests for Angular applications and it's libraries. Even though We still write our tests in Jasmine and run using Karma, this API provides an easier way to create components, handle injection, test asynchronous behaviour and interact with our application.
-
Protractor is an end-to-end test framework for Angular and AngularJS applications. It runs tests against your application running in a real browser, interacting with it as a user would.
npm install -g protractor
-
Collection is a set of related schematics collected in an npm package. For example,
@schematics/angularcollection is used in Angular CLI to apply transforms to a web-app project. You can create your own schematic collection for customizing angular projects. -
You can create your own schematic collections to integrate your library with the Angular CLI. These collections are classified as 3 main schematics,
- Add schematics: These schematics are used to install library in an Angular workspace using
ng addcommand. For example, @angular/material schematic tells the add command to install and set up Angular Material and theming. - Generate schematics: These schematics are used to modify projects, add configurations and scripts, and scaffold artifacts in library using
ng generatecommand. For example, @angular/material generation schematic supplies generation schematics for the UI components. Let's say the table component is generated usingng generate @angular/material:table. - Update schematics: These schematics are used to update library's dependencies and adjust for breaking changes in a new library release using
ng updatecommand. For example, @angular/material update schematic updates material and cdk dependencies usingng update @angular/materialcommand.
- Add schematics: These schematics are used to install library in an Angular workspace using
-
You can use jquery in Angular using 3 simple steps,
- Install the dependency: At first, install the jquery dependency using npm
npm install --save jquery
- Add the jquery script: In Angular-CLI project, add the relative path to jquery in the angular.json file.
"scripts": [
   "node_modules/jquery/dist/jquery.min.js"
]
- Start using jquery: Define the element in template. Whereas declare the jquery variable and apply CSS classes on the element.
<div id="elementId">
  <h1>JQuery integration</h1>
</div>
import {Component, OnInit} from '@angular/core';

declare var $: any; // (or) import * as $ from 'jquery';

@Component({
  selector: 'app-root',
  templateUrl: './app.component.html',
  styleUrls: ['./app.component.css']
})
export class AppComponent implements OnInit {
  ngOnInit(): void {
    $(document).ready(() => {
      $('#elementId').css({'text-color': 'blue', 'font-size': '150%'});
    });
  }
}
- Install the dependency: At first, install the jquery dependency using npm
-
This exception is due to missing HttpClientModule in your module. You just need to import in module as below,
import { HttpClientModule } from '@angular/common/http';

@NgModule({
  imports: [
    BrowserModule,
    HttpClientModule,
  ],
  declarations: [ AppComponent ],
  bootstrap:    [ AppComponent ]
})
export class AppModule { }
-
The RouteState is an interface which represents the state of the router as a tree of activated routes.
interface RouterState extends Tree {
  snapshot: RouterStateSnapshot
  toString(): string
}
You can access the current RouterState from anywhere in the Angular app using the Router service and the routerState property.
-
When you are creating your project with angular cli, you can use
ng newcommand. It generates all your components with predefined sass files.ng new My_New_Project --style=sass
But if you are changing your existing style in your project then use
ng setcommand,ng set defaults.styleExt scss
-
What is the purpose of hidden property?
The hidden property is used to show or hide the associated DOM element, based on an expression. It can be compared close to
ng-showdirective in AngularJS. Let's say you want to show user name based on the availability of user usinghiddenproperty.<div [hidden]="!user.name"> My name is: {{user.name}} </div>
-
What is the difference between ngIf and hidden property?
The main difference is that *ngIf will remove the element from the DOM, while [hidden] actually plays with the CSS style by setting
display:none. Generally it is expensive to add and remove stuff from the DOM for frequent actions. -
The slice pipe is used to create a new Array or String containing a subset (slice) of the elements. The syntax looks like as below,
{{ value_expression | slice : start [ : end ] }}
For example, you can provide 'hello' list based on a greeting array,
@Component({
  selector: 'list-pipe',
  template: `<ul>
    <li *ngFor="let i of greeting | slice:0:5">{{i}}</li>
  </ul>`
})
export class PipeListComponent {
  greeting: string[] = ['h', 'e', 'l', 'l', 'o', 'm','o', 'r', 'n', 'i', 'n', 'g'];
}
-
The index property of the NgFor directive is used to return the zero-based index of the item in each iteration. You can capture the index in a template input variable and use it in the template.
For example, you can capture the index in a variable named indexVar and displays it with the todo's name using ngFor directive as below.
<div *ngFor="let todo of todos; let i=index">{{i + 1}} - {{todo.name}}</div>
-
The main purpose of using *ngFor with trackBy option is performance optimization. Normally if you use NgFor with large data sets, a small change to one item by removing or adding an item, can trigger a cascade of DOM manipulations. In this case, Angular sees only a fresh list of new object references and to replace the old DOM elements with all new DOM elements. You can help Angular to track which items added or removed by providing a
trackByfunction which takes the index and the current item as arguments and needs to return the unique identifier for this item.For example, lets set trackBy to the trackByTodos() method
<div *ngFor="let todo of todos; trackBy: trackByTodos">
  ({{todo.id}}) {{todo.name}}
</div>
and define the trackByTodos method,
trackByTodos(index: number, item: Todo): number { return todo.id; }
-
NgSwitch directive is similar to JavaScript switch statement which displays one element from among several possible elements, based on a switch condition. In this case only the selected element placed into the DOM. It has been used along with
NgSwitch,NgSwitchCaseandNgSwitchDefaultdirectives.For example, let's display the browser details based on selected browser using ngSwitch directive.
<div [ngSwitch]="currentBrowser.name">
  <chrome-browser    *ngSwitchCase="'chrome'"    [item]="currentBrowser"></chrome-browser>
  <firefox-browser   *ngSwitchCase="'firefox'"     [item]="currentBrowser"></firefox-browser>
  <opera-browser     *ngSwitchCase="'opera'"  [item]="currentBrowser"></opera-browser>
  <safari-browser     *ngSwitchCase="'safari'"   [item]="currentBrowser"></safari-browser>
  <ie-browser  *ngSwitchDefault           [item]="currentItem"></ie-browser>
</div>
-
Yes, it is possible to do aliasing for inputs and outputs in two ways.
- Aliasing in metadata: The inputs and outputs in the metadata aliased using a colon-delimited (:) string with the directive property name on the left and the public alias on the right. i.e. It will be in the format of propertyName:alias.
inputs: ['input1: buyItem'],
outputs: ['outputEvent1: completedEvent']
- Aliasing with @Input()/@Output() decorator: The alias can be specified for the property name by passing the alias name to the @Input()/@Output() decorator.i.e. It will be in the form of @Input(alias) or @Output(alias).
@Input('buyItem') input1: string;
@Output('completedEvent') outputEvent1 = new EventEmitter<string>();
- Aliasing in metadata: The inputs and outputs in the metadata aliased using a colon-delimited (:) string with the directive property name on the left and the public alias on the right. i.e. It will be in the format of propertyName:alias.
-
The safe navigation operator(?)(or known as Elvis Operator) is used to guard against
nullandundefinedvalues in property paths when you are not aware whether a path exists or not. i.e. It returns value of the object path if it exists, else it returns the null value.For example, you can access nested properties of a user profile easily without null reference errors as below,
<p>The user firstName is: {{user?.fullName.firstName}}</p>
Using this safe navigation operator, Angular framework stops evaluating the expression when it hits the first null value and renders the view without any errors.
-
You don't need any special configuration. In Angular9, the Ivy renderer is the default Angular compiler. Even though Ivy is available Angular8 itself, you had to configure it in tsconfig.json file as below,
"angularCompilerOptions": { "enableIvy": true }
-
Angular 9 provides type safe changes in TestBed API changes by replacing the old get function with the new inject method. Because TestBed.get method is not type-safe. The usage would be as below,
TestBed.get(ChangeDetectorRef) // returns any. It is deprecated now.

TestBed.inject(ChangeDetectorRef) // returns ChangeDetectorRef
-
In Angular 8, the static flag is required for ViewChild. Whereas in Angular9, you no longer need to pass this property. Once you updated to Angular9 using
ng update, the migration will remove { static: false } script everywhere.@ViewChild(ChildDirective) child: ChildDirective; // Angular9 usage @ViewChild(ChildDirective, { static: false }) child: ChildDirective; //Angular8 usage
-
The Angular template expression language supports three special template expression operators.
- Pipe operator
- Safe navigation operator
- Non-null assertion operator
-
The pipe operator has a higher precedence than the ternary operator (?:). For example, the expression
first ? second : third | fourthis parsed asfirst ? second : (third | fourth). -
An entry component is any component that Angular loads imperatively(i.e, not referencing it in the template) by type. Due to this behavior, they can’t be found by the Angular compiler during compilation. These components created dynamically with
ComponentFactoryResolver.Basically, there are two main kinds of entry components which are following -
- The bootstrapped root component
- A component you specify in a route
-
A bootstrapped component is an entry component that Angular loads into the DOM during the bootstrap process or application launch time. Generally, this bootstrapped or root component is named as
AppComponentin your root module usingbootstrapproperty as below.@NgModule({ declarations: [ AppComponent ], imports: [ BrowserModule, FormsModule, HttpClientModule, AppRoutingModule ], providers: [], bootstrap: [AppComponent] // bootstrapped entry component need to be declared here })
-
You can use
ngDoBootstraphook for a manual bootstrapping of the application instead of using bootstrap array in@NgModuleannotation. This hook is part ofDoBootstapinterface.interface DoBootstrap { ngDoBootstrap(appRef: ApplicationRef): void }
The module needs to be implement the above interface to use the hook for bootstrapping.
class AppModule implements DoBootstrap {
  ngDoBootstrap(appRef: ApplicationRef) {
    appRef.bootstrap(AppComponent); // bootstrapped entry component need to be passed
  }
}
-
Yes, the bootstrapped component needs to be an entry component. This is because the bootstrapping process is an imperative process.
-
The components referenced in router configuration are called as routed entry components. This routed entry component defined in a route definition as below,
const routes: Routes = [
  {
    path: '',
    component: TodoListComponent // router entry component
  }
];
Since router definition requires you to add the component in two places (router and entryComponents), these components are always entry components.
Note: The compilers are smart enough to recognize a router definition and automatically add the router component into
entryComponents. -
Most of the time, you don't need to explicity to set entry components in entryComponents array of ngModule decorator. Because angular adds components from both @NgModule.bootstrap and route definitions to entry components automatically.
-
No. In previous angular releases, the entryComponents array of ngModule decorator is used to tell the compiler which components would be created and inserted dynamically in the view. In Angular9, this is not required anymore with Ivy.
-
No, only the entry components and template components appears in production builds. If a component isn't an entry component and isn't found in a template, the tree shaker will throw it away. Due to this reason, make sure to add only true entry components to reduce the bundle size.
-
The Angular compiler is used to convert the application code into JavaScript code. It reads the template markup, combines it with the corresponding component class code, and emits component factories which creates JavaScript representation of the component along with elements of @Component metadata.
-
The
@NgModulemetadata is used to tell the Angular compiler what components to be compiled for this module and how to link this module with other modules. -
The Angular compiler finds a component or directive in a template when it can match the selector of that component or directive in that template. Whereas it finds a pipe if the pipe's name appears within the pipe syntax of the template HTML.
-
The Angular core libraries and third-party libraries are available as NgModules.
- Angular libraries such as FormsModule, HttpClientModule, and RouterModule are NgModules.
- Many third-party libraries such as Material Design, Ionic, and AngularFire2 are NgModules.
-
Feature modules are NgModules, which are used for the purpose of organizing code. The feature module can be created with Angular CLI using the below command in the root directory,
ng generate module MyCustomFeature //
Angular CLI creates a folder called
my-custom-featurewith a file inside calledmy-custom-feature.module.tswith the following contentsimport { NgModule } from '@angular/core'; import { CommonModule } from '@angular/common'; @NgModule({ imports: [ CommonModule ], declarations: [] }) export class MyCustomFeature { }
Note: The "Module" suffix shouldn't present in the name because the CLI appends it.
-
In the CLI generated feature module, there are two JavaScript import statements at the top of the file
- NgModule: InOrder to use the
@NgModuledecorator - CommonModule: It provides many common directives such as
ngIfandngFor.
- NgModule: InOrder to use the
-
Below are the main differences between Angular NgModule and javascript module,
NgModule JavaScript module NgModule bounds declarable classes only There is no restriction classes List the module's classes in declarations array only Can define all member classes in one giant file It only export the declarable classes it owns or imports from other modules It can export any classes Extend the entire application with services by adding providers to provides array Can't extend the application with services -
There are two common possible errors with declarations array,
- If you use a component without declaring it, Angular returns an error message.
- If you try to declare the same class in more than one module then compiler emits an error.
-
Below are the steps to be followed to use declaration elements.
- Create the element(component, directive and pipes) and export it from the file where you wrote it
- Import it into the appropriate module.
- Declare it in the @NgModule declarations array.
-
If you do import
BrowserModuleinto a lazy loaded feature module, Angular returns an error telling you to useCommonModuleinstead. Because BrowserModule’s providers are for the entire app so it should only be in the root module, not in feature module. Whereas Feature modules only need the common directives in CommonModule.
-
Below are the five categories of feature modules,
- Domain: Deliver a user experience dedicated to a particular application domain(For example, place an order, registration etc)
- Routed: These are domain feature modules whose top components are the targets of router navigation routes.
- Routing: It provides routing configuration for another module.
- Service: It provides utility services such as data access and messaging(For example, HttpClientModule)
- Widget: It makes components, directives, and pipes available to external modules(For example, third-party libraries such as Material UI)
-
A provider is an instruction to the Dependency Injection system on how to obtain a value for a dependency(aka services created). The service can be provided using Angular CLI as below,
ng generate service my-service
The created service by CLI would be as below,
import { Injectable } from '@angular/core';

@Injectable({
  providedIn: 'root', //Angular provide the service in root injector
})
export class MyService {
}
-
You should always provide your service in the root injector unless there is a case where you want the service to be available only if you import a particular @NgModule.
-
It is possible to restrict service provider scope to a specific module instead making available to entire application. There are two possible ways to do it.
- Using providedIn in service:
import { Injectable } from '@angular/core';
import { SomeModule } from './some.module';

@Injectable({
  providedIn: SomeModule,
})
export class SomeService {
}
- Declare provider for the service in module:
import { NgModule } from '@angular/core';

import { SomeService } from './some.service';

@NgModule({
  providers: [SomeService],
})
export class SomeModule {
}
- Using providedIn in service:
-
There are two possible ways to provide a singleton service.
-
Set the providedIn property of the @Injectable() to "root". This is the preferred way(starting from Angular 6.0) of creating a singleton service since it makes your services tree-shakable.
import { Injectable } from '@angular/core';

@Injectable({
  providedIn: 'root',
})
export class MyService {
}
-
Include the service in root module or in a module that is only imported by root module. It has been used to register services before Angular 6.0.
@NgModule({
  ...
  providers: [MyService],
  ...
})
-
-
If a module defines provides and declarations then loading the module in multiple feature modules will duplicate the registration of the service. Below are the different ways to prevent this duplicate behavior.
- Use the providedIn syntax instead of registering the service in the module.
- Separate your services into their own module.
- Define forRoot() and forChild() methods in the module.
-
If the
RouterModulemodule didn’t have forRoot() static method then each feature module would instantiate a new Router instance, which leads to broken application due to duplicate instances. After using forRoot() method, the root application module importsRouterModule.forRoot(...)and gets a Router, and all feature modules importRouterModule.forChild(...)which does not instantiate another Router. -
The Shared Module is the module in which you put commonly used directives, pipes, and components into one module that is shared(import it) throughout the application.
For example, the below shared module imports CommonModule, FormsModule for common directives and components, pipes and directives based on the need,
import { CommonModule } from '@angular/common';
import { NgModule } from '@angular/core';
import { FormsModule } from '@angular/forms';
import { UserComponent } from './user.component';
import { NewUserDirective } from './new-user.directive';
import { OrdersPipe } from './orders.pipe';

@NgModule({
 imports:      [ CommonModule ],
 declarations: [ UserComponent, NewUserDirective, OrdersPipe ],
 exports:      [ UserComponent, NewUserDirective, OrdersPipe,
                 CommonModule, FormsModule ]
})
export class SharedModule { }
-
No, it is not recommended to share services by importing module. i.e Import modules when you want to use directives, pipes, and components only. The best approach to get a hold of shared services is through 'Angular dependency injection' because importing a module will result in a new service instance.
-
In Angular 9.1, the API method
getLocaleDirectioncan be used to get the current direction in your app. This method is useful to support Right to Left locales for your Internationalization based applications.import { getLocaleDirection, registerLocaleData } from '@angular/common'; import { LOCALE_ID } from '@angular/core'; import localeAr from '@angular/common/locales/ar'; ... constructor(@Inject(LOCALE_ID) locale) { const directionForLocale = getLocaleDirection(locale); // Returns 'rtl' or 'ltr' based on the current locale registerLocaleData(localeAr, 'ar-ae'); const direction = getLocaleDirection('ar-ae'); // Returns 'rtl' // Current direction is used to provide conditional logic here }
-
The ngcc(Angular Compatibility Compiler) is a tool which upgrades node_module compiled with non-ivy ngc into ivy compliant format. The
postinstallscript from package.json will make sure your node_modules will be compatible with the Ivy renderer."scripts": { "postinstall": "ngcc" }
Whereas, Ivy compiler (ngtsc), which compiles Ivy-compatible code.
-
The below class types shouldn't be added to declarations
- A class which is already declared in any another module.
- Directives imported from another module.
- Module classes.
- Service classes.
- Non-Angular classes and objects, such as strings, numbers, functions, entity models, configurations, business logic, and helper classes.
-
Angular provides a service called NgZone which creates a zone named
angularto automatically trigger change detection when the following conditions are satisfied.- When a sync or async function is executed.
- When there is no microTask scheduled.
-
Zone is loaded/required by default in Angular applications and it helps Angular to know when to trigger the change detection. This way, it make sures developers focus on application development rather core part of Angular. You can also use Angular without Zone but the change detection need to be implemented on your own and
noop zoneneed to be configured in bootstrap process. Let's follow the below two steps to remove zone.js,- Remove the zone.js import from polyfills.ts.
/***************************************************************************************************
 * Zone JS is required by default for Angular itself.
 */
// import 'zone.js/dist/zone';  // Included with Angular CLI.
- Bootstrap Angular with noop zone in src/main.ts.
platformBrowserDynamic().bootstrapModule(AppModule, {ngZone: 'noop'})
  .catch(err => console.error(err));
- Remove the zone.js import from polyfills.ts.
-
By default, Angular CLI creates components in an inline displayed mode(i.e, display:inline). But it is possible to create components with display: block style using
displayBlockoption,ng generate component my-component --displayBlock
(OR) the option can be turned on by default in Angular.json with
schematics.@schematics/angular:component.displayBlockkey value as true. -
The change detection works in the following scenarios where the data changes needs to update the application HTML.
- Component initialization: While bootstrapping the Angular application, Angular triggers the
ApplicationRef.tick()to call change detection and View Rendering. - Event listener: The DOM event listener can update the data in an Angular component and trigger the change detection too.
@Component({
  selector: 'app-event-listener',
  template: `
    <button (click)="onClick()">Click</button>
    {{message}}`
})
export class EventListenerComponent {
  message = '';

  onClick() {
    this.message = 'data updated';
  }
}
- HTTP Data Request: You can get data from a server through an HTTP request
data = 'default value';
constructor(private httpClient: HttpClient) {}

  ngOnInit() {
    this.httpClient.get(this.serverUrl).subscribe(response => {
      this.data = response.data; // change detection will happen automatically
    });
  }
- Macro tasks setTimeout() or setInterval(): You can update the data in the callback function of setTimeout or setInterval
data = 'default value';

  ngOnInit() {
    setTimeout(() => {
      this.data = 'data updated'; // Change detection will happen automatically
    });
  }
- Micro tasks Promises: You can update the data in the callback function of promise
data = 'initial value';

  ngOnInit() {
    Promise.resolve(1).then(v => {
      this.data = v; // Change detection will happen automatically
    });
  }
- Async operations like Web sockets and Canvas: The data can be updated asynchronously using WebSocket.onmessage() and Canvas.toBlob().
- Component initialization: While bootstrapping the Angular application, Angular triggers the
-
Execution Context is an abstract concept that holds information about the environment within the current code being executed. A zone provides an execution context that persists across asynchronous operations is called as zone context. For example, the zone context will be same in both outside and inside setTimeout callback function,
zone.run(() => {
  // outside zone
  expect(zoneThis).toBe(zone);
  setTimeout(function() {
    // the same outside zone exist here
    expect(zoneThis).toBe(zone);
  });
});
The current zone is retrieved through
Zone.current. -
There are four lifecycle hooks for asynchronous operations from zone.js.
- onScheduleTask: This hook triggers when a new asynchronous task is scheduled. For example, when you call setTimeout()
onScheduleTask: function(delegate, curr, target, task) {
    console.log('new task is scheduled:', task.type, task.source);
    return delegate.scheduleTask(target, task);
  }
- onInvokeTask: This hook triggers when an asynchronous task is about to execute. For example, when the callback of setTimeout() is about to execute.
onInvokeTask: function(delegate, curr, target, task, applyThis, applyArgs) {
    console.log('task will be invoked:', task.type, task.source);
    return delegate.invokeTask(target, task, applyThis, applyArgs);
  }
- onHasTask: This hook triggers when the status of one kind of task inside a zone changes from stable(no tasks in the zone) to unstable(a new task is scheduled in the zone) or from unstable to stable.
  onHasTask: function(delegate, curr, target, hasTaskState) {
    console.log('task state changed in the zone:', hasTaskState);
    return delegate.hasTask(target, hasTaskState);
  }
- onInvoke: This hook triggers when a synchronous function is going to execute in the zone.
onInvoke: function(delegate, curr, target, callback, applyThis, applyArgs) {
    console.log('the callback will be invoked:', callback);
    return delegate.invoke(target, callback, applyThis, applyArgs);
  }
- onScheduleTask: This hook triggers when a new asynchronous task is scheduled. For example, when you call setTimeout()
-
NgZone service provides a
run()method that allows you to execute a function inside the angular zone. This function is used to execute third party APIs which are not handled by Zone and trigger change detection automatically at the correct time.export class AppComponent implements OnInit { constructor(private ngZone: NgZone) {} ngOnInit() { // use ngZone.run() to make the asynchronous operation in the angular zone this.ngZone.run(() => { someNewAsyncAPI(() => { // update the data of the component }); }); } }
Whereas
runOutsideAngular()method is used when you don't want to trigger change detection.export class AppComponent implements OnInit { constructor(private ngZone: NgZone) {} ngOnInit() { // Use this method when you know no data will be updated this.ngZone.runOutsideAngular(() => { setTimeout(() => { // update component data and don't trigger change detection }); }); } }
-
You can change the settings of zone by configuring them in a separate file and import it just after zonejs import. For example, you can disable the requestAnimationFrame() monkey patch to prevent change detection for no data update as one setting and prevent DOM events(a mousemove or scroll event) to trigger change detection. Let's say the new file named zone-flags.js,
// disable patching requestAnimationFrame
(window as any).__Zone_disable_requestAnimationFrame = true;

// disable patching specified eventNames
(window as any).__zone_symbol__UNPATCHED_EVENTS = ['scroll', 'mousemove'];
The above configuration file can be imported in a polyfill.ts file as below,
/***************************************************************************************************
 * Zone JS is required by default for Angular.
 */
import `./zone-flags`;
import 'zone.js/dist/zone';  // Included with Angular CLI.
-
Angular provides a
trigger()function for animation in order to collect the states and transitions with a specific animation name, so that you can attach it to the triggering element in the HTML template. This function watch for changes and trigger initiates the actions when a change occurs. For example, let's create trigger namedupDown, and attach it to the button element.content_copy @Component({ selector: 'app-up-down', animations: [ trigger('upDown', [ state('up', style({ height: '200px', opacity: 1, backgroundColor: 'yellow' })), state('down', style({ height: '100px', opacity: 0.5, backgroundColor: 'green' })), transition('up => down', [ animate('1s') ]), transition('down => up', [ animate('0.5s') ]), ]), ], templateUrl: 'up-down.component.html', styleUrls: ['up-down.component.css'] }) export class UpDownComponent { isUp = true; toggle() { this.isUp = !this.isUp; }
-
You can configure injectors with providers at different levels of your application by setting a metadata value. The configuration can happen in one of three places,
- In the
@Injectable()decorator for the service itself - In the
@NgModule()decorator for an NgModule - In the
@Component()decorator for a component
- In the
-
No. The
@Injectable()decorator is not strictly required if the class has other Angular decorators on it or does not have any dependencies. But the important thing here is any class that is going to be injected with Angular is decorated. i.e, If we add the decorator, the metadatadesign:paramtypesis added, and the dependency injection can do it's job. That is the exact reason to add the @Injectable() decorator on a service if this service has some dependencies itself. For example, Let's see the different variations of AppService in a root component,- The below AppService can be injected in AppComponent without any problems. This is because there are no dependency services inside AppService.
export class AppService {
  constructor() {
    console.log('A new app service');
  }
}
- The below AppService with dummy decorator and httpService can be injected in AppComponent without any problems. This is because meta information is generated with dummy decorator.
function SomeDummyDecorator() {
  return (constructor: Function) => console.log(constructor);
}

@SomeDummyDecorator()
export class AppService {
  constructor(http: HttpService) {
    console.log(http);
  }
}
and the generated javascript code of above service has meta information about HttpService,
js var AppService = (function () { function AppService(http) { console.log(http); } AppService = __decorate([ core_1.Injectable(), __metadata('design:paramtypes', [http_service_1.HttpService]) ], AppService); return AppService; }()); exports.AppService = AppService;3. The below AppService with @injectable decorator and httpService can be injected in AppComponent without any problems. This is because meta information is generated with Injectable decorator.js @Injectable({ providedIn: 'root', }) export class AppService { constructor(http: HttpService) { console.log(http); } }⬆ Back to Top - The below AppService can be injected in AppComponent without any problems. This is because there are no dependency services inside AppService.
-
The optional dependency is a parameter decorator to be used on constructor parameters, which marks the parameter as being an optional dependency. Due to this, the DI framework provides null if the dependency is not found. For example, If you don't register a logger provider anywhere, the injector sets the value of logger(or logger service) to null in the below class.
import { Optional } from '@angular/core';

constructor(@Optional() private logger?: Logger) {
  if (this.logger) {
    this.logger.log('This is an optional dependency message');
  } else {
    console.log('The logger is not registered');
  }
}
-
There are two types of injector hierarchies in Angular
- ModuleInjector hierarchy: It configure on a module level using an @NgModule() or @Injectable() annotation.
- ElementInjector hierarchy: It created implicitly at each DOM element. Also it is empty by default unless you configure it in the providers property on @Directive() or @Component().
-
Reactive forms is a model-driven approach for creating forms in a reactive style(form inputs changes over time). These are built around observable streams, where form inputs and values are provided as streams of input values. Let's follow the below steps to create reactive forms,
- Register the reactive forms module which declares reactive-form directives in your app
import { ReactiveFormsModule } from '@angular/forms';

@NgModule({
  imports: [
    // other imports ...
    ReactiveFormsModule
  ],
})
export class AppModule { }
- Create a new FormControl instance and save it in the component.
import { Component } from '@angular/core';
import { FormControl } from '@angular/forms';

@Component({
  selector: 'user-profile',
  styleUrls: ['./user-profile.component.css']
})
export class UserProfileComponent {
  userName = new FormControl('');
}
- Register the FormControl in the template.
<label>
  User name:
  <input type="text" [formControl]="userName">
</label>
Finally, the component with reactive form control appears as below,
import { Component } from '@angular/core';
import { FormControl } from '@angular/forms';

@Component({
  selector: 'user-profile',
  styleUrls: ['./user-profile.component.css'],
  template: `
    <label>
      User name:
      <input type="text" [formControl]="userName">
    </label>
  `
})
export class UserProfileComponent {
  userName = new FormControl('');
}
- Register the reactive forms module which declares reactive-form directives in your app
-
Dynamic forms is a pattern in which we build a form dynamically based on metadata that describes a business object model. You can create them based on reactive form API. ⬆ Back to Top
-
Template driven forms are model-driven forms where you write the logic, validations, controls etc, in the template part of the code using directives. They are suitable for simple scenarios and uses two-way binding with [(ngModel)] syntax. For example, you can create register form easily by following the below simple steps,
- Import the FormsModule into the Application module's imports array
   import { BrowserModule } from '@angular/platform-browser';
   import { NgModule } from '@angular/core';
   import {FormsModule} from '@angular/forms'
   import { RegisterComponent } from './app.component';
   @NgModule({
     declarations: [
       RegisterComponent,
     ],
     imports: [
       BrowserModule,
       FormsModule
     ],
     providers: [],
     bootstrap: [RegisterComponent]
   })
   export class AppModule { }
- Bind the form from template to the component using ngModel syntax
<input type="text" class="form-control" id="name"
  required
  [(ngModel)]="model.name" name="name">
- Attach NgForm directive to the tag in order to create FormControl instances and register them
<form #registerForm="ngForm">
- Apply the validation message for form controls
<label for="name">Name</label>
<input type="text" class="form-control" id="name"
       required
       [(ngModel)]="model.name" name="name"
       #name="ngModel">
<div [hidden]="name.valid || name.pristine"
     class="alert alert-danger">
  Please enter your name
</div>
- Let's submit the form with ngSubmit directive and add type="submit" button at the bottom of the form to trigger form submit.
<form (ngSubmit)="onSubmit()" #heroForm="ngForm">
// Form goes here
<button type="submit" class="btn btn-success" [disabled]="!registerForm.form.valid">Submit</button>
Finally, the completed template-driven registration form will be appeared as follow.
<div class="container">
  <h1>Registration Form</h1>
  <form (ngSubmit)="onSubmit()" #registerForm="ngForm">
    <div class="form-group">
      <label for="name">Name</label>
        <input type="text" class="form-control" id="name"
               required
               [(ngModel)]="model.name" name="name"
               #name="ngModel">
        <div [hidden]="name.valid || name.pristine"
             class="alert alert-danger">
          Please enter your name
        </div>
    </div>
    <button type="submit" class="btn btn-success" [disabled]="!registerForm.form.valid">Submit</button>
    </form>
</div>
- Import the FormsModule into the Application module's imports array
-
Below are the main differences between reactive forms and template driven forms
Feature Reactive Template-Driven Form model setup Created(FormControl instance) in component explicitly Created by directives Data updates Synchronous Asynchronous Form custom validation Defined as Functions Defined as Directives Testing No interaction with change detection cycle Need knowledge of the change detection process Mutability Immutable(by always returning new value for FormControl instance) Mutable(Property always modified to new value) Scalability More scalable using low-level APIs Less scalable using due to abstraction on APIs -
Reactive forms provide two ways of grouping multiple related controls.
- FormGroup: It defines a form with a fixed set of controls those can be managed together in an one object. It has same properties and methods similar to a FormControl instance.
This FormGroup can be nested to create complex forms as below.
import { Component } from '@angular/core';
import { FormGroup, FormControl } from '@angular/forms';

@Component({
  selector: 'user-profile',
  templateUrl: './user-profile.component.html',
  styleUrls: ['./user-profile.component.css']
})
export class UserProfileComponent {
  userProfile = new FormGroup({
    firstName: new FormControl(''),
    lastName: new FormControl(''),
    address: new FormGroup({
          street: new FormControl(''),
          city: new FormControl(''),
          state: new FormControl(''),
          zip: new FormControl('')
        })
  });

  onSubmit() {
    // Store this.userProfile.value in DB
  }
}
<form [formGroup]="userProfile" (ngSubmit)="onSubmit()">

  <label>
    First Name:
    <input type="text" formControlName="firstName">
  </label>

  <label>
    Last Name:
    <input type="text" formControlName="lastName">
  </label>

  <div formGroupName="address">
    <h3>Address</h3>

    <label>
      Street:
      <input type="text" formControlName="street">
    </label>

    <label>
      City:
      <input type="text" formControlName="city">
    </label>

    <label>
      State:
      <input type="text" formControlName="state">
    </label>

    <label>
      Zip Code:
      <input type="text" formControlName="zip">
    </label>
   </div>
    <button type="submit" [disabled]="!userProfile.valid">Submit</button>

</form>
- FormArray: It defines a dynamic form in an array format, where you can add and remove controls at run time. This is useful for dynamic forms when you don’t know how many controls will be present within the group.
 import { Component } from '@angular/core';
 import { FormArray, FormControl } from '@angular/forms';

 @Component({
   selector: 'order-form',
   templateUrl: './order-form.component.html',
   styleUrls: ['./order-form.component.css']
 })
 export class OrderFormComponent {
   constructor () {
     this.orderForm = new FormGroup({
       firstName: new FormControl('John', Validators.minLength(3)),
       lastName: new FormControl('Rodson'),
       items: new FormArray([
         new FormControl(null)
       ])
     });
   }

   onSubmitForm () {
     // Save the items this.orderForm.value in DB
   }

   onAddItem () {
     this.orderForm.controls
     .items.push(new FormControl(null));
   }

   onRemoveItem (index) {
     this.orderForm.controls['items'].removeAt(index);
   }
 }
<form [formControlName]="orderForm" (ngSubmit)="onSubmit()">

  <label>
    First Name:
    <input type="text" formControlName="firstName">
  </label>

  <label>
    Last Name:
    <input type="text" formControlName="lastName">
  </label>

  <div>
  <p>Add items</p>
  <ul formArrayName="items">
    <li *ngFor="let item of orderForm.controls.items.controls; let i = index">
      <input type="text" formControlName="{{i}}">
      <button type="button" title="Remove Item" (click)="onRemoveItem(i)">Remove</button>
    </li>
  </ul>
  <button type="button" (click)="onAddItem">
    Add an item
  </button>
 </div>
- FormGroup: It defines a form with a fixed set of controls those can be managed together in an one object. It has same properties and methods similar to a FormControl instance.
This FormGroup can be nested to create complex forms as below.
-
You can use
patchValue()method to update specific properties defined in the form model. For example,you can update the name and street of certain profile on click of the update button as shown below.updateProfile() { this.userProfile.patchValue({ firstName: 'John', address: { street: '98 Crescent Street' } }); }
<button (click)="updateProfile()">Update Profile</button>
You can also use
setValuemethod to update properties.Note: Remember to update the properties against the exact model structure.
-
FormBuilder is used as syntactic sugar for easily creating instances of a FormControl, FormGroup, or FormArray. This is helpful to reduce the amount of boilerplate needed to build complex reactive forms. It is available as an injectable helper class of the
@angular/formspackage.For example, the user profile component creation becomes easier as shown here.
export class UserProfileComponent {
  profileForm = this.formBuilder.group({
    firstName: [''],
    lastName: [''],
    address: this.formBuilder.group({
      street: [''],
      city: [''],
      state: [''],
      zip: ['']
    }),
  });
  constructor(private formBuilder: FormBuilder) { }
  }
-
You can add a getter property(let's say, diagnostic) inside component to return a JSON representation of the model during the development. This is useful to verify whether the values are really flowing from the input box to the model and vice versa or not.
export class UserProfileComponent {

  model = new User('John', 29, 'Writer');

  // TODO: Remove after the verification
  get diagnostic() { return JSON.stringify(this.model); }
}
and add
diagnosticbinding near the top of the form{{diagnostic}} <div class="form-group"> // FormControls goes here </div> -
The ngModel directive updates the form control with special Angular CSS classes to reflect it's state. Let's find the list of classes in a tabular format,
Form control state If true If false Visited ng-touched ng-untouched Value has changed ng-dirty ng-pristine Value is valid ng-valid ng-invalid -
In a model-driven form, you can reset the form just by calling the function
reset()on our form model. For example, you can reset the form model on submission as follows,onSubmit() { if (this.myform.valid) { console.log("Form is submitted"); // Perform business logic here this.myform.reset(); } }
Now, your form model resets the form back to its original pristine state.
-
In reactive forms, the validators can be either synchronous or asynchronous functions,
- Sync validators: These are the synchronous functions which take a control instance and immediately return either a set of validation errors or null. Also, these functions passed as second argument while instantiating the form control. The main use cases are simple checks like whether a field is empty, whether it exceeds a maximum length etc.
- Async validators: These are the asynchronous functions which take a control instance and return a Promise or Observable that later emits a set of validation errors or null. Also, these functions passed as second argument while instantiating the form control. The main use cases are complex validations like hitting a server to check the availability of a username or email.
The representation of these validators looks like below
this.myForm = formBuilder.group({
    firstName: ['value'],
    lastName: ['value', *Some Sync validation function*],
    email: ['value', *Some validation function*, *Some asynchronous validation function*]
});
-
In reactive forms, you can use built-in validator like
requiredandminlengthon your input form controls. For example, the registration form can have these validators on name input fieldthis.registrationForm = new FormGroup({ 'name': new FormControl(this.hero.name, [ Validators.required, Validators.minLength(4), ]) });
Whereas in template-driven forms, both
requiredandminlengthvalidators available as attributes. -
Since all validators run after every form value change, it creates a major impact on performance with async validators by hitting the external API on each keystroke. This situation can be avoided by delaying the form validity by changing the updateOn property from change (default) to submit or blur. The usage would be different based on form types,
- Template-driven forms: Set the property on
ngModelOptionsdirective<input [(ngModel)]="name" [ngModelOptions]="{updateOn: 'blur'}">
- Reactive-forms: Set the property on FormControl instance
name = new FormControl('', {updateOn: 'blur'});
- Template-driven forms: Set the property on
-
Sometimes you may need to both ngFor and ngIf on the same element but unfortunately you are going to encounter below template error.
Template parse errors: Can't have multiple template bindings on one element.
In this case, You need to use either ng-container or ng-template. Let's say if you try to loop over the items only when the items are available, the below code throws an error in the browser
<ul *ngIf="items" *ngFor="let item of items">
  <li></li>
</ul>
and it can be fixed by
<ng-container *ngIf="items">
  <ul *ngFor="let item of items">
    <li></li>
  </ul>
</ng-container>
-
The
:hostpseudo-class selector is used to target styles in the element that hosts the component. Since the host element is in a parent component's template, you can't reach the host element from inside the component by other means. For example, you can create a border for parent element as below,//Other styles for app.component.css //... :host { display: block; border: 1px solid black; padding: 20px; }
-
In Angular, there is an
urlproperty of router package to get the current route. You need to follow the below few steps,- Import Router from @angular/router
import { Router } from '@angular/router';
- Inject router inside constructor
constructor(private router: Router ) {

}
- Access url parameter
console.log(this.router.url); // /routename
-
A component harness is a testing API around an Angular directive or component to make tests simpler by hiding implementation details from test suites. This can be shared between unit tests, integration tests, and end-to-end tests. The idea for component harnesses comes from the PageObject pattern commonly used for integration testing.
-
During compile time, Angular CLI will download and inline the fonts that your application is using. This performance update speed up the first contentful paint(FCP) and this feature is enabled by default in apps built with version 11.
-
Content projection is a pattern in which you insert, or project, the content you want to use inside another component.
-
The ng-content is used to insert the content dynamically inside the component that helps to increase component reusability.
-
A standalone component is a type of component which is not part of any Angular module. It provides a simplified way to build Angular applications.
-
Generate standalone component using CLI command as shown below
ng generate component component-name --standalone
On running the command standalone component is created. Here is the list of file created.
component-name.component.tscomponent-name.component.csscomponent-name.component.speccomponent-name.component.html
Next need to update
app.module.tsas shown below.import { NgModule } from '@angular/core'; import { BrowserModule } from '@angular/platform-browser'; import { ComponentNameComponent } from './component-name/component-name.component'; @NgModule({ imports: [ BrowserModule, ComponentNameComponent ], declarations: [AppComponent], bootstrap: [AppComponent], }) export class AppModule {}
-
To make existing component to standalone, then add
standalone: trueincomponent-name.component.tsas shown belowimport { CommonModule } from '@angular/common'; import { Component, OnInit } from '@angular/core'; @Component({ standalone: true, imports: [CommonModule], selector: 'app-standalone-component', templateUrl: './standalone-component.component.html', styleUrls: ['./standalone-component.component.css'], }) export class ComponentNameComponent implements OnInit { constructor() {} ngOnInit() {} }
Next need to update
app.module.tsas shown below.import { NgModule } from '@angular/core'; import { BrowserModule } from '@angular/platform-browser'; import { ComponentNameComponent } from './component-name/component-name.component'; @NgModule({ imports: [ BrowserModule, ComponentNameComponent ], declarations: [AppComponent], bootstrap: [AppComponent], }) export class AppModule {}
-
Hydration is the process that restores the server side rendered application on the client. This includes things like reusing the server rendered DOM structures, persisting the application state, transferring application data that was retrieved already by the server, and other processes.
To enable hydration, we have to enable server side rendering or Angular Universal. Once enabled, we can add the following piece of code in the root component.
import {
  bootstrapApplication,
  provideClientHydration,
} from '@angular/platform-browser';

bootstrapApplication(RootCmp, {
  providers: [provideClientHydration()]
});
Alternatively we can add
providers: [provideClientHydration()]in the App Moduleimport {provideClientHydration} from '@angular/platform-browser'; import {NgModule} from '@angular/core'; @NgModule({ declarations: [RootCmp], exports: [RootCmp], bootstrap: [RootCmp], providers: [provideClientHydration()], }) export class AppModule {}
