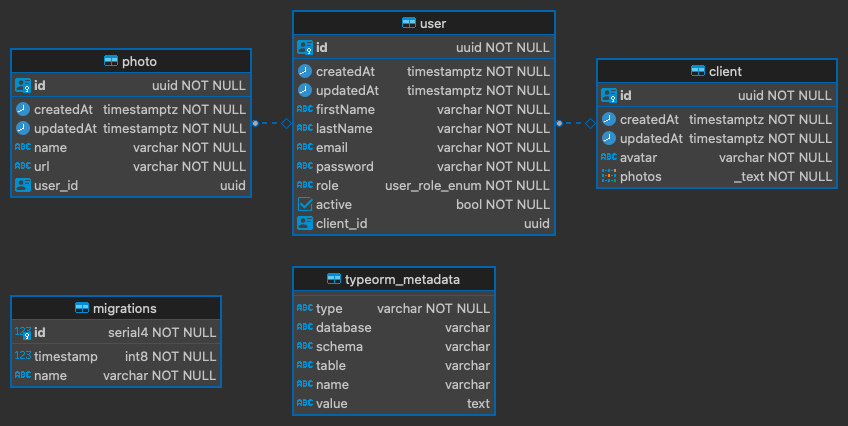
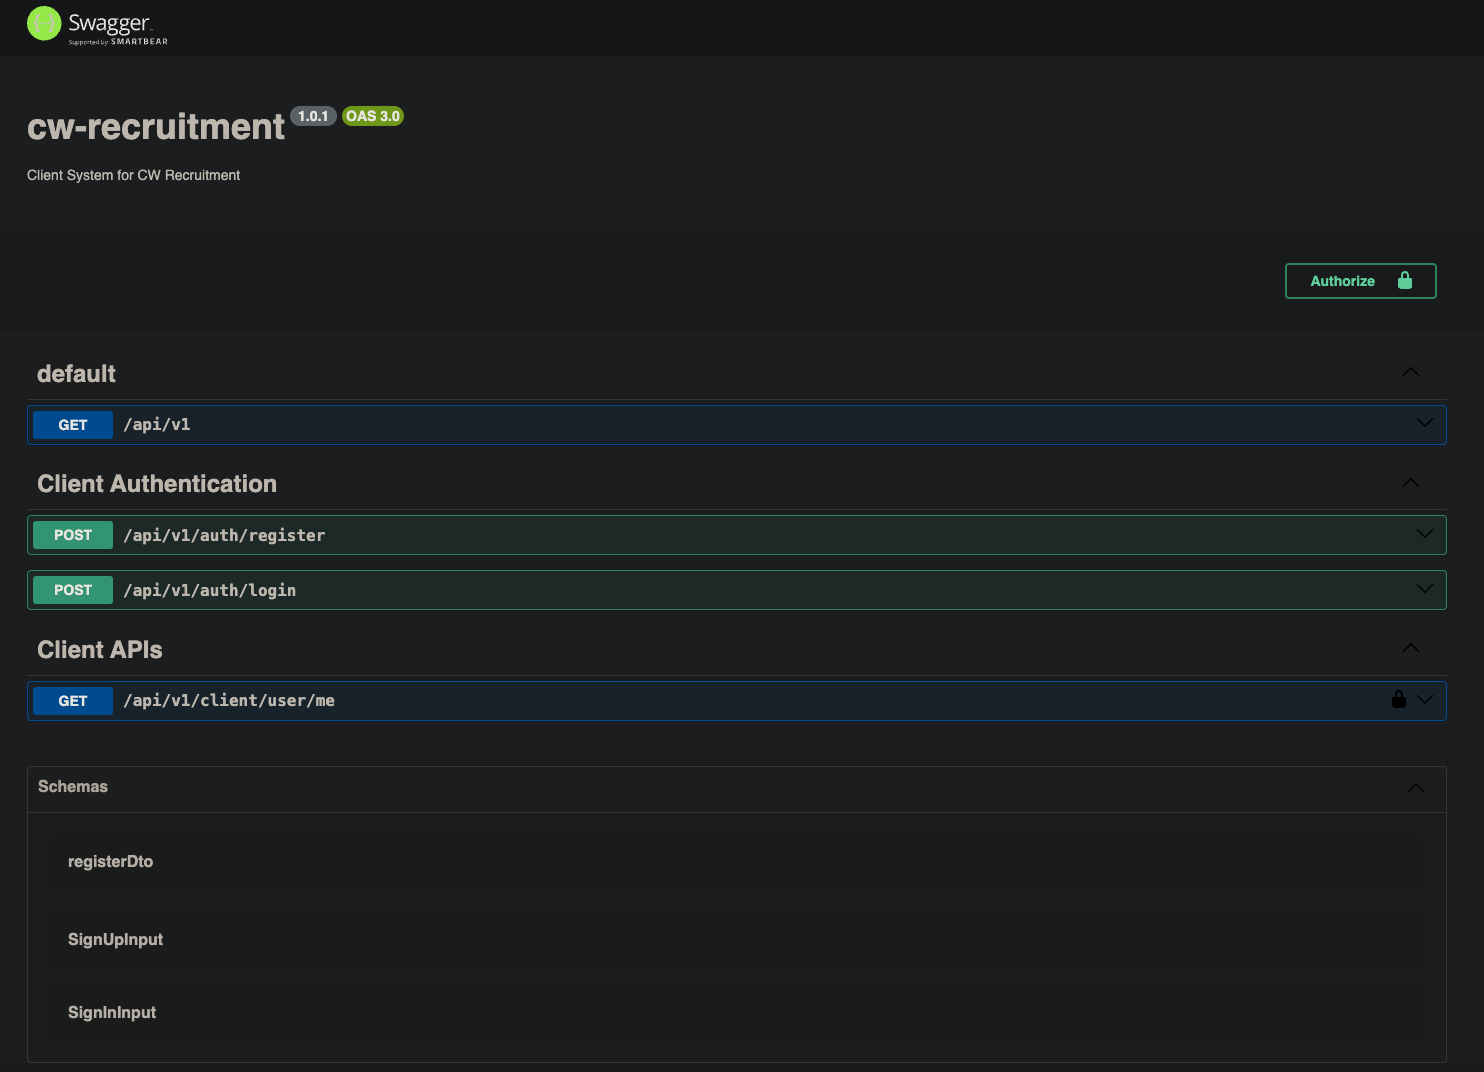
The API provides a platform for user registration and client management. Users (client) can register with the system and retrieve their data when authenticated. The system ensures that the provided information meets specific criteria.
I implemented a domain-driven design approach to structure the project codebase, aligning business logic with distinct domains.
├── src
├── .env.sample
├── .eslintrc
├── .gitignore
├── .prettierrc
├── jest.config
├── Makefile
├── package.json
├── README.md
└── tsconfig.json- Endpoint:
/api/v1/auth/register - Method:
POST - Request Payload:
firstName: First name of the user (2 to 25 characters).lastName: Last name of the user (2 to 25 characters).email: Email address of the user (must be a valid email format).password: User password (6 to 50 characters, must contain at least one number).role(optional): User role, either 'Admin' or 'Client'. Defaults to 'Client'.photos: photo(s) that clients upload which is stored in AWS s3 bucket.
-
Endpoint:
/api/v1/auth/login -
Method:
POST -
Request Payload:
email: Email address of the user (must be a valid email format).password: User password (6 to 50 characters, must contain at least one number).
-
Response: Returns a JWT token that can be used to authenticate future requests.
Registered users are categorized as clients, and each client has additional details:
- Client Entity:
Avatar: URL of the client's avatar (default provided).Photos: Array of photos associated with the client.
Each photo is associated with a user (client) and includes details such as the name and URL.
UserandClient: One-to-One relationship.UserandPhoto: One-to-Many relationship.
Authenticated clients can retrieve their own data:
- Endpoint:
/api/v1/client/user/me - Method:
GET - Authentication: JWT (JSON Web Token)
- Response: Returns details of the authenticated client, including avatar, photos, and other relevant information.
This project uses Nest.js v10.0.0. It has the following dependencies:
- Typeorm
- ESLint & Prettier
- Ensure you have NodeJS installed by entering
node -von your terminal If you don't have NodeJS installed, go to the NodeJS Website, and follow the download instructions
- After cloning the repository, create a
.envfile from.env.sampleand set your local.env.variable(s).
cp .env.sample .env-
User Registration:
- Users can register by making a
POSTrequest to the/api/v1/auth/registerendpoint. - Provide the required information in the request payload.
- The system validates the input and creates a new user.
- Users can register by making a
-
User Login:
- Users can login by making a
POSTrequest to the/api/v1/auth/loginendpoint. - Provide the required information in the request payload.
- The system validates the input and login the user (client).
- Users can login by making a
-
Client Details:
- Upon successful registration, a user is automatically associated with a client.
- Clients have an avatar and can upload multiple photos.
- Photos are associated with the client who uploaded them.
-
User Authentication:
- Authenticated clients can use the
/api/v1/client/user/meendpoint to retrieve their own data.
- Authenticated clients can use the
How to run all tests locally
make install- Installs dependencies.make dev- Run the servermake build- Run build to generate dist foldermake lint- Lint code
-
Swagger documentation can be accessed on this localhost link Swagger Docs Link
-
Postman documentation is available on Postman Docs
Recorded demonstration of how to test validations, error messages, API response of the project in postman or swagger docs.
Each response will be returned with one of the following HTTP status codes:
200OKThe request was successful201New ResourceThe request was successful and created a new resource400Bad RequestThere was a problem with the request (security, malformed)401UnauthorizedThere was a problem with the request (security, malformed)404Not FoundAn attempt was made to access a resource that does not exist in the API500Server ErrorAn error on the server occurred
Nestjs, Postgres, Typeorm, Swagger, AWS S3, Postman
TypeScript Support:
It is built with TypeScript, which brings the benefits of static typing, interfaces, and a more robust development experience. This helps catch errors during development rather than runtime.
Modular Architecture:
It promotes a modular and organized code structure. It uses domain/modules, controllers, and services to separate concerns, making the codebase more maintainable and scalable.
Dependency Injection:
NestJS uses a powerful dependency injection system that facilitates the development of loosely coupled and easily testable components. This promotes a clean and modular codebase.
ORM Integration:
NestJS seamlessly integrates with popular Object-Relational Mapping (ORM) libraries like TypeORM. This simplifies database operations and allows developers to work with databases using TypeScript.
Scalability:
It is designed to be scalable, making it suitable for both small projects and large-scale enterprise applications. Its modular architecture and organization facilitate the growth of applications over time.
Francis Nnamdi Abonyi


