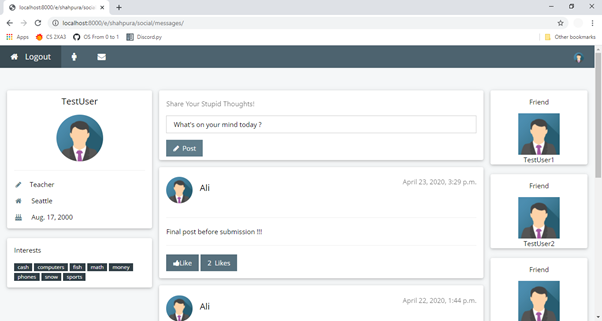
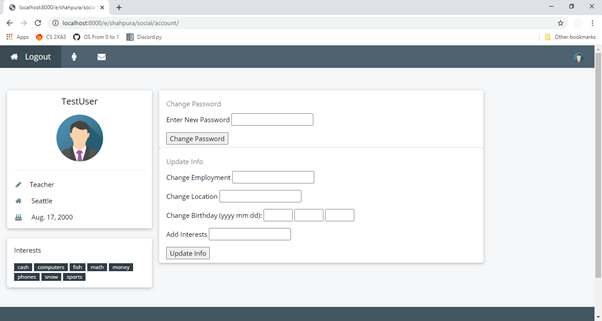
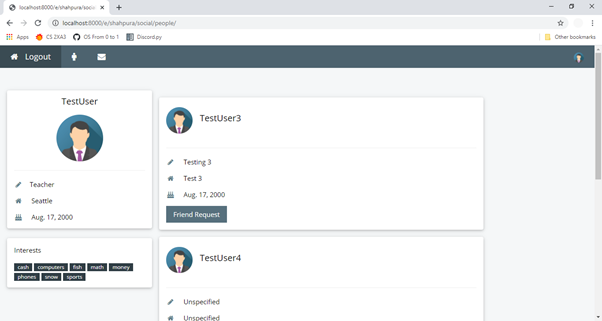
Note: You may notice that these images contain many test Users. This is because it was never deployed to production!
To use this project, you're first going to need to create a django environment. I did my project on my local machine through powershell using vitualenv, therefor I'll be explaining how to create this virtual ennvironment on Windows Powershell. First, inside your repository you must run:
virtualenv djangovenv
This statement will create a virtual environment named djangoenv. To activate this virtual environment, simply type the following into the terminal making sure you're inside the repository where the virtual environment was created since this is a relative path:
djangoenv\Scripts\Activate.ps1
It'll now say (djangoenv) right at the start of the line on powershell informing you that you are in your virtual environment. Assuming you have pip installed on your computer, you be able to install django in your virtual environment by running the command:
pip install django==3.0.4
Once the download is completed, run the command:
pip freeze
The result of this command must be the same as the contents given in the environment.txt file. To deactivate the environment, simply enter deactivate.
If you are on the server, the django environment has already been created, simply run the command:
conda activate djangoenv
To deactivate, simply enter deactivate.
Now that you have successfully created a virtual environment, it's time to get the server up and running. First, make sure your virtual environemnt is activated. Next, if you are working on your local machine, enter the following command:
python manage.py runserver localhost:8000
Next, in your browser, naviagte to localhost:8000/e/shahpura/. If you are running this on the mac1xa3 server, then you'll need to run the following ensuring that the django environment has been activated (see above):
python manage.py runserver localhost:10089
In your browser, navigate to mac1xa3.ca/e/shahpura/.
- For the signup page, I've created my own signup form. In the signup form, the user is asked for a username and a password.
- Once the user enters this information, a UserInfo object is created for them and they are logged in with that account.
- The sign up form sends a post with the username and password from signup.djhtml to signup_view where the UserInfo object is created and the user is then logged in.
- The logout view clears the two session variables which control the number of posts and people that are displayed.
- If the user enters a username that has already been user, they will be redirected back to the sign up page.
- If the user enters a password that is less than 8 characters, a password without numbers or a password containing a space character, they will be redirected back to the sign up page.
- A valid password example is 'wordings1' without the quotes.
- The account info is rendered in the left column of the account page, messages page as well as the people page.
- Using the UserInfo object, a list of interests is created and passed on to the social_base.djhtml. Along with this generated list of interests, the UserInfo object is sent to message.djhtml which can render the username,* employment*, location and DOB of the logged in user as well.
- The interests are printed in a django loop of a specific span in the social_base.djhtml.
- If a new user is just created, the field of employment, location and DOB will just say Unspecified. The username of the user will still be printed and the interests section will be empty.
- For Update Info, I created my own form which accepts location, employment,DOB and interests.
- These values are sent as a post to account_view. The values of employment and location are updated in UserInfo model as is. The DOB is first verified as a real birthday and then stored a date object in the birthday attribute of UserInfo object.
- For the inputs recieved as interests, for each interest received, an Interest object is created. If an Interest object with that name already exists, then a new object is not created. This interest is then added to the ManyToMany field attribute of interests in the UserInfo object.
- For password change, I implemented my own form which accepts a new password from the user. This password in posted to account_view where it uses the set_password() function to change the password. Unfortunately, I was not able to implement the password change.
- Multiple interests can be added at once. Each interest must be added separated by a comma in the Interests input box on the form.
- If a user adds a interest that they already have, it will not be replicated.
- The backend for handling interest inputs does not handle for whitespaces before or after an interest. Therefore, the input 'soccer' and 'soccer ' will be treatead as different interests. Therefore, the user is advised NOT to have any lingering spaces before or after their input in the interests field.
- In people_view, several lists are generated in order to create one list which includes all users that are not friends with the current logged in user.
- The above users who are not friends of the current user are displayed in people.djhtml which is rendered by people_view. It uses a django for loop to iterate through the list of people who are not friends and recursively recreates a certain div element in people.djhtml.
- A session variable called numPeople has been created to limit the number of people shown at once. Everytime the load more button is pressed, an AJAX post is sent through people.js and is sent to more_ppl_view where a list of people not friends is recreated. At a time, 2 more people are added. If say for example only one person is left to be displayed, then the last person will be displayed and the program will stop the variable from going out of index of the list.
- If a user has sent a friend request to the current logged in user, they will still appear in the people not friends list. But as soon as the friend request is accepted, they will no longer appear in that list. It was not specified in the project PDF to exclude those with pending friend requests and therefore has not been implemented.
- A list is created in people_view which contains all the friendrequests to the current logged in user. The list is generated by iterating over all friendrequest objects and selecting those where the to_user attribute of the friend request object is the current logged in user. This is list in rendered in people.djhtml and displayed using a django loop to iterate over all the FriendRequest objects given in the list.
- When the current user clicks on friend request button, it sends an post to people.js. In people.js, the id of the button which contains the name of the user who to send it to is forwarded on to friend_request_view where the FriendRequest object is created.
- Before creating a friend request object, the code checks if a friend request like that already exists. This was implemented as I was not able to disable the friend request button once a request was sent.
- For example, if the user you are trying to send a friend request to has already sent you a request, then in that case a new friend request object will not be created as well.
- In people.djhtml, each of the friendrequest divs that are friend requests buttons have 2 options. Accept or Decline. Each one will the send the user who sent the friendrequest with either an a or d at the start signifying either accept or decline. These Id's of the button are extracted in in people.js and then forwarded on to accept_decline_view. In this view, using the current logged in user and the user who sent the request info, the relevant friendRequest object is found. This object is deleted and each user is made a friend of the other if the user had chosen to accept the friend request.
- There aren't any real exceptions to this objective as either the user selects to accept or decline the friendrequest. In either case, the friend request object is deleted.
- This objective was one of the easier ones to implement. A list of all the friends of the current user is compiled in messages_view. This list is then rendered and sent to messages.djhtml where it is displayed using django loop where it replicates a certain div element repeatedly.
- Similar to the last objective, since this just displays items and does not handle and input, it doesn't really have any exceptions. If the user does not have any friends, nothing will be printed.
- The content for a is accept through an editable paragraph element in messages.djhtml. This paragraph has an ID post-text which will be used by the function in messages.js to extract that actual content that the user has entered.
- This paragraph element is accompanied with a button which sends the value of the paragprah element as an AJAX post to messages.js. Here, the content is made part of a dictionary and forwarded to post_submit_view.
- In post_submit_view, a new Post object is created with the owner as the current logged in user and the content as the content that was received from the AJAX post. The timestamp is automatically set to the current date and time.
- Upon success, the page is reloaded.
- When the post is created and the page is reloaded, the new post will appear as the first post. Since the post has no likes, It will always start at 0 likes.
- In messages_view, a list of post objects is created where they are ordered in descending order of their timestamp.
- This section gets a little complicated now. A list of dictionaries is created with 3 entries. The first entry is postContent which holds the actual Post object. The second entry is likes which holds the number of likes that post has recieved. The last entry is a boolean which will store whether or not the current logged in user has liked that specific post.
- In messages.djhtml, using a django loop which iterates through the list of dictionaries provided, the postContent is displayed using a div element. The likes for each post is also displayed. When it comes to the like button, if the given boolean in the dictionary is False then the user will be able to like the post. If not, the button will be disabled for that user.
- At first, only one post will be displayed and then the load more button will load more posts. The load more button sends a post to messages.js. The number of posts displayed at once is controlled the session variable numPosts. The function in messages.js for more posts links to more_post_view which will increase the session variable morePosts by 2 everytime.
- If there is only one post left to display, then the session variable will be set to display all the posts that are stored since it cannot increase by 2 to avoid an out of index error.
- When the user clicks the like button for a post, the button submits an AJAX POST to messages.js. The ID of the button contains the ID of the post which is the default identifier of the post considering it doesn't have a primary key. From messages.js it is forwarded to like_view.
- In like_view, the ID is type casted to an int and then that specific post is located using the ID given from the AJAX post. The current user is added to the likes attribute of the Post object. Upon success, the page is reloaded which automatically updates the like count as well as disables the like button for the logged in user as explained above.
- This objective like others doesn't really have any exceptions as it is pretty straightforward.
- Please refer to the table given below for a set of already created accounts. The user is encouraged to create their own account to test the features out.
| Username | Password |
|---|---|
| Ali | 1234 |
| Tas | 1234 |
| farida | 1234 |
The user is encouraged to create their own account to make posts and update information. They should send friendrequests to these accounts and log in with these accounts to accept them to demonstrate working friend request implementation.
Note: These passwords are relatively simple as they were created before the password check was implemented to keep things simple. Please refer above to the rules of creating a valid password. Note 2: There are about 6 TestUsers that were created while creating this project. Any of them can be accessed by using their username and their password is the same ie 1234. Note 3: There are also other users not mentioned here, they have the same password 1234 and can be accessed if the user so wishes so.
Table for Test Users
| Username | Password |
|---|---|
| TestUser | 1234 |
| TestUser | 1234 |
| TestUser4 | 45Hello55 |
| TestUser5 | 1234 |
| TestUser6 | 1234 |


