This ansible playbook installs Jenkins on specified host
-
Run the ansible playbook on
DebianorUbuntu. We used VM with Jammy Ubuntu. Use the script to create VM onProxmox. -
Install Ansible: Follow the second step
-
Use
$HOME/awesome-jenkins/inventory/localhost/hosts.yamlif you are installing theJenkinson the same host whereAnsibleis running. Use$HOME/awesome-jenkins/inventory/example/hosts.yamlif you are installing theJenkinson the remote host.In our examples, we use
$HOME/awesome-jenkins/inventory/localhost/hosts.yamlfile. -
Install
moleculeonUbuntuLinux. Molecule project is designed to aid in the development and testing of Ansible roles.
apt update apt install pip python3 -m pip install molecule ansible-core pip3 install 'molecule-plugins[docker]' -
The HTTP port for
Jenkinsweb interface:jenkins_http_port: 8085
-
Admin account credentials which will be created the first time
Jenkinsis installed:jenkins_admin_username: admin jenkins_admin_password: admin
-
Java version:
java_packages:
  - openjdk-17-jdk
-
Install global tools. Maven versions:
jenkins_maven_installations:
  - 3.8.4
  - 3.9.0
-
Multibranch pipeline job's repository url. Please change this parameter to the url of your fork:
multibranch_repository_url: "https://github.com/Alliedium-demo-test/springboot-api-rest-example.git"
git clone https://github.com/Alliedium/awesome-jenkins.git $HOME/awesome-jenkins-
Copy
$HOME/awesome-jenkins/inventory/exampleto$HOME/awesome-jenkins/inventory/my-jenkinsfolder.cp -r $HOME/awesome-jenkins/inventory/example $HOME/awesome-jenkins/inventory/my-jenkins
-
Change the variables in the files
$HOME/awesome-jenkins/inventory/my-jenkins/hosts.ymlas you need

- Installing
Jenkinson localhost does not require any changes to$HOME/awesome-jenkins/inventory/localhost/hosts.ymlfile.
ansible-galaxy install -r $HOME/awesome-jenkins/requirements.ymlThis playbook contains multiple tasks that install git, java, Jenkins, as well as plugins, tools, and pipelines in Jenkins. Using Ansible tags you can run a part of tasks. In our playbook we use 8 tags: always, step1, step2, step3, step4, step5, step6, and step7. Use the -t <tag_name> flag to specify the desired tag. They form a hierarchy of tags from always to step6. In this hierarchy, each subsequent tag includes both the tasks marked by this tag as well as tasks relating to all preceding tags, except step1, e.g., if you run the playbook with step3 tag, all tasks with tags always, step2 and step3 will be run. Tag step7 does not include all previous steps, it includes only tags always, step2, and step3, because Input job needs no plugins or tools. However, run of this tag will not remove any installed tool or plugin.
- Before running tasks, check the list of tasks that will be executed using
--list-tasksflag
ansible-playbook $HOME/awesome-jenkins/playbooks/create-job.yml -i $HOME/awesome-jenkins/inventory/localhost --list-tasksYou will receive a list of all tasks. Using -t step2 when getting a list of tasks.
ansible-playbook $HOME/awesome-jenkins/playbooks/create-job.yml -i $HOME/awesome-jenkins/inventory/localhost -t step2 --list-tasksYou will receive a list of tasks, tagged always, step1 and step2.
- Run all the available tasks from
playbook.ymlplaybook.
ansible-playbook $HOME/awesome-jenkins/playbooks/create-job.yml -i $HOME/awesome-jenkins/inventory/localhost- Run without installing any plugins in
Jenkins:
ansible-playbook $HOME/awesome-jenkins/playbooks/create-job.yml -i $HOME/awesome-jenkins/inventory/localhost -t step1- Run with installing plugins in
Jenkins:
ansible-playbook $HOME/awesome-jenkins/playbooks/create-job.yml -i $HOME/awesome-jenkins/inventory/localhost -t step2- Use
step3tag - installpython-jenkins
ansible-playbook $HOME/awesome-jenkins/playbooks/create-job.yml -i $HOME/awesome-jenkins/inventory/localhost -t step3step4- Addmaventool
ansible-playbook $HOME/awesome-jenkins/playbooks/create-job.yml -i $HOME/awesome-jenkins/inventory/localhost -t step4step5- Create and launchJenkins pipeline job
ansible-playbook $HOME/awesome-jenkins/playbooks/create-job.yml -i $HOME/awesome-jenkins/inventory/localhost -t step5step6- Create and launchJenkins multibranch pipeline job
ansible-playbook $HOME/awesome-jenkins/playbooks/create-job.yml -i $HOME/awesome-jenkins/inventory/localhost -t step6-
step7- CreateJenkins pipeline for input job.ansible-playbook $HOME/awesome-jenkins/playbooks/create-job.yml -i $HOME/awesome-jenkins/inventory/localhost -t step7
- Go to the host specified in the
$HOME/awesome-jenkins/inventory/localhost/hosts.ymlfile, open the browser, and check thatJenkinsis available at http://localhost:8085/. - Login to
Jenkinsusing the credentials. - You will see
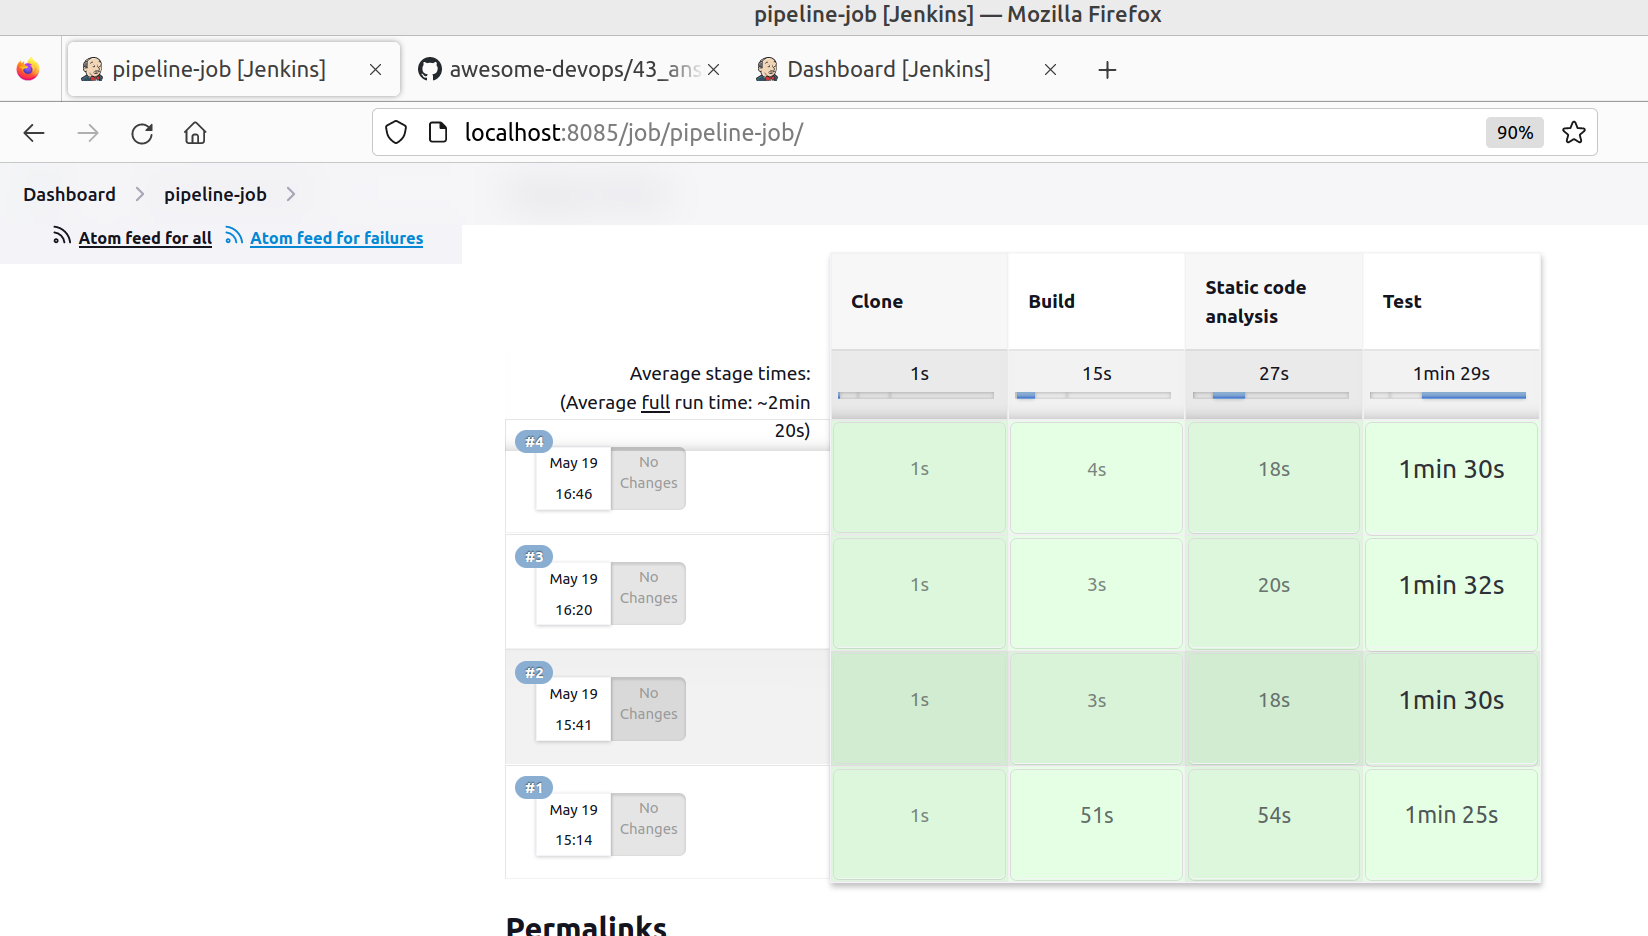
Jenkinsdashboard. Open job.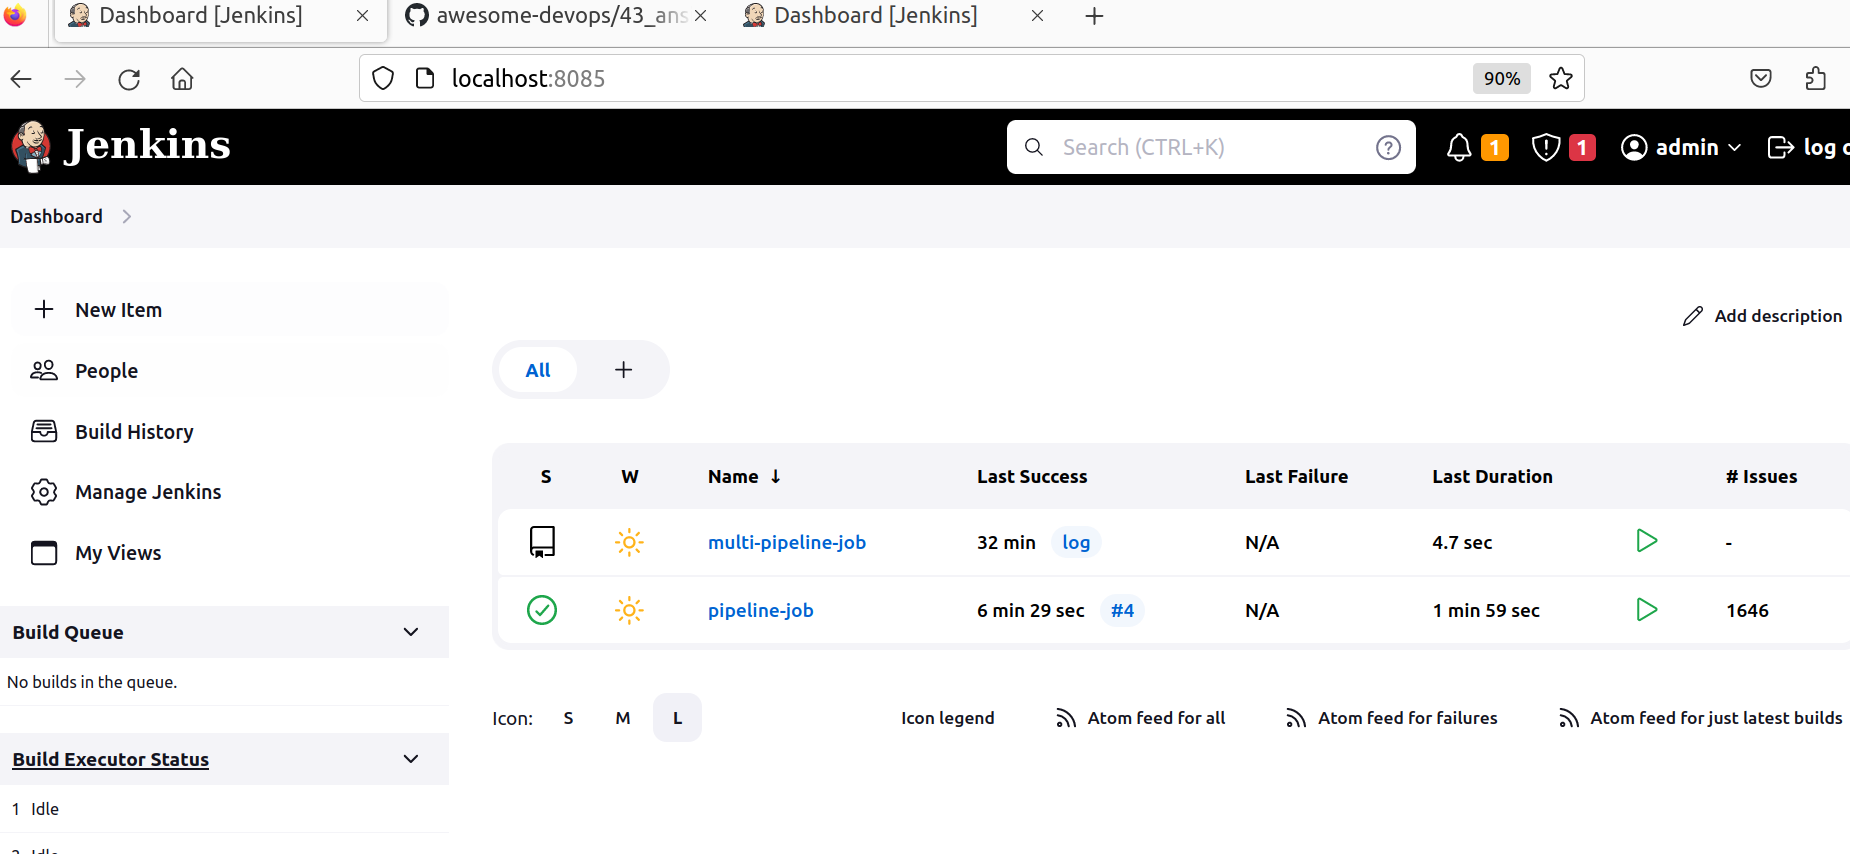
- The main branch will be run for the single pipeline job
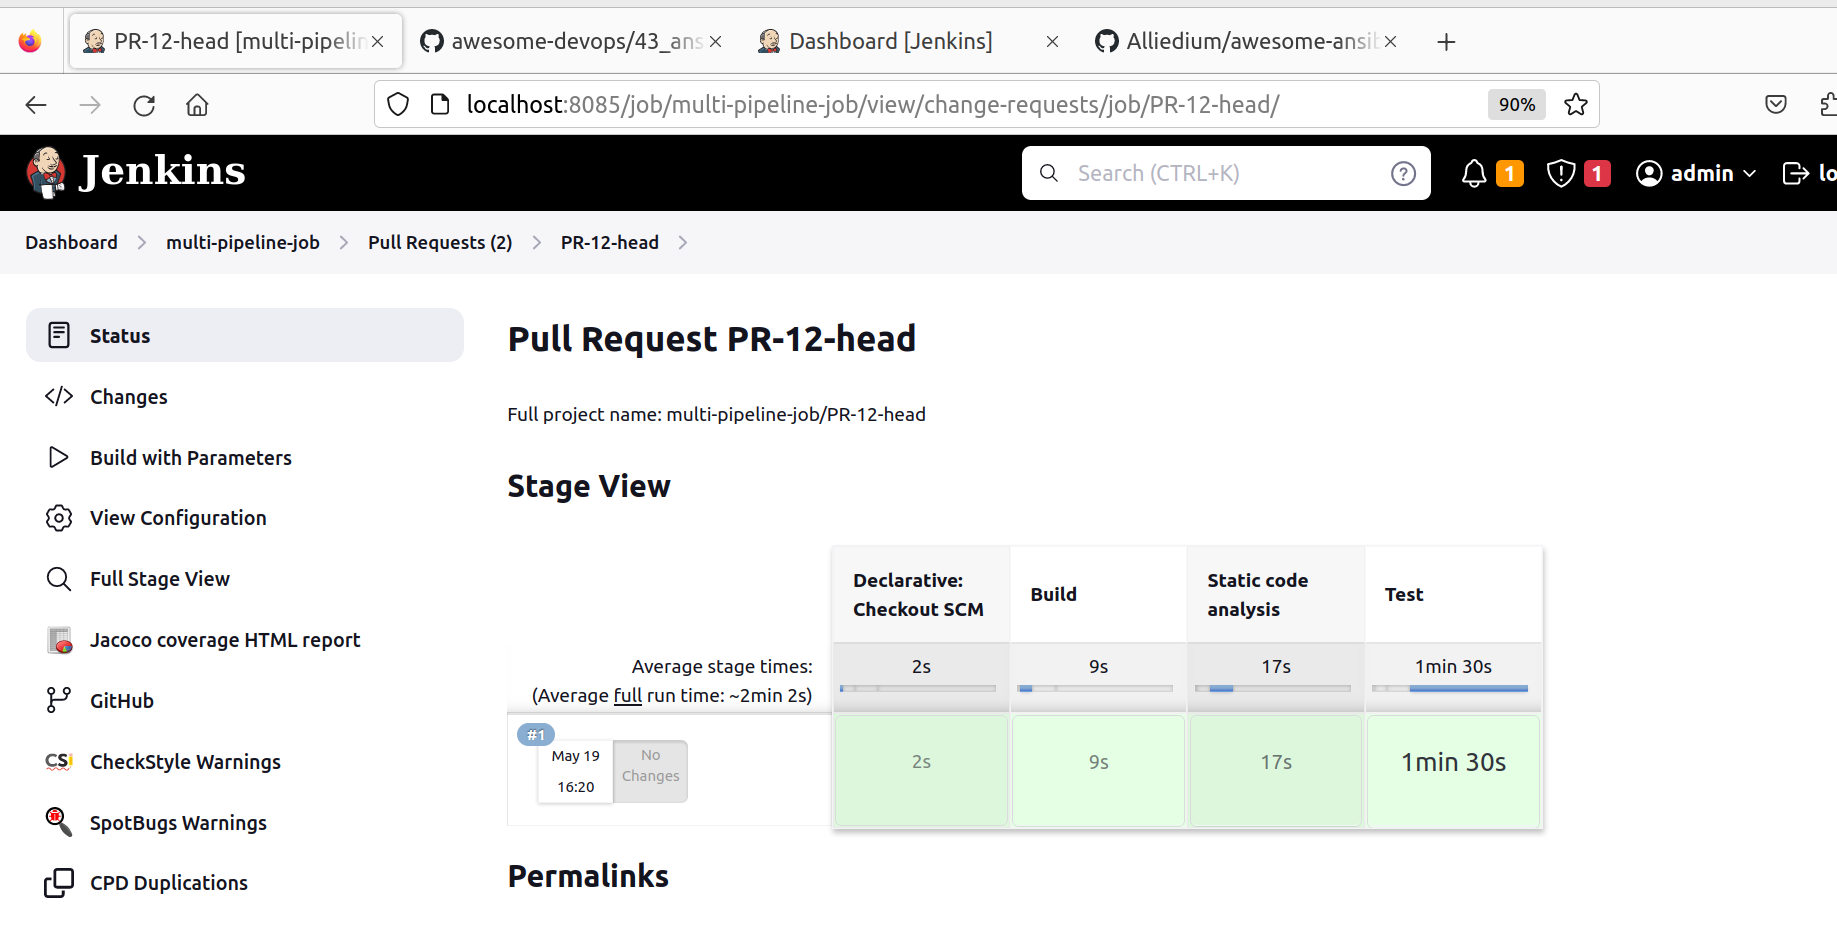
- Pull requests will be run for the multibranch pipeline job.


5. Ansible playbook local testing with molecule
The molecule configuration files are located in the $HOME/awesome-jenkins/molecule/default folder.
molecule.yml - this is the core file for Molecule. Used to define your testing steps, scenarios, dependencies, and other configuration options.
converge.yml - this is the playbook that Molecule will run to provision the targets for testing.
verify.yml - this is the playbook that is used to validate that the already converged instance state matches the desired state.
Before running the molecule command, go to awesome-jenkins project
cd $HOME/awesome-jenkins
- Run Ansible playbook test after which all previously created resources are deleted.
molecule test
The test command will run the entire scenario; creating, converging, verifying.
- Ansible playbook execution or role in target infrastructure, without testing. In this case, molecule will run the Ansible playbook in docker
molecule converge
- Run Ansible playbook test after the infrastructure has been converged using the "molecule converge" command. All previously created resources are not deleted
molecule verify
- Navigate to the target infrastructure - the docker container with the debug or check target
molecule login
- Reset molecule temporary folders.
molecule reset
- Finally, to clean up, we can run
molecule destroyThis removes the containers that we deployed and provisioned with create or converge. Putting us into a great place to start again.
The $HOME/awesome-jenkins/.github/workflows/ci.yml file describes the steps for GitHub Actions testing.
After creating or updating a pull request, tests are launched on the GitHub server and the results can be viewed here


We used the following project as an example
Job configuration is set in the templates/multibranch-pipeline-config.xml.j2
-
Set Resource Root URL
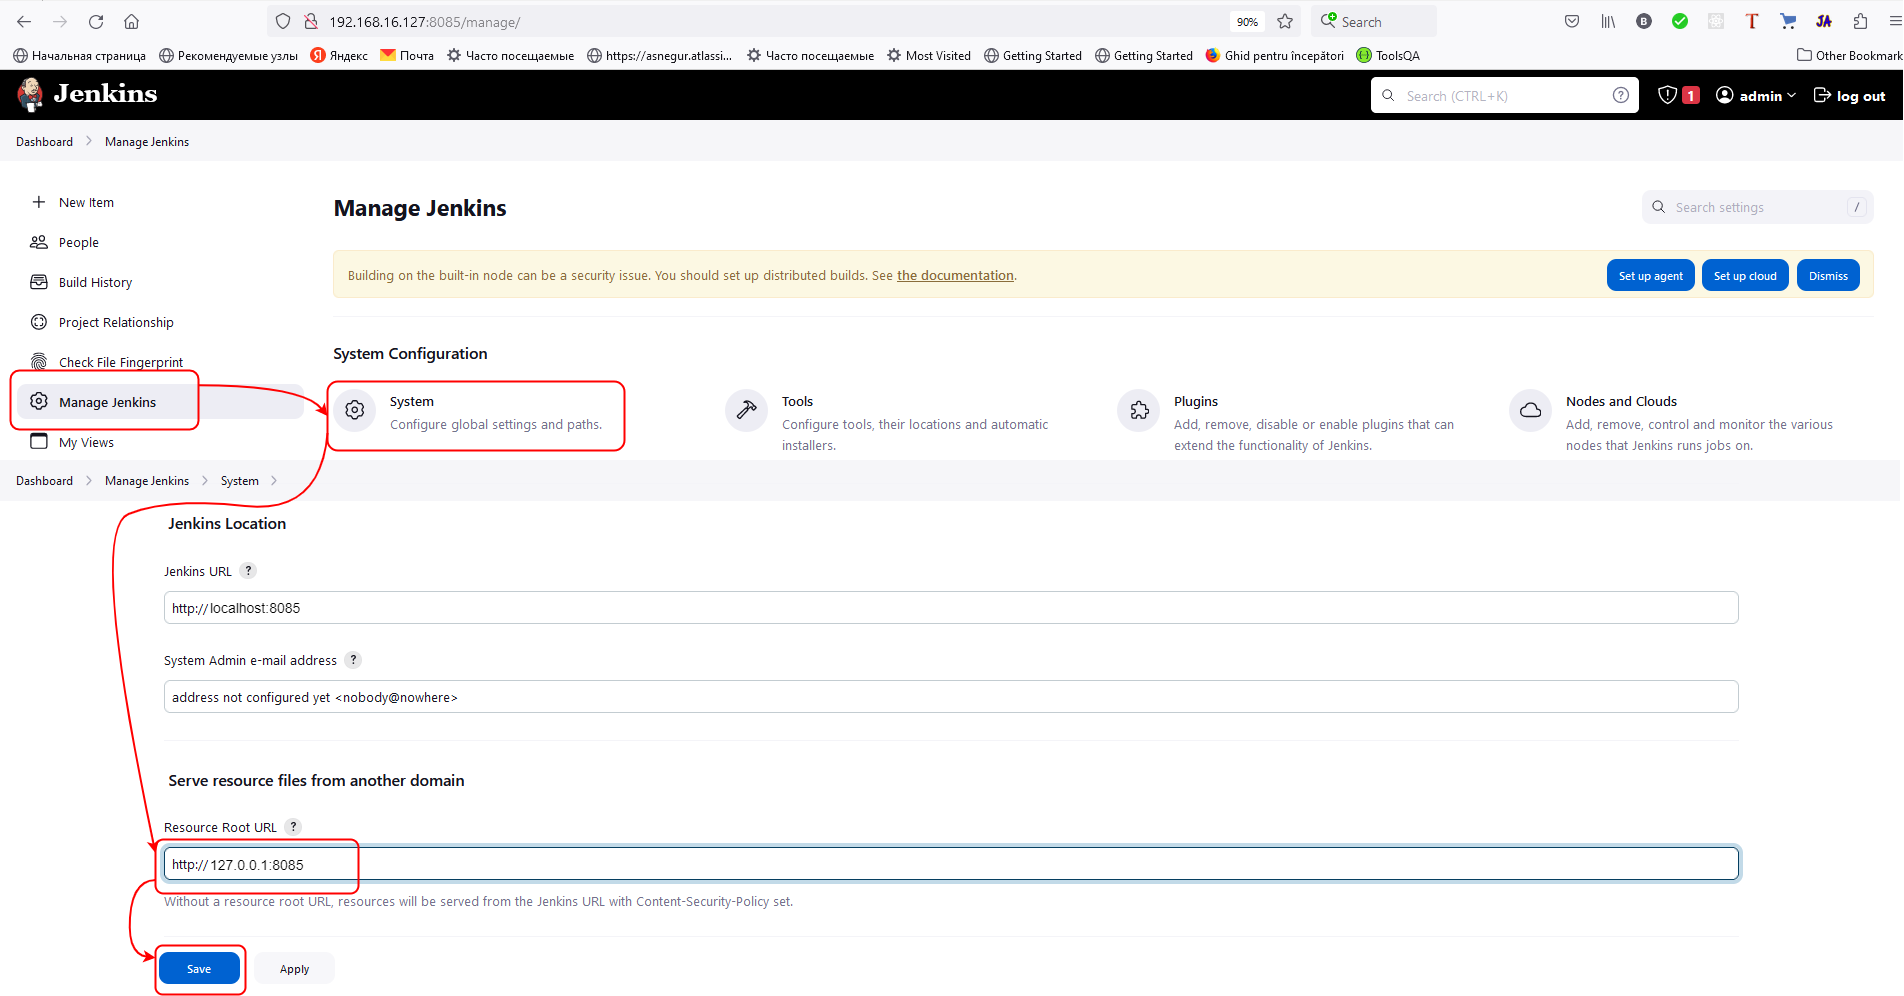
-
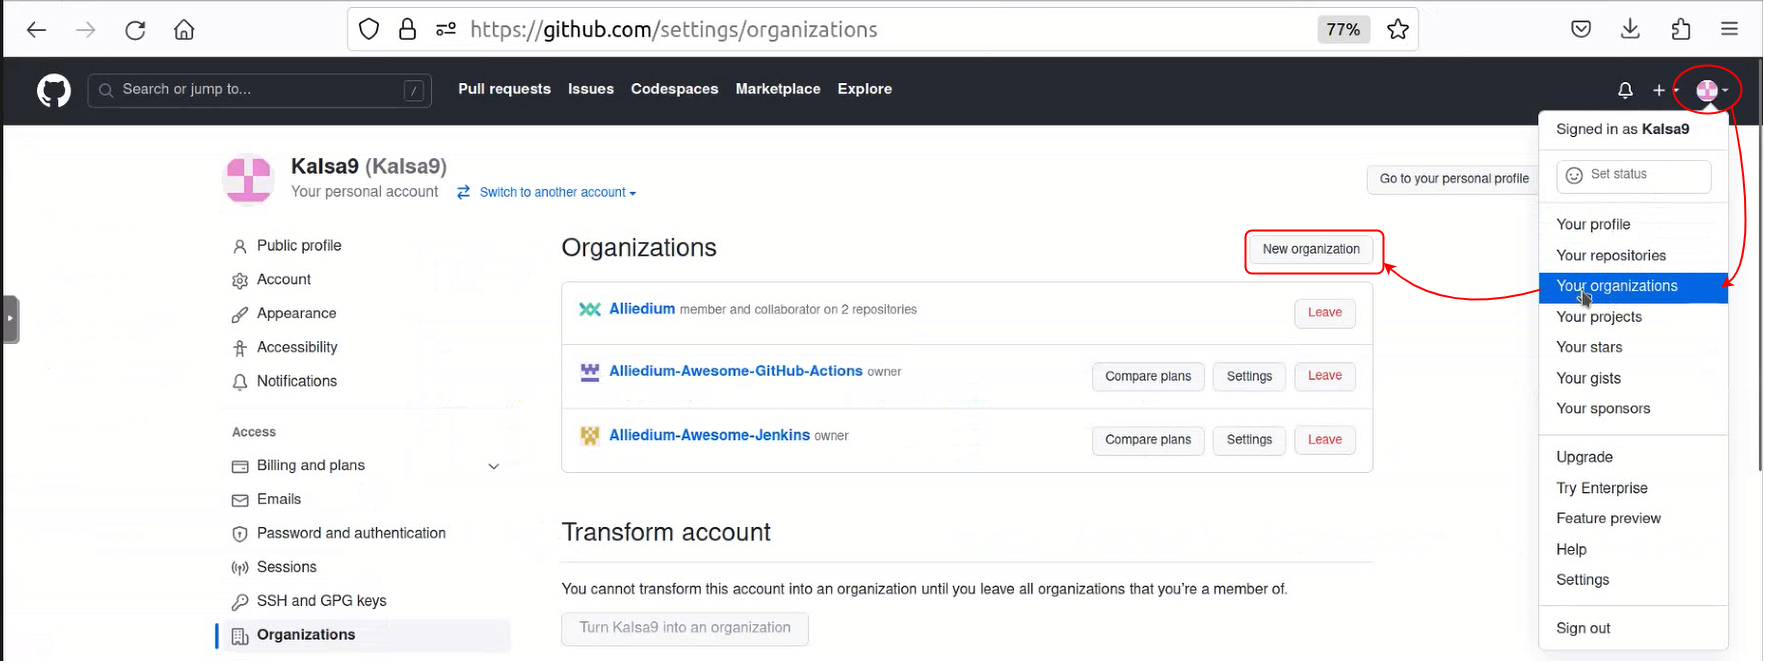
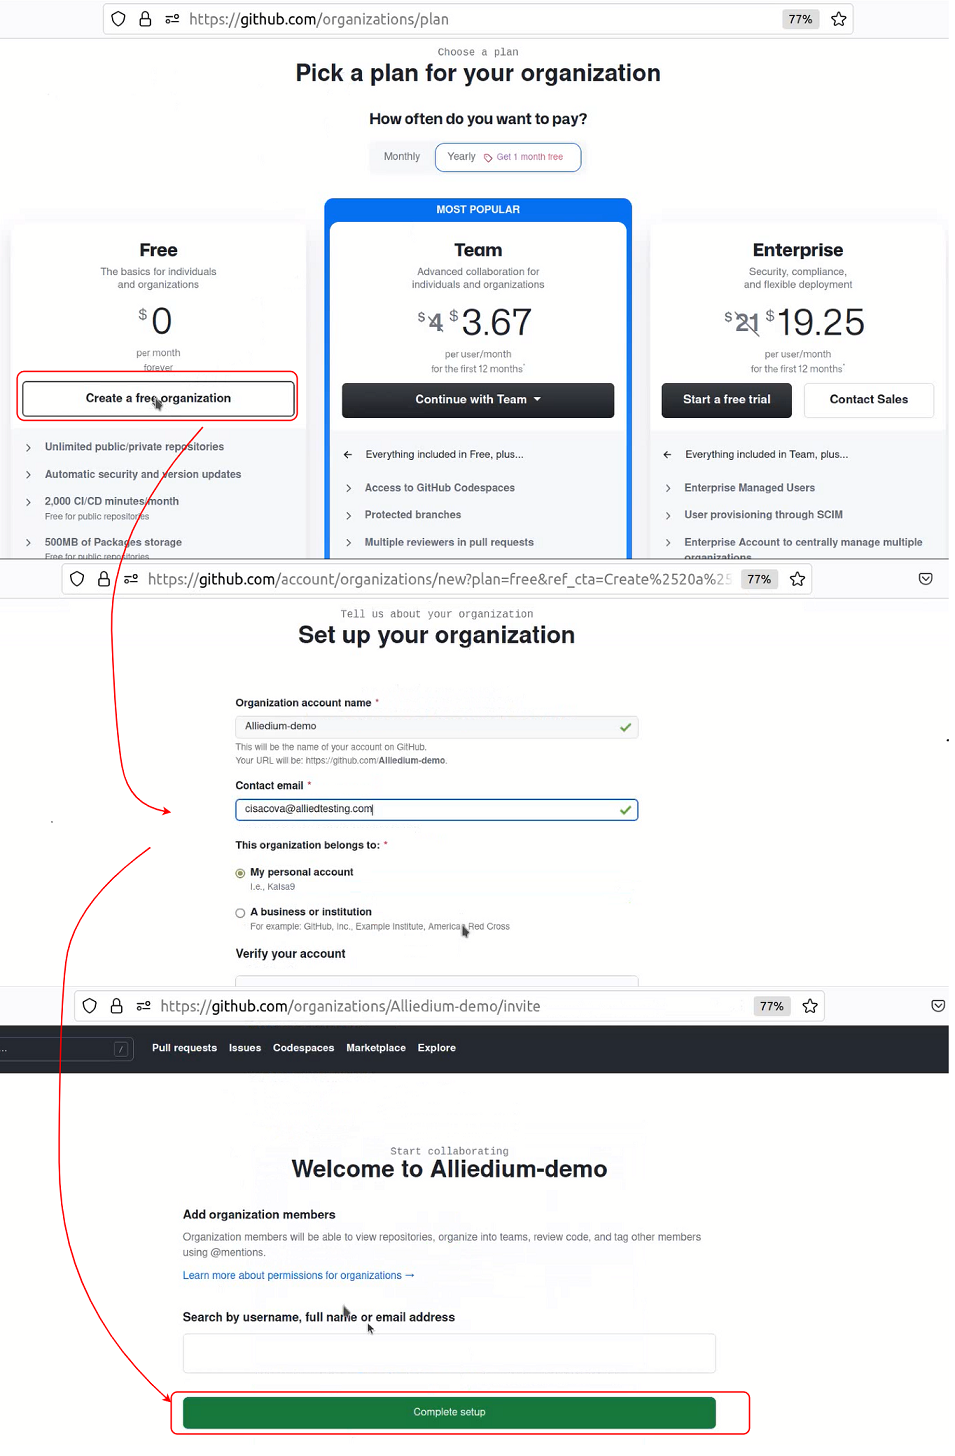
Creating your organization in
GitHub
-
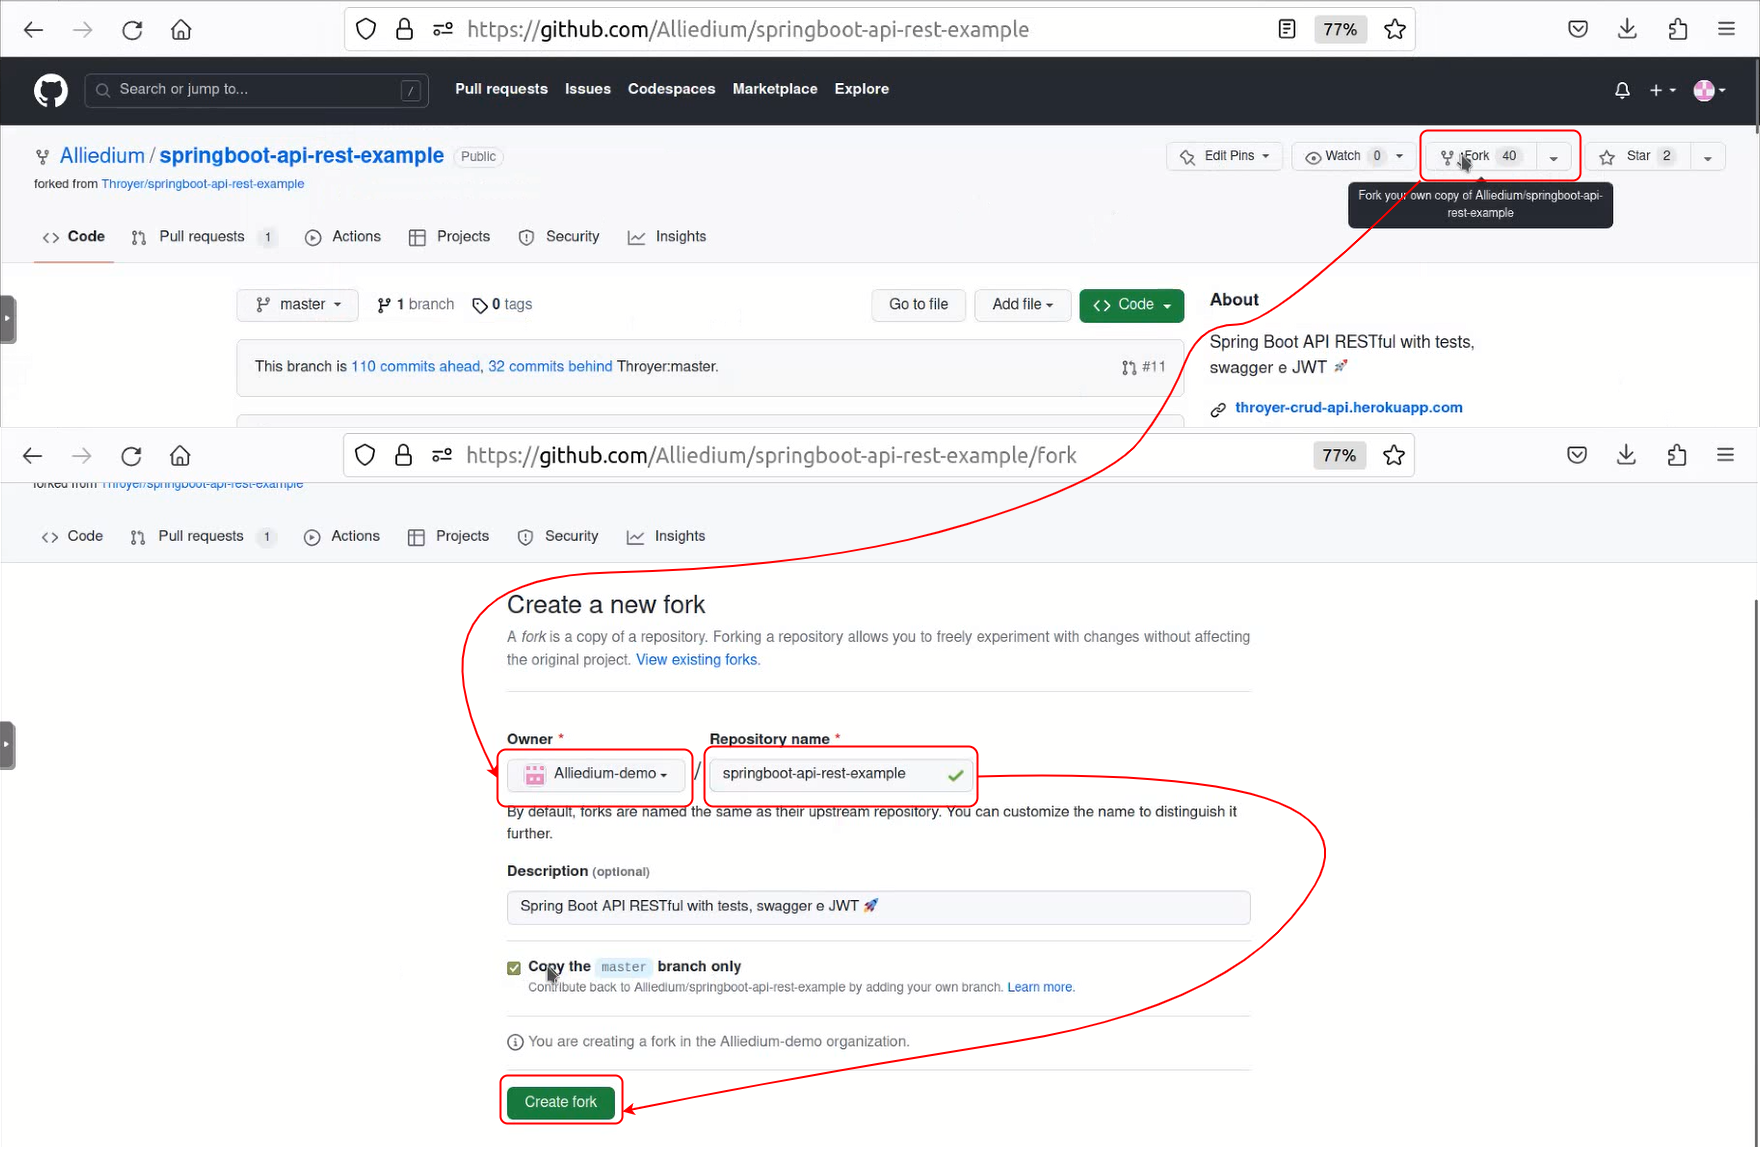
Fork your repo for testing purposes on
GitHub
-
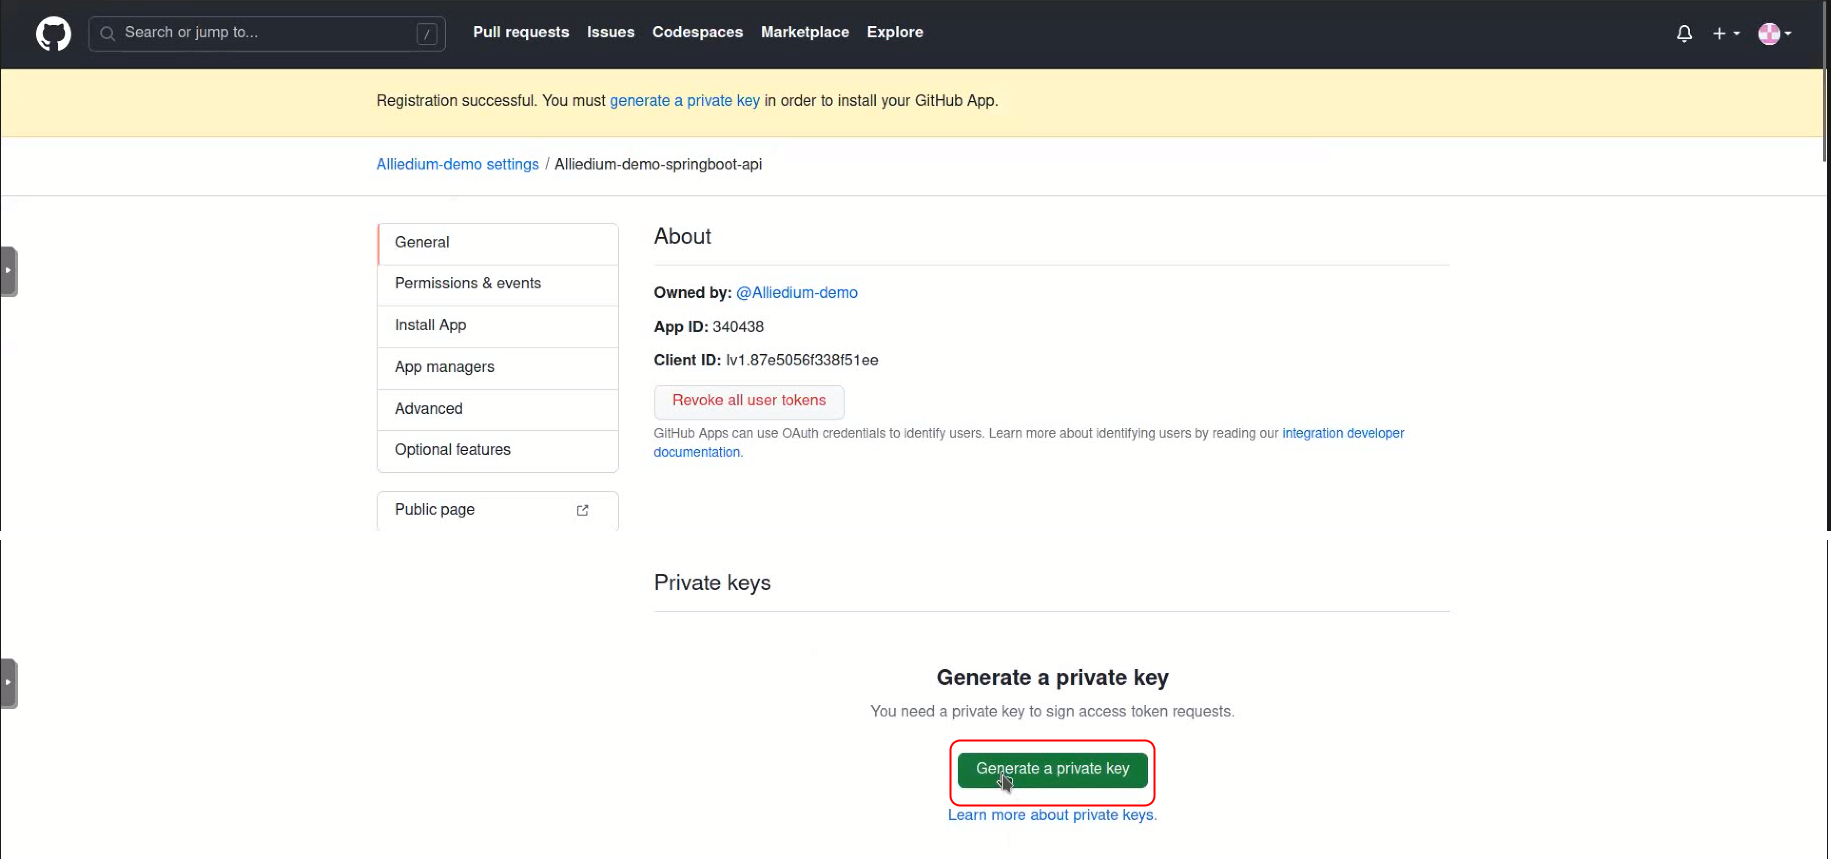
Creating
GitHub apps


-
Generate and download SSH key
-
Install your app for repositories
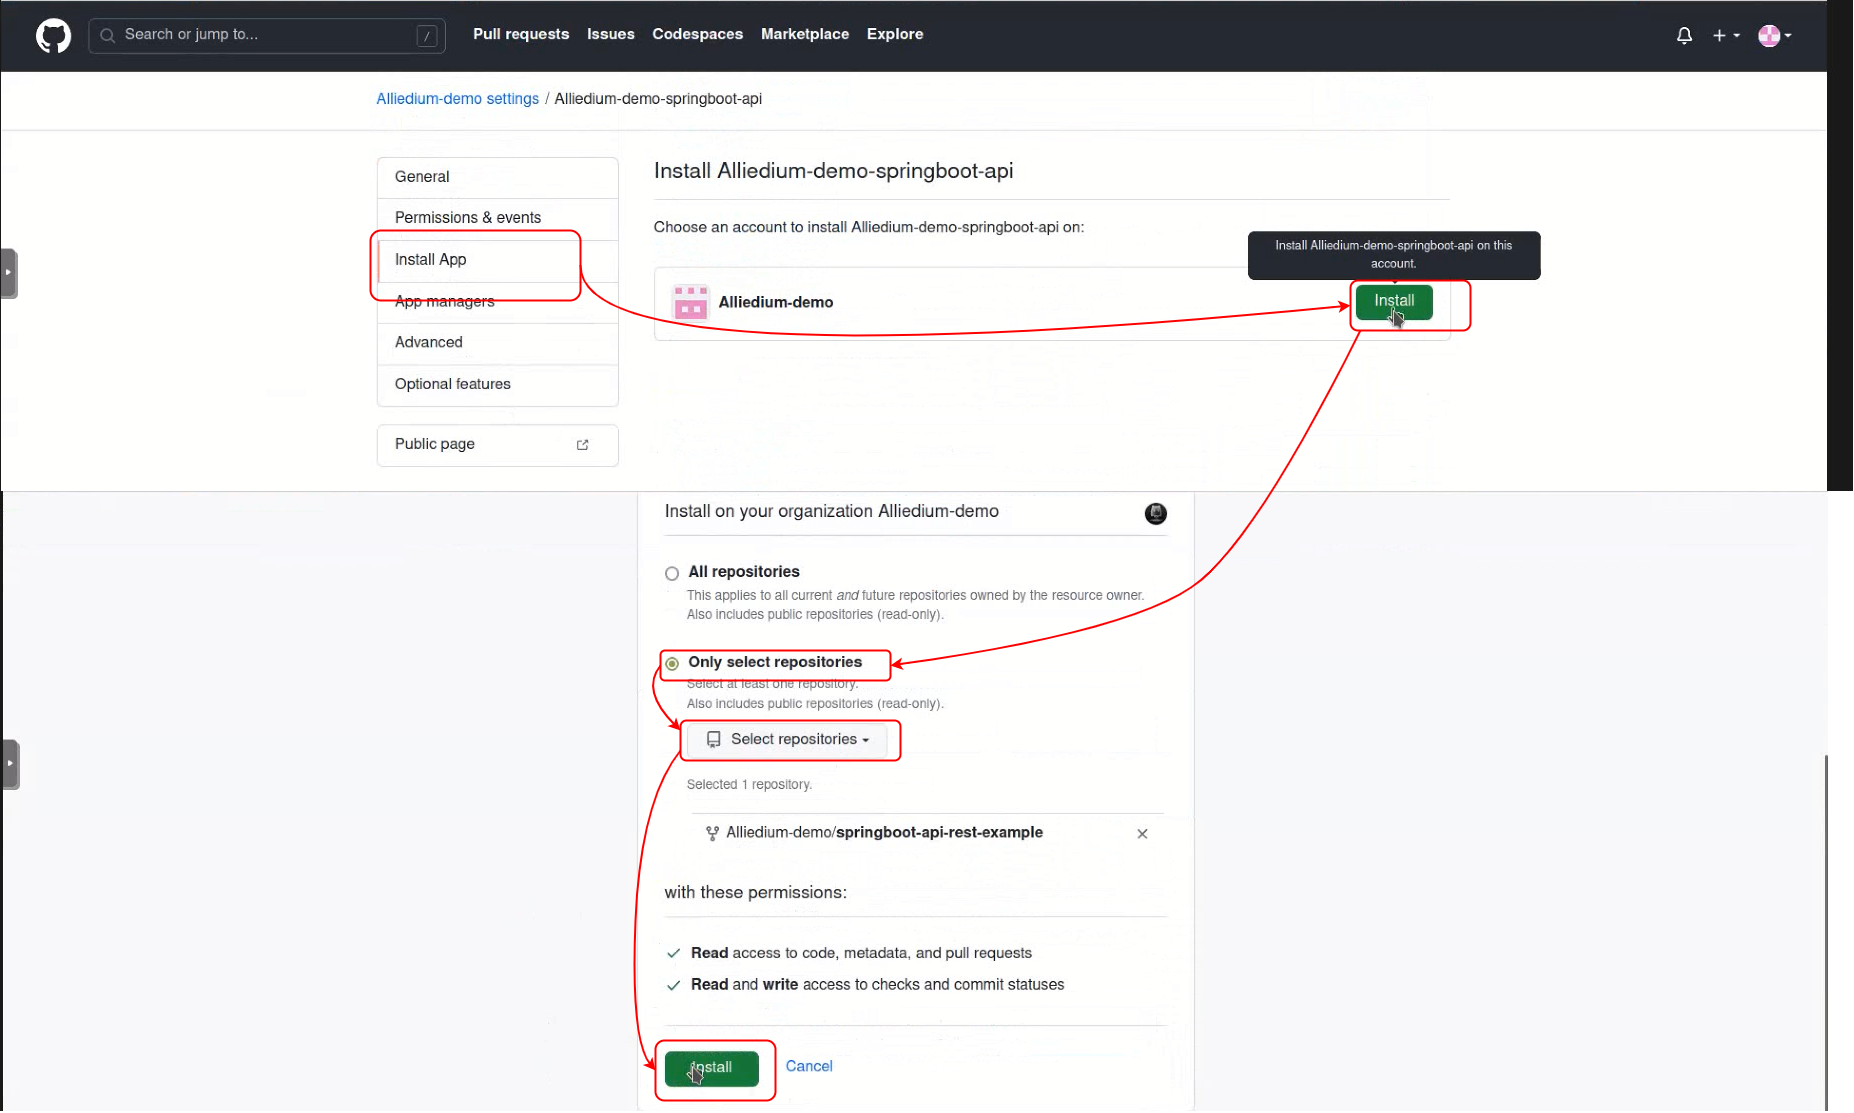
-
Convert your generated key
<key-in-your-downloads-folder>- path to your generated SSH key
file-name-private-key.pem- file with generated SSH key
<key-in-your-downloads-folder>- path to a converted key
converted-github-app.pem- file with a converted key


openssl pkcs8 -topk8 -inform PEM -outform PEM -in <key-in-your-downloads-folder>/file-name-private-key.pem -out <key-in-your-downloads-folder>/converted-github-app.pem -nocrypt- Create
multibranch pipelineinJenkins

-
Configure
multibranch pipeline
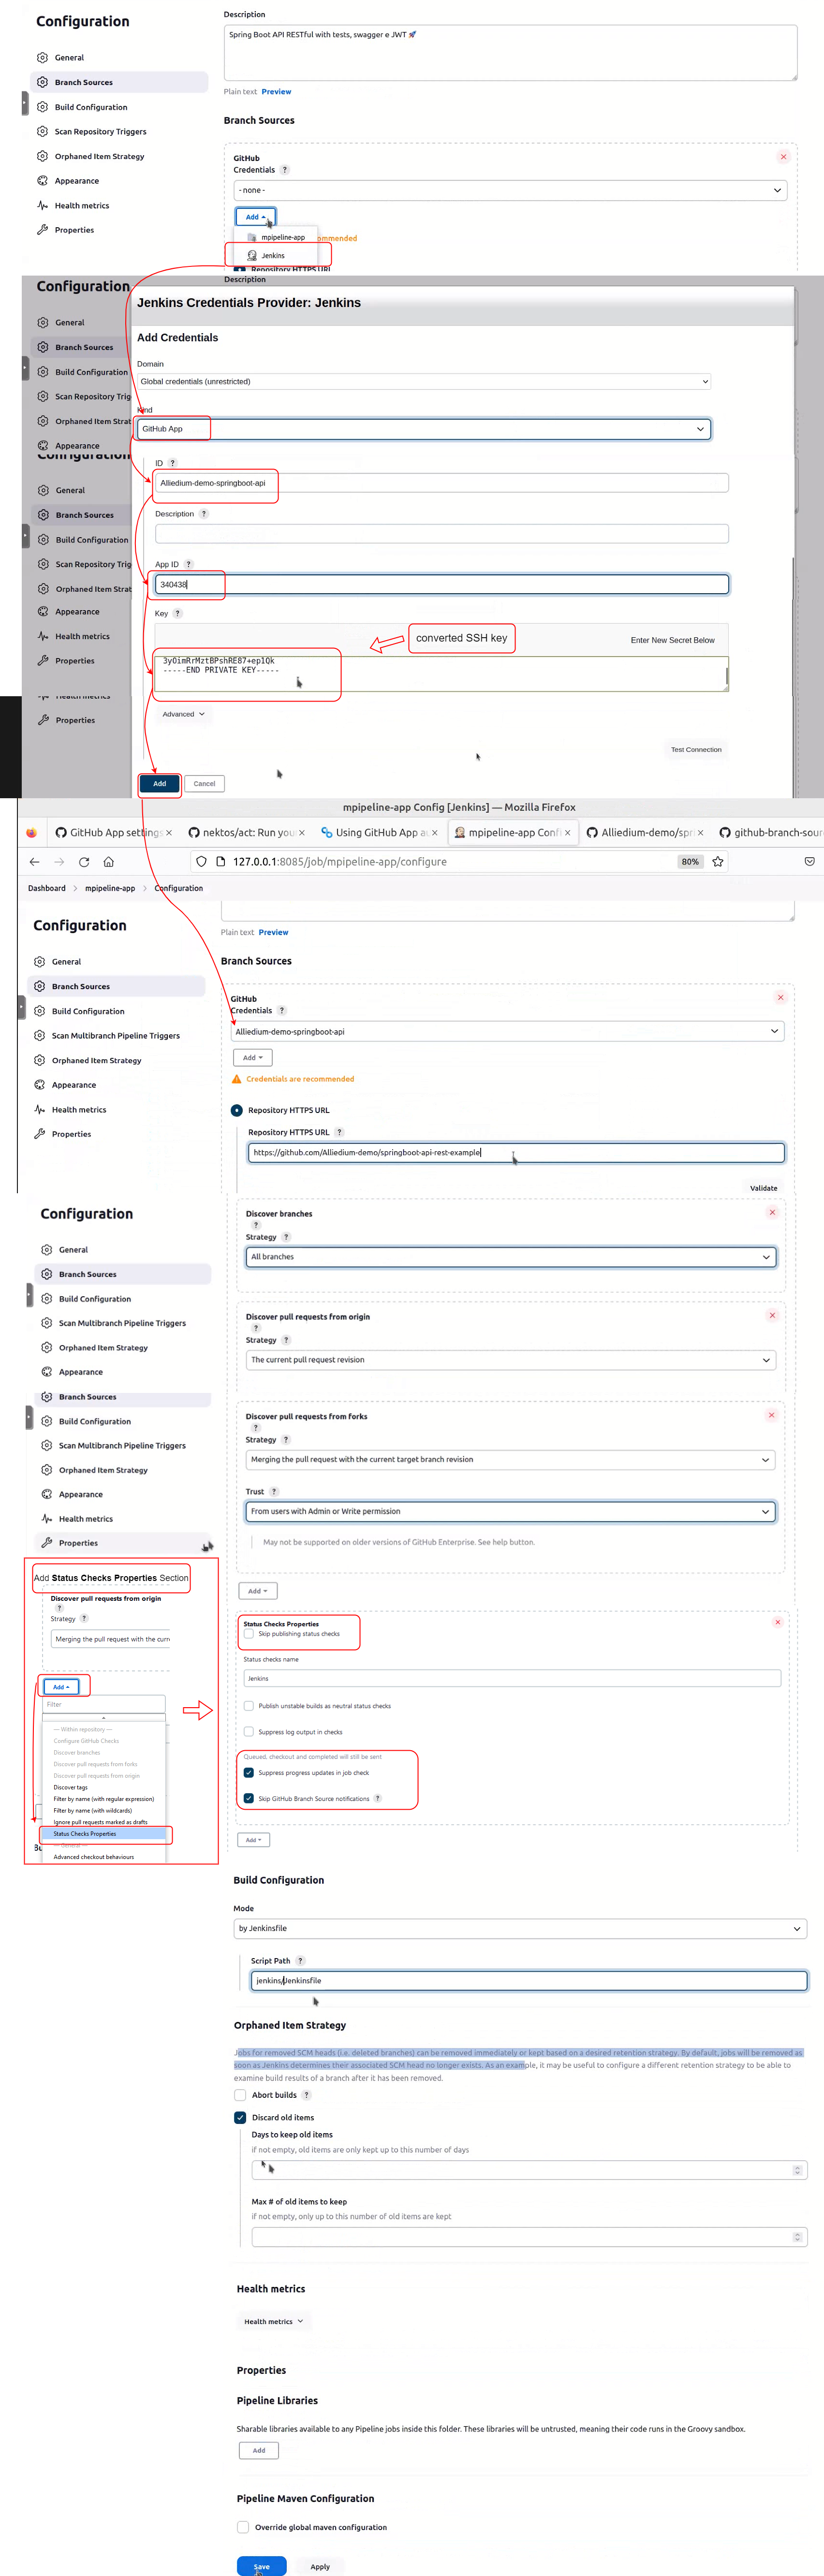
-
On
GitHubcreate new branch and pull request
After creating new pull request onJenkinsscan repository


-
Run your build
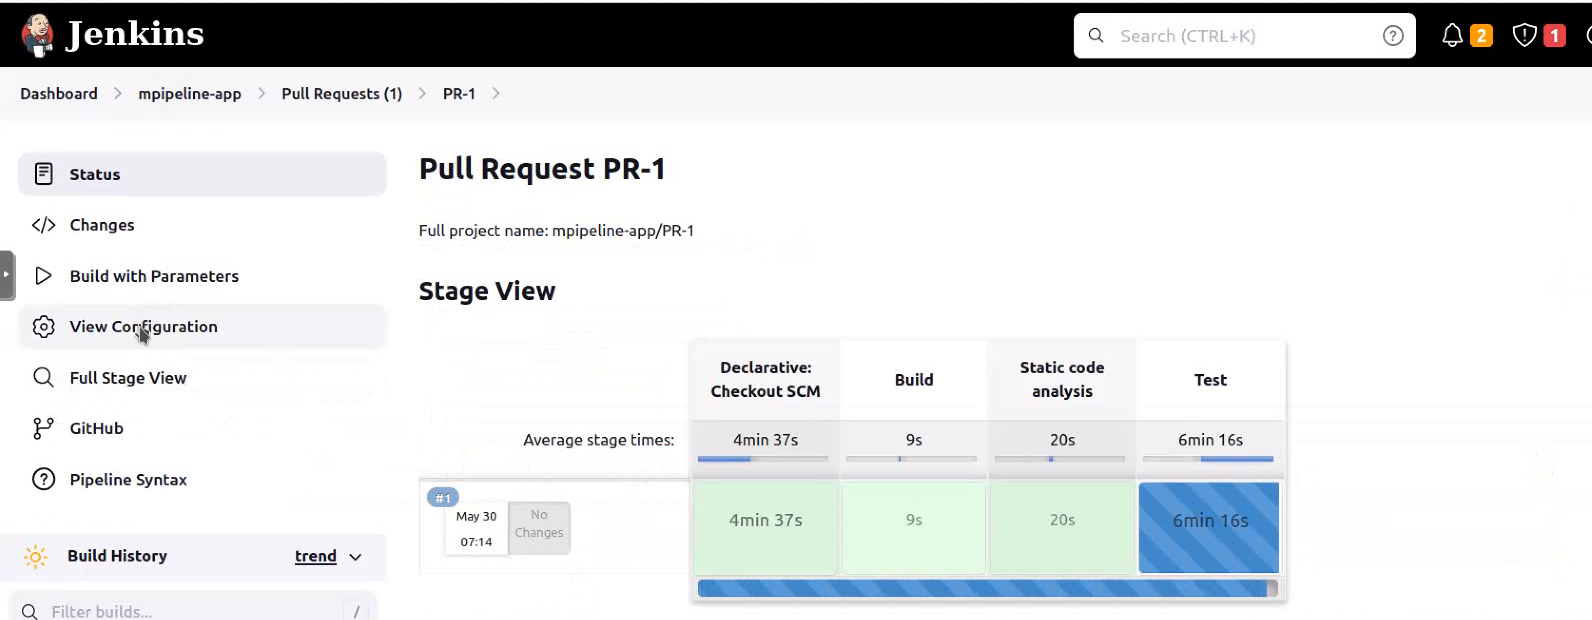
-
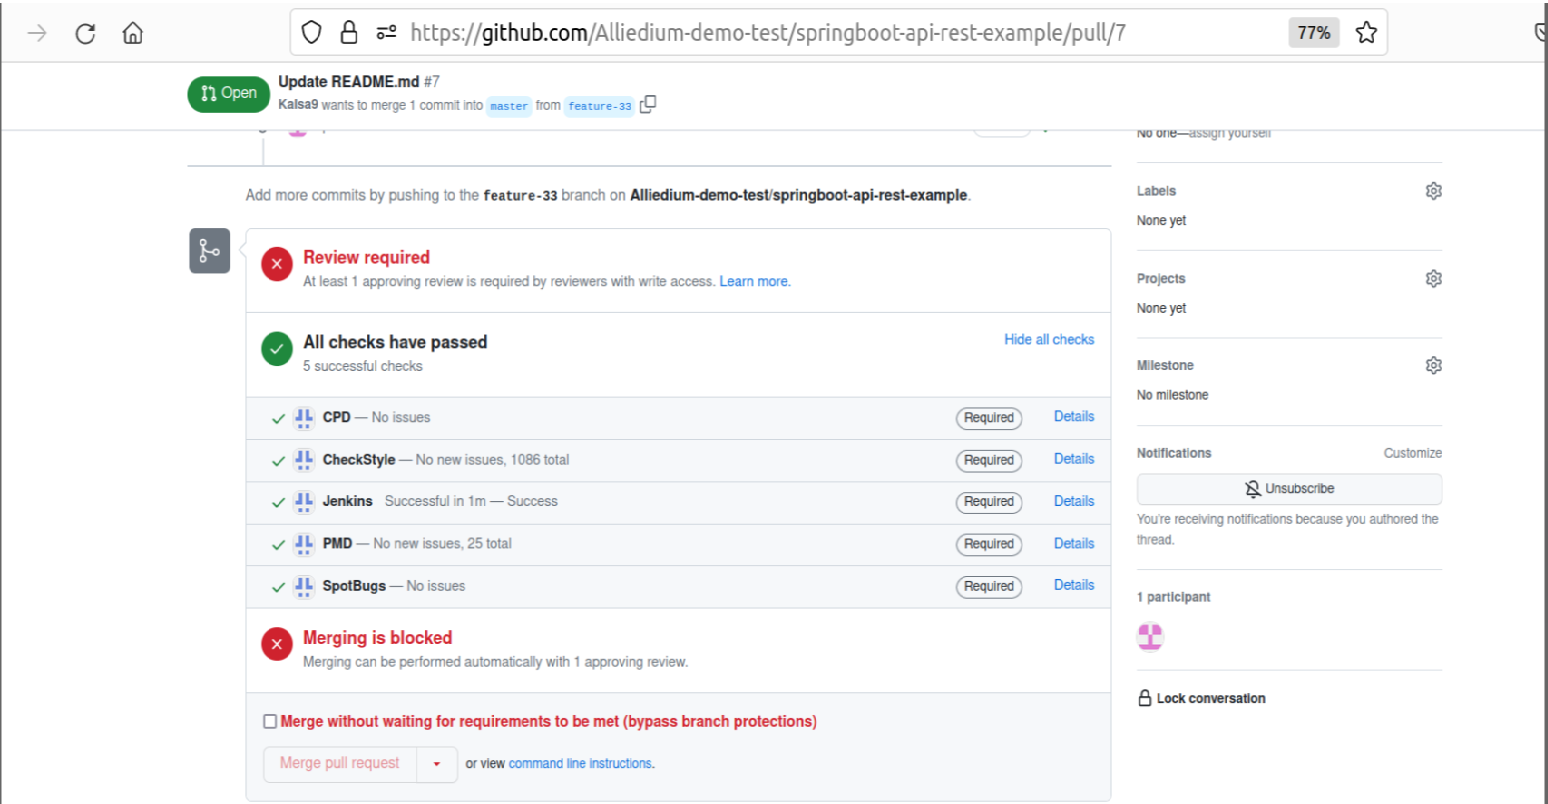
See build result on
GitHub


Matrix Authorization Strategy Jenkins plugin is installed
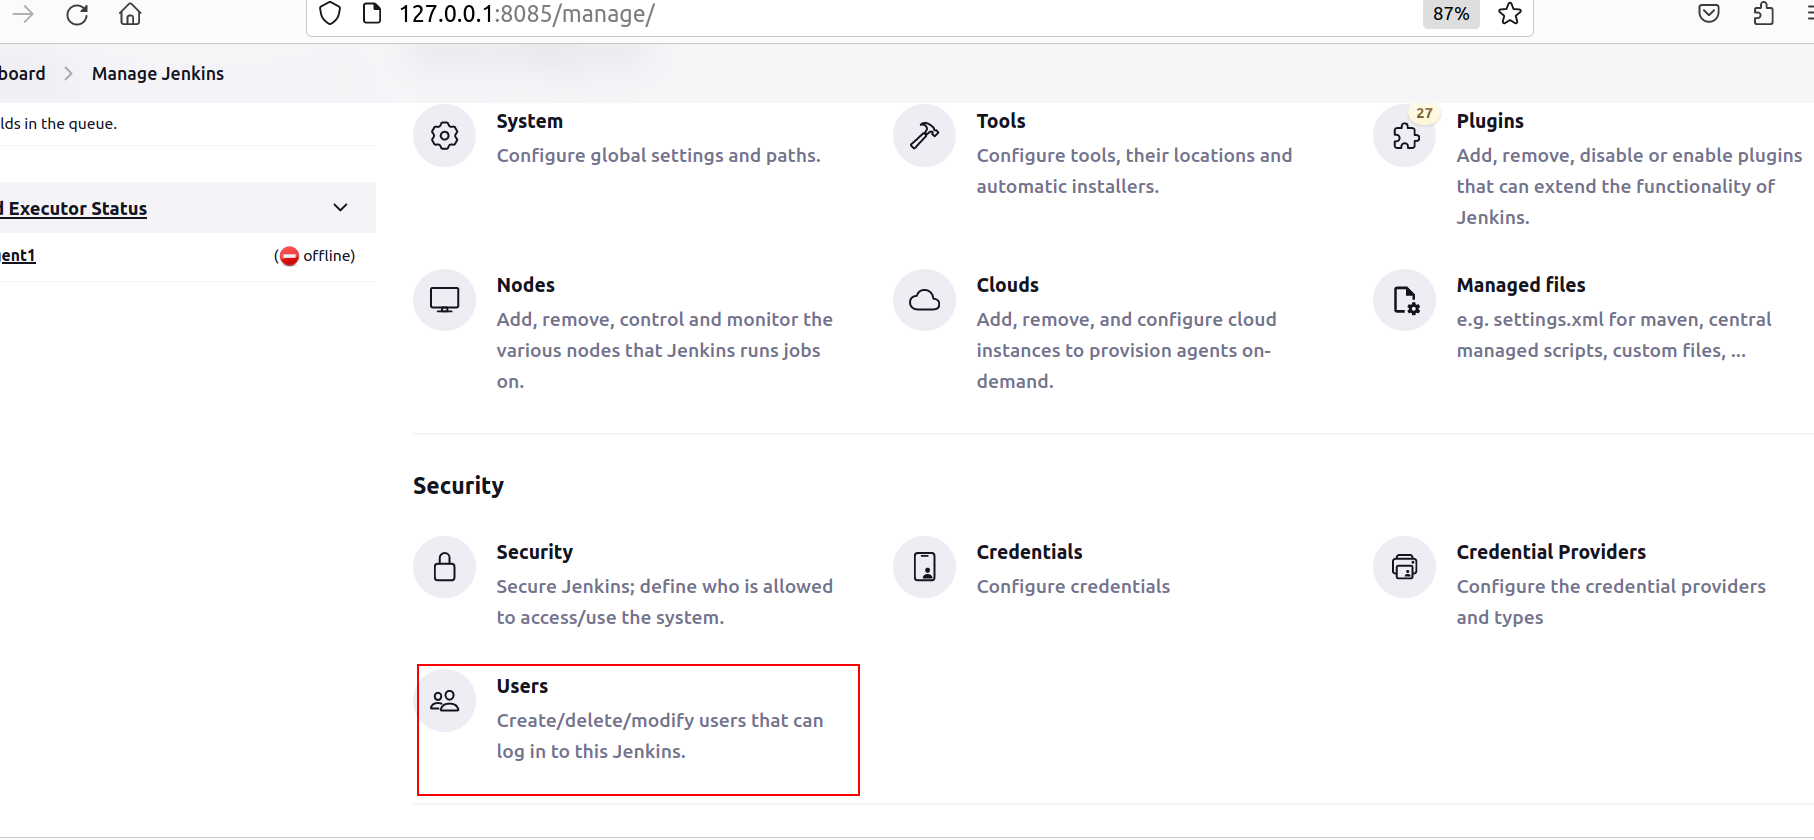
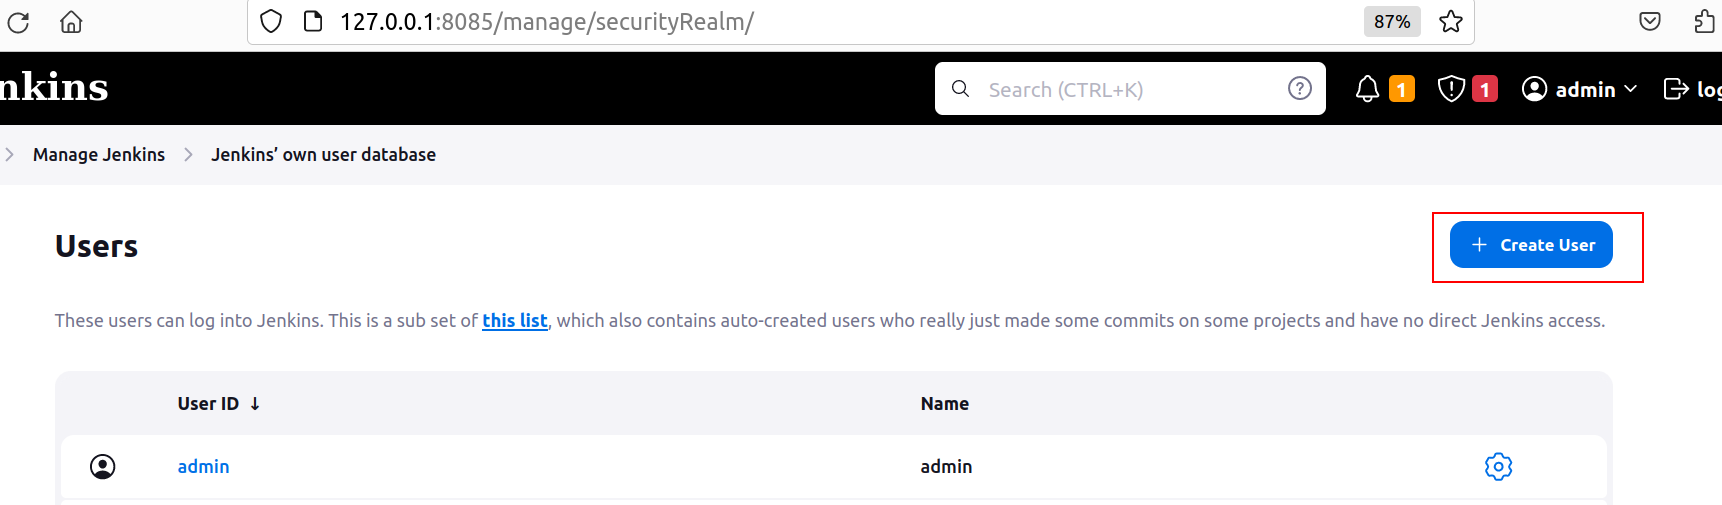
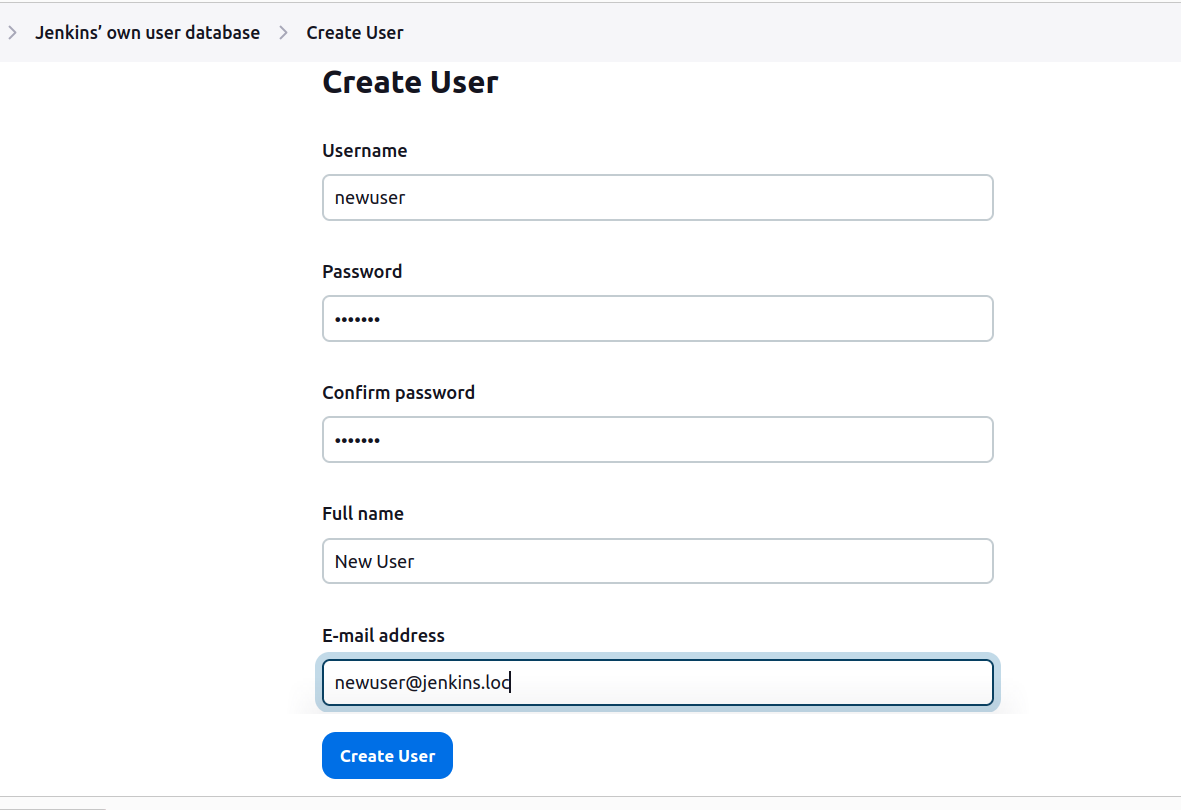
- Create new user: Go to
Manage Jenkins->Users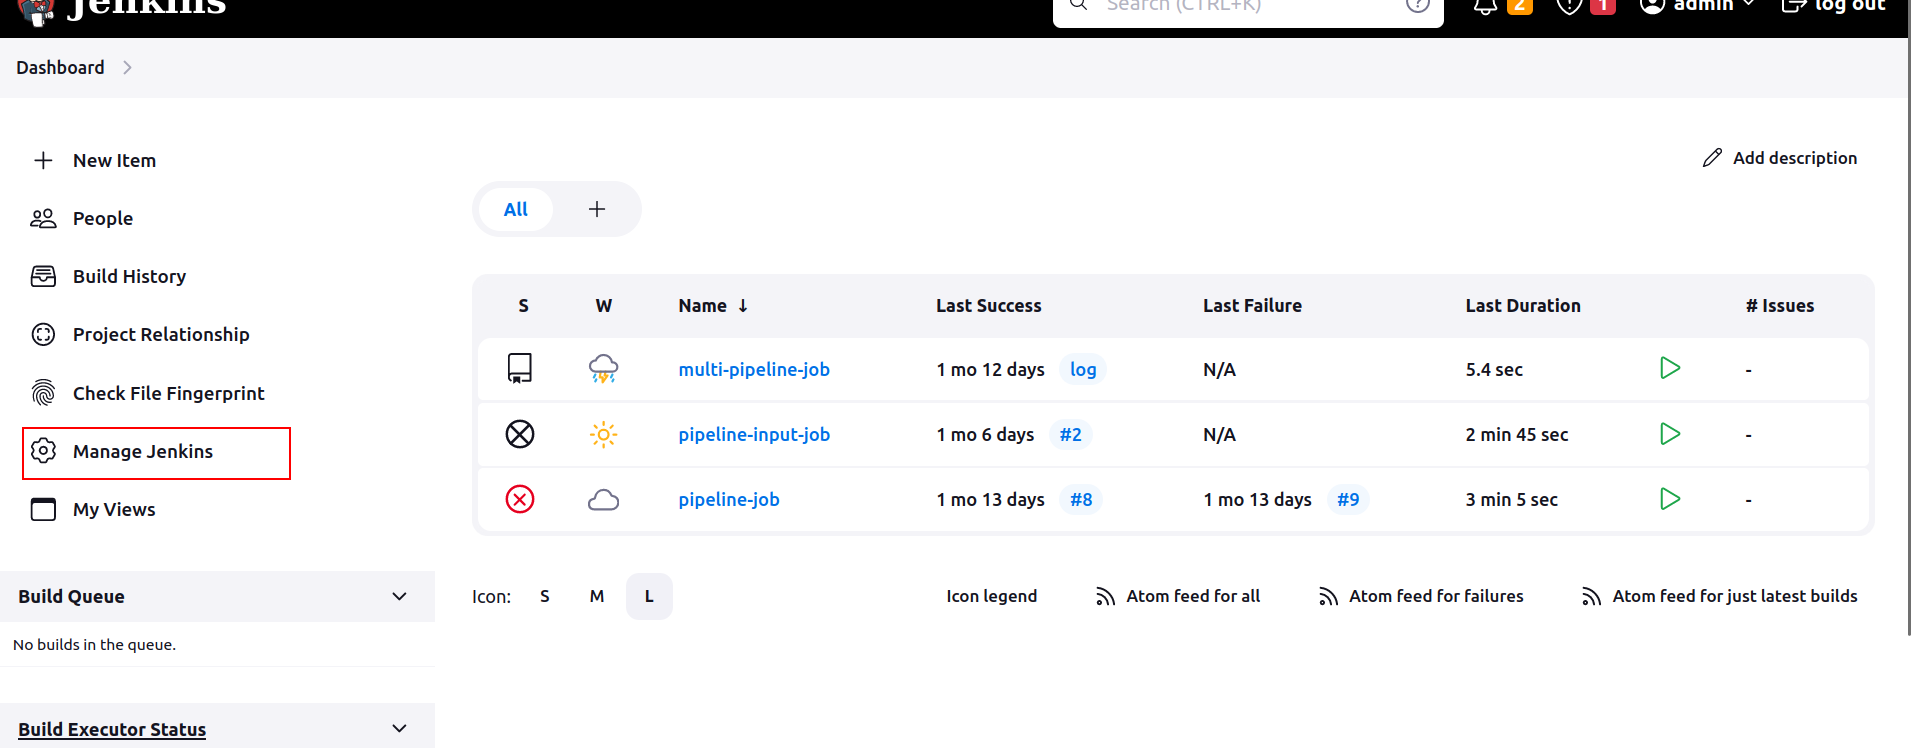
- Go to Manage Jenkins -> Security. Select from the
Security Realmdrop-downJenkins' own user database, whileAuthorization:Project-based Matrix Authorization security. Then add existing users to the table and check desired access options. Save changes.

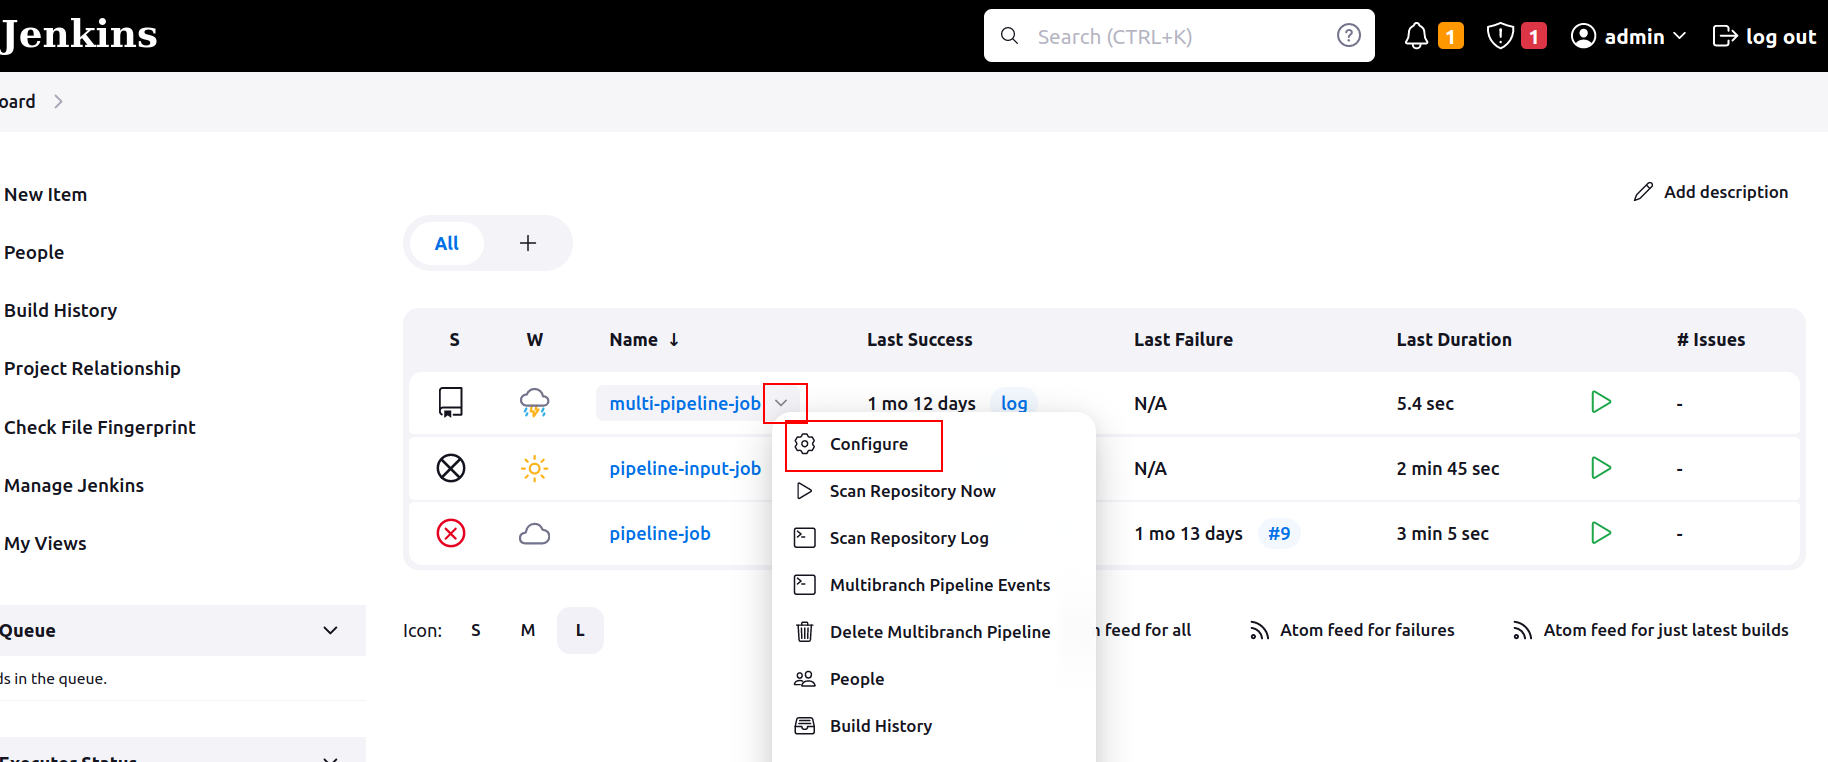
- Go to the
Dashboardand open configuration of an existing pipeline
- Check
Enable project-based security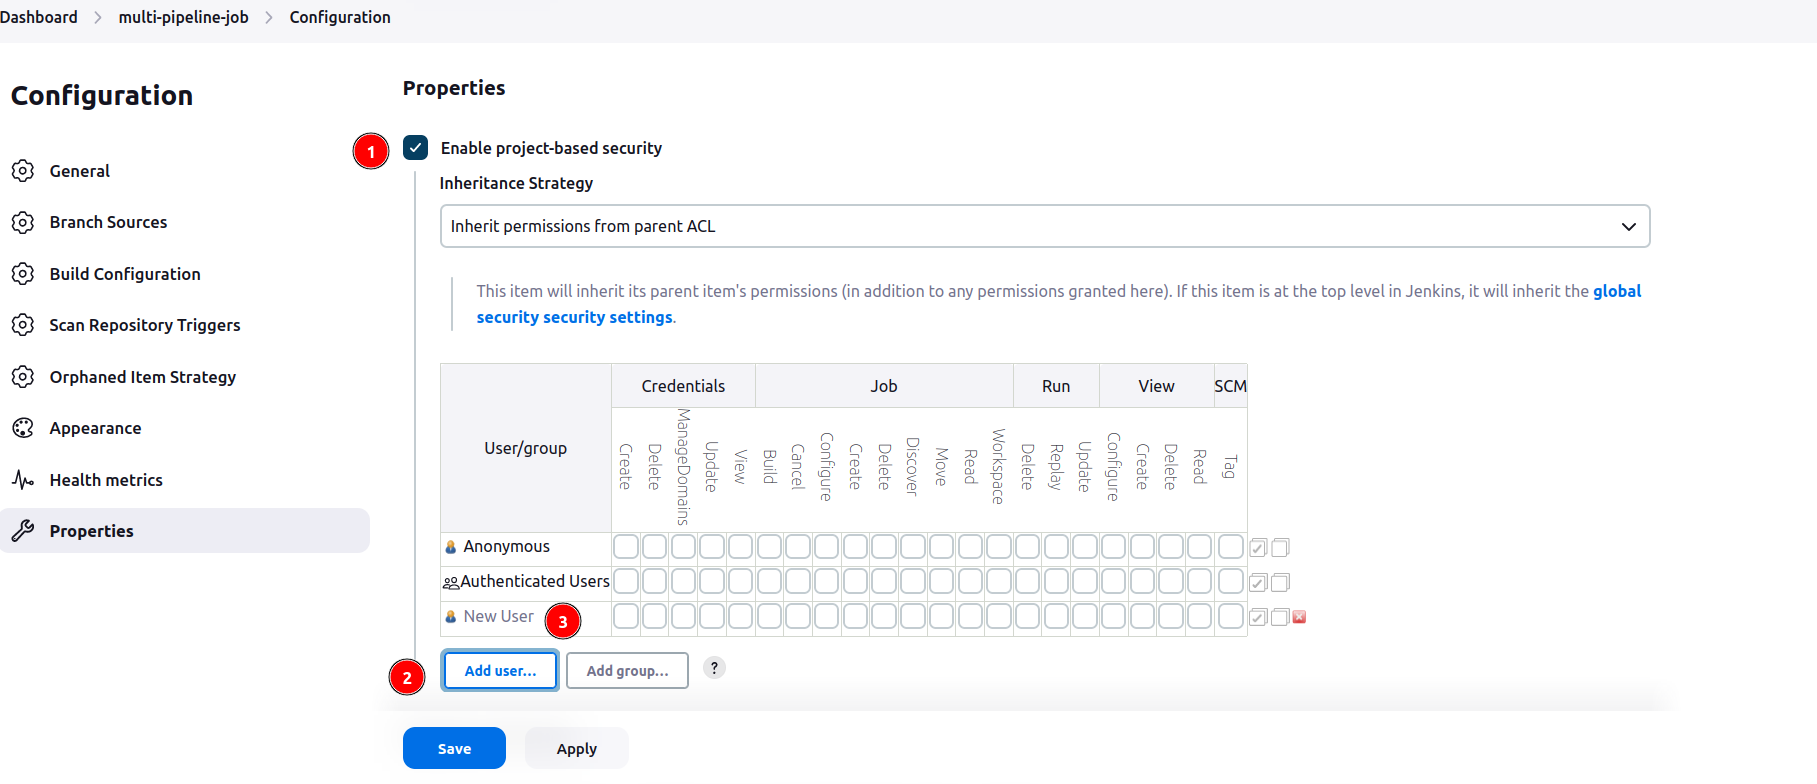
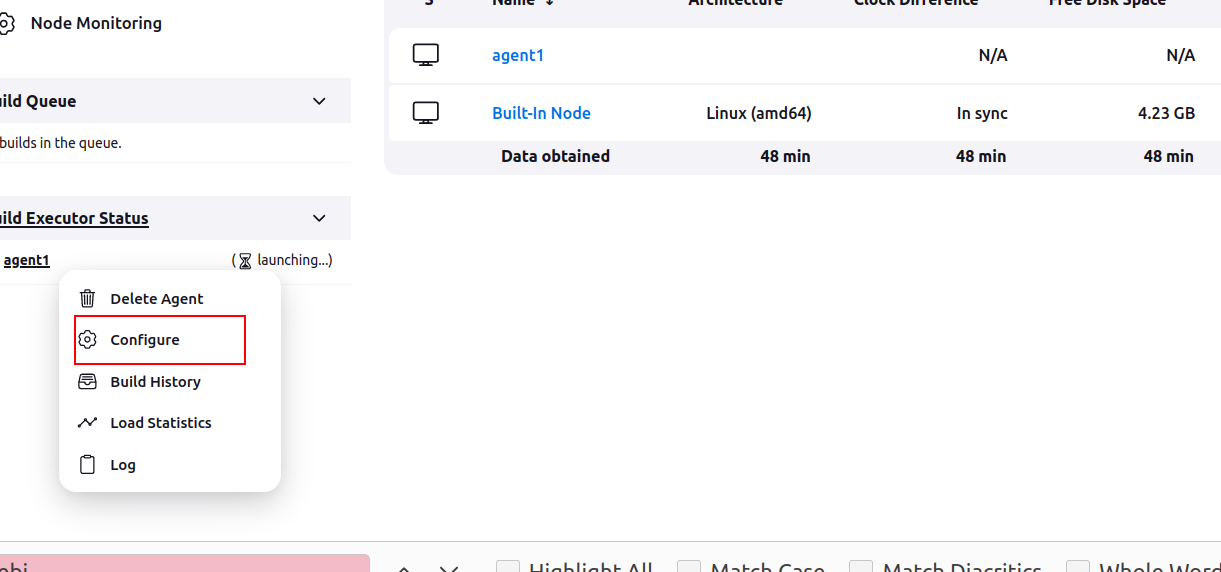
- Go to the
Dashboardand open configuration of an existingnode
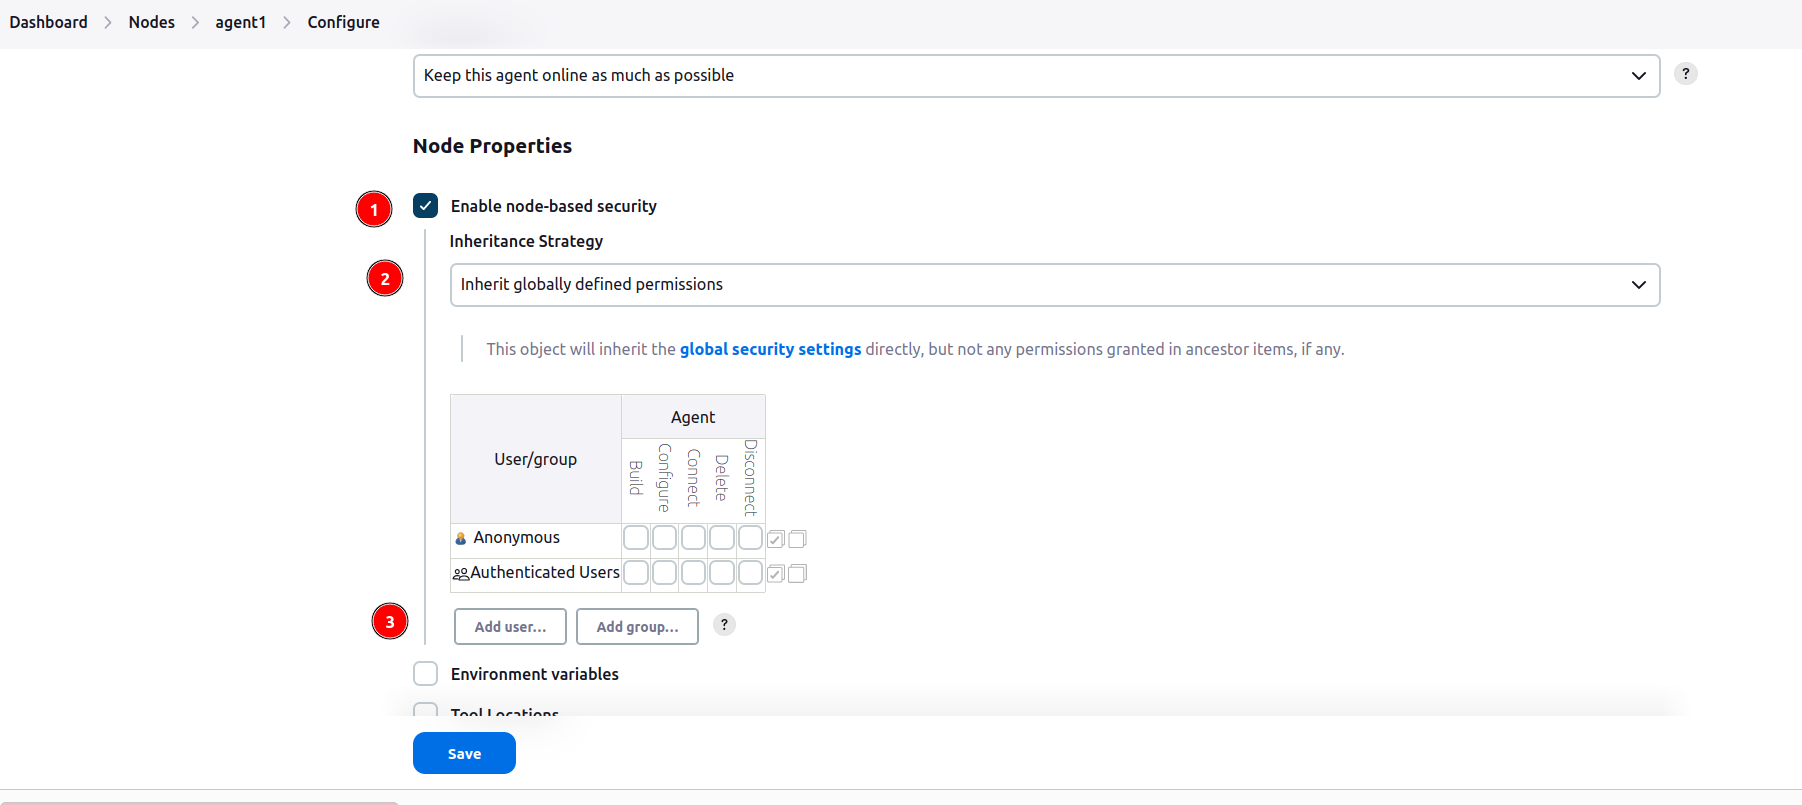
- Check
Enable node-based security


Use VM with Rocky9.2. Use the script to create VM on Proxmox.
Connect to your VM via ssh and enter password:
ssh <username>@<vm_ip_address>- Install git
sudo dnf install git
- Install java 17 and make it default
sudo dnf install java-17-openjdk java-17-openjdk-devel
java -version
alternatives --list
sudo alternatives --config java
java -version
- Create directory <agent_jenkins_dir> for Jenkins on your VM. In this directory the Jenkins associated files (settings, jobs) will be stored.
mkdir <agent_jenkins_dir>
- Navigate to
cd /var/lib/jenkins - Create directory
mkdir ./ssh
- Change its owner
sudo chown -R jenkins:jenkins /var/lib/jenkins/.ssh
- Change user to
jenkinsdirectorysudo su jenkins
- Create file
known_hoststouch ./.ssh/known_hosts
- Add
VMto theknown_hostsssh-keyscan host <your_vm_ip> >> /var/lib/jenkins/.ssh/known_hosts
- Go to your Jenkins. Open Manage Jenkins => Nodes

- Configure your Jenkins agent-node:
Write Name (1), indicate Number of runners (2), Remote root directory should be the same as in the p.5 (3), add Labels that will trigger your agent (4); select type of Usage (5); choose launch method via SSH

Create credentials. Choose kind SSH Username with private key. Use username from your VM machine.

Enter directly private key from your VM. Use key for ssh access generated on VM creation.

Indicate IP address of your VM machine and add credentials for it; set Host Key Verification Strategy to Known hosts file verification strategy

Go to Advanced settings and set path to your JVM:

- Disable agent on your Jenkins controller

Set number of runners to 0

-
On your host machine go to the directory with
awesome-jenkinsprojectcd $HOME/awesome-jenkins
-
Run
step7from ansible playbook - Create and launchJenkins pipeline input job.ansible-playbook $HOME/awesome-jenkins/playbooks/create-job.yml -i $HOME/awesome-jenkins/inventory/localhost -t step7
-
Open Jenkins in your browser:
127.0.0.1:8085 -
Go to the
pipeline-input-joband run the build. It will stop after some seconds. -
Connect to your VM machine with Jenkins node
-
Go to the repository <agent_jenkins_dir> set for Jenkins
cd <agent_jenkins_dir>
-
Explore it. Your may found installed tools in the
toolsdirectory -
Your job workspaces is in the
workspaces/pipeline-input-jobdirectory -
After exploring go back to Jenkins on your VM machine and input any name to continue the build.
- CI/CD tools review
- Jenkins vs Jenkins X
- Jenkins user documentation
- Jenkins X
- GitHub actions docs
- Argo Workflows - The workflow engine for Kubernetes
- Tekton - Cloud Native CI/CD
- GitLab CI/CD docs
- Jenkins pipelines
- Jenkinsfile
- Jenkins pipeline syntax
- Pipeline stage view Jenkins plugin
- Rendering User Content
- Jenkins script console
- Debugging Jenkins pipeline
- Debugging tips
- Testing framework for Jenkins pipelines
- Spotbugs maven plugin
- PMD/CPD static analysis plugin
- Checkstyle plugin
- Code coverage tools
- Comparison of findbugs, pmd and checkstyle
- Spotbugs docs
- Spotbugs maven plugin docs
- Code style analysis reports publisher on Jenkins
- Code coverage tools
- Jacoco documentationJacoco examples
- Jacoco examples
- Code coverage reports publisher on Jenkins
- GitHub checks Jenkins plugin
- Disable GitHub multibranch status Jenkins plugin
- How to integrate Jenkins with GitHub
- How to create GitHub App
- Manage protected branches on GitHub
- Setup GitHub checks in Jenkinsfile
- How to configure Jenkins master and slave nodes
- Jenkins ssh-slaves plugin
- Managing Jenkins nodes
- Video: Jenkins node setup