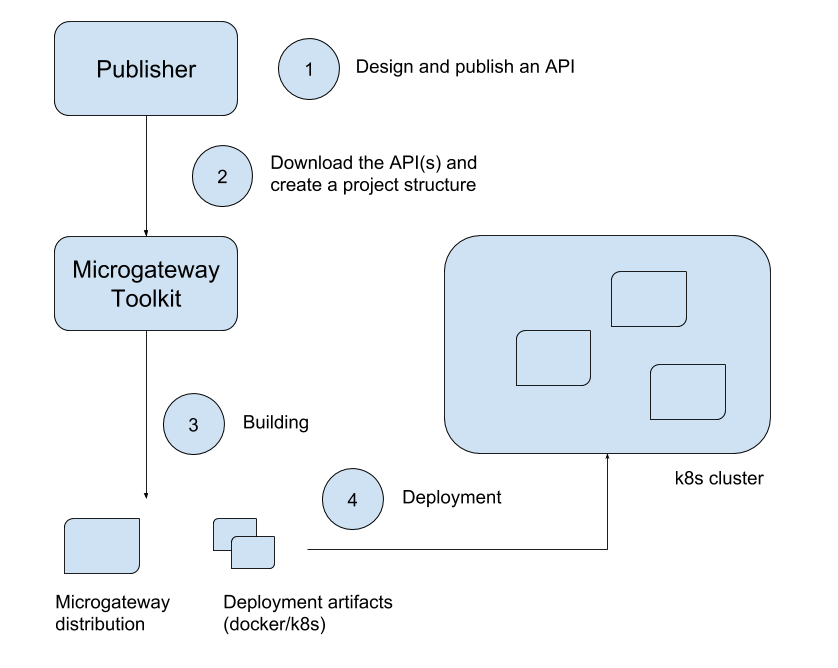
The Microgateway provides the capability to create specialized gateway distribution (Microgateway distributions) where only a single API or a group of APIs are included. Once a Microgateway distribution is started, it will start serving those specific API(s) right away.
In summary, a Microgateway is a specialized form of the WSO2 API Gateway with characteristics below:
- Its ability to execute in isolation without mandatory connections to other components (Key Manager, Traffic Manager, Anayltics).
- Ability to host a subset of APIs of choice (defined on the API Publisher) instead of all.
- Immutability - The gateway runtime is immutable. If APIs or Policies change after the Microgateway has been built, a rebuild process is required to capture the changes.
- Seamless integration with deployment automation tools and techniques.
- Easy integration with CI/CD processes.
Microgateway offers you a proxy that is capable of performing security validations (Signed JWT, OAuth), in-memory (local) rate limiting and Analytics.
The following diagram illustrates the process of getting an API (or a selected set of APIs) to be hosted on a Microgateway.
Running the Microgateway is a 3 step process. The first two steps are involved in building the runtime.
- Setting up a microgateway project.
- Building the microgateway project and creating a microgateway distribution.
- Running the microgateway distribution.
To setup a microgateway project, a developer can choose two ways.
- Create a microgateway project for a single API
- Create a microgateway project for a group of APIs
The first step of setting up a microgateway project includes connecting to the API Publisher (Management Layer) and downloading the relevant API artifacts (JSON representation of the APIs). Once this step is completed it will convert the JSON representation of the APIs to Ballarina source code. The annotations that go into these source files (k8s, docker annotations, etc) are governed by a config file which the microgateway can see. These generated files can optionally be managed via source management repositories (Git).
What gets downloaded/pulled?
- The JSON representation of the API files
- The subscription information of each API
- The rate limiting policies associated with each API
Once the project has been created, the next step is to build the project sources.
Following are the set of commands included within the Microgateway.
Note: Before you execute any of the commands below you need to add the path to the /bin directory to the PATH environment variable. Ex: /home/dev/wso2am-micro-gw/bin
$ micro-gw setup
The "micro-gw setup" command is used to initialize a project with artifacts required for generating a microgateway distribution. During the setup phase, the Microgateway CLI will communicate with the API Manager REST APIs and retrieve the details of the resources (APIs, policies ..) which are required to generate the microgateway project artifacts.
If the project already exists, a warning will be prompted requesting permission to override existing source.
Execute micro-gw help setup to get more detailed information regarding the setup command.
Example
-
Setting up a project for a single API.
$ micro-gw setup pizzashack-project -a PizzaShackAPI -v 1.0.0 -
Setting up a project for a group of APIs.
$ micro-gw setup pizzashack-project -l label-name
$ micro-gw build
Upon execution of this command, the Microgateway CLI tool will build the micro gateway distribution for the specified project.
Execute micro-gw help build to get more detailed information regarding the build command.
Example
$ micro-gw build pizzashack-project
Following is the structure of a project generated when running micro-gw setup command.
.
└── pizzashack-project
    ├── conf
    │   └── label-config.toml
    ├── src
    │   ├── endpoints.bal
    │   ├── extension_filter.bal
    │   ├── PizzaShackAPI_1_0_0.bal
    │   └── policies
    │       ├── application_10PerMin.bal
    │       ├── application_20PerMin.bal
    │       ├── ...
    │       └── throttle_policy_initializer.bal
    └── target
micro-gw-pizzashack-project
├── bin (The binary scripts of the micro-gateway distribution)
│   └── gateway
    └── gateway.bat
├── conf (micro gateway distribution configuration)
│   └── micro-gw.conf
├── exec (generated balx ballerina executable for the APIs)
│   └── pizzashack-project.balx
├── logs (logs generated from the gateway)
└── runtime
Once the setup, build commands are executed, a micro gateway distribution will be created under target folder.
../pizzashack-project/target$ ls
micro-gw-pizzashack-project.zip
- Unzip the micro-gw-pizzashack-project.zip and run the
gatewayscript inside the bin folder of the extracted zip using below command.
$ bash gateway
micro-gw-internal/bin$ bash gateway
ballerina: initiating service(s) in '/home/user/pizzashack-project/target/micro-gw-pizzashack-project/exec/internal.balx'
ballerina: started HTTPS/WSS endpoint localhost:9095
ballerina: started HTTP/WS endpoint localhost:9090
ballerina: started HTTPS/WSS endpoint localhost:9096
