Here is the code base of Vexless, the first vector database built for Cloud Functions with the benefits of high elasticity, low operational cost, and a fine-grained billing model.
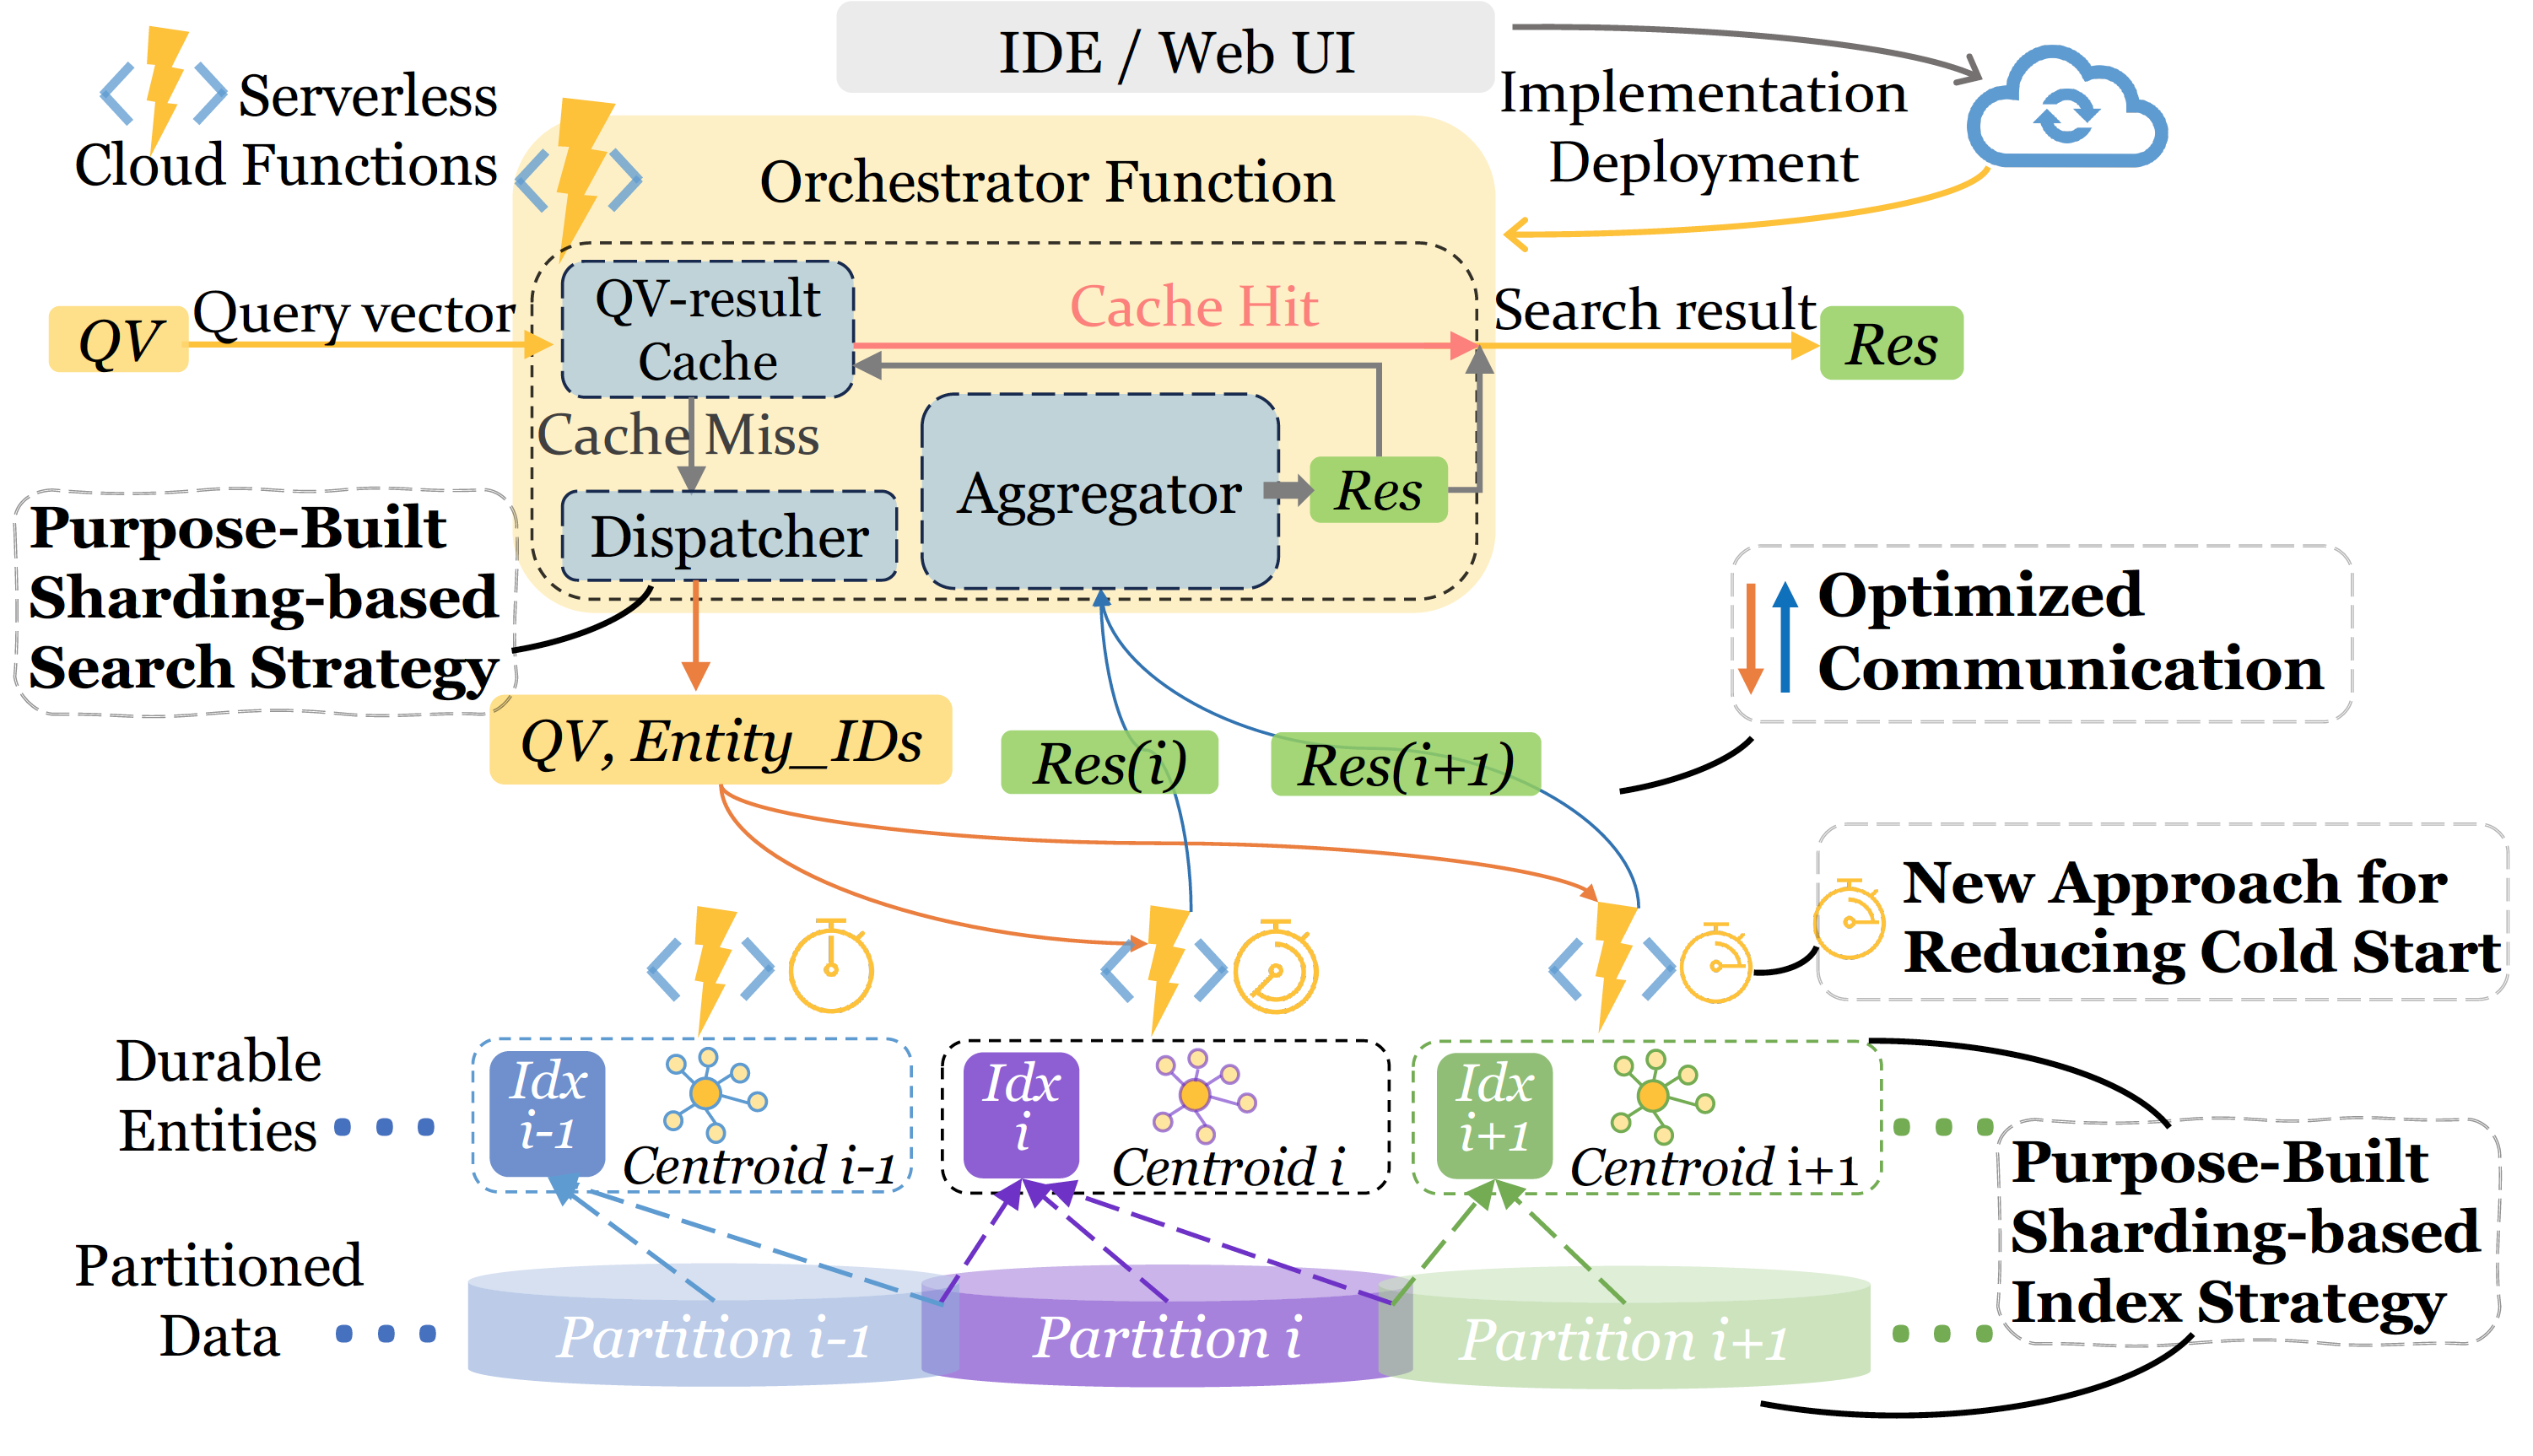
The overall architecture is shown below:

├── Clustering
│   ├── constrained-Vexless // clustering using the method in the paper
│   │   └── constrained_kmeans_w_clusters.py
│   └── unbalanced-faiss // clustering using faiss-based method
│       ├── deep100M_faiss_kmeans.py
│       ├── ...
│       └── sift10M_faiss_kmeans.py
├── Data // all the data we used in the experiment
│   ├── DEEP
│   │   └── script.sh
│   ├── GIST
│   │   └── script.sh
│   └── SIFT
│       └── script.sh
├── Index // the destination folder for the vector data index
│   ├── DEEP
│   │   └── readme.md
│   ├── GIST
│   │   └── readme.md
│   └── SIFT
│       └── readme.md
├── Indexing // code for building indexes
│   ├── GIST1M_hnswlib_1index.py
│   ├── constrained_kmeans_w_clusters.py
│   └── deep10M_indexing_1index.py
└── VectorSearch // code for conducting vector searches on various solutions on cloud
    ├── Naive // naively implemented function that did not have optimization.
    │   └── Naive_DF
    │       ├── DurableFunctionsHttpStart
    │       │   ├── __init__.py
    │       │   └── function.json
    │       ├── DurableFunctionsOrchestrator1
    │       │   ├── __init__.py
    │       │   └── function.json
    │       ├── Function
    │       │   ├── __init__.py
    │       │   └── function.json
    │       ├── host.json
    │       ├── local.settings.json
    │       └── requirements.txt
    ├── VM // code for running single index query on a single VM D3 v2
    │   └── Deep10M_baseline_ANN_with_EF.py
    └── Vexless // code of Vexless' main function logic
        └── DEF_with_partitioned_vector_Search
            ├── DEF
            │   ├── __init__.py
            │   └── function.json
            ├── DurableFunctionsHttpStart
            │   ├── __init__.py
            │   └── function.json
            ├── DurableFunctionsOrchestrator1
            │   ├── __init__.py
            │   └── function.json
            ├── host.json
            ├── local.settings.json
            └── requirements.txt
- Scripts Execution: Navigate to the Data directory and execute the provided script.
- Open-Source Data: By running the script, you'll be able to access and prepare the open-source data for clustering and indexing.
- Building Indexes: Go to the Indexing directory and run the available code to construct diverse indexes, setting the foundation for various vector search solutions.
- Storage: Ensure you have more than 1TB of storage space due to the substantial size of the original dataset.
- Code Deployment: Upload the provided code to your desired platform.
- Configuration Update: Ensure to replace placeholder variables with your Azure account credentials and specific configurations to make the solution work seamlessly on the Azure serverless platform.
- If you don't have an Azure account, create one at the Azure portal.
- After signing up, log in to the portal to access Azure services.
- Once logged in, navigate to "Subscriptions" on the left sidebar.
- Click on "+ Add" to create a new subscription.
- Choose the subscription type and provide the necessary details.
- Review and confirm your selection.
- In the Azure portal, go to "Resource groups" from the left sidebar.
- Click on "+ Add" to create a new resource group.
- Select your subscription, give your resource group a name, and choose a region.
- Click "Review + Create", then "Create" once validation is passed.
- Navigate to "Storage accounts" from the left sidebar.
- Click on "+ Add" to initiate the storage account creation process.
- Select your subscription and resource group.
- Provide a unique name for the storage account.
- Choose a region and performance tier as per your requirement.
- Review the other configurations and adjust if necessary.
- Click "Review + Create", then "Create" to finalize the storage account creation.
- In the Azure portal, go to "Function App" from the left sidebar.
- Click on "+ Add" to start the creation process.
- Choose your subscription and resource group.
- Name your function app and select a runtime stack suitable for your application.
- Choose a region for your function app.
- Under "Hosting", select the storage account you created in the previous step.
- Configure other settings like Monitoring and Tags as per your requirement.
- Click "Review + Create", then "Create" to set up the Function App.
- Please do follow the deployment steps and specify your account to run the code from your end.
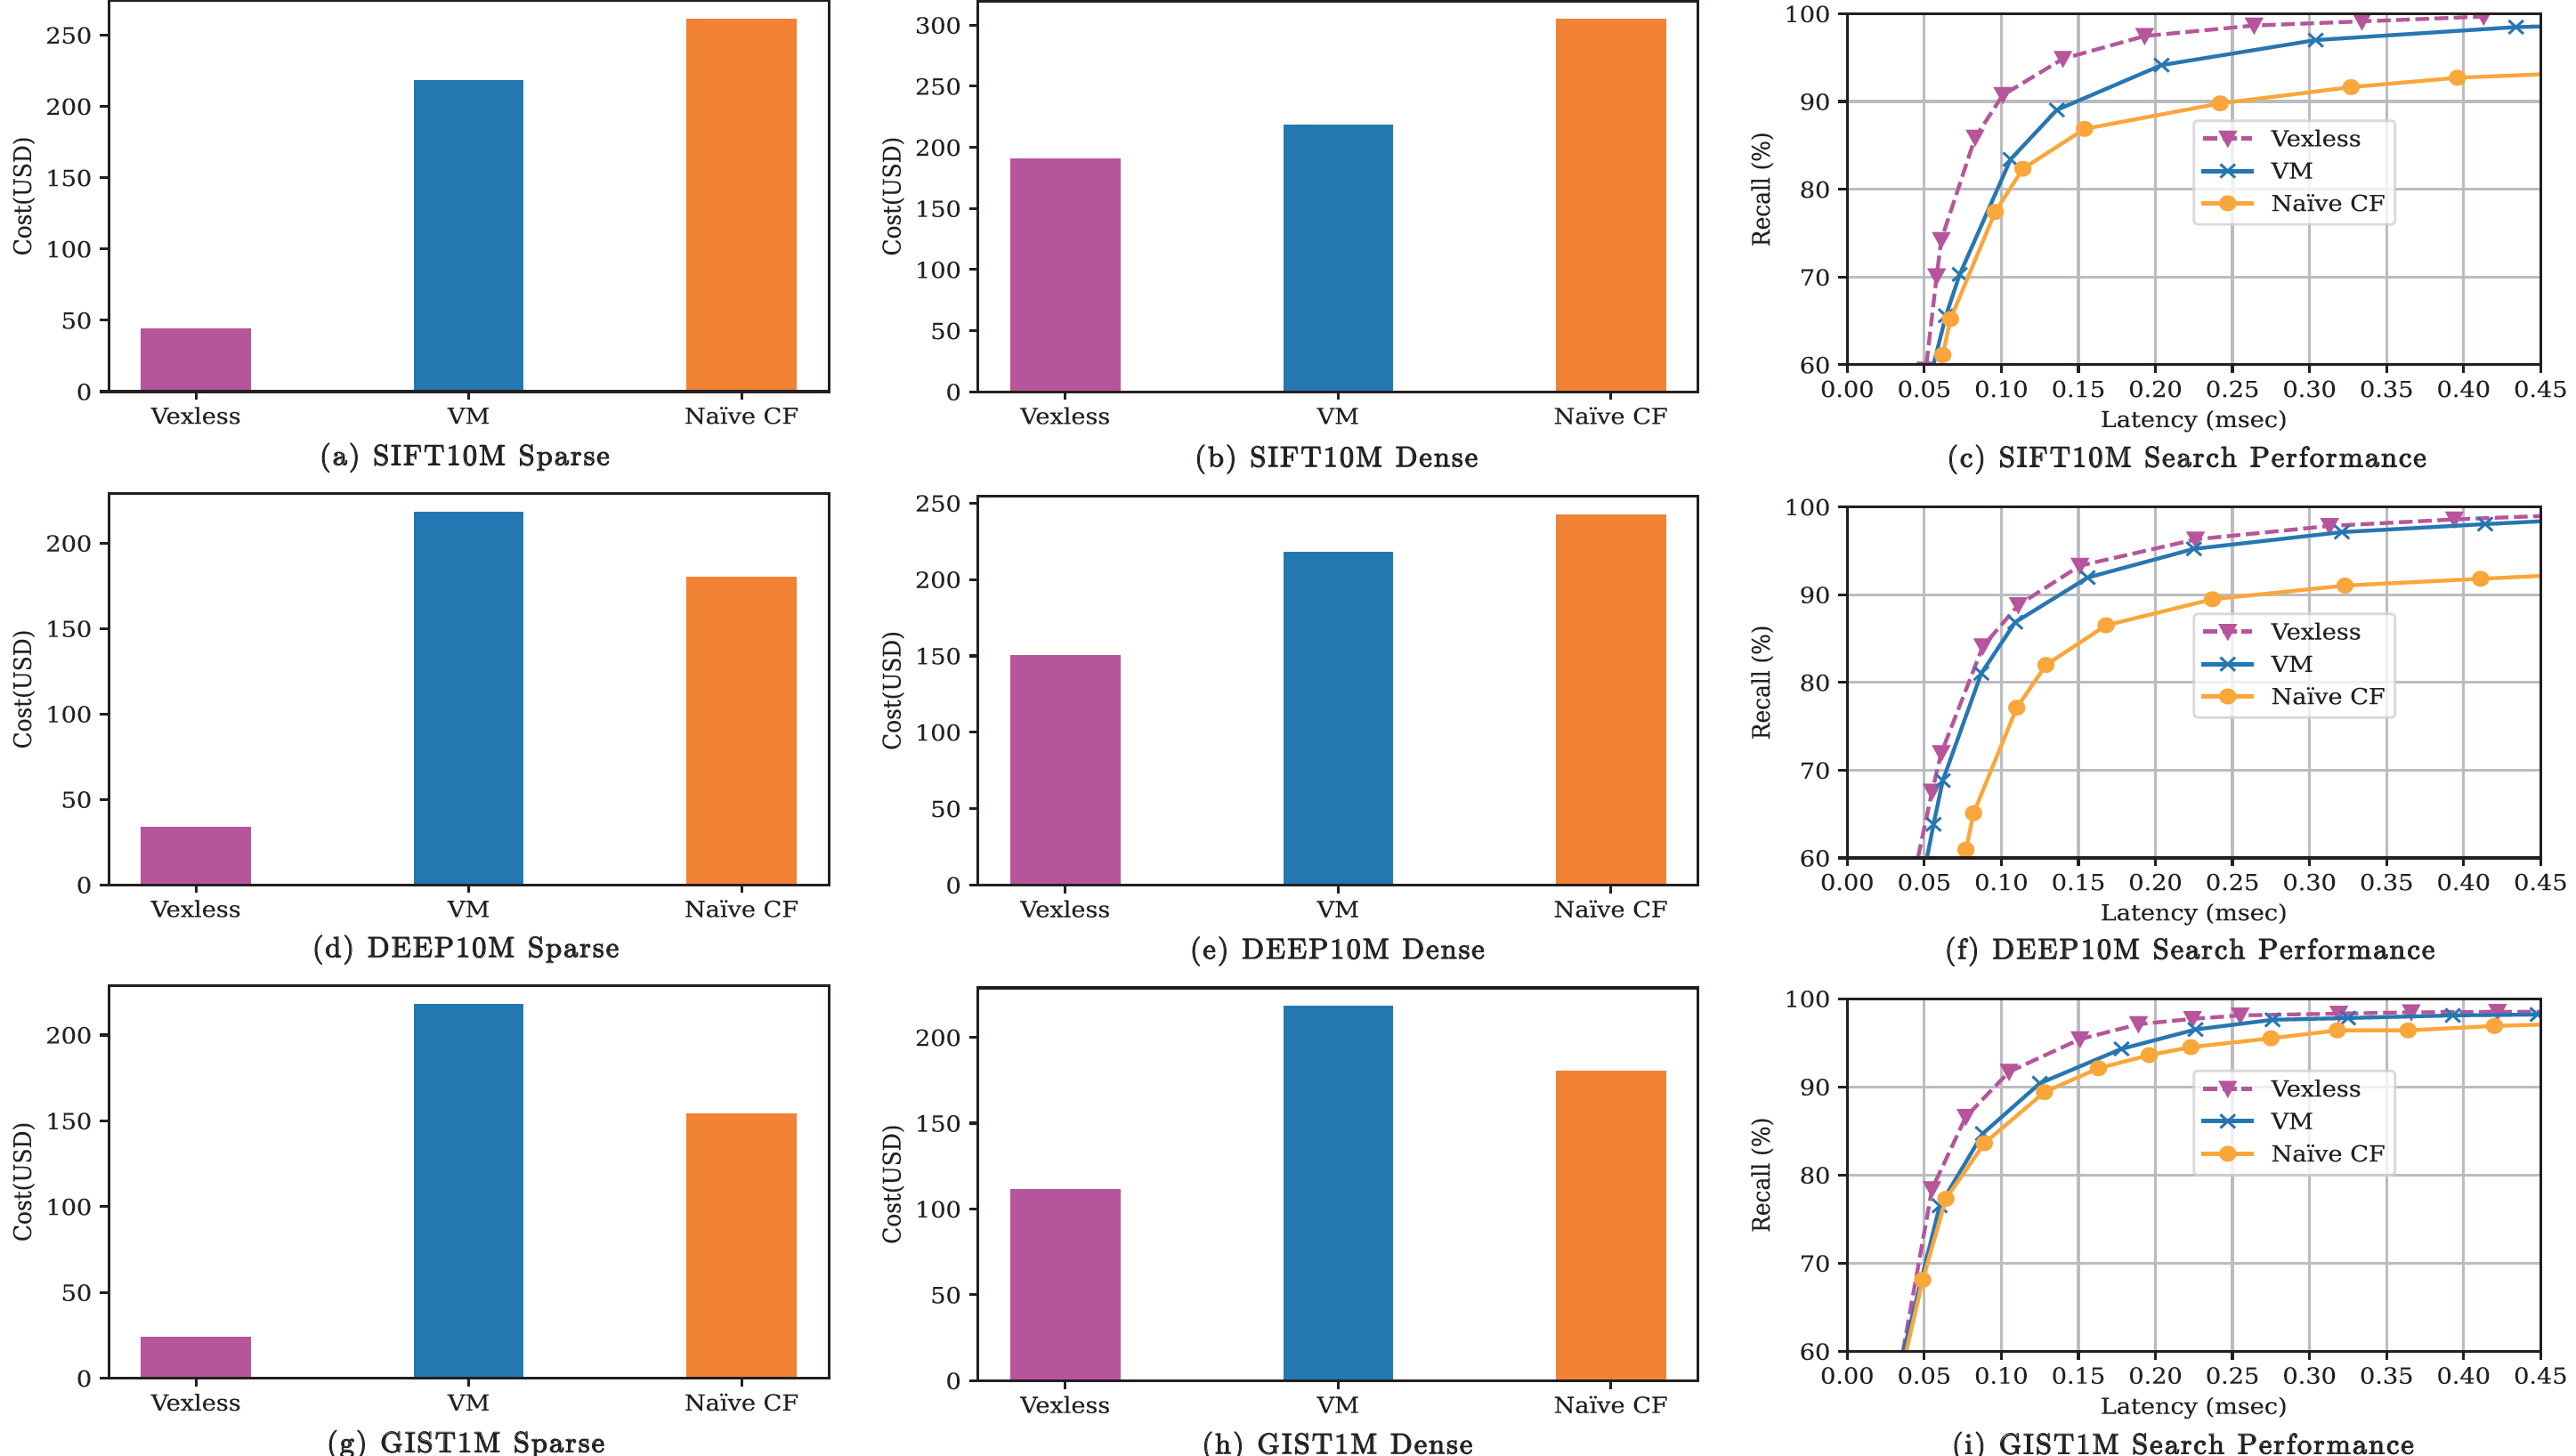
The cost of different solutions can be calculated using the Azure billing calculator
