Paper Reference: https://arxiv.org/abs/2106.01342
NB: This implementation uses Pytorch-lightning for setting up experiments and Hydra for configuration. For an earlier release of this code which does not use hydra, check the branch saint-orig
We decided to create an implementation of saint that can work with any tabular dataset, not jsut those mentioned in the paper. This implementation can be run with any tabular data for binary or multiclass classification. Regression is not supported.
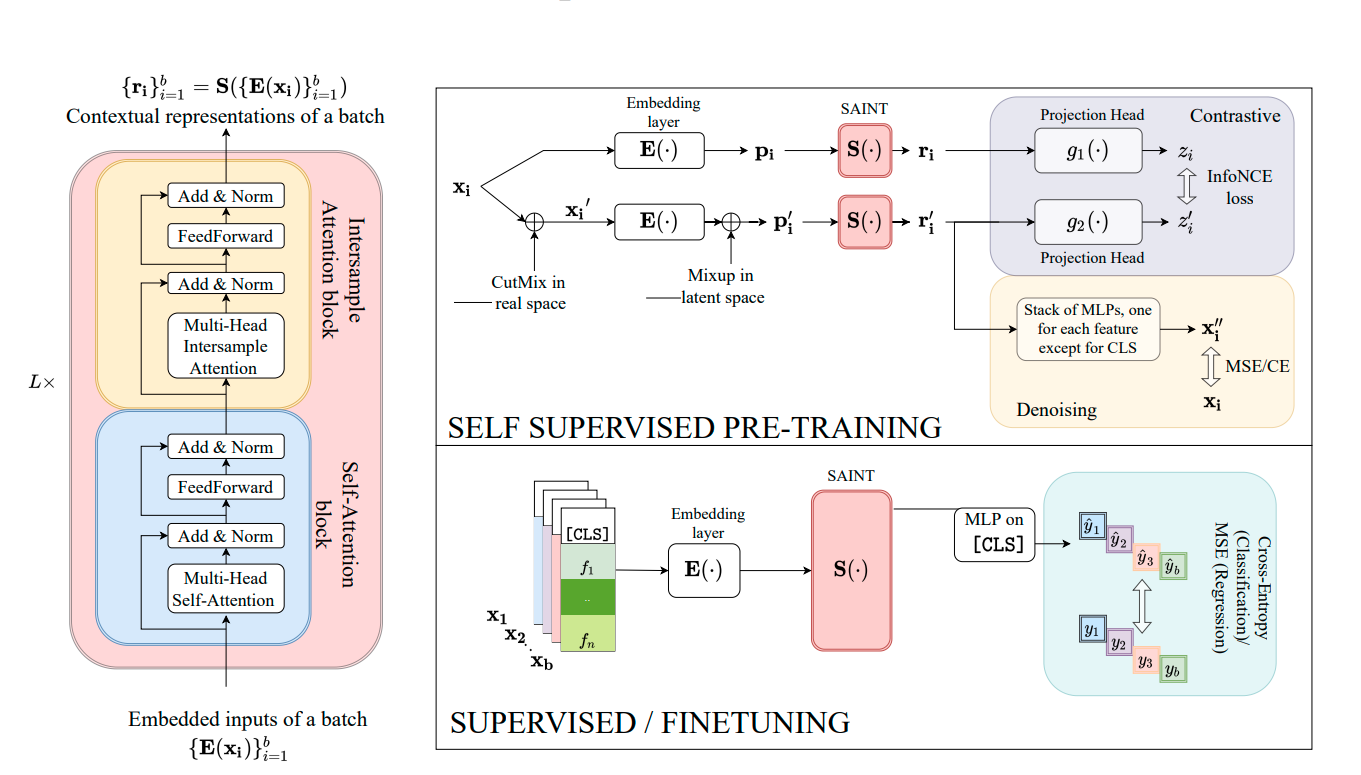
- Saint Transformer
- Saint Intersample Transformer
- Embeddings for tabular data
- Mixup
- CutMix
- Contrastive Loss
- Denoising Loss
For easy configuration, we decided to organize the code in a structured way
- The base config file can be found the the
configsdirectory. This contains most hyperparameters for training the models. - Configurations for experiments are split into
supervisedandself-supervisedconfigs. The supervised config file is to be used as default when running predictive tasks while the self-supervised config file should be selected in case of self-supervised pre-training tasks. The files can be edited to suit your needs. In addition, there is apredictconfig file which we setup to make predictions on a test set (e.g. for kaggle) - Another config directory is dedicated to house all datasets configurations. This is the
datasub-directory inside the configs directory. It includes hyperparameters like train, validation and test data paths and other data statistics. Samples of configs for supervised (indicated with names ending in "_sup") and self-supervised training (indicated with names ending in "_ssl") are provided for bank dataset. They can be replicated for other custom datasets as well.
The datasets should live in the data directory. It is necessary to provide the absolute paths to the data folder in the data configs. Also, the datasets have to be pre-processed before running experiments. These are recommendations from the paper e.g data transforms using z-transform. Other recommendations are design decisions made by us.
- Add a column named 'cls' to your dataset. The 'cls' column should be the first column as mentioned in paper
- Apply z-transform to numerical columns
- Label encode categorical columns
- It is required that categorical columns are separated from numerical columns. In particular, we track the total categorical columns in the dataframe by the number of columns. Therefore, you need split the data into categorical columns and numerical columns, compute some statistics as explained below, then merge them to form a new dataframe which can be understood by the model. Note that all categorical columns appear before the numerical columns in the data. The cls column is expected the be the first column and it is counted as a categorical column.
- Calculate the number of categorical columns (including 'cls' column) and numerical columns. Include these statistics under
data_statsin the data configs of your particular dataset. - Also, you will need to provide the number of categories in each categorical column in the data config. These are required to build proper embeddings for the model. It should also be provided as an array in the
data.data_stats.catsparameter or hard coded in the data config. Note that the cls column has 1 category and is always indicated as 1 in the array. - Save your processed files as train, val and test csvs in
datafolder.
A sample function named
preprocess.pyis included undersrc > dataset.pythat explains the preprocessing strategy. You may need to modify this function depending on the dataset. Also, tutorial notebooks are provided innotebooksfolder to showcase how to preprocess custom datasets and run experiments. Look at Bank_Dataset.ipynb
git clone https://github.com/ogunlao/saint.git
- Activate your virtual environment. It is advisable to use a virtual environment to setup this code.
- Install dependencies using the
requirements.txtfile provided
pip3 install -r requirements.txt - Update the config.yaml file with your hyperparameters. Alternatively, you can provide your settings on the command-line while running experiments. A good knowledge of hydra might be required.
Examples
- To train saint-intersample (saint-i) model in self-supervised mode using bank dataset, run;
python main.py experiment=self-supervised \
    experiment.model=saint_i \
    data=bank_ssl \
data.data_folder=/content/saint/data- To train saint model in supervised mode using bank dataset, run;
python main.py experiment=supervised \
    experiment.model=saint \
    data=bank_sup \
data.data_folder=/content/saint/data- To make prediction using saint model in supervised mode using bank dataset, run;
!python saint/predict.py experiment=predict \
    experiment.model=saint \
    experiment.pretrained_checkpoint=["PATH_TO_SAVED_CKPT"] \
    experiment.pred_sav_path=["PATH_TO_SAVE_PREDICTION.csv"] \
    data=bank_sup \
    data.data_folder=/content/saint/data
You may need to run some hyperparameter search to determine the best model for your task. Hydra provides this functionality out of the box with multirun.
- Ahmed A. Elhag
- Aisha Alaagib
- Amina Rufai
- Amna Ahmed Elmustapha
- Jamal Hussein
- Mohammedelfatih Salah
- Ruba Mutasim
- Sewade Olaolu Ogun
(names in alphabetical order)
