This is an ES2015/ES6 fork of the popular Angular 1.x Style Guide by John Papa. It is intended for use with the generator-gulp-angular and Babel, and things that do not apply in that circumstance have been removed.
Please be advised that all examples will not be copy/paste working examples. In instances where classes are imported, it is expected that the imported class was defined correctly, in another file, and imported in.
- Single Responsibility
- Modules
- Controllers
- Data Services
- Directives
- Minification and Annotation
- Naming
- Application Structure LIFT Principle
- Application Structure
- Modularity
- Angular $ Wrapper Services
- Testing
- ESLint
- Constants
- Angular Docs
- Contributing
- License
[Style Y001]
- Define 1 component per file.
The following example defines the app module and its dependencies, defines a controller, and defines a factory all in the same file.
/* avoid */

class SomeController {
  constructor() { }
}

class someFactory{
  constructor() { }
}

angular
    .module('app', ['ngRoute'])
    .controller('SomeController', SomeController)
    .factory('someFactory', someFactory);
The same components are now separated into their own files.
/* recommended */

// app.module.js
import { SomeController } from './some.controller';
import { someFactory } from './some.factory';

const app = angular
    .module('app', ['ngRoute'])
    .controller('SomeController', SomeController)
    .factory('someFactory', someFactory)
    .name;
export app;
/* recommended */
// some.controller.js
class SomeController{
constructor() { }
}/* recommended */
// some.factory.js
class someFactory{
constructor() { }
}[Style Y020]
- Use unique naming conventions with separators for sub-modules.
Why?: Unique names help avoid module name collisions. Separators help define modules and their submodule hierarchy. For example app may be your root module while app.dashboard and app.users may be modules that are used as dependencies of app.
[Style Y035]
-
Defer logic in a controller by delegating to services and factories.
Why?: Logic may be reused by multiple controllers when placed within a service and exposed via a function.
Why?: Logic in a service can more easily be isolated in a unit test, while the calling logic in the controller can be easily mocked.
Why?: Removes dependencies and hides implementation details from the controller.
Why?: Keeps the controller slim, trim, and focused.
/* avoid */
class Order {
  constructor($http, $q, config, userInfo) {
    this.isCreditOk = false;
    this.total = 0;
  }
  checkCredit() {
    let settings = {};
    // Get the credit service base URL from config
    // Set credit service required headers
    // Prepare URL query string or data object with request data
    // Add user-identifying info so service gets the right credit limit for this user.
    // Use JSONP for this browser if it doesn't support CORS
    return $http.get(settings)
      .then((data) => {
      // Unpack JSON data in the response object
      // to find maxRemainingAmount
        this.isCreditOk = this.total <= maxRemainingAmount
      })
      .catch((error) => {
        // Interpret error
        // Cope w/ timeout? retry? try alternate service?
        // Re-reject with appropriate error for a user to see
      });
    };
}
/* recommended */
class Order {
constructor (creditService) {
this.isCreditOk;
this.total = 0;
}
checkCredit() {
return creditService.isOrderTotalOk(this.total)
.then((isOk) => { this.isCreditOk = isOk; })
.catch(showError);
}
}[Style Y037]
-
Define a controller for a view, and try not to reuse the controller for other views. Instead, move reusable logic to factories and keep the controller simple and focused on its view.
Why?: Reusing controllers with several views is brittle and good end-to-end (e2e) test coverage is required to ensure stability across large applications.
[Style Y060]
-
Refactor logic for making data operations and interacting with data to a factory. Make data services responsible for XHR calls, local storage, stashing in memory, or any other data operations.
Why?: The controller's responsibility is for the presentation and gathering of information for the view. It should not care how it gets the data, just that it knows who to ask for it. Separating the data services moves the logic on how to get it to the data service, and lets the controller be simpler and more focused on the view.
Why?: This makes it easier to test (mock or real) the data calls when testing a controller that uses a data service.
Why?: Data service implementation may have very specific code to handle the data repository. This may include headers, how to talk to the data, or other services such as
$http. Separating the logic into a data service encapsulates this logic in a single place hiding the implementation from the outside consumers (perhaps a controller), also making it easier to change the implementation.
/* recommended */

// dataservice factory
const appCore = angular
    .module('app.core')
    .factory('dataservice', dataservice)
    .name;

class dataservice {
  constructor($http, logger) {
    this.$http = $http;
    this.logger = logger;
  }
  getAvengers() {
    return this.$http.get('/api/maa')
      .then(getAvengersComplete)
      .catch(getAvengersFailed);

    getAvengersComplete(response) => {
      return response.data.results;
    }

    getAvengersFailed(error) => {
      this.logger.error('XHR Failed for getAvengers.' + error.data);
    }
  }
}

export default appCore;[Style Y061]
-
When calling a data service that returns a promise such as
$http, return a promise in your calling function too.Why?: You can chain the promises together and take further action after the data call completes and resolves or rejects the promise.
/* recommended */

activate() {
    /**
     * Step 1
     * Ask the getAvengers function for the
     * avenger data and wait for the promise
     */
    return getAvengers().then(() => {
        /**
         * Step 4
         * Perform an action on resolve of final promise
         */
        logger.info('Activated Avengers View');
    });
}

getAvengers() {
      /**
       * Step 2
       * Ask the data service for the data and wait
       * for the promise
       */
      return dataservice.getAvengers()
          .then((data) => {
              /**
               * Step 3
               * set the data and resolve the promise
               */
              this.avengers = data;
              return this.avengers;
      });
}[Style Y070]
-
Create one directive per file. Name the file for the directive.
Why?: It is easy to mash all the directives in one file, but difficult to then break those out so some are shared across apps, some across modules, some just for one module.
Why?: One directive per file is easy to maintain.
Note: "Best Practice: Directives should clean up after themselves. You can use
element.on('$destroy', ...)orscope.$on('$destroy', ...)to run a clean-up function when the directive is removed" ... from the Angular documentation.
/* avoid */
/* directives.js */

class orderCalendarRange {
    /* implementation details */
}

class salesCustomerInfo {
    /* implementation details */
}

class sharedSpinner {
    /* implementation details */
}
/* recommended */
/* calendarRange.directive.js */
/**
* @desc order directive that is specific to the order module at a company named Acme
* @example <div acme-order-calendar-range></div>
*/
class orderCalendarRange {
/* implementation details */
}/* recommended */
/* customerInfo.directive.js */
/**
* @desc sales directive that can be used anywhere across the sales app at a company named Acme
* @example <div acme-sales-customer-info></div>
*/
class salesCustomerInfo {
/* implementation details */
}/* recommended */
/* spinner.directive.js */
/**
* @desc spinner directive that can be used anywhere across apps at a company named Acme
* @example <div acme-shared-spinner></div>
*/
class sharedSpinner {
/* implementation details */
}Note: There are many naming options for directives, especially since they can be used in narrow or wide scopes. Choose one that makes the directive and its file name distinct and clear. Some examples are below, but see the [Naming](#naming) section for more recommendations.
[Style Y072]
-
When manipulating the DOM directly, use a directive. If alternative ways can be used such as using CSS to set styles or the animation services, Angular templating,
ngShoworngHide, then use those instead. For example, if the directive simply hides and shows, use ngHide/ngShow.Why?: DOM manipulation can be difficult to test, debug, and there are often better ways (e.g. CSS, animations, templates)
[Style Y073]
-
Provide a short, unique and descriptive directive prefix such as
acmeSalesCustomerInfowhich would be declared in HTML asacme-sales-customer-info.Why?: The unique short prefix identifies the directive's context and origin. For example a prefix of
cc-may indicate that the directive is part of a CodeCamper app whileacme-may indicate a directive for the Acme company.Note: Avoid
ng-as these are reserved for Angular directives. Research widely used directives to avoid naming conflicts, such asion-for the Ionic Framework.
[Style Y074]
-
When creating a directive then restrict it to
A!!! (custom attribute).Why?: It makes sense.
Note: A is the default for Angular 1.3 +
<!-- avoid -->
<div class="my-calendar-range"></div>
/* avoid */
class myCalendarRange {
constructor() {
this.link = this.linkFunc;
this.templateUrl = '/template/is/located/here.html';
this.restrict = 'C';
}
linkFunc(scope, element, attrs) {
/* */
}
}<!-- recommended -->
<div my-calendar-range></div>/* recommended */
class myCalendarRange {
constructor() {
this.link = this.linkFunc;
this.templateUrl = '/template/is/located/here.html';
this.restrict = 'A';
}
linkFunc(scope, element, attrs) {
/* */
}
}[Style Y081]
-
When a controller depends on a promise to be resolved before the controller is activated, resolve those dependencies in the
$routeProviderbefore the controller logic is executed. If you need to conditionally cancel a route before the controller is activated, use a route resolver. -
Use a route resolve when you want to decide to cancel the route before ever transitioning to the View.
Why?: A controller may require data before it loads. That data may come from a promise via a custom factory or $http. Using a route resolve allows the promise to resolve before the controller logic executes, so it might take action based on that data from the promise.
Why?: The code executes after the route and in the controller’s activate function. The View starts to load right away. Data binding kicks in when the activate promise resolves. A “busy” animation can be shown during the view transition (via
ng-vieworui-view)Note: The code executes before the route via a promise. Rejecting the promise cancels the route. Resolve makes the new view wait for the route to resolve. A “busy” animation can be shown before the resolve and through the view transition. If you want to get to the View faster and do not require a checkpoint to decide if you can get to the View, consider the controller
activatetechnique instead.
/* avoid */

class AvengersController {
  constructor(movieService) {
    // unresolved
    this.movies;
    // resolved asynchronously
    movieService.getMovies().then((response) => {
        this.movies = response.movies;
    });
  }
}
/* better */
// route-config.js
function config($routeProvider) {
$routeProvider
.when('/avengers', {
templateUrl: 'avengers.html',
controller: 'AvengersController',
controllerAs: 'avengers',
resolve: {
moviesPrepService: function(movieService) {
return movieService.getMovies();
}
}
});
}
// avengers.controller.js
class AvengersController {
constructor(moviesPrepService) {
this.movies = moviesPrepService.movies;
}
}Note: The example below shows the route resolve points to a named function, which is easier to debug and easier to handle dependency injection.
/* even better */

// route-config.js

function config($routeProvider) {
  $routeProvider
    .when('/avengers', {
      templateUrl: 'avengers.html',
      controller: 'AvengersController',
      controllerAs: 'avengers',
      resolve: {
        moviesPrepService: moviesPrepService
      }
    });
}

function moviesPrepService(movieService) {
    return movieService.getMovies();
}

// avengers.controller.js

class AvengersController {
  constructor(moviesPrepService) {
    this.movies = moviesPrepService.movies;
  }
}[Style Y100]
-
Use ng-annotate for Gulp or Grunt and comment functions that need automated dependency injection using
'ngInject'Why?: This safeguards your code from any dependencies that may not be using minification-safe practices.
class Avengers {
  /** @ngInject */
  constructor(storage, avengerService) {


    this.heroSearch = '';

    this.avengerService = avengerService;
    this.storage = storage;
  }
  storeHero() {
    let hero = this.avengerService.find(this.heroSearch);
    this.storage.save(hero.name, hero);
  }
}
Note: When using a route resolver you can prefix the resolver's function with
/* @ngInject */and it will produce properly annotated code, keeping any injected dependencies minification safe.// Using @ngInject annotations function config($routeProvider) { $routeProvider .when('/avengers', { templateUrl: 'avengers.html', controller: 'AvengersController', controllerAs: 'avengers', resolve: { /* @ngInject */ moviesPrepService: function(movieService) { return movieService.getMovies(); } } }); }
Note: Starting from Angular 1.3 you can use the
ngAppdirective'sngStrictDiparameter to detect any potentially missing minification safe dependencies. When present the injector will be created in "strict-di" mode causing the application to fail to invoke functions which do not use explicit function annotation (these may not be minification safe). Debugging info will be logged to the console to help track down the offending code. I prefer to only useng-strict-difor debugging purposes only.<body ng-app="APP" ng-strict-di>
[Style Y120]
-
Use consistent names for all components following a pattern that describes the component's feature then (optionally) its type. My recommended pattern is
feature.type.js. There are 2 names for most assets:- the file name (
avengers.controller.js) - the registered component name with Angular (
AvengersController)
Why?: Naming conventions help provide a consistent way to find content at a glance. Consistency within the project is vital. Consistency with a team is important. Consistency across a company provides tremendous efficiency.
Why?: The naming conventions should simply help you find your code faster and make it easier to understand.
- the file name (
[Style Y121]
-
Use consistent names for all components following a pattern that describes the component's feature then (optionally) its type. My recommended pattern is
feature.type.js.Why?: Provides a consistent way to quickly identify components.
Why?: Provides pattern matching for any automated tasks.
/**
 * recommended
 */

// modules
avengers.module.js

// controllers
avengers.js
avengers.spec.js

// services/factories
logger.service.js
logger.service.spec.js

// constants
constants.js

// configuration
avengers.config.js

// directives
avenger-profile.directive.js
avenger-profile.directive.spec.js
[Style Y122]
-
Name test specifications similar to the component they test with a suffix of
spec.Why?: Provides a consistent way to quickly identify components.
Why?: Provides pattern matching for karma or other test runners.
/**
 * recommended
 */
avengers.spec.js
logger.service.spec.js
avengers.routes.spec.js
avenger-profile.directive.spec.js
[Style Y123]
-
Use consistent names for all controllers named after their feature. Use UpperCamelCase for controllers, as they are classes.
Why?: Provides a consistent way to quickly identify and reference controllers.
Why?: UpperCamelCase is conventional for identifying object that can be instantiated using a constructor.
/**
 * recommended
 */

// avengers.controller.js

class HeroAvengersController{
  constructor() { }
}
[Style Y124]
-
Append the controller name with the suffix
Controller.Why?: The
Controllersuffix is more commonly used and is more explicitly descriptive./** * recommended */ // avengers.controller.js class AvengersController{ constructor() { } }
[Style Y125]
-
Use consistent names for all factories and services named after their feature. Use camel-casing for services and factories. Avoid prefixing factories and services with
$. Only suffix service and factories withServicewhen it is not clear what they are (i.e. when they are nouns).Why?: Provides a consistent way to quickly identify and reference factories.
Why?: Avoids name collisions with built-in factories and services that use the
$prefix.Why?: Clear service names such as
loggerdo not require a suffix.Why?: Service names such as
avengersare nouns and require a suffix and should be namedavengersService./** * recommended */ // logger.service.js class logger { constructor() { } }
/**
 * recommended
 */

// credit.service.js

class creditService {
  constructor() { }
}

// customer.service.js

class customersService {
  constructor() { }
}
[Style Y126]
-
Use consistent names for all directives using camel-case. Use a short prefix to describe the area that the directives belong (some example are company prefix or project prefix).
Why?: Provides a consistent way to quickly identify and reference components.
/**
 * recommended
 */

// avenger-profile.directive.js

// usage is <div xx-avenger-profile> </div>

class xxAvengerProfile {
  constructor() {
    this.restrict = 'A';
  }
}
[Style Y127]
-
When there are multiple modules, the main module file is named
app.module.jswhile other dependent modules are named after what they represent. For example, an admin module is namedadmin.module.js. The respective registered module names would beappandadmin.Why?: Provides consistency for multiple module apps, and for expanding to large applications.
Why?: Provides easy way to use task automation to load all module definitions first, then all other angular files (for bundling).
[Style Y140]
-
Structure your app such that you can
Locate your code quickly,Identify the code at a glance, keep theFlattest structure you can, andTry to stay DRY. The structure should follow these 4 basic guidelines.Why LIFT?: Provides a consistent structure that scales well, is modular, and makes it easier to increase developer efficiency by finding code quickly. Another way to check your app structure is to ask yourself: How quickly can you open and work in all of the related files for a feature?
When I find my structure is not feeling comfortable, I go back and revisit these LIFT guidelines
Locating our code is easyIdentify code at a glanceFlat structure as long as we canTry to stay DRY (Don’t Repeat Yourself) or T-DRY
[Style Y141]
-
Make locating your code intuitive, simple and fast.
Why?: I find this to be super important for a project. If the team cannot find the files they need to work on quickly, they will not be able to work as efficiently as possible, and the structure needs to change. You may not know the file name or where its related files are, so putting them in the most intuitive locations and near each other saves a ton of time. A descriptive folder structure can help with this.
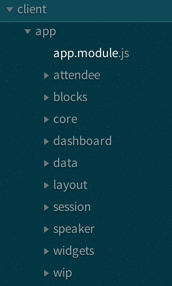
/jspm_packages
/node_modules
/build
/dist
/server
/src
  /assets
  /core
  /app
    /avengers
    /blocks
      /exception
      /logger
    /core
    /dashboard
    /data
    /layout
    /widgets
  /content
  index.html
.bower.json
[Style Y142]
-
When you look at a file you should instantly know what it contains and represents.
Why?: You spend less time hunting and pecking for code, and become more efficient. If this means you want longer file names, then so be it. Be descriptive with file names and keeping the contents of the file to exactly 1 component. Avoid files with multiple controllers, multiple services, or a mixture. There are deviations of the 1 per file rule when I have a set of very small features that are all related to each other, they are still easily identifiable.
[Style Y143]
-
Keep a flat folder structure as long as possible. When you get to 7+ files, begin considering separation.
Why?: Nobody wants to search 7 levels of folders to find a file. Think about menus on web sites … anything deeper than 2 should take serious consideration. In a folder structure there is no hard and fast number rule, but when a folder has 7-10 files, that may be time to create subfolders. Base it on your comfort level. Use a flatter structure until there is an obvious value (to help the rest of LIFT) in creating a new folder.
[Style Y144]
-
Be DRY, but don't go nuts and sacrifice readability.
Why?: Being DRY is important, but not crucial if it sacrifices the others in LIFT, which is why I call it T-DRY. I don’t want to type session-view.html for a view because, well, it’s obviously a view. If it is not obvious or by convention, then I name it.
[Style Y150]
-
Have a near term view of implementation and a long term vision. In other words, start small but keep in mind on where the app is heading down the road. All of the app's code goes in a root folder named
app. All content is 1 feature per file. Each controller, service, module, view is in its own file. All 3rd party vendor scripts are stored in another root folder and not in theappfolder. I didn't write them and I don't want them cluttering my app (bower_components,scripts,lib).Note: Find more details and reasoning behind the structure at this original post on application structure.
[Style Y152]
-
Create folders named for the feature they represent. When a folder grows to contain more than 7 files, start to consider creating a folder for them. Your threshold may be different, so adjust as needed.
Why?: A developer can locate the code, identify what each file represents at a glance, the structure is flat as can be, and there is no repetitive nor redundant names.
Why?: The LIFT guidelines are all covered.
Why?: Helps reduce the app from becoming cluttered through organizing the content and keeping them aligned with the LIFT guidelines.
Why?: When there are a lot of files (10+) locating them is easier with a consistent folder structures and more difficult in flat structures.
/**
 * recommended
 */

src/
    app/
        calendar/
            list/
                calendar-list.js
                calendar-list.tpl.html
                calendar-list.module.js
            details/
                calendar-details.js
                calendar-details.tpl.html
                calendar-details.module.js
            calendar.module.js
    app.module.js
    app.config.js
    app.run.js
  core/
    resources/
        users/
            users.js
            users.spec.js
            users.module.js
        resources.module.js
    services/
        users/
            users.spec.js
            users.js
            users.module.js
        services.module.js
    components/
        tables/
            tables.html
            tables.js
            tables.module.js
        filters/
            simple/
                simple.html
                simple.js
                simple.module.js
            advanced/
                advanced.html
                advanced.js
                advanced.module.js
            filters.module.js
        components.module.js
    core.module.js
Note: Do not structure your app using folders-by-type. This requires moving to multiple folders when working on a feature and gets unwieldy quickly as the app grows to 5, 10 or 25+ views and controllers (and other features), which makes it more difficult than folder-by-feature to locate files.
[Style Y160]
-
Create small modules that encapsulate one responsibility.
Why?: Modular applications make it easy to plug and go as they allow the development teams to build vertical slices of the applications and roll out incrementally. This means we can plug in new features as we develop them.
[Style Y161]
-
Create an application root module whose role is pull together all of the modules and features of your application. Name this for your application.
Why?: Angular encourages modularity and separation patterns. Creating an application root module whose role is to tie your other modules together provides a very straightforward way to add or remove modules from your application.
[Style Y162]
-
Only put logic for pulling together the app in the application module. Leave features in their own modules.
Why?: Adding additional roles to the application root to get remote data, display views, or other logic not related to pulling the app together muddies the app module and make both sets of features harder to reuse or turn off.
Why?: The app module becomes a manifest that describes which modules help define the application.
[Style Y163]
-
Create modules that represent feature areas, such as layout, reusable and shared services, dashboards, and app specific features (e.g. customers, admin, sales).
Why?: Self contained modules can be added to the application with little or no friction.
Why?: Sprints or iterations can focus on feature areas and turn them on at the end of the sprint or iteration.
Why?: Separating feature areas into modules makes it easier to test the modules in isolation and reuse code.
[Style Y164]
-
Create modules that represent reusable application blocks for common services such as exception handling, logging, diagnostics, security, and local data stashing.
Why?: These types of features are needed in many applications, so by keeping them separated in their own modules they can be application generic and be reused across applications.
[Style Y165]
-
The application root module depends on the app specific feature modules and any shared or reusable modules.
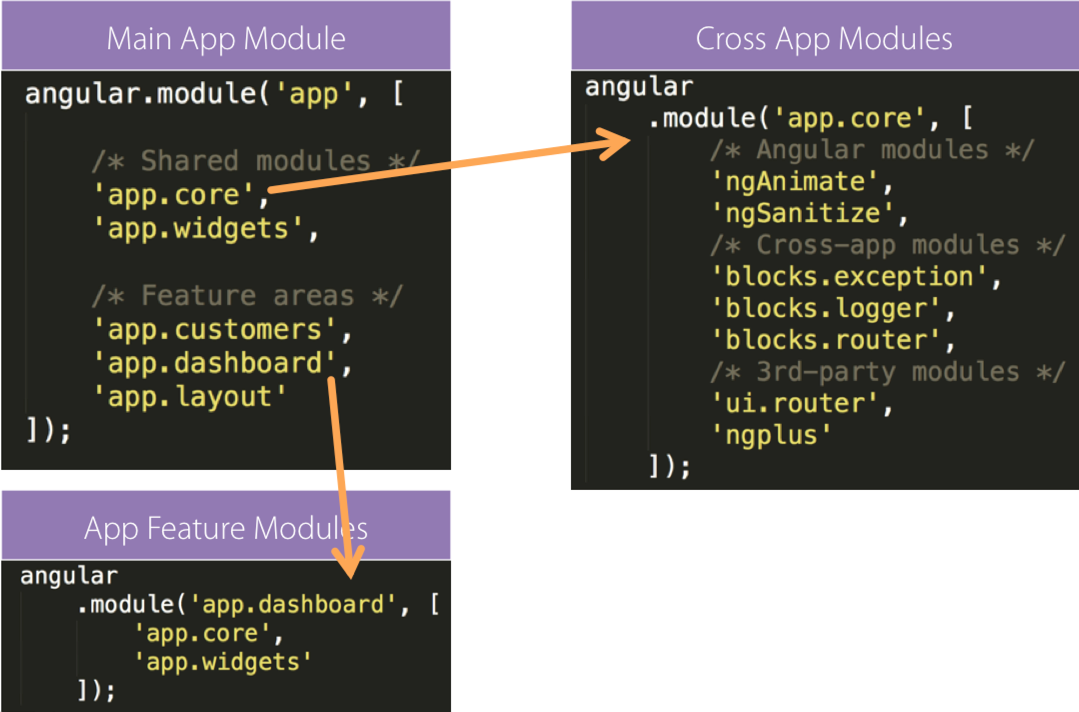
Why?: The main app module contains a quickly identifiable manifest of the application's features.
Why?: Each feature area contains a manifest of what it depends on, so it can be pulled in as a dependency in other applications and still work.
Why?: Intra-App features such as shared data services become easy to locate and share from within
app.core(choose your favorite name for this module).Note: This is a strategy for consistency. There are many good options here. Choose one that is consistent, follows Angular's dependency rules, and is easy to maintain and scale.
My structures vary slightly between projects but they all follow these guidelines for structure and modularity. The implementation may vary depending on the features and the team. In other words, don't get hung up on an exact like-for-like structure but do justify your structure using consistency, maintainability, and efficiency in mind.
In a small app, you can also consider putting all the shared dependencies in the app module where the feature modules have no direct dependencies. This makes it easier to maintain the smaller application, but makes it harder to reuse modules outside of this application.
[Style Y180]
-
Use
$documentand$windowinstead ofdocumentandwindow.Why?: These services are wrapped by Angular and more easily testable than using document and window in tests. This helps you avoid having to mock document and window yourself.
[Style Y181]
-
Use
$timeoutand$intervalinstead ofsetTimeoutandsetInterval.Why?: These services are wrapped by Angular and more easily testable and handle Angular's digest cycle thus keeping data binding in sync.
Unit testing helps maintain clean code, as such I included some of my recommendations for unit testing foundations with links for more information.
[Style Y190]
-
Write a set of tests for every story. Start with an empty test and fill them in as you write the code for the story.
Why?: Writing the test descriptions helps clearly define what your story will do, will not do, and how you can measure success.
it('should have Avengers controller', function() {
    // TODO
});

it('should find 1 Avenger when filtered by name', function() {
    // TODO
});

it('should have 10 Avengers', function() {
    // TODO (mock data?)
});

it('should return Avengers via XHR', function() {
    // TODO ($httpBackend?)
});

// and so on
[Style Y191]
-
Use Jasmine or Mocha for unit testing.
Why?: Both Jasmine and Mocha are widely used in the Angular community. Both are stable, well maintained, and provide robust testing features.
Note: When using Mocha, also consider choosing an assert library such as Chai. I prefer Mocha.
[Style Y192]
-
Use Karma as a test runner.
Why?: Karma is easy to configure to run once or automatically when you change your code.
Why?: Karma hooks into your Continuous Integration process easily on its own or through Grunt or Gulp.
Why?: Some IDE's are beginning to integrate with Karma, such as WebStorm and Visual Studio.
Why?: Karma works well with task automation leaders such as Grunt (with grunt-karma) and Gulp. When using Gulp, use Karma directly and not with a plugin as the API can be called directly.
/* recommended */

// Gulp example with Karma directly
function startTests(singleRun, done) {
    var child;
    var excludeFiles = [];
    var fork = require('child_process').fork;
    var karma = require('karma').server;
    var serverSpecs = config.serverIntegrationSpecs;

    if (args.startServers) {
        log('Starting servers');
        var savedEnv = process.env;
        savedEnv.NODE_ENV = 'dev';
        savedEnv.PORT = 8888;
        child = fork(config.nodeServer);
    } else {
        if (serverSpecs && serverSpecs.length) {
            excludeFiles = serverSpecs;
        }
    }

    karma.start({
        configFile: __dirname + '/karma.conf.js',
        exclude: excludeFiles,
        singleRun: !!singleRun
    }, karmaCompleted);

    ////////////////

    function karmaCompleted(karmaResult) {
        log('Karma completed');
        if (child) {
            log('shutting down the child process');
            child.kill();
        }
        if (karmaResult === 1) {
            done('karma: tests failed with code ' + karmaResult);
        } else {
            done();
        }
    }
}
[Style Y193]
- Use [Jasmine] for stubbing and spying.
[Style Y194]
-
Use PhantomJS to run your tests on a server.
Why?: PhantomJS is a headless browser that helps run your tests without needing a "visual" browser. So you do not have to install Chrome, Safari, IE, or other browsers on your server.
Note: You should still test on all browsers in your environment, as appropriate for your target audience.
[Style Y195]
-
Run ESLint on your tests.
Why?: Tests are code. ESLint can help identify code quality issues that may cause the test to work improperly.
[Style Y197]
-
Place unit test files (specs) side-by-side with your client code. Place specs that cover server integration or test multiple components in a separate
testsfolder.Why?: Unit tests have a direct correlation to a specific component and file in source code.
Why?: It is easier to keep them up to date since they are always in sight. When coding whether you do TDD or test during development or test after development, the specs are side-by-side and never out of sight nor mind, and thus more likely to be maintained which also helps maintain code coverage.
Why?: When you update source code it is easier to go update the tests at the same time.
Why?: Placing them side-by-side makes it easy to find them and easy to move them with the source code if you move the source.
Why?: Having the spec nearby makes it easier for the source code reader to learn how the component is supposed to be used and to discover its known limitations.
Why?: Separating specs so they are not in a distributed build is easy with grunt or gulp.
/src/client/app/customers/customer-detail.controller.js
                         /customer-detail.controller.spec.js
                         /customers.controller.js
                         /customers.controller.spec.js
                         /customers.module.js
                         /customers.route.js
                         /customers.route.spec.js
[Style Y230]
-
Use ESLint for linting your JavaScript and be sure to customize the .eslintrc file and include in source control. See the ESLint docs for details on the options.
Why?: Provides a first alert prior to committing any code to source control.
Why?: Provides consistency across your team.
Why?: ESLint supports ES6.
{
"globals": { "_": false, "angular": false, "console": false, "inject": false, "module": false, "window": false }, "parser": "babel-eslint", "rules": { "brace-style": [2, "stroustrup", {"allowSingleLine": false}], "camelcase": 1, "comma-dangle": [1, "never"], "curly": 1, "dot-notation": 1, "eqeqeq": 1, "indent": [1, 2], "lines-around-comment": [2, {"allowBlockStart": true, "beforeBlockComment": true, "beforeLineComment": true}], "new-parens": 1, "no-bitwise": 1, "no-cond-assign": 1, "no-debugger": 1, "no-dupe-args": 1, "no-dupe-keys": 1, "no-empty": 1, "no-invalid-regexp": 1, "no-invalid-this": 1, "no-mixed-spaces-and-tabs": [1, "smart-tabs"], "no-multiple-empty-lines": [1, {"max": 2}], "no-undef": 1, "no-underscore-dangle": 1, "no-unreachable": 1, "no-unused-vars": 1, "one-var": [1, "never"], "quote-props": [1, "as-needed"], "semi": [1, "always"], "space-after-keywords": [1, "always"], "space-unary-ops": [1, {"words": true, "nonwords": false}], "strict": [1, "function"], "vars-on-top": 1, "wrap-iife": [1, "outside"], "yoda": [1, "never"],
//ES6 Stuff
"arrow-parens": 1,
"arrow-spacing": 1,
"constructor-super": 1,
"no-class-assign": 1,
"no-const-assign": 1,
"no-dupe-class-members": 1,
"no-this-before-super": 1,
"no-var": 1,
"object-shorthand": 1,
"prefer-arrow-callback": 1,
"prefer-const": 1
} }
```
[Style Y240]
-
Create an Angular Constant for vendor libraries' global variables.
Why?: Provides a way to inject vendor libraries that otherwise are globals. This improves code testability by allowing you to more easily know what the dependencies of your components are (avoids leaky abstractions). It also allows you to mock these dependencies, where it makes sense.
// constants.js

/* global toastr:false, moment:false */
(function() {
    'use strict';

    angular
        .module('app.core')
        .constant('toastr', toastr)
        .constant('moment', moment);
})();
[Style Y241]
-
Use constants for values that do not change and do not come from another service. When constants are used only for a module that may be reused in multiple applications, place constants in a file per module named after the module. Until this is required, keep constants in the main module in a
constants.jsfile.Why?: A value that may change, even infrequently, should be retrieved from a service so you do not have to change the source code. For example, a url for a data service could be placed in a constants but a better place would be to load it from a web service.
Why?: Constants can be injected into any angular component, including providers.
Why?: When an application is separated into modules that may be reused in other applications, each stand-alone module should be able to operate on its own including any dependent constants.
// Constants used by the entire app
const appCore = angular
    .module('app.core')
    .constant('moment', moment);

// Constants used only by the sales module
const appSales = angular
    .module('app.sales')
    .constant('events', {
        ORDER_CREATED: 'event_order_created',
        INVENTORY_DEPLETED: 'event_inventory_depleted'
    });
For anything else, API reference, check the Angular documentation.
Open an issue first to discuss potential changes/additions. If you have questions with the guide, feel free to leave them as issues in the repository. If you find a typo, create a pull request. The idea is to keep the content up to date and use github’s native feature to help tell the story with issues and PR’s, which are all searchable via google. Why? Because odds are if you have a question, someone else does too! You can learn more here at about how to contribute.
By contributing to this repository you are agreeing to make your content available subject to the license of this repository.
1. Discuss the changes in a GitHub issue.
2. Open a Pull Request, reference the issue, and explain the change and why it adds value.
3. The Pull Request will be evaluated and either merged or declined.
tldr; Use this guide. Attributions are appreciated.
Copyright (c) 2014-2015 John Papa and 2015 Robert Wagner
Permission is hereby granted, free of charge, to any person obtaining a copy of this software and associated documentation files (the 'Software'), to deal in the Software without restriction, including without limitation the rights to use, copy, modify, merge, publish, distribute, sublicense, and/or sell copies of the Software, and to permit persons to whom the Software is furnished to do so, subject to the following conditions:
The above copyright notice and this permission notice shall be included in all copies or substantial portions of the Software.
THE SOFTWARE IS PROVIDED 'AS IS', WITHOUT WARRANTY OF ANY KIND, EXPRESS OR IMPLIED, INCLUDING BUT NOT LIMITED TO THE WARRANTIES OF MERCHANTABILITY, FITNESS FOR A PARTICULAR PURPOSE AND NONINFRINGEMENT. IN NO EVENT SHALL THE AUTHORS OR COPYRIGHT HOLDERS BE LIABLE FOR ANY CLAIM, DAMAGES OR OTHER LIABILITY, WHETHER IN AN ACTION OF CONTRACT, TORT OR OTHERWISE, ARISING FROM, OUT OF OR IN CONNECTION WITH THE SOFTWARE OR THE USE OR OTHER DEALINGS IN THE SOFTWARE.