  ./gradlew clean build
docker build -t cmsch . ./gradlew bootRun --args='--spring.profiles.include=test,internal'Use your authsch details for docker login. Tag rc for staging (release candidate) and tag release for release.
  docker login harbor.sch.bme.hu

  # Release candidate
  docker image tag cmsch:latest harbor.sch.bme.hu/org-golyakorte/cmsch:rc
  docker image push harbor.sch.bme.hu/org-golyakorte/cmsch:rc

  # Release (you can use versions like ':major.minor.build' as well)
  docker image tag cmsch:latest harbor.sch.bme.hu/org-golyakorte/cmsch:release
docker image push harbor.sch.bme.hu/org-golyakorte/cmsch:releaseFor develpment:
  docker run --rm -p 8080:80 \
        -e AUTHSCH_CLIENT_ID=20_CHARS \
        -e AUTHSCH_CLIENT_KEY=80_CHARS \
        -e PROFILE_SALT=RANDOM_STRING \
        -e SYSADMINS=YOUR_AUTH_SCH_UUID \
        cmsch
or from the registry: YOU MIGHT PROBABLY WANT TO START WITH THIS
  docker pull harbor.sch.bme.hu/org-golyakorte/cmsch
  docker run --rm -p 8080:80 \
        -e AUTHSCH_CLIENT_ID=20_CHARS \
        -e AUTHSCH_CLIENT_KEY=80_CHARS \
        -e PROFILE_SALT=RANDOM_STRING \
        -e SYSADMINS=YOUR_AUTH_SCH_UUID \
harbor.sch.bme.hu/org-golyakorte/cmsch- Api docs: BASE_URL/swagger-ui.html
- Admin UI: BASE_URL/admin/control/basics
- API: BASE_URL/api/... (see swagger for more)
You must install:
- Node v16
- Yarn v1.22.17
- IDEA or at least Gradle
Create an application-local.properties file in the src/main/resources/config folder,
and fill the file with these configurations (using your credentials):
authsch.client-identifier=<insert the shorter key>
authsch.client-key=<insert the long key>
cmsch.sysadmins=<your pekId>
cmsch.website-default-url=http://<your ip>:8080/
logging.level.web=DEBUG
Your pekId can be found in the console log of the Spring app when signing in with AuthSCH. The cmsch.website-default-url
property's IP address needs to be either localhost or the IP of your current device running your Spring app on your network.
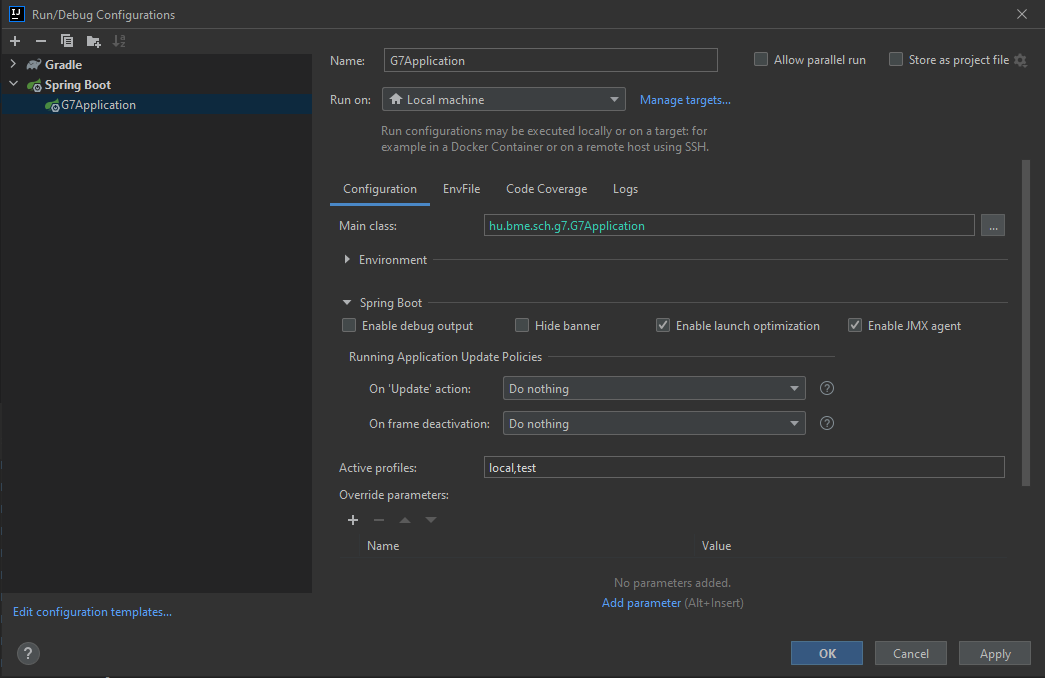
Once created, edit the CMSchApplication Run Configuration's Spring Boot Active Profiles to use (see image down below)
local,testif you want test data in the database alsolocalif you don't
The React client is built into the Spring app upon triggering a Gradle build.
The gradle building task will build the React app's built JS files into the static directory of our Spring app, from where the Spring backend app will serve the built js files, they will access easily the Spring app backend through axios API. This will not induce CORS related problems, both the backend and these static files will be served by Tomcat in Spring app's domain.
If you need to declare a new client environment variable, create it in the src/main/resources/configurations/application.properties
file and modify the build.gradle.kts script (approx. line 97) to include the new property in the built .env file.
When in development mode, you can freely change the .env file. WARNING: Gradle build will override the existing .env file so always have an .env.development file in the client repo as a backup.
Open up IDEA, start the Spring app, you're good to go.
- Open up
src/main/clientin VSCode or Webstorm, open a terminal there. yarn installto install dependencies locally in node_modulesyarn startto start React client server DEPRECATED: while using React dev-server, you won't be able to make proper API calls or use session handling so you won't be able to log into the Spring app.yarn spring:start-appto start the Spring app easily.
Once the Spring server is running on localhost:8080, you need to open this url, where you can see your React frontend in production mode.
IMPORTANT AND USEFUL TIP: Anytime you need to see your modifications without the need of restarting the Spring app,
do not close the terminal running the Spring app, but open a new terminal and use the yarn spring:build-ui command
in the client-side project root.
Be wise with using the yarn spring:build-ui script, as it takes approx. 1 minute to rebuild the React frontend and move
it into the Spring app's static resources files.
The last two yarn commands work from Windows, use yarn spring:start-app-alt and yarn spring:build-ui-alt if you're
using MaxOS or Linux base systems.
If you need to declare a new environment variable, create it in the src/main/resources/configurations/application.properties
file and modify the build.gradle.kts script (approx. line 97) to include the new property in the built .env file.
