- Safe-SD mainly contains two stages: 1) Pre-train graphic watermark injector/extractor and 2) Fine-tune latent λ-encryption diffuser with prompt triggering.
- Moreover, we introduce a novel prompt triggering mechanism to enable adaptive watermark injection for facilitating copyright protection and generative traceability.
- To verify the image generation quality with watermarking, and to qualitatively assess the fidelity of the decoded watermarks, we conduct the qualitative experiments.
- We perform a study on the impact of watermarking frequency λ on image synthesis.
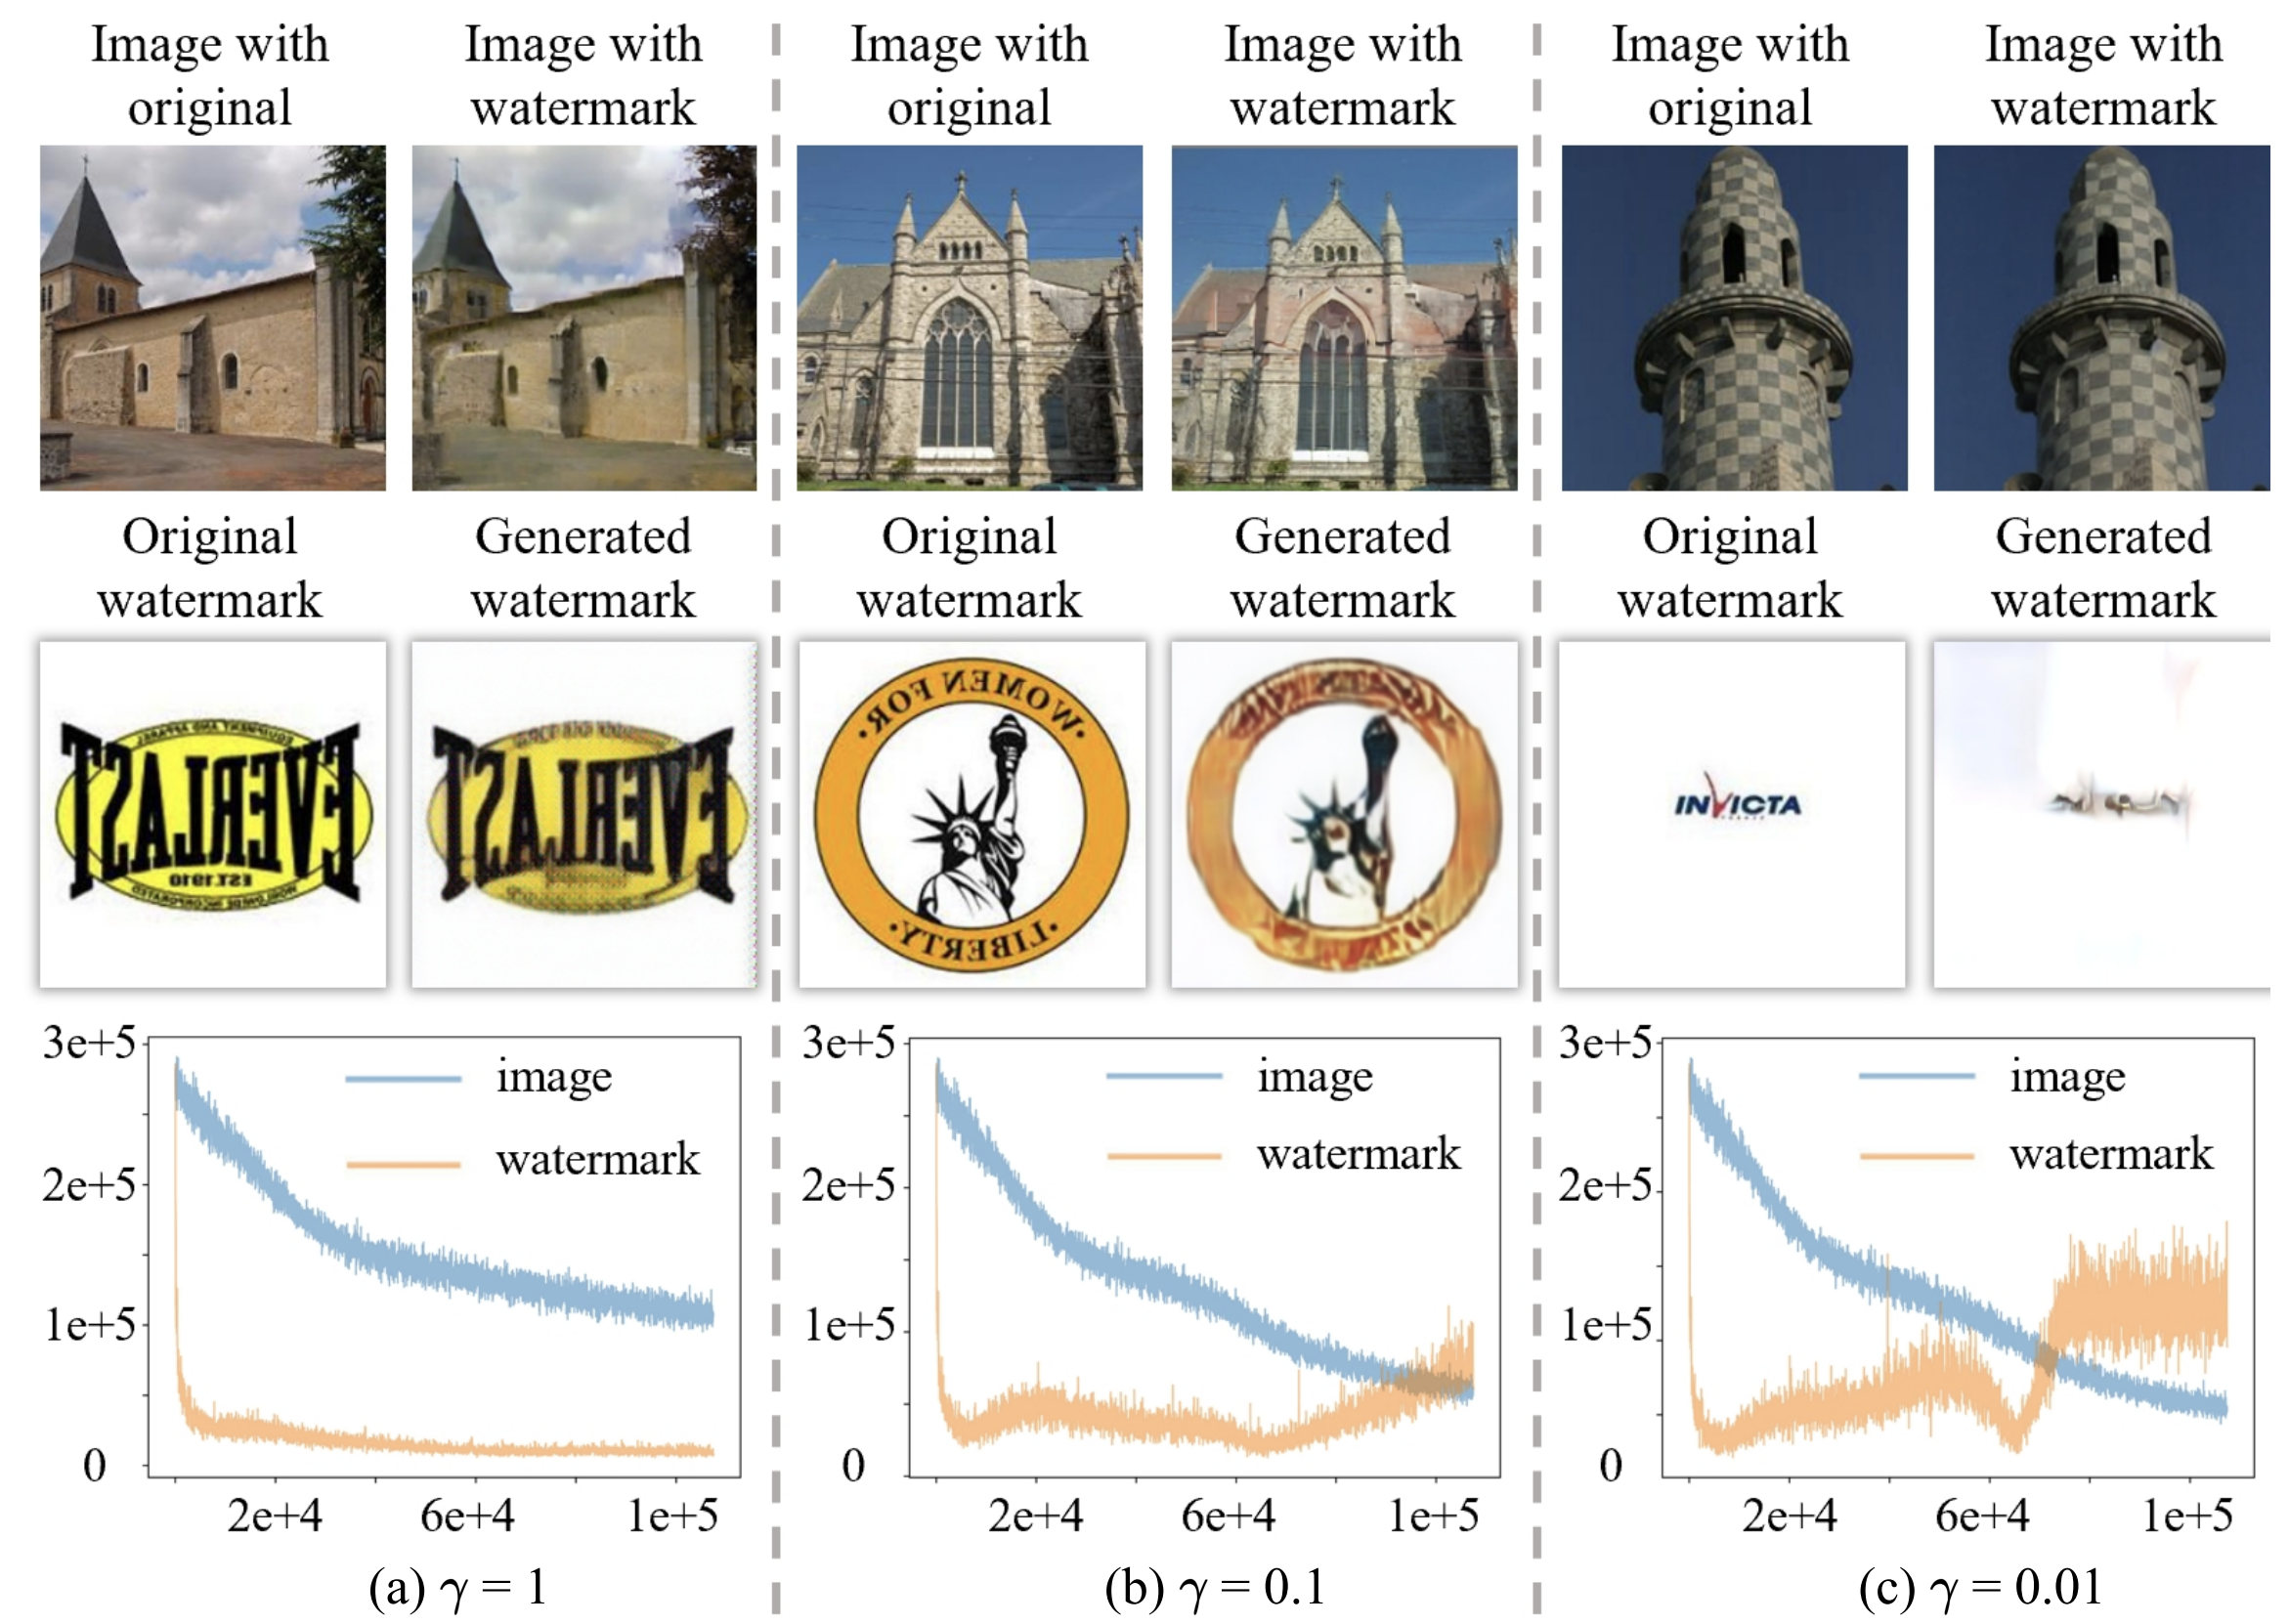
- To further explore the impact of the weighting hyper-parameter γ on the training of dual-objective decoders, for trading off image synthesis and watermark extraction in a unified first-stage-model, we perform this study on hyper-parameter.
- More pre-trained LDMs are available:
- A 1.45B model trained on the LAION-400M database.
- A class-conditional model on ImageNet, achieving a FID of 3.6 when using classifier-free guidance Available via a colab notebook [![][colab]][colab-cin].
A suitable conda environment named safe-sd can be created
and activated with:
conda env create -f environment.yaml
conda activate safe-sd
Download the pre-trained weights (5.7GB)
mkdir -p models/ldm/text2img-large/
wget -O models/ldm/text2img-large/model.ckpt https://ommer-lab.com/files/latent-diffusion/nitro/txt2img-f8-large/model.ckpt
and sample with
python scripts/txt2img.py --prompt "a virus monster is playing guitar, oil on canvas" --ddim_eta 0.0 --n_samples 4 --n_iter 4 --scale 5.0 --ddim_steps 50
This will save each sample individually as well as a grid of size n_iter x n_samples at the specified output location (default: outputs/txt2img-samples).
Quality, sampling speed and diversity are best controlled via the scale, ddim_steps and ddim_eta arguments.
As a rule of thumb, higher values of scale produce better samples at the cost of a reduced output diversity.
Furthermore, increasing ddim_steps generally also gives higher quality samples, but returns are diminishing for values > 250.
Fast sampling (i.e. low values of ddim_steps) while retaining good quality can be achieved by using --ddim_eta 0.0.
Faster sampling (i.e. even lower values of ddim_steps) while retaining good quality can be achieved by using --ddim_eta 0.0 and --plms (see Pseudo Numerical Methods for Diffusion Models on Manifolds).
For certain inputs, simply running the model in a convolutional fashion on larger features than it was trained on
can sometimes result in interesting results. To try it out, tune the H and W arguments (which will be integer-divided
by 8 in order to calculate the corresponding latent size), e.g. run
python scripts/txt2img.py --prompt "a sunset behind a mountain range, vector image" --ddim_eta 1.0 --n_samples 1 --n_iter 1 --H 384 --W 1024 --scale 5.0
to create a sample of size 384x1024. Note, however, that controllability is reduced compared to the 256x256 setting.
The example below was generated using the above command.

We also provide a script for sampling from unconditional LDMs (e.g. LSUN, FFHQ, ...). Start it via
CUDA_VISIBLE_DEVICES=<GPU_ID> python scripts/sample_diffusion.py -r models/ldm/<model_spec>/model.ckpt -l <logdir> -n <\#samples> --batch_size <batch_size> -c <\#ddim steps> -e <\#eta> The LSUN datasets can be conveniently downloaded via the script available here.
We performed a custom split into training and validation images, and provide the corresponding filenames
at https://ommer-lab.com/files/lsun.zip.
After downloading, extract them to ./data/lsun. The beds/cats/churches subsets should
also be placed/symlinked at ./data/lsun/bedrooms/./data/lsun/cats/./data/lsun/churches, respectively.
Logs and checkpoints for trained models are saved to logs/<START_DATE_AND_TIME>_<config_spec>.
Configs for training a KL-regularized autoencoder on ImageNet are provided at configs/autoencoder.
Training can be started by running
CUDA_VISIBLE_DEVICES=<GPU_ID> python main.py --base configs/autoencoder/<config_spec>.yaml -t --gpus 0,
where config_spec is one of {autoencoder_kl_8x8x64(f=32, d=64), autoencoder_kl_16x16x16(f=16, d=16),
autoencoder_kl_32x32x4(f=8, d=4), autoencoder_kl_64x64x3(f=4, d=3)}.
For training VQ-regularized models, see the taming-transformers repository.
In configs/latent-diffusion/ we provide configs for training LDMs on the LSUN-, CelebA-HQ, FFHQ and ImageNet datasets.
Training can be started by running
CUDA_VISIBLE_DEVICES=<GPU_ID> python main.py --base configs/latent-diffusion/<config_spec>.yaml -t --gpus 0,where <config_spec> is one of {celebahq-ldm-vq-4(f=4, VQ-reg. autoencoder, spatial size 64x64x3),ffhq-ldm-vq-4(f=4, VQ-reg. autoencoder, spatial size 64x64x3),
lsun_churches-ldm-vq-4(f=8, KL-reg. autoencoder, spatial size 32x32x4),cin-ldm-vq-8(f=8, VQ-reg. autoencoder, spatial size 32x32x4)}.
-
Our codebase for the diffusion models builds heavily on OpenAI's ADM codebase and https://github.com/lucidrains/denoising-diffusion-pytorch. Thanks for open-sourcing!
-
The implementation of the transformer encoder is from x-transformers by lucidrains.


