This is a guide on how to automate a couple of things around you(lights, lamps etc.)
I would like to start by informing the reader that before trying this method, I tried using the apache web server method and it didn't work for me. After reading a lot on the internet I have written this tutorial because I couldn't find a descent one that has explains everything. Also if you dont understand anything or would like to point out something I missed or something that's wrong, feel free to infrom me.
Hardware required:
- Raspberry pi (2 or 3)
- Relay(Number of channels depends on you)
- Jumper cables (female to female)
- ethernet cable
- SD card >= 8 GB (for your Raspberry Pi)
Note: I have a mac so I'll be guiding you using that, you can use bash if you have a PC(I guess).
##Step 1: Setup##
- Start by downloading Raspbian with PIXEL from here https://www.raspberrypi.org/downloads/raspbian/
- Download Etcher (https://www.etcher.io)
- Open Etcher and flash the raspbian image you downloaded into your sd card.
- Put your SD card in your raspberry pi. (Note: Make sure its not already switched on)
NOTE: There are 2 ways to move forward. One way is to connect a monitor (using hdmi), keyboard and mouse (using USB). In that case you can skip Step 2. On the other hand if you don't have a monitor and a keyboard, go ahead and read step 2 for wireless/ headless setup.
**NOTE:**If you plan to keep your RPi connected to the network via the ethernet, you can skip step 3 also.
##Step 2: Headless (Wireless) Setup##
- Connect your RPi to the router using an ethernet cable.
- Now you'll have to figure out the IP address of the RPi. To do this, download IP Scanner from the app store for apple mac/iphone or download FING from playstore for android.
- Open the application and you'll see the RPi connected to your network with the name RaspberryPi. Not down the IP address.
- Open terminal(or bash) and type ssh@192.168.##.### , replace the hashes with your numbers. It will prompt you for a password, the default password is: "raspberry".
##Step 3: Connecting to the wifi## NOTE: If you have Raspberry Pi 2, you want to plug in the wireless dongle now. 5. Then, while connected to the RPi, enter "sudo nano /etc/wpa_supplicant/wpa_supplicant.conf". This will open the network configuration file. Browse down to the end of the file and add your network information: ''' network={ ssid="your-network-ssid-name" psk="your-network-password" } ''' 6. Remove the ethernet cable, and reboot your RPi. It should be now connected to the Wifi.
**Side note:**If you want to operate the RPi using the interface without monitor, keybaord and mouse you can install VNC. Follow this tutorial here.
We've now setup the OS on the raspberry pi. We are going to install node
##Step 4: Installing node on RPi## The first step will be to add the apt.adafruit.com package repository to your Pi's /etc/apt/sources.list file. You can do this by running the following command.
curl -sLS https://apt.adafruit.com/add | sudo bash
Next, we will install the latest version of node.js using apt-get.
sudo apt-get install node
If everything went as expected, we can check the installed version of node.js by running "node -v". it should return something like :
v0.12.0
You also need to install a GPIO module from the npmjs website.
npm install rpi-gpio
Now to install the appropriate files, open the directory where you want the server files to be installed. If you are new to all this, stick to desktop. Open terminal and clone my git repo.
git clone https://github.com/deepanshpahwa/Home-Automation
##Step 5: Setting up the relay.##
If you don't know what a relay is, you should google it and undersand the basic idea. It is basically just a switch which will get switched on whenever the pin ints connected to on RPI will get power.

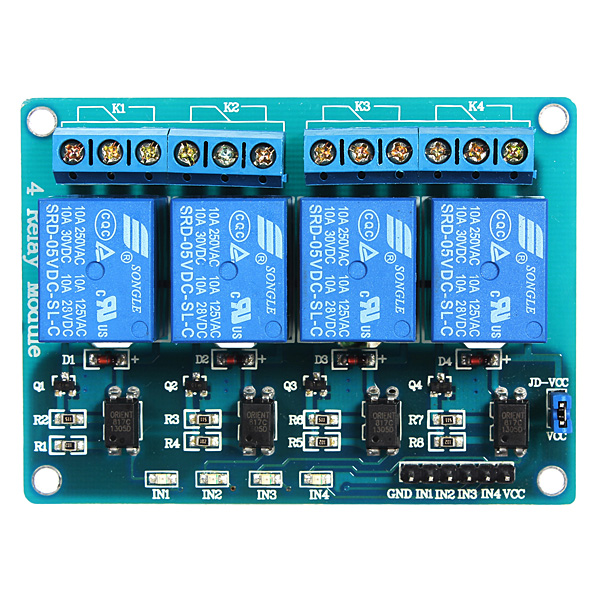
Take female to female jumper cables and connect like so:
- from GND on relay to GND on RPi.
- from IN1 on relay to pin#3(GPIO2) on RPi.
- from VCC on relay to pin#2 on RPi. (This is to power your relay, if you have external power source for yur relay, skip this.)
NOTE: If you want to change the pin number you can do so by opening the server.js file with text editor and changing the pin number. Keep in mind that we are talking about the pin number and not the GPIO number.
Now connect whatever appliance you want to the relay.
##Step 6: Starting the node server ## Now, cd into the the Home-Automation directory and start the node server.
sudo node server.js
As of now, all the devices connected to the same wifi as RPi can send a signal and turn the appliance on or off.
To do this open the browser on a device and type "http://:2368/lights?state=1" so if my ip address is 192.168.1.35, I'll enter http://192.168.1.35:2368/lights?state=1 . Changing the state from 1 to 0 will switch it on or off. You should hear a click on your relay.
I would like to add a couple of more points before ending.
- To control multiple channels on the relay you'll need to learn a little bit of node js and do it yourself.
- If you want to make a mobile app that can do this, look into retrofit
- If you are trying to do this with apache web server, it probably will not happen. You are better of doing it the node way.
- If you want to control your appliance without connecting to the wifo al the time you'll have to get a static ip address from your ISP.
- Your RPi doesn't have a static internal ip address either so it might change from time to time. To avoid this, look at this tutorial.
- If you want to keep the seving running forever even when it crashes, you can look into forever(yeah, that's what it's called)
##Happy experimenting. ##