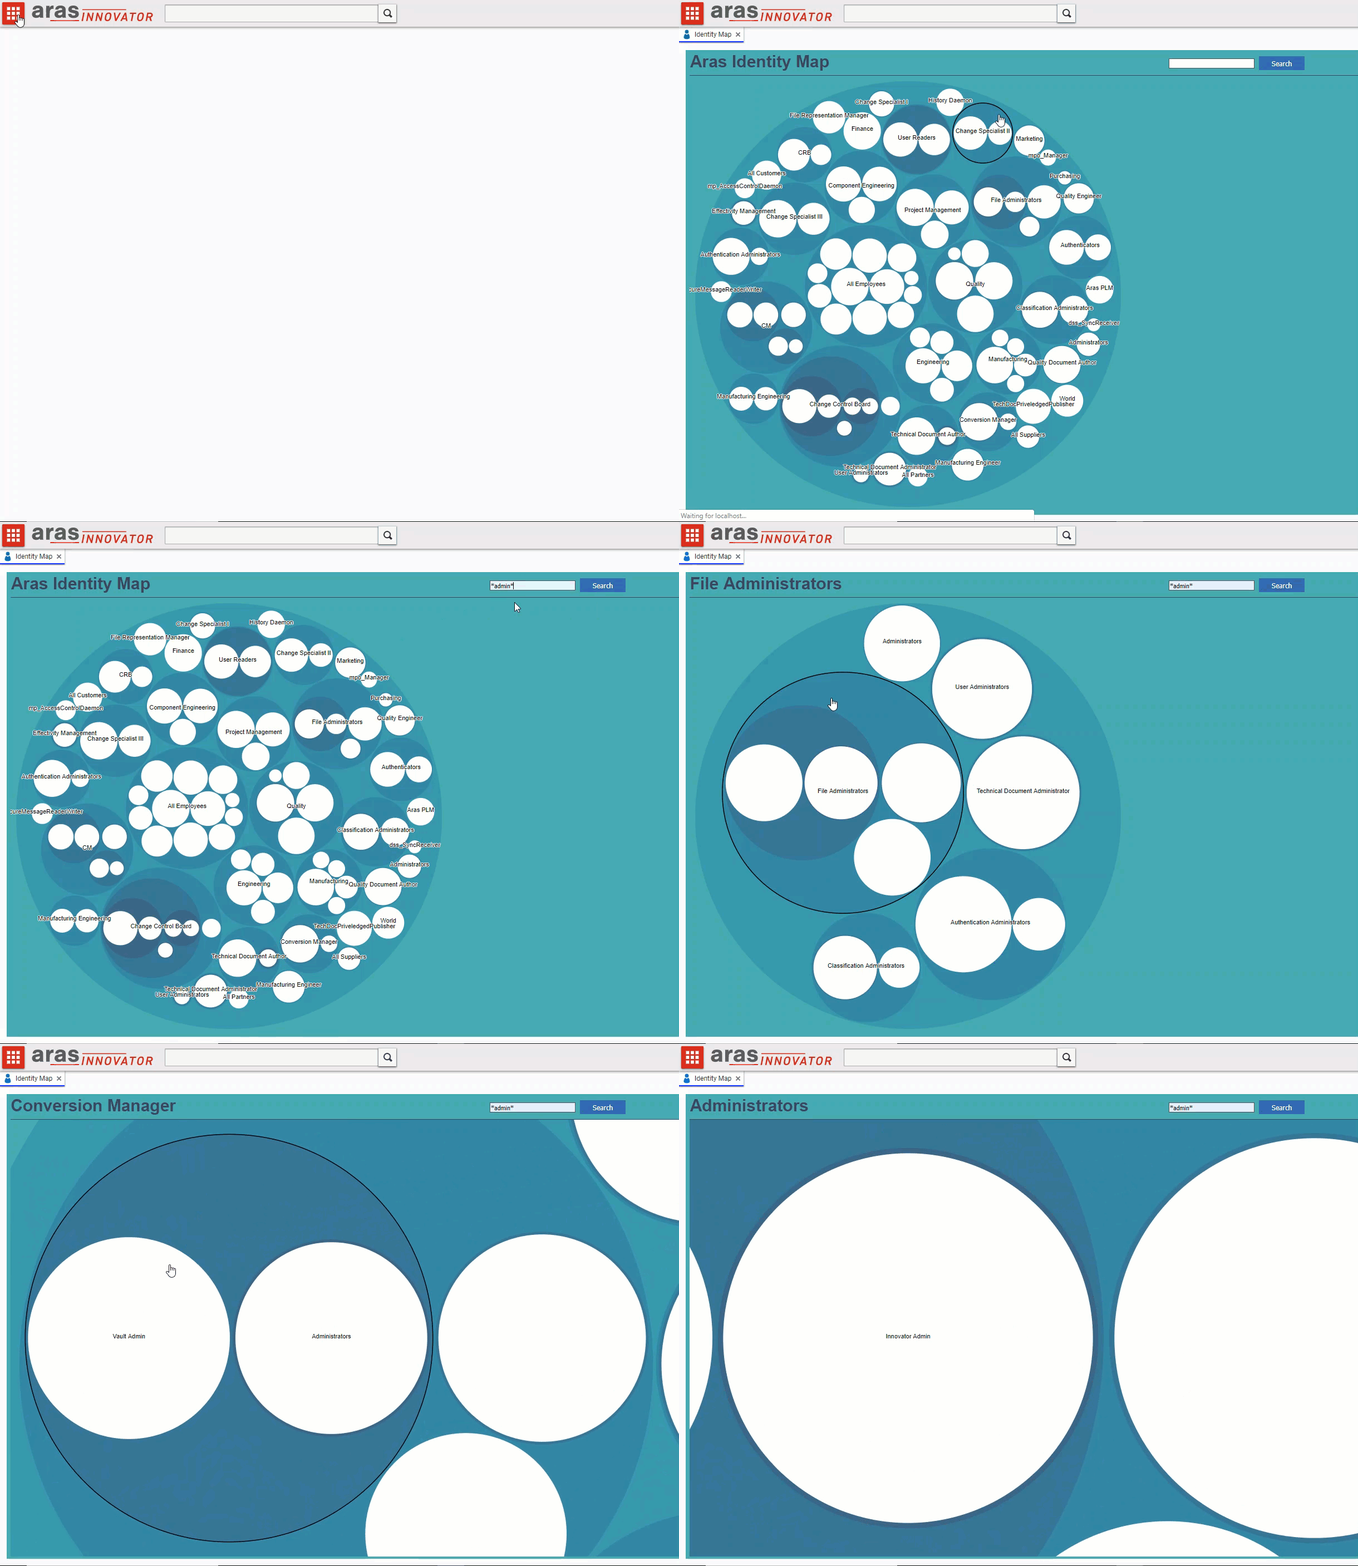
This project demonstrates how to execute a Query Definition programmatically and visualize the output with D3. A recursive Query Definition retrieves the identity membership data and a form event renders a bubble graph.
A Query Definition is a reusable query structure that is defined using the Query Builder GUI. Introduced in Aras 11 SP10, Query Definitions are used for populating certain Aras views, like Tree Grid View. Query definitions can be used to query structures below the context item, structures above the context item, and recursive structures. This project includes a demonstration of a recursive Query Definition (retrieves identities that are members of identities).
When a Query Definition is executed, the results are returned in an XML format that looks a bit like your typical AML data structure, but it has some important differences to consider:
- The Item tag uses an "alias" attribute instead of "type".
- The "alias" attribute may or may not match an ItemType name. The alias can be set explicitly in the Query Builder GUI.
- The Item tag does not include the typical "id", "typeId", or "keyed_name" attributes.
- Item properties contain the id of the referenced item.
- Related items appear in the "Relationships" tag on the relationship item - not in the "related_item" tag.
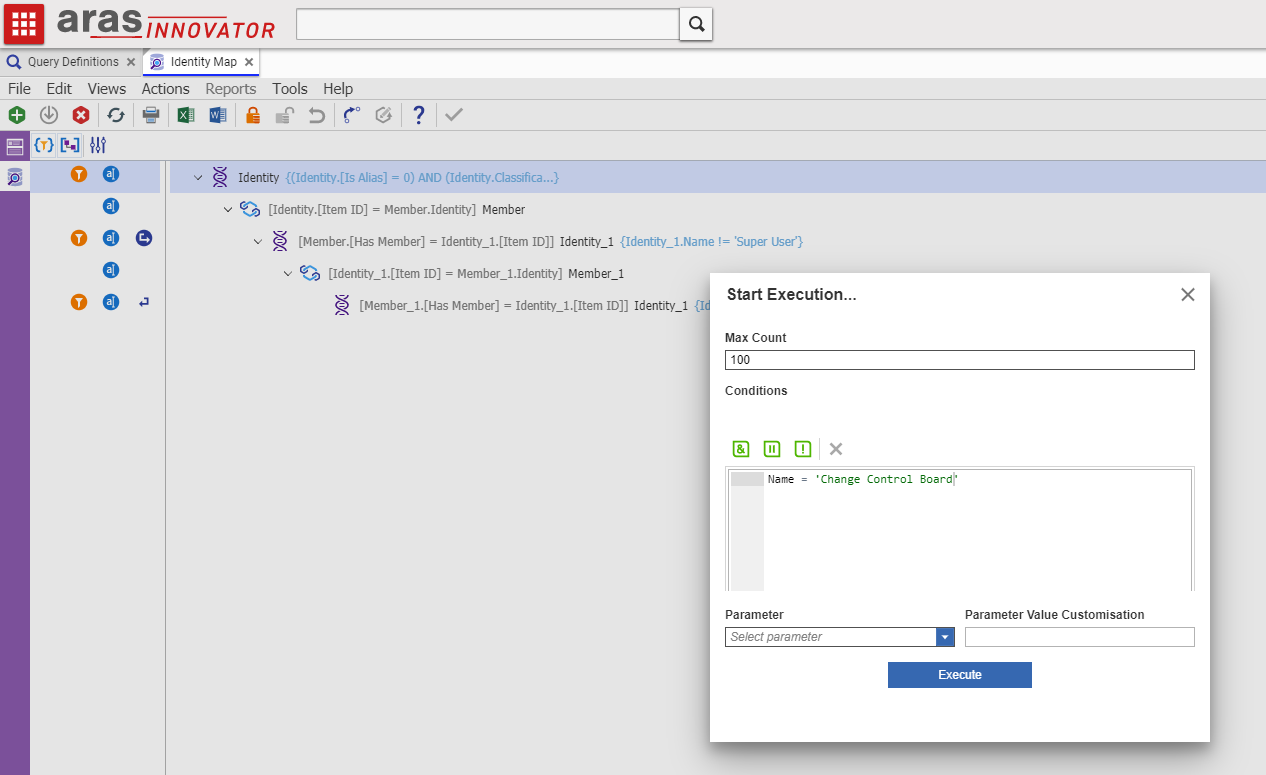
The Query Builder includes an action called "Execute Query". This action provides an options dialog where the user can enter a max result, conditions, and parameters:
When the user clicks the "Execute" button, the Query Definition is executed using the options provided by the user and a result dialog provides the XML result of the query.
If your Query Definition has parameters defined, you can set specific parameter values when testing your query execution. Just select a parameter from the "Parameter" dropdown list and then enter the value you want to use in the "Parameter Value Customization" input field. If you have multiple parameters to set, repeat the process for each parameter before clicking the "Execute" button.
You can use server debug logs to see the AML request that is created by the Execute Query action. Here are the basic steps for collecting the logs:
- In the Query Builder view, click Actions > Execute Query.
- Enter your options, but don't click Execute just yet.
- Open up your
InnovatorServerConfig.xmlfile in a file editor. - Set the
debug_log_flagoperating parameter value to "true". - Save the
InnovatorServerConfig.xmlfile. - In Innovator, click the Execute button in the dialog.
- After the query result appears, go back to the
InnovatorServerConfig.xmlfile in your editor. - Set the
debug_log_flagoperating parameter value to "false".- This is an important step. If you leave server debug logging enabled, you can accumulate a lot of log files in your code tree.
- Save the
InnovatorServerConfig.xmlfile. - Navigate to
Innovator\Server\logs\to find the generated log file with the request AML.- Note: You may see several log files generated depending on what else your server is doing while the logging is enabled.
- You can find the Query Definition-specific log by searching for "qry_QueryDefinition".
| Release | Notes |
|---|---|
| v1.2.1 | Verified on Aras v12; Updated Screenshot |
| v1.2.0 | Confirmed project supports Aras 11 SP15. No new features added. |
| v1.1.0 | Updates the My Identity Map form with a search field to search top-level identities. This use case demonstrates how to use a query parameter when executing a Query Definition programmatically. |
| v1.0.1 | Adds background information about Query Definitions to the README file. |
| v1.0.0 | First release. |
| Project | Aras |
|---|---|
| v1.2.1 | 11.0 SP11+, 12.0 |
| v1.2.0 | 11.0 SP11+ |
| v1.1.0 | 11.0 SP11 – SP14 |
| v1.0.1 | 11.0 SP11, SP12 |
| v1.0.0 | 11.0 SP11, SP12 |
Warning: This package is not backwards-compatible with Innovator 11.0 SP10.
Always back up your code tree and database before applying an import package or code tree patch!
- Aras Innovator installed
- Aras Package Import Utility
- aras.labs.IdentityMap package
- Code Tree overlay
- Backup your code tree and store the backup in a safe place.
- Copy the
/Innovator/folder in your local repository. - Paste this folder to the root of your code tree.
- This should be the same folder that contains the
InnovatorServerConfig.xml.
- This should be the same folder that contains the
- Backup your database and store the BAK file in a safe place.
- Open up the Aras Package Import tool.
- Enter your login credentials and click Login
- Note: You must login as root for the package import to succeed!
- Enter the package name in the TargetRelease field.
- Optional: Enter a description in the Description field.
- Enter the path to your local
..\identity-map\Import\imports.mffile in the Manifest File field. - Select the following in the Available for Import field.
- aras.labs.IdentityMap
- Select Type = Merge and Mode = Thorough Mode.
- Click Import in the top left corner.
- Close the Aras Package Import tool.
You are now ready to login to Aras and check out the identity map.
- Login to Aras Innovator as admin.
- Navigate to Dashboards > Identity Map in the TOC.
- To filter the diagram for a particular identity or group of identities, you can enter criteria in the input field and click the Search button (wildcards are allowed).
- Note: This search only filters on the name of top-level identities. It does not filter on other fields or execute a "where used" search to find the group identities that a specific identity belongs to.
- To clear filtered results and return to the default view, clear the search box and click the search button.
The main grid area will display a bubble chart representing the identity membership in the database. Click on group bubbles to see the labels of the member bubbles.
- Fork it!
- Create your feature branch:
git checkout -b my-new-feature - Commit your changes:
git commit -am 'Add some feature' - Push to the branch:
git push origin my-new-feature - Submit a pull request
For more information on contributing to this project, another Aras Labs project, or any Aras Community project, shoot us an email at araslabs@aras.com.
Created by Eli Donahue for Aras Labs. @EliJDonahue
Bubble map rendering is based on Mike Bostock's sample.
Aras Labs projects are published to Github under the MIT license. See the LICENSE file for license rights and limitations.

