- Brew:
- ruby -e "$(curl -fsSL https://raw.githubusercontent.com/Homebrew/install/master/install)"
- JAVA JDK - http://www.oracle.com/technetwork/java/javase/downloads/index.html
- Android SDK - https://developer.android.com/sdk/index.html [Note: Appium supports Android API >=17]
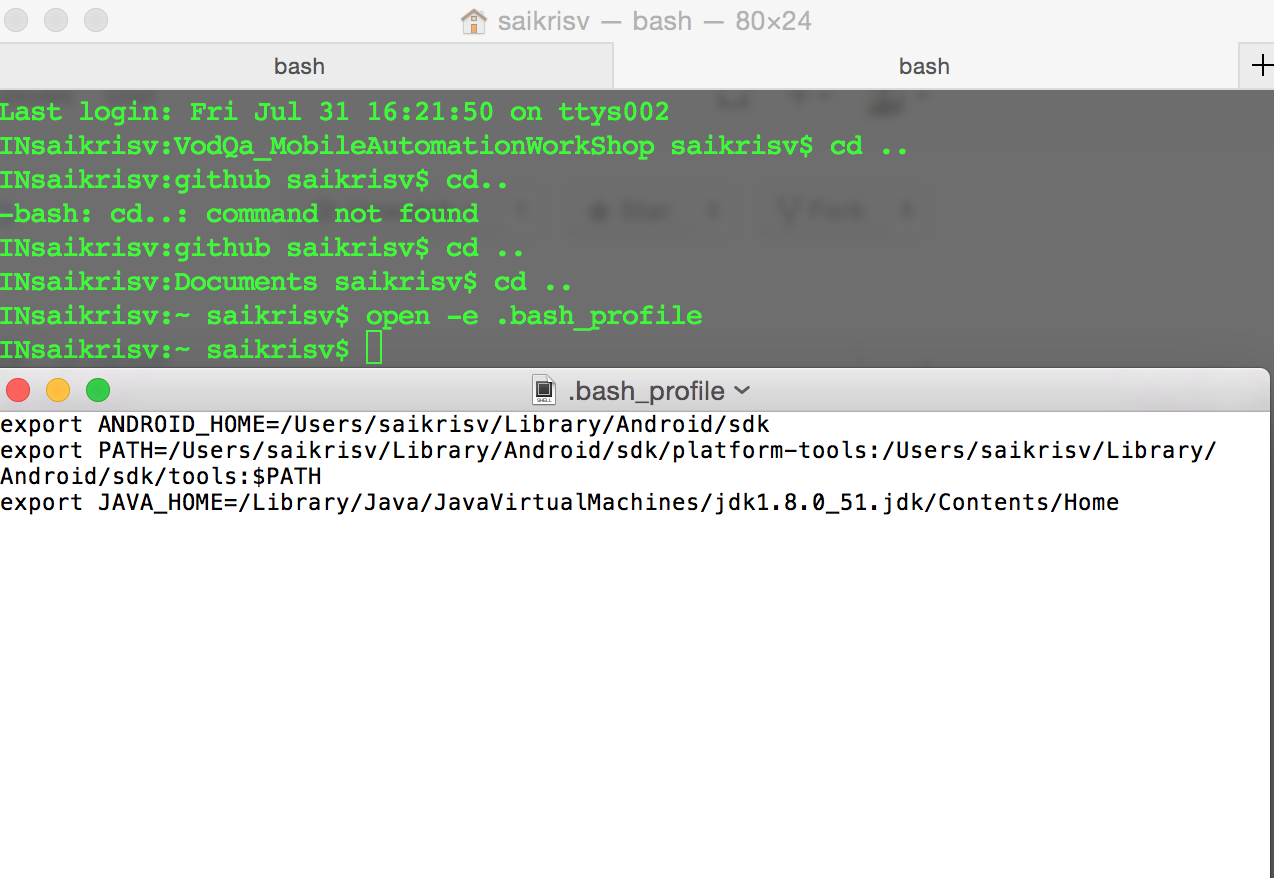
- Set ANDROID_HOME and JAVA_HOME
- Open Terminal and Navigate to Home Directory.
- Execute command touch .bash_profile
- Execute command open -e .bash_profile and set the path a shown in image below( Change the path to the android sdk downloaded)

- Save the file and Execute "set" in your terminal and restart your terminal for the changes to reflect.
- Node.js and Appium:
- brew install node # get node.js
- npm install -g appium # get appium
- npm install wd # get appium client
- appium-doctor # check if everything is correctly set
- Appium.app (for Appium Inspector) - https://bitbucket.org/appium/appium.app/downloads/
- Any IDE: IntelliJ IDEA - https://www.jetbrains.com/idea/download/
- Android SDK - https://developer.android.com/sdk/index.html [Note: Appium supports Android API >=17]
-
Node.js - https://nodejs.org/en/download/. Then run following commands on cmd:
- npm install -g appium # get appium
- npm install wd # get appium client
- appium-doctor # check if everything is correctly set
-
Appium.exe (zip file) (for Appium Inspector) - https://bitbucket.org/appium/appium.app/downloads/
-
Apache Maven (zip file) - https://maven.apache.org/download.cgi - Set environment variable M2_HOME under 'System variables':
-
Any IDE: IntelliJ IDEA - https://www.jetbrains.com/idea/download/
-
Add all the environment variables set(in steps 1,2 and 5) along with platform-tools and npm(node package manager)path to the PATH variable:
So, your PATH variable would look something like: C:\Windows\System32;%JAVA_HOME%\bin;%ANDROID_HOME%\bin;%M2_HOME%\bin;C:\Users\Administrator\AppData\Local\Android\android-sdk\platform-tools;C:\Program Files\nodejs\node_modules\npm\bin;
- Launch Eclipse. Click on File -> New -> Other -> Maven project.
- Select workspace and then click on Next.
- Select 'Catalog -> Internal' and 'maven-archetype-quickstart'.
- Provide Group and Artifact ID.
- Click 'Finish'.
- Add Appium Java Client Dependency: You can add appium java client dependency (which is a java language binding for writing Appium tests) in pom.xml as -
- DEVICE_NAME: The kind of mobile device or emulator to use (Android Emulator, iPhone Simulator, Nexus 5 etc.)
- APP: The absolute local path or remote http URL to a .apk file. This capability is not required for Android if you specify appPackage and appActivity capabilities.
- APP_PACKAGE(Android): Java package of the Android app you want to run(say- com.example.android.myApp)
- APP_ACTIVITY(Android): Activity name for the Android activity you want to launch from your package(MainActivity, .Settings etc.)
- UDID(iOS): Unique device identifier of the connected physical device
All other Appium capabilties details can be found here - https://github.com/appium/appium/blob/master/docs/en/writing-running-appium/caps.md
- Launch Appium Server: appium &
- Run scripts
- To View any element id : Launch Appium Inspector
- Download the Android Wear App from Google PlayStore and install it on the Android Phone.
- Sync the Android Wearbable device/emulator with Android Phone.
- Check if android phone and android wearable are detected
- Navigate to terminal and type "adb devices" -- Should display both phone and wearbale
- Port forward 5601 from mac to android device to allow wearable device to connect with the andriod device.
- abd -s forward tcp:5601 tcp:5601
- Run appium server one for android device(port 4724) and one for the wearable device(port 4723)
- appium -p 4723 --udid &
- appium -p 4724 --udid &
- Run the Sameple Test(AppiumWearableTest)
How to get the UIAutomation Javascript API from Instruments
- brew install ios-sim
- ios-sim launch ios.app --devicetypeid com.apple.CoreSimulator.SimDeviceType.iPhone-6
To prepare for your Appium tests to run on a real device, you will need to:
- Build your app with specific device-targeted parameters
- Use fruitstrap, a 3rd-party tool, to deploy this build to your device
A newer xcodebuild now allows settings to be specified. Taken from developer.apple.com:
xcodebuild [-project projectname] [-target targetname ...]
             [-configuration configurationname] [-sdk [sdkfullpath | sdkname]]
             [buildaction ...] [setting=value ...] [-userdefault=value ...]
This is a resource to explore the available settings
CODE_SIGN_IDENTITY (Code Signing Identity)
    Description: Identifier. Specifies the name of a code signing identity.
    Example value: iPhone Developer
PROVISIONING_PROFILE is missing from the index of available commands, but may be necessary.
Specify "CODE_SIGN_IDENTITY" & "PROVISIONING_PROFILE" settings in the xcodebuild command:
xcodebuild -sdk <iphoneos> -target <target_name> -configuration <Debug> CODE_SIGN_IDENTITY="iPhone Developer: Mister Smith" PROVISIONING_PROFILE="XXXXXXXXX-XXXX-XXXX-XXXX-XXXXXXXX"
On success, the app will be built to your <app_dir>/build/<configuration>-iphoneos/<app_name>.app
Go clone a forked version of fruitstrap as the ghughes version is no longer maintained. Success has been confirmed with the unprompted fork, but others are reportedly functional.
Once cloned, run make fruitstrap
Now, copy the resulting fruitstrap executable to your app's project or a
parent directory.
Execute fruitstrap after a clean build by running (commands available depend on your fork of fruitstrap):
./fruitstrap -d -b <PATH_TO_APP> -i <Device_UDID>
If you are aiming to use continuous integration in this setup, you may find it useful to want to log the output of fruitstrap to both command line and log, like so:
./fruitstrap -d -b <PATH_TO_APP> -i <Device_UDID> 2>&1 | tee fruit.out
Since fruitstrap will need to be killed before the node server can be
launched, an option is to scan the output of the fruitstrap launch for some
telling sign that the app has completed launching. This may prove useful if
you are doing this via a Rakefile and a go_device.sh script:
bundle exec rake ci:fruit_deploy_app | while read line ; do
   echo "$line" | grep "text to identify successful launch"
   if [ $? = 0 ]
   then
   # Actions
       echo "App finished launching: $line"
       sleep 5
       kill -9 `ps -aef | grep fruitstrap | grep -v grep | awk '{print $2}'`
   fi
 done
Once fruitstrap is killed, node server can be launched and Appium tests can run!
| elements | locators | examples |
|---|---|---|
| type | className | driver.findElementsByClassName("") |
| text,label | AccessibilityId | driver.findElementByAccessibilityId("").click(); |
| resource-id | Id | driver.findElementsById("") |
| elements | locators | examples |
|---|---|---|
| type | className | driver.findElementsByClassName("") |
| name,label | AccessibilityId | driver.findElementByAccessibilityId("").click(); |
| value | Id | driver.findElementsById("") |
