Door Detector
This project make use of Rasbperry Pi and VL53L0X sensor board to help identifying if a door is open or closed. It then display the result on another set of Raspberry Pi (the receiver) with PiStop traffic light.
You will need at least 2 sets of the following for the project, 1 set for sender and the rest for receiver(s):
- Raspberry Pi (Zero W is good enough) with soldered headers.
- VL53L0X sensor board, you can buy from any of the following sites:
- Red, Amber, Green LED or you may simply get a PiStop Traffic Lights from Pimoroni
- A Pusher account
Setup
Hardware setup
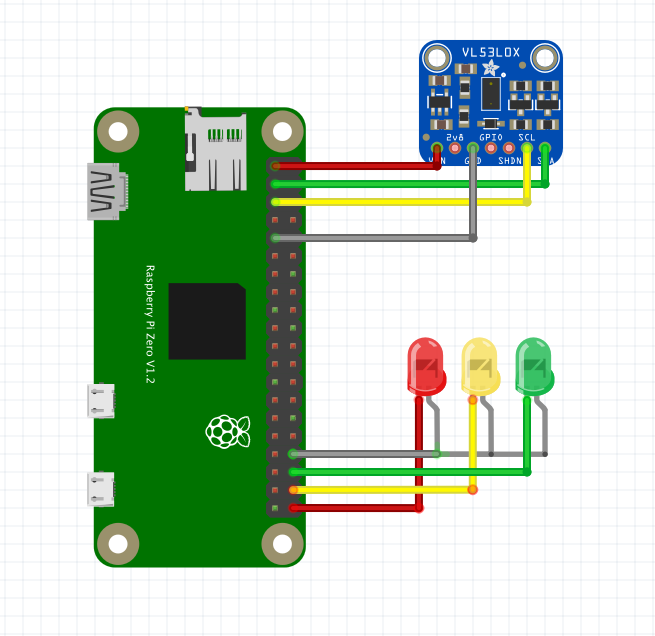
With your Rasbperry Pi, VL53L0X sensor board and LEDs on hand, wire them like the following image:
(Image courtesy of adafruit fritzing library of VL53L0X sensor)
Pin assignments in details
-
VL53L0X sensor
- VCC to pin 1 or any 3.5V or 5V pin on Raspberry Pi
- SDA to pin 3
- SCL to pin 5
- Ground to pin 9, or any Ground (GND) pins on Raspberry Pi
-
LEDs
- Red to pin 40
- Amber to pin 38
- Green to pin 36
- Ground to pin 34, or any Ground (GND) pins on Raspberry Pi
You cannot change the pins for SDA and SCL, but you are free to change the LEDs pins. To change the LED pins, please be reminded to change the configurations in config.ini file as well.
Software installation
On Raspberry Pi, you will need to install some software module. To do so, exceute
sudo apt-get install python3-pip python3-smbus -y
Enabling I2C Interface
The sensor in this project, VL53L0X, use I2C interface on Raspberry Pi. The I2C interface was initially disabled on Raspberry Pi, to enable it, run:
sudo raspi-config- Use the arrow keys to select "5 Interfacing Options", and hit Enter.
- Arrow down to "P5 I2C", and hit Enter.
- Select when it asks you to enable I2C,
- Use the right arrow key to select the button.
- Reboot your Raspberry Pi
Check if I2C Interface was enabled.
Execute:
i2cdetect -y 1, you should see a grided result, that's mean you have I2C enabled. If you don't, go back and check again.
Get this project code
git clone https://github.com/arnoldgithub/Door_Detector.git
Python module installation
We will also need to install the VL53L0X Python module, and some other Python library to make it work.
sudo pip3 install -r requiremenst.txtConfiguration
The only change that have to made before you can run the code is pusher section in the config.ini file. Replace the following lines with your values:
[pusher]
app_id = <your_pusher_app_id>
key = <your_pusher_key>
secret = <your_pusher_secret>
cluster = <your_pusher_cluster>
channel = door-detector
You can also change the values of other section in the configuration file later, after you are comfortable with the program.
Testing
If you have wired the traffic lights, you can test it by running:
Testing LED setups
python3 test_led.py
Testing the sensor
python3 test_sensor.py
Which should turn the LED alternatively. If it doesn't, check your wiring, or the config.ini file.
Execute the program
To execute the program, on the sender device, execute:
python3 sender.py
While on the receiver device, execute:
python3 receiver.py
