The following tutorial is designed to help you create your own discord bots for whatever purpose you may have. The tutorial will cover the following topics...
- Node.js
- Javascript (ES6)
- Discord.js
- REST APIs (Wikipedia)
If you don't already know fundamentally what the concept of a Bot I suggest that you keep reading, otherwise feel free to skip this section. At its core a bot is just a computer script whose whole intention is to mimic the actions of a real human user. For all intents and purposes, the bot could just be a person sitting at home all day with the only purpose of replying "Hello World" to everything you send. The point here, is that if you want any higher functionality, you have surpassed the description of a bot and are in the realm of analytical programming (this is beyond the scope of this tutorial but I'd be happy to go into it at a later time).
So where does the bot live? Like any other computer program the bot lives on, well... your computer. If it wasn't obvious already, in order for the bot to operate in the way that you may have seen bots do on other discord servers, it needs to be on all the time (otherwise you'd have a toaster that occasionally works and not a bot). In order to do this we'll need to host the bot somewhere, for our purposes this place can just be our PCs, but as you move up in the bot making world you can look into hosting options online. If you want to look into hosting check out Heroku.
To host, we'll take advantage of a tool that let's us write our server side code in a language that frontend developers are already familiar with, JavaScript. Now you can also write a discord bot in Python as well, so if that's something that you'd like to do check out the Discord Python Docs. If you are good at troubleshooting you can try other backend languages (C++, Java, Ruby on Rails etc.), but they aren't officially supported so I'd advise against it.
Node.js is a JavaScript runtime that's free and open source and you'll need it to host your bot for other's to use.
Visit Node.js's Website to download it for your OS.
Additionally, although this is not required to make a Discord Bot (or any script/program for that matter), a great text editor is the sharpest sword in a programmers arsenal, so I would recommend that you get one that best suits you. A lot of people will tell you that one is better than the other, but there is no one size fits all solution, play around with a couple and see what you like. At the end of the day its a subjective decision, but here are some popular editors that you may like.
- My personal favourite: VIM
- This one's also the lightest weight
- A very close second: Atom
- VIM Plugins: Vim Awesome
- Recently Very Popular: VS Code
- A Classic, with lot's of customizability: Sublime Text
- Very bulky but most powerful: WebStorm
- I use if for larger scale projects
If it wasn't obvious, you'll need to have a discord account in order to make a discord bot.
If you don't have an account, you can make one here.

Discord has a very powerful dashboard to help developers like us make the cool things that we want. So we'll leverage their dashboard to make our bot (it's also the only way you can get an auth token but we'll get to that later).
You'll need to create an "application to make your bot work". This takes some doing but it isn't too complex. Like I mentioned before the goal is to get an "authorization token" for the bot so that Discord knows what code is yours, and what code is not (in the event someone tried to hijack your bot). After your bot is authorized Discord knows it can safely accept your code.
To create the application, head over to the dashboard and login using your Discord credentials. Hit “New Application” to get started. Give the bot a name, then hit the button marked “Create Application.”
You’ll now be on the page for your application. Scroll down to the box marked “Create a Bot User,” hit it, and confirm the choice.
From here you can customize the look and feel of your bot. This task is subjective and highly trivial so I'll let you figure it out, but to get you started here's an example:


In the tab marked Bot, look for the words "Token: Click to reveal." Click that link and you’ll reveal a string of text. That’s your bot’s authorization token, which allows you to send it code. Don’t share it with anyone — that token allows whoever has it to create code for the bot, which means whoever has it can control your bot. If you think the token has been compromised, the good news is that you can easily generate a new one with the link right under the token, which reads "Regenerate".

Here you can also chose if you would like your bot to be public for all Discord users to add to their servers or just for you. Look for Public Bot.

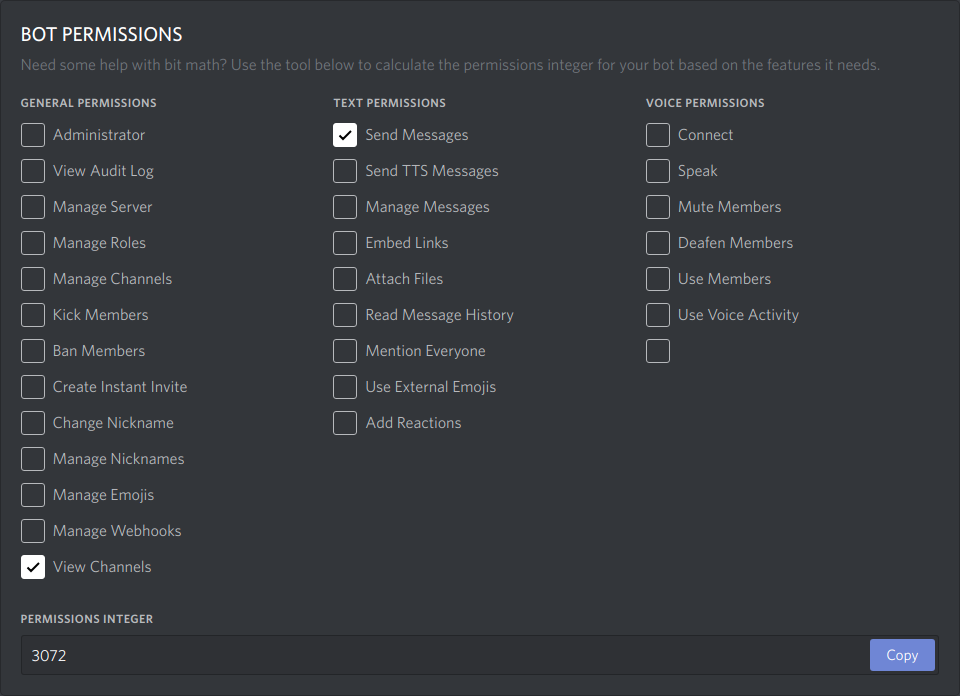
Use the provided bit math tool (in the Bot tab) to determine the permissions integer for your
bot. For this example the "Permissions Integer" is 3072
You’ll need that token and the permissions integer in just a second.
Now go back to the General Information tab, and look for "Client ID". This
is the ID with which Discord identifies your App. In this example, the Client
ID is 475899786369826841. This Client ID will be different for every app.

To add your bot to your server use both your unique "Client ID" and "Permission Integer" in place of CLIENTID and PERMISSIONSINT in the following URL and visit that site.
https://discordapp.com/oauth2/authorize?&client_id=CLIENTID&scope=bot&permissions=PERMISSIONSINT
Here is what it looks like for our example case:
https://discordapp.com/oauth2/authorize?&client_id=475899786369826841&scope=bot&permissions=3072

While you're doing that, you can also take a moment to create a folder in an easy-to-reach place on your computer where you can store all your bot's files. Call it something simple, like "DiscordBot" or "MyBot" so you know exactly what it is.
Node has a great command line tool that helps with creating, compiling and hosting projects, so we'll take advantage of that to build our app.
Using the following steps, we'll initialize a Node.js project:
NOTE: Make sure that NodeJS was added to PATH during installation, or the command line interface will not work.
- Open your terminal or ubuntu shell on windows (or git bash terminal).
- Navigate to the folder you created earlier. Alternatively you can probably right click in the folder and open git bash or command prompt from that menu.
- Run
npm init. - Enter the appropriate values into each field as it asks you the questions.
- Note for this tutorial, we are renaming index.js to bot.js
When complete, you should have the following files in the directory:
- package.json
- bot.js
package.json example:
{
    "name": "Wikibot",
        "version": "1.0.0",
        "description": "A Wikipedia bot.",
        "main": "bot.js",
        "author": "Atif Mahmud",
        "dependencies": {
        }
}In order to make a bot the only required dependency is Discord.js, but if you are following along with our example, we'll be using two other Node packages to teach some JavaScript quirks and fun things you can do.
For the bare minimum run the following command in the root directory:
npm install discord.js --save
To follow along run the following command in the root directory:
npm install discord.js winston wikiquote --save
Node will automatically install the dependencies into the "node_modules"
subdirectory and add the latest versions of the dependencies to your
package.json (this means that should any of the dependencies change,
you can update your bot in one go with npm update).
Your package.json should now look something like this:
{
    "name": "Wikibot",
    "version": "1.0.0",
    "description": "A Wikipedia bot.",
    "main": "bot.js",
    "author": "Atif Mahmud",
    "dependencies": {
        "discord.js": "^11.3.2",
        "wikiquote": "^0.4.4",
        "winston": "^3.0.0"
    }
}
Remember that Auth Token from earlier? Well now is where it comes into play. We are going to create a dedicated json file for authentication so that if someone else (ie. this tutorial) wants to use our bot code they can without compromising our bot's security.
In the root directory create a file called auth.json, inside it paste the
following:
{
    "token": "YOUR TOKEN HERE"
}
You don't see my token in there for obvious reasons. Remember the auth token is a string not an integer.
First thing is first, we have to let Node know which packages we want to use in our app, so the first lines of code will be just that. Imports.
Because without Babel.js Node doesn't yet support ES6 imports we'll be using synchronous ES5 require statements for the scope of this project.
Add the following lines to the top of bot.js:
// Imports
var Discord = require('discord.js');
var logger = require('winston');
var auth = require('./auth.json');
var wiki = require('wikiquote');
Now we'll be configuring a logger to provide us with information in the console as our bot runs.
Add the following lines after the imports:
// Configure logger settings
logger.remove(logger.transports.Console);
logger.add(new logger.transports.Console, {
    colorize: true
});
logger.level = 'debug';
For more on winston configuration visit The NPM page.
After configuring our logger, we'll initialize the Discord Bot
// Initialize Discord Bot
var bot = new Discord.Client({
});So the discord bot library operates on an event handling system, so the bot will only preform an action provided that a specific event has triggered.
Visit the documentation for more event handlers and specific use cases.
For this exercise we'll only be using the following handlers:
- Ready
- Message
The "ready" handler is triggered immediately after the bot has been successfully connected, authorized and acknowledged by Discord's servers.
So this is the perfect handler to use to make sure our connection is all good. To verify that everything is okay, we'll use our logger to let us know.
Add the following lines to bot.js:
bot.on('ready', () => {
    logger.info('Connected');
    logger.info('Logged in as: ');
    logger.info(bot.user.tag);
});
If you haven't seen () => {} notation before I'll take some time to explain
it because I think it's pretty neat. Lambda functions are a concept that is
kind of recent in web development, although it's been around forever in
functional programming. We're seeing a bit of a paradigm merge in web where
functional and object oriented programming are meeting. That's where these
lambda functions come in.
In javascript they're called arrow functions because of the syntax but the concept is the same. They are basically a way to define a nameless function, in this case the function has no parameters but we'll see how to add those in later.
The reason an arrow function is advantageous here is because the bot.on() method takes two parameters, the event handler id ('ready'), and a function to preform when that event is triggered.
Because we don't plan on reusing it, by defining the function inside the parentheses we save time and space.
Moving on, we come to the core functionality of our bot. Our bot's aim will be to display a random quote from wikiquote, whenever a specific user sends a message. (This can easily be tweaked to be all users, or a specific channel etc.).
To do this we'll use the "message" event handler. For now, let's just reply with a message to all users.
Add the following lines to bot.js
bot.on('message', (message) => {
    message.reply("Why thanks for taking the time to chat!");
})
As you can see above, this time, we include the message parameter in the arrow
function, this let's us call message.reply() to reply to the specific message
that was sent. If you're lost on how we knew to use .reply() refer to the
documentation for the message class.
Finally, we'll let Discord know that we want to log our bot in, so we'll add the last line of code:
bot.login(auth.token);Here we are referring to the secret token that we put in auth.json
Let's say, we have a particularly un-environmentally concious friend. We'll make it so that whenever they send a message, our bot sends them a wikiquote about climate change.
Finally, we'll tweak the bot to send random quotes instead of the same old reply each time. And we'll only target a specific user.
Inside the message event handler comment out the previous code and add the wiki code as such:
bot.on('message', (message) => {
    /* Previous code:
        message.reply("Why thanks for taking the time to chat!");
    */

    // New Wiki Code
    if (message.author.id === 'INSERT ID OF USER HERE') {
        wiki.search('Climate')
            .then(pages => wiki.getRandomQuote(pages[Math.floor(Math.random() * pages.length)].title))
            .then(quote => message.reply(quote));
    }
});
Okay so that last snippet was a little bit loaded, so I'll try and explain it in chunks.
First, we use the author property of the message class to grab the id of
the person who sent the message. Then we check to see if it's the same as the
ID of the friend we want to check. If the condition is met we'll run the wiki
search code, otherwise, the message goes through without a response.
Now onto the wikiquote api. To read more about it visit the NPM page. I won't go into great detail about each of the functions parameters and return types, but I will explain the new javascript that we see.
First of all we are using those arrow functions again, and because these are
one-liners, we don't even need the curly braces, pretty neat huh! Now you may
be asking what is .then? Well, because the wikiquote api is a RESTful
operation, it's asynchronous in nature (we sometimes have to wait for the
response whilst we do other things), instead of a static value, any wiki methods
return a promise. A promise is javascripts way of saying, hold on,
I don't have the result yet but when I do get it eventually you have to tell me
what to do with it. That's why we use .then. We are basically telling javascript
wait for the response, .then preform this function that I've given you with
the result.
The entire bot.js in its finished state is shown here:
// Imports
var Discord = require('discord.js');
var logger = require('winston');
var auth = require('./auth.json');
var wiki = require('wikiquote');

// Configure logger settings
logger.remove(logger.transports.Console);
logger.add(new logger.transports.Console, {
colorize: true
});
logger.level = 'debug';

// Initialize Discord Bot
var bot = new Discord.Client({
        });

bot.on('ready', () => {
        logger.info('Connected');
        logger.info('Logged in as: ');
        logger.info(bot.user.tag);
        });

bot.on('message', (message) => {
        if (message.author.id === 'INSERT ID HERE') {
        wiki.search('Climate')
        .then(pages => wiki.getRandomQuote(pages[Math.floor(Math.random() * pages.length)].title))
        .then(quote => message.reply(quote));
        }
        });

bot.login(auth.token);All that's left to do is host the bot and Discord will do the rest.
Re-open command prompt/terminal in the root directory of this project.
run npm install if you haven't already, and then run node bot.js
If you've done everything correctly, your bot should be live and ready to go!
And that's it! You've successfully completed the tutorial, pat yourself on the back because that wasn't a super easy job, I look forward to building cool things with you in the future. Hopefully you've learned something new and feel free to open a GitHub issue if you notice anything off about the tutorial or if you have any questions.