Compressure is a tool for video and image creation that hacks the time-dependence properties of video compression codecs (H.264, MPEG-4, etc.) by manipulating the frame timeline to break motion-estimation for new forms of movement. In practice, we do this in a a few distinct steps:
- transcode source videos into specified format
- slice source videos into "superframes," or equal-sized chunks of adjacent frames
- compose slices/superframes such that the output repeats or skips frames in the original, by navigating through a timeline of superframes forwards or backwards
We will elaborate on each of these steps, as well as how these steps work together to make these visuals, later in this README.
Below is just one example of the kinds of textures and colors we can create using this tool. For more examples, please see the Gallery at the bottom of this README.
First of all, make sure you have ffmpeg installed - on MacOS, you can use
brew install ffmpeg, and on Debian derivatives you can use apt-get install ffmpeg.
You probably don't need anything special here, so the builds distributed in
these main channels will suffice.
We strongly recommend using virtual environments. You can use any virtual
environment system you like, but we build and test with python -m venv VIRTUAL_ENVIRONMENT_PATH. Make sure you're using Python 3.7+.
To install, simply activate your venv and run:
pip install -r requirements.txt
pip install .The graphical user interface (GUI) is under active development, so the UI is
subject to change. That being said, it's perhaps the most intuitive and quick
to use. Once you've installed everything on the command line, simply run
python ui.py
If you have the cores to spare, specify --n_workers X, where X is the number of cores to use
Note that you'll need some source videos to run any of these. That's kinda what this whole project is about. We suggest starting with short videos (10-30 seconds).
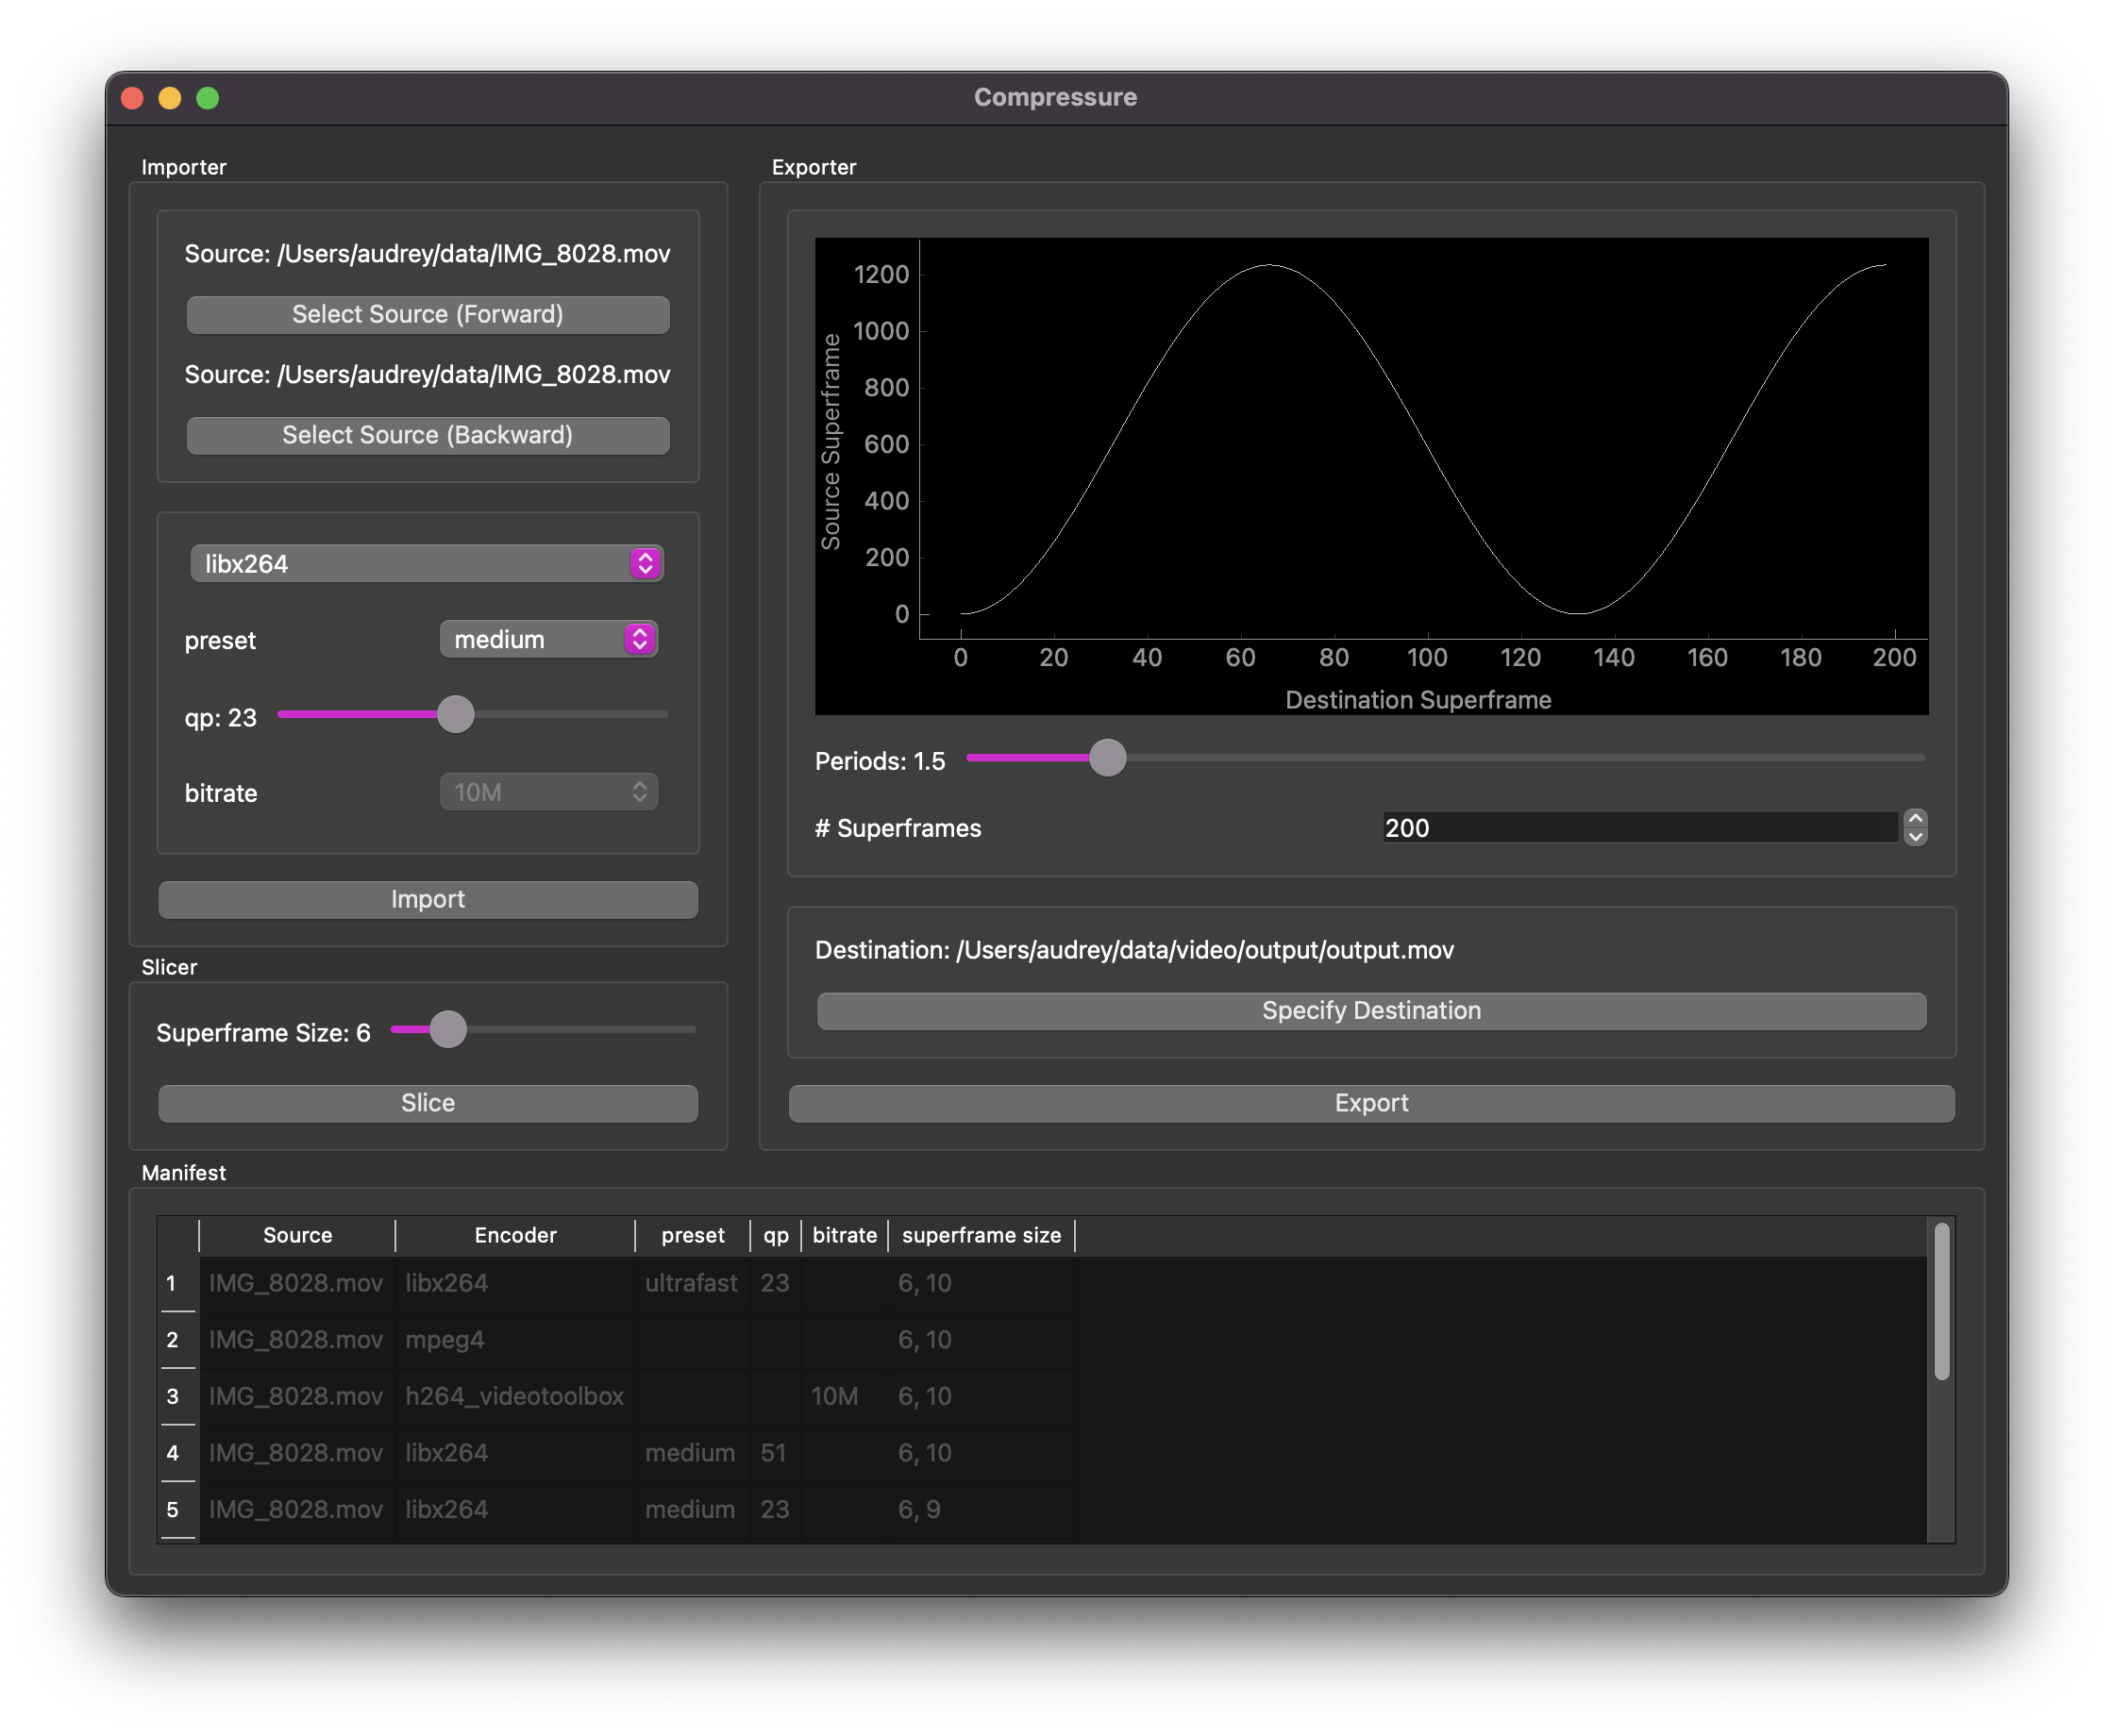
Note that the GUI exposes four main components:
- Importer
- Slicer
- Exporter
- Manifest
The Importer, Slicer, and Exporter are designed to work in series: you use them in that order. In fact, you'll notice that the Slicer's "Slice" and Exporter's "Export" buttons are disabled until they can be used (in general, after you click "Import" and "Slice" respectively).
Note that each of the steps takes some time to process. If a cached version of
a file is available, the system will grab that which is a very fast operation.
The system caches files as much as possible to save time (defaults to
~/.cache/compressure), which can grow to several GB quickly. Do be aware of
this when using the system.
The Importer is where we specify the forward source, backward source, and encoder settings. The forward source is the source material that we will see when we navigate forward through the timeline. The backward source is the material we will see when navigating backwards through the timeline. If you only move forward through the timeline, you'll only see the forward source. However, since the system doesn't know how you'll specify the timeline it forces you to import both directions. You can always use the same video if you just wanna get going faster. We go into detail about each of the encoder settings later, but I encourage you to try different settings to see what you like! When you've selected your sources and set the encoder how you like it, you can import it. This will take some time, depending on the length/size of the sources and the encoder settings. Once the system's done importing, you'll notice the "Slice" button is enabled.
- select source files:
- forward - video used to start, used when moving forward in the timeline
- Backward - used when moving backwards through the timeline
- specify encoder settings:
- encoder selection (
mpeg4,libx264,h264_videotoolbox) - this is perhaps the most impactful choice you can make - encoder options:
- preset - dictates encode speed (including size of encodes on disk),
only available for
libx264 - qp - another important parameter worth playing with, only available
for
libx264 - bitrate - similar to qp, only relevant for
h264_videotoolbox
- preset - dictates encode speed (including size of encodes on disk),
only available for
- encoder selection (
A "superframe" is a collection of adjacent frames (I like 6-10) which constitute the smallest unit within the compressure system. This is by far the longest part of the process and the point at which you can benefit from multiprocessing. The system will appear to freeze, but if you look over at the terminal at this time, you'll see it's working hard.
The Slicer is where we specify how many frames to include in each slice/superframe. Shorter slices (fewer frames) will allow you to produce a more abstract piece that diverges from the source, whereas longer slices will tend to appear more natural or evolve into chaos more slowly. Note that there's no "right" or "wrong" setting here, but it's helpful to know the framerate of the source video: a higher framerate source will correspond to shorter chunks of time per superframe than a lower framerate source (assuming the same superframe size). I like the appearance of videos made with superframe size ~6-12, but follow your heart! Once you've set the superframe size, you can click "Slice" to perform the operation. Note that this often takes the longest time, and the system may appear to freeze. This can be mitigated somewhat by using more cores, but it's never going to be instantaneous.
The Exporter is perhaps the quickest operation, and is where we specify the timeline function. It defaults to using a scaled & offset negative cosine function over half of a period, though we plan to support other functions in the future. The number of superframes you choose will impact how long the output file is and how quickly the motion appears to be. Choose more superframes for slower motion and longer files. Note here that the output video length is also dependent on superframe size, so you will notice longer output videos if you use different superframe sizes, even if you use the same number of superframes.
You will note the Exporter section has a graph which shows the timeline function - how we will move through the superframes from the sources as we move through the destination/output video. Since the period slider defaults to 0.5, you'll see the timeline visualizer defaults to half of a full period. You'll notice this updates when you change the period. Note that the timeline function can only be calculated after the source has been sliced, so it starts blank and will be updated every time you slice with a new superframe size.
- Compose with timeline operations - the default operation is a negative cosine:
- number of superframes to fit into the timeline - more is a longer film with slower motion, high is a shorter film with faster motion
- Number of periods in the timeline function from the beginning to the end of the timeline
- specify destination file
Finally, the Manifest shows you exactly what sources you've imported, how they've been encoded, and how they've been sliced. This updates automatically and is designed to help you make informed decisions about encoder and superframe selection, in case you need to save time or storage space.
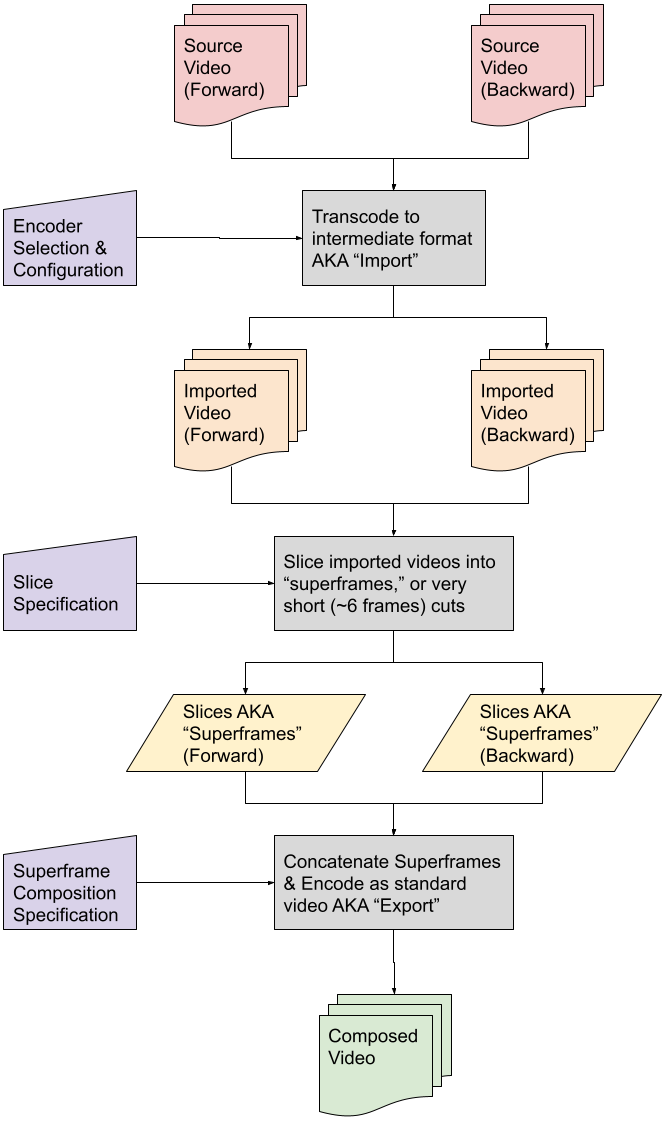
Compressure is a data processing pipeline over which the user has some control. The following system diagram may be helpful in understanding how the user's input affects the process.
The following assumes the reader is using MacOS or a Debian derivative and is relatively familiar with managing their machine. We don't currently support Windows, and if you use something like CentOS, BSD, or Arch, you can likely figure out how to translate these commands.
Regarding ffmpeg, if you're trying to do hardware acceleration, we suggest
trying the builds distributed through the main package manager channels first,
then install from source if necessary. Note that the ffmpeg developers
recommend installing from source code, but that process is out of scope for
this document.
The easiest thing to do is simply install with Make and Docker:
make build
make run
Note that the above will first build the docker container using Dockerfile
and then run that image using the mountpoints specified in Makefile, and
execute the shell script sample_compressure_command.sh. Because it uses
sample values for video filenames, you should see a SubprocessError
indicating that a video file couldn't be found. To get around this, you should:
- locate one or two videos you're interested in using (suggested length >10sec and <5min), place somewhere on your filesystem to expose to the Docker container
- in
sample_compressure_command.sh, change the values ofFNAME_VIDEO_FORWARDandFNAME_VIDEO_BACKWARDto match those of the one or two videos you selected above - in
Makefile, change the value ofDPATH_INPUTto be the parent directory of the one or two videos you selected above - Optionally in
Makefile, change the value ofDPATH_OUTPUTto a preferred location - Build and run the docker container with
make run
If you're trying to use the system directly or interactively, the easiest
entrypoint is main.py. You can run this in an interactive Python session (we
prefer IPython), or straight from the command line.
Compressure defaults to filesystem locations, encoding schemes, and
hyperparameters that are supposed to be understandable, interesting, and fast.
In general, we try to keep default parameters in a simple class within the
module in which they're relevant, with class names like
VideoPersistenceDefaults and VideoCompressionDefaults. This may change at
some point. Below are some examples:
- cached files (including the manifest file, a JSON file that keeps track of
cached files) go to
~/.cache/compressureunless specified otherwise - encoded videos are dropped into the
$CACHE/encodesby default, where$CACHEis the location specified above. - videos are encoded with
libx264unless specified otherwise - encoding parameters (listed below as ffmpeg commands:
-c:v libx264 -preset veryfast -qp -1 -bf 0:libx264is the default codec for H.264 in FFmpeg.-presetis a coarse setting that loosely governs the trade-off between encode speed and compression efficiency-qpis the quantization parameter, which governs how fine the details are. Changing this has a large impact on the end results-bfis the max number of bidirectional interframes (or B-frames). We usually set this to 0 to avoid stuttering.
-c:v mpeg4-c:v h264_videotoolbox -bf 0 -b:v 10M:h264_videotoolboxis the MacOS hardware-accelerated codec for H.264. In our experiments with it in this context, it's not particularly impactful-b:vis the target bitrate, which we specify asbitratein Python for readability
- GoP size is the "group of pictures" size, specifying the maximum number
of frames to place between intra-frames. Lower numbers will "reset" the
video to a normal-looking state more frequently, higher numbers will
propagate artifacts for longer (more abstract). This corresponds to the
ffmpeg option
-g
- Encoded videos later get sliced into "superframes" - very short (4-10 frames)
chunks that are each offset by one second w.r.t. their temporal neighbors. We
can move through the timeline one superframe at a time, to see a kind of
quantized (in the sense of atomic packets, not necessarily discretized)
motion. We find that
superframe_sizeis best tweaked differently for each asset, based on how much motion is captured in the video, as well as the inherent framerate of the video. We usually start with 6, since it's a factor of 24, 30, and 60 (three common framerates for video). A superframe size of 6 will yield slices of 0.25 seconds, 0.2 seconds, and 0.1 seconds respectively. Superframe size does NOT need to be a factor of framerate, though we think the result looks best when it's less than 0.5 seconds.
The compressure system makes extensive use of persistent caching to avoid
redunant encoding and slicing operations. By default, these are kept in
~/.cache/compressure and tracked in ~/.cache/compressure/manifest.json.
The compressure.persistence.CompressurePersistence class is the object we use
for tracking all these versions. Unfortunately, the manifest doesn't
automatically scan the persistence directory at startup, so any versions
deleted outside the Compressure app won't be reflected in the manifest. The
best way to add or remove entries to the persistent cache is to use the
persistence object referenced at the top of this paragraph.
You can manually set the persistence directory by specifying fpath_manifest
and workdir when instantiating the compressure.main.CompressureSystem
object. There is currently no command-line support for this operation.
This is the "manual" mode that gives you the most control and responsibility. It is the preferred mode of development. The specifics will be different based on your system, but it likely will look something like this:
from compressure.main import CompressureSystem
controller = CompressureSystem()

# Forward and backward videos - could be different sources entirely!
fpath_source_fwd = "~/data/video/input/blooming-4.mov"
fpath_source_back = "~/data/video/input/blooming-4_reverse.mov"

# Encode both - may replace all references to "compression" with "encoding"
fpath_encode_fwd = controller.compress(fpath_source_fwd)
fpath_encode_back = controller.compress(fpath_source_back)

dpath_slices_fwd = controller.slice(
    fpath_source=fpath_source_fwd,
    fpath_encode=fpath_encode_fwd,
    superframe_size=6,
)
dpath_slices_back = controller.slice(
    fpath_source=fpath_source_back,
    fpath_encode=fpath_encode_back,
    superframe_size=6,
)

# Create "buffer" of all superframes, for scrubbing through the timeline by superframes
buffer = controller.init_buffer(dpath_slices_fwd, dpath_slices_back, superframe_size=6)

# Generate a timeline function, establishing how we're moving through the timeline.
# TODO we want this to be controlled live, rather than a predefined function like so
timeline = generate_timeline_function(6, len(buffer), frequency=0.5, n_superframes=100)

# Now use the timeline to step/traverse through the video buffer
video_list = [deepcopy(buffer.state)]
for loc in timeline:
    video_list.append(buffer.step(to=loc))

# Finally, concatenate the videos!
concat_videos(video_list, fpath_out="~/data/video/output/output.mov")
We don't currently have a more tightly-integrated traversal tool, because we're hoping to replace it with something more playable. Unfortunately, this means we're not putting much energy into tightening-up the traversal
from compressure.main import CompressureSystem, generate_timeline_function
from compressure.dataproc import concat_videos
from copy import deepcopy

# Instantiate the controller (including persistent caching, encoding, slicing)
controller = CompressureSystem(fpath_manifest, workdir, verbosity)

# Forward and backward videos - could be different sources entirely!
fpath_source_fwd = "~/data/video/input/blooming-4.mov"
fpath_source_back = "~/data/video/input/blooming-4_reverse.mov"

# Encode both - may replace all references to "compression" with "encoding"
fpath_encode_fwd = controller.compress(
    fpath_source_fwd,
    gop_size=6000,
    encoder='libx264',
    encoder_config={
        'preset': 'veryslow',
        'qp': 31,
        'bf': 0,
    },
)
fpath_encode_back = controller.compress(
    fpath_source_back,
    gop_size=6000,
    encoder='libx264',
    encoder_config={
        'preset': 'veryslow',
        'qp': 31,
        'bf': 0,
    },
)

# Slice both into "superframes" - very short (4-10 frames) video files,
# each offset by one frame with respect to its neighbors
dpath_slices_fwd = controller.slice(
    fpath_source=fpath_source_fwd,
    fpath_encode=fpath_encode_fwd,
    superframe_size=6,
)
dpath_slices_back = controller.slice(
    fpath_source=fpath_source_back,
    fpath_encode=fpath_encode_back,
    superframe_size=6,
)

# Create "buffer" of all superframes, for scrubbing through the timeline by superframes
buffer = controller.init_buffer(dpath_slices_fwd, dpath_slices_back, superframe_size=6)

# Generate a timeline function, establishing how we're moving through the timeline.
# TODO we want this to be controlled live, rather than a predefined function like so
timeline = generate_timeline_function(6, len(buffer), frequency=0.5, n_superframes=100)

# Now use the timeline to step through the video buffer
video_list = [deepcopy(buffer.state)]
for loc in timeline:
    video_list.append(buffer.step(to=loc))

# Finally, concatenate the videos!
concat_videos(video_list, fpath_out="~/data/video/output/output.mov")
This is where it starts to become an interesting experiment. We recommend playing around with this - use different presets, codecs, qp values, bitrates, superframe sizes, timeline functions, etc.!
Once we have a GUI and support live video creation, the experimentation process will be much faster!
python main.py \
  -f ~/data/video/input/blooming-4.mov \
  -b ~/data/video/input/blooming-4_reverse.mov \
  -g 6000 \
  --encoder libx264 \
  --encoder_config preset veryslow qp 31 bf 0 \
  --superframe_size 6 \
  --frequency 0.5 \
  --n_superframes 100 \
  -o ~/data/video/output/output.mov
The above will do exactly what we're doing above, from the command line. This may be the fastest way of interacting with it
TODO
Video compression codecs take advantage of both spatial and temporal redundancies, to encode images and motion by referencing other parts of the image or timeline. Let's start with images, then move to the video domain:
Images are composed of high-frequency components (quickly changing colors or light intensity in space) and low-frequency components (solid blocks of color or light). A fine checkerboard, detailed hair or fur, and the texture of leaves on a tree from afar, are all examples of high-frequency spatial data. A clear sky or a single-color shirt are examples of low-frequency spatial data. Low-frequency spatial data can be encoded much more efficiently than high-frequency data, because it's less costly to say "take this color and apply it to this whole area" than to encode individual pixels (or represent an arbitrarily complex function). The specifics of this are somewhat more complex, but this simplification will do just fine for now.
Videos are obviously composed of images, so image compression ideas come into play here as well. However, since videos have a temporal component to them, we can exploit redundancies there too. A fast-paced image sequence, where subjects appear and disappear quickly, requires encoding whole sections of images from scratch. But if motion is small, or gradual, or non-existent, then we may encode a frame as "the same as the last frame, with these pixels moving in this direction," which is much more efficient. The simplest (though impractical for several reasons) implementation involves encoding only the first image in a sequence, then encoding the rest as a modification on the first. This creates a cascading chain of dependencies, where each frame is derivative of previous frames. We'll discuss the impracticalities of this particular implementation later, but its close enough to continue the conversation now.
With each of these models of compression, we encode a few components:
- Approximation of spatial or temporal function
- e.g. 2D function over image patch, or back-references to previous frames
- Error or residual term, applied to the approximation to correct it for this particular data
The question that Compressure answers is "what happens if you interrupt this chain of temporal dependencies?" If we skip frames, or duplicate frames, without adjusting the motion or residual estimation, we introduce artifacts that cascade through the image sequence, producing unexpected and unique videos. Compressure does this by encoding a source video according to user-defined parameters, slicing the compressed video it into "superframes," or short collections of consecutive frames (1-10 frames, for instance), then moving through the timeline of superframes in a way that repeats or skips superframes, introducing artifacts and slowing or speeding-up movement.
We mentioned above that we encode videos using references to previous frames, with the first frame in the video as the terminal frame. In the parlance of video compression, we're talking about I-frames a P-frames. P-frames are those which are encoded as derivatives of previous frames and itself as much as possible, while I-frames are those which are not encoded with any temporal dependencies. Modern video codecs also make use of B-frames (for bidirectional temporal dependencies), but we don't often use them in Compressure because they tend to manifest as stuttering which we find undesireable.
In most use-cases, videos are encoded such that every ten frames or so is an
I-frame, the justification being that they seek to minimize distortion (from
approximating motion and residuals) and allow random access to different parts
of the film. In codec world, this equates to a "group of pictures (gop) size)"
of 10 (give or take). This yields the benefits above, but we eschew this in
order to produce interesting artifacts. In our case, we set the gop_size to
some absurdly large number, such that we never refresh the video feed with an
I-frame, allowing artifacts to propagate. This technique actually comes from an
artistic practice called "data moshing," which is how the Compressure project
started.
Datamoshing usually involves taking two or more videos, removing the I-frames of the second, and concatenating it with the first to produce motion from the second, on top of imagery from the first. We diverge from the standard datamoshing practice by taking a single video and slicing it into many shorter videos, selecting a subset of them, and concatenating them again. The artifacting comes from moving through the video timeline (one slice at a time) at a faster or slower rate. To illustrate the slicing and traversal project, we've made a few small diagrams illustrating it:
Standard Video, 30 frames long
start                        end
<---------------------------->
26 Sliced videos, each 5 frames long
 0 <--->
 1  <--->
 2   <--->
 3    <--->
 4     <--->
 5      <--->
 6       <--->
 7        <--->
 8         <--->
 9          <--->
10           <--->
11            <--->
12             <--->
13              <--->
14               <--->
15                <--->
16                 <--->
17                  <--->
18                   <--->
19                    <--->
20                     <--->
21                      <--->
22                       <--->
23                        <--->
24                         <--->
25                          <--->
Moving through timeline (via slices) at standard speed, yielding no (or minimal) artifacting
 0 <--->
 5      <--->
10           <--->
15                <--->
20                     <--->
25                          <--->
Moving through timeline (via slices) at 140% speed, yielding some artifacts, faster motion, and a shorter video
 0 <--->
 7        <--->
14               <--->
21                      <--->
Moving through timeline (via slices) at 60% speed, yielding some artifacts, slower motion, and a longer video
 0 <--->
 3    <--->
 6       <--->
 9          <--->
12             <--->
15                <--->
18                   <--->
21                      <--->
24                         <--->
Moving through timeline (via slices) at standard speed, then reversing, yielding no (or minimal) artifacting (if we supplied a reversed video as input as well)
 0 <--->
 5      <--->
10           <--->
15                <--->
20                     <--->
25                          <--->
20                     <--->
15                <--->
10           <--->
 5      <--->
 0 <--->
As we can see above, each slice is offset by 1 frame w.r.t. its neighbors, so we can grab any slice we want. If we want to reproduce the source exactly, we simply grab each non-overlapping slice, and the output is the same length of the input. Skipping parts of the source between each concatenated slice yields faster motion (shorter video if we don't repeat) and repeating frames by selecting overlapping slices yields slower motion (longer video if we move through the whole timeline linearly).
Of course this begs the question: "what if we arbitrarily move through the timeline?" That's what we're exploring here! We currently use a function that generates a timeline according to a sinusoid. You can try this yourself following the instructions of a later section.
You'll find, as you play around with different codecs (sometimes called encoders in this project), and codec parameters (encoder_config), that different codecs produce wildly different artifacts, and tweaking various codec parameters can result in unexpected changes in the finished product. In a later section, we'll discuss some of our findings.
The timeline function we've currently implemented is a rectified sine wave, with variable frequency. The way we implement that is by generating a discrete sine function, scale it to the total number of slices, and use that to index a slice. For example, here's some simple code that uses the values we established above:
>>> from compressure.main import generate_timeline_function
>>> generate_timeline_function(
...     superframe_size=5,
...     len_lvb=26,
...     n_superframes=6,
...     frequency=0.5
...     )
array([ 0, 14, 23, 23, 14, 0 ])
The above timeline function corresponds to the following video ordering:
 0 <--->
14               <--->
23                        <--->
23                        <--->
14               <--->
 0 <--->
Another example:
>>> generate_timeline_function(
...     superframe_size=5,
...     len_lvb=26,
...     n_superframes=13,
...     frequency=1
...     )
array([ 0, 12, 21, 25, 21, 12, 0, 12, 21, 25, 21, 12, 0 ])
which corresponds to
 0 <--->
12             <--->
21                      <--->
25                          <--->
21                      <--->
12             <--->
 0 <--->
12             <--->
21                      <--->
25                          <--->
21                      <--->
12             <--->
 0 <--->
Finally, here's an example with higher resolution:
>>> generate_timeline_function(
...     superframe_size=5,
...     len_lvb=26,
...     n_superframes=21,
...     frequency=0.5
...     )
array([ 0, 3, 7, 11, 14, 17, 20, 22, 23, 24, 25, 24, 23, 22, 20, 17, 14, 11, 7, 3, 0 ])
and the visual representation:
 0 <--->
 3    <--->
 7        <--->
11            <--->
14               <--->
17                  <--->
20                     <--->
22                       <--->
23                        <--->
24                         <--->
25                          <--->
24                         <--->
23                        <--->
22                       <--->
20                     <--->
17                  <--->
14               <--->
11            <--->
 7        <--->
 3    <--->
 0 <--->
You can see from the above that the selection of this function is designed to show off the variable speed and directionality afforded by the compressure system.
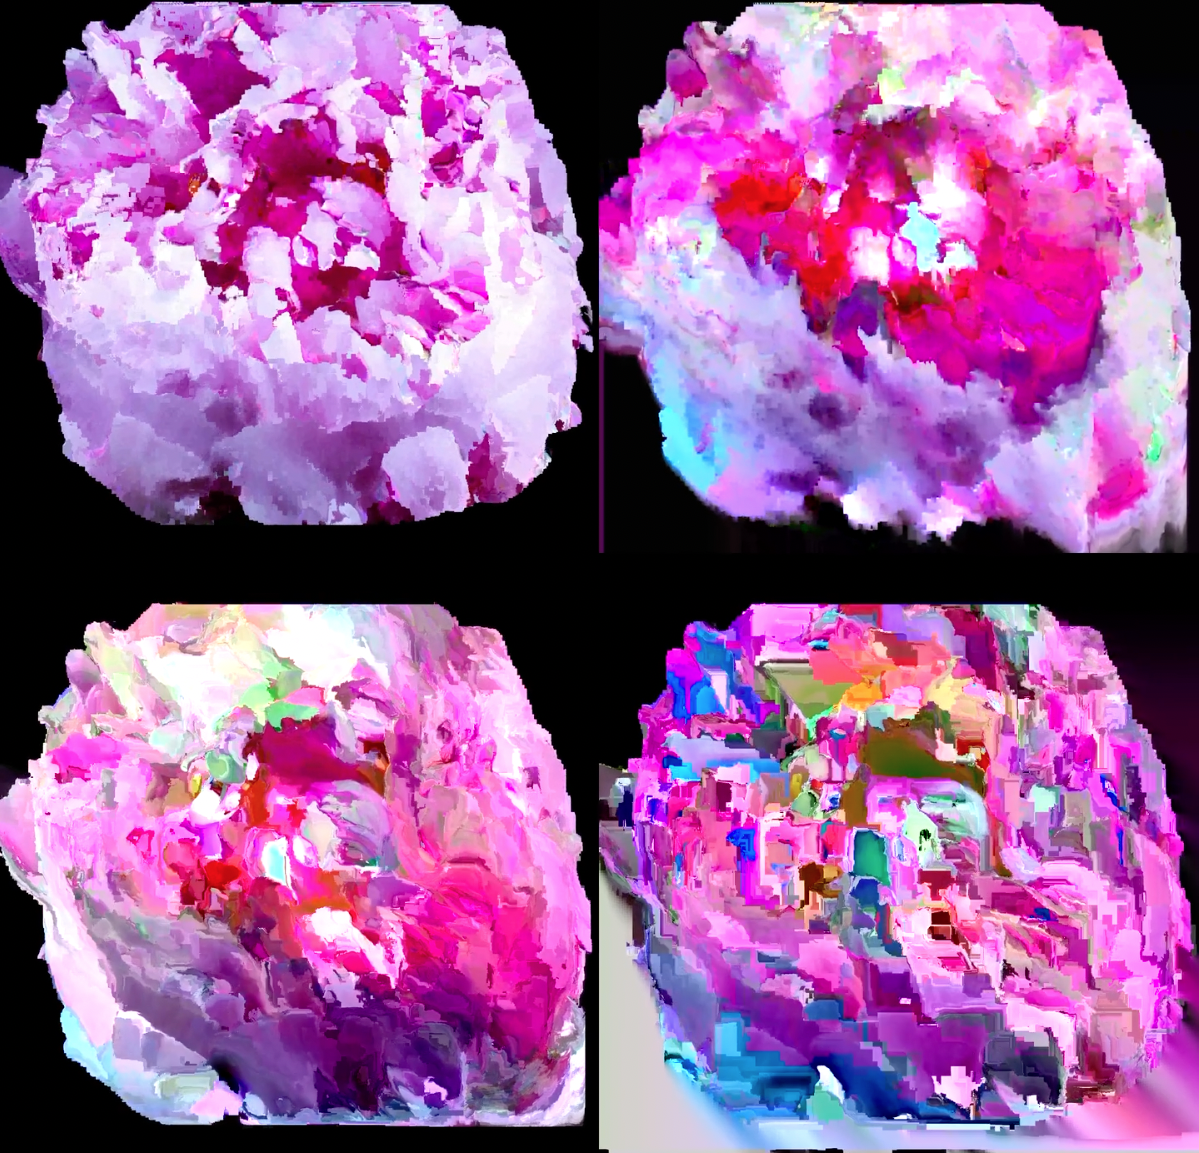 bl/lo/oo/om, a piece by mip using only Compressure with four different settings on the same source
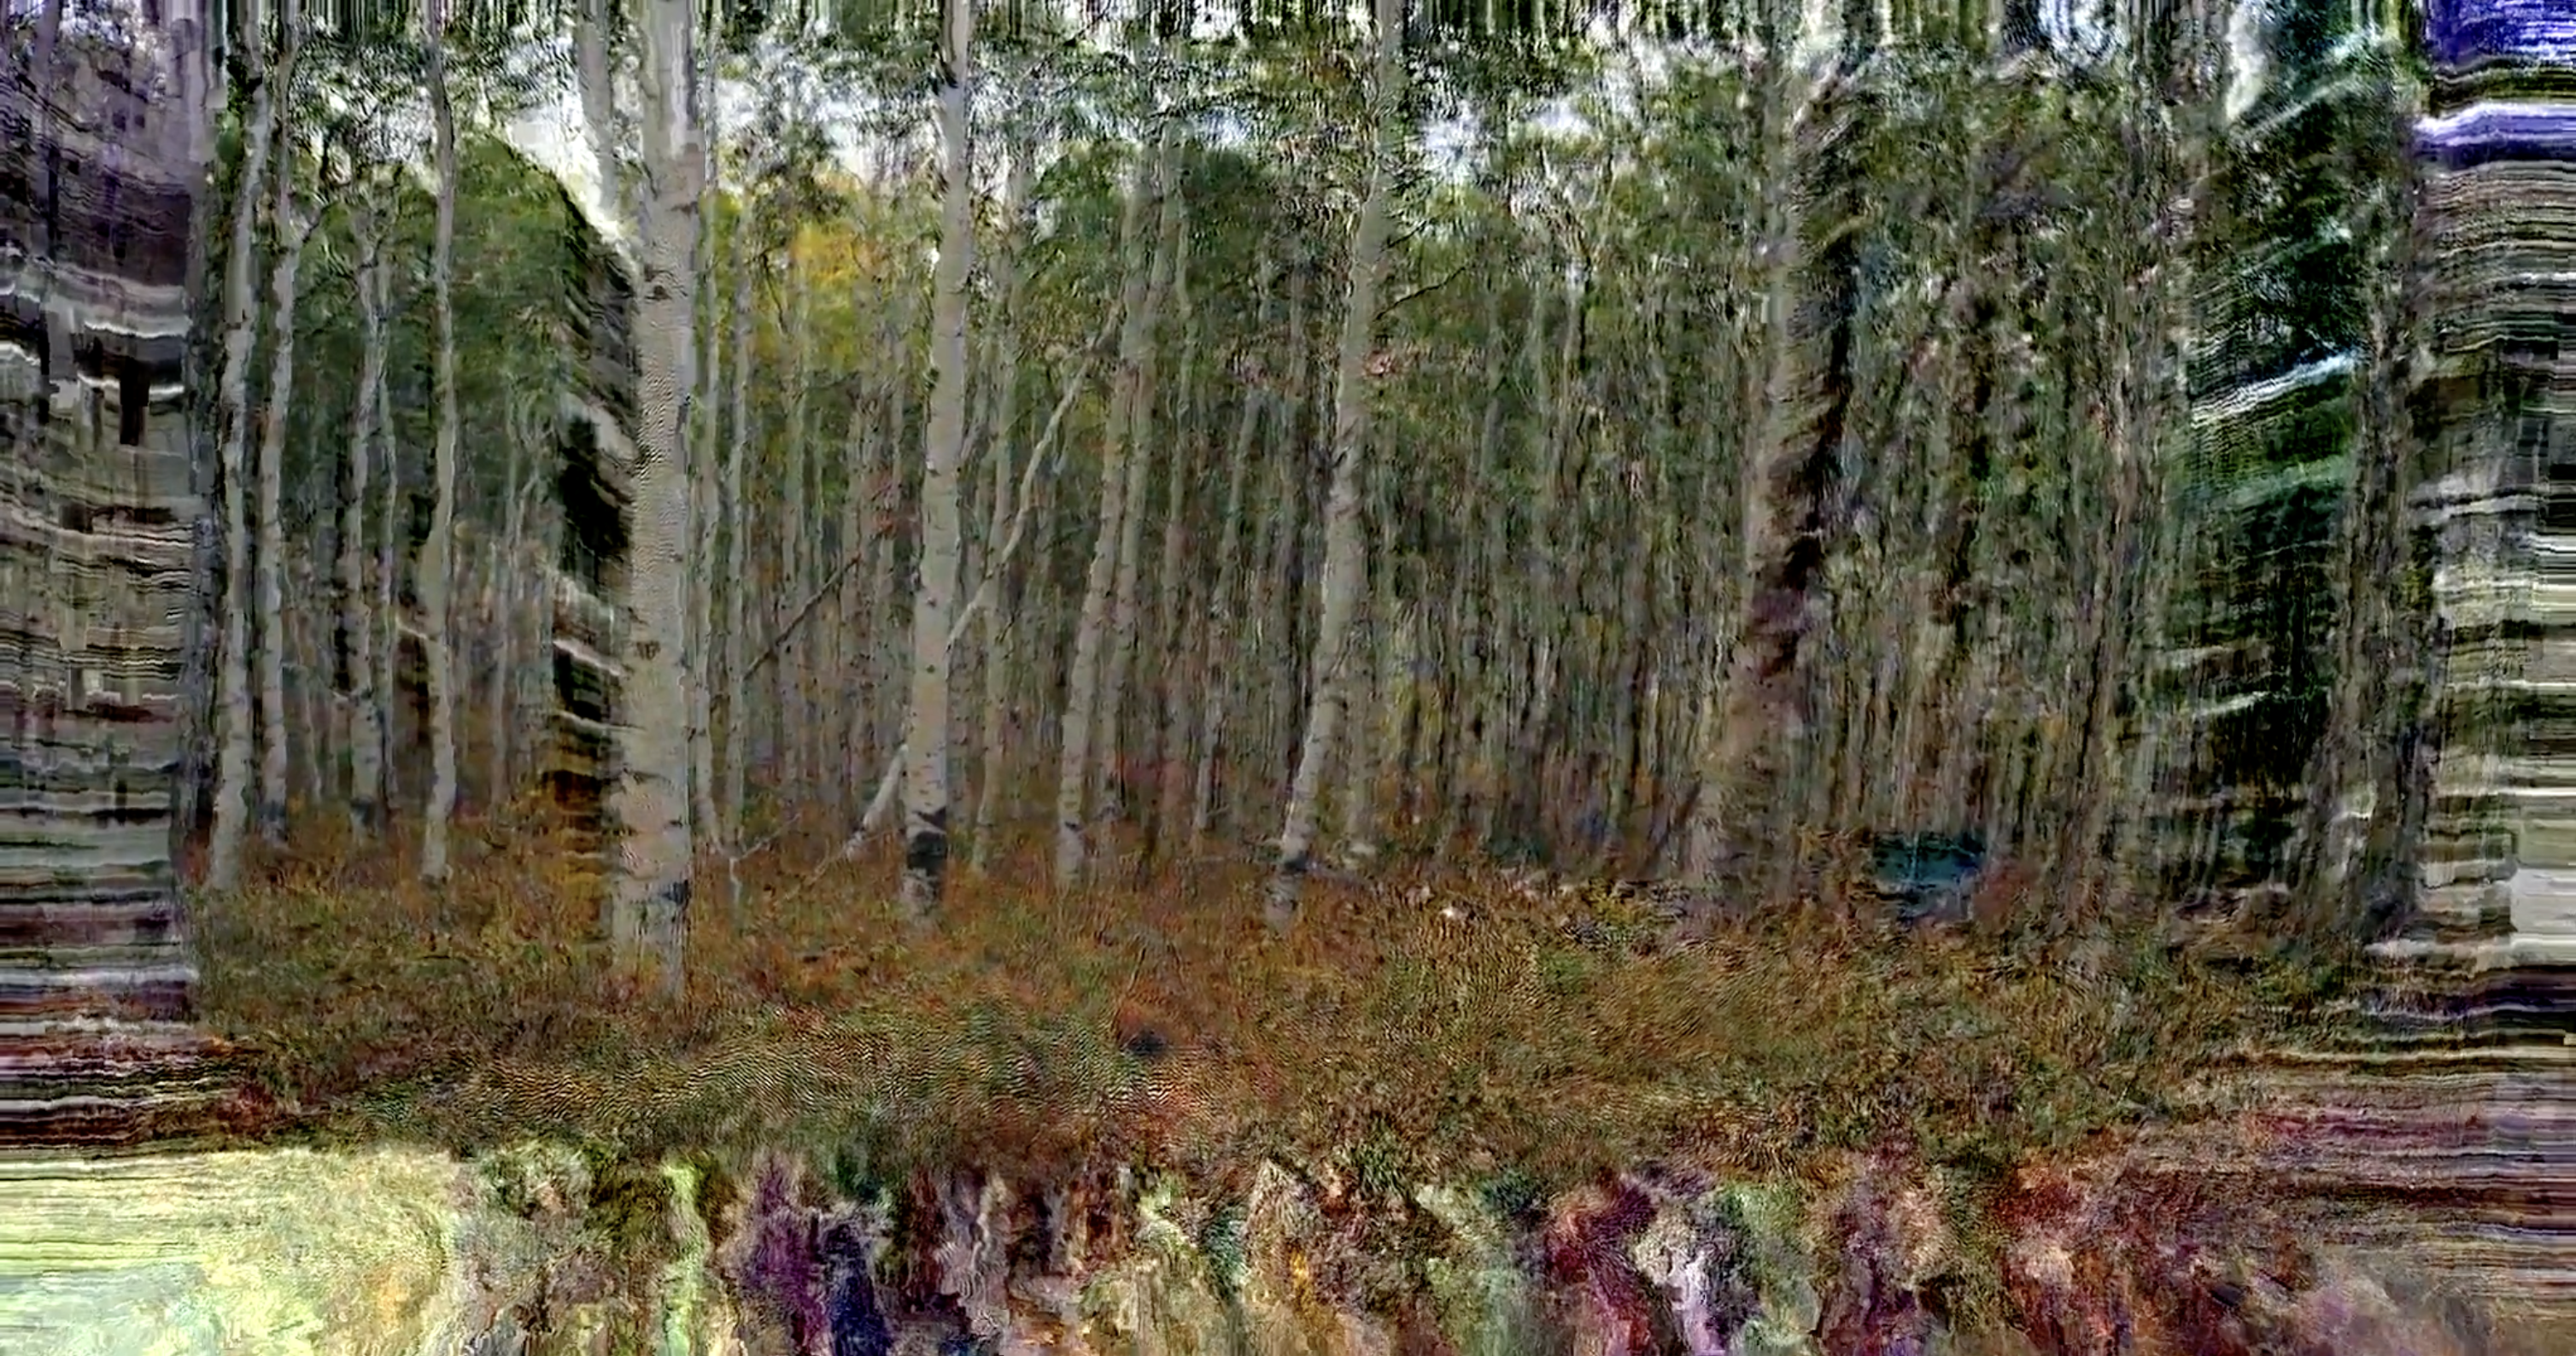 dissociation v2, a piece by mip using only Compressure on a single source
 descendence, a piece by mip using only Compressure on a single source
