CountDelete is a sample application that counts and deletes Revit elements in a host and link model using the Design Automation API for Revit.
This sample is based on Learn Forge Learn Forge Tutorial, the workflow is pretty similar, please make sure to go through that sample first, or you are already familiar with that.
This sample includes 2 Revit plugin projects, CountIt and DeleteElement, which are referenced at the CountIt & DeleteWalls tutorial. This include a few improvement to DeleteWalls sample to support deleting different types of elements(Walls, Floors, Doors, Windows) based on the input json file, and renamed the Revit plugin project to DeleteElements.
The sample also integrates the bucket jstree and viewer from Learn Forge Tutorial for viewing models (.NET version) to get the input revit file from the bucket, and also put the result file back to the same bucket. The result files are different based on different activities, a .txt file for CountIt, and an modified .rvt file for DeleteElements.
- Forge Account: Learn how to create a Forge Account, activate subscription and create an app at this tutorial.
- Visual Studio: Either Community (Windows) or Code (Windows, MacOS).
- .NET Core basic knowledge with C#
- ngrok: Routing tool, download here
- Revit 2019: required to compile changes into the plugin
Clone this project or download it. It's recommended to install GitHub desktop. To clone it via command line, use the following (Terminal on MacOSX/Linux, Git Shell on Windows):
git clone https://github.com/Autodesk-Forge/design.automation-csharp-revit.count.delete
ngrok
Run ngrok http 3000 -host-header="localhost:3000" to create a tunnel to your local machine, then copy the address into the FORGE_WEBHOOK_URL environment variable.
Visual Studio (Windows):
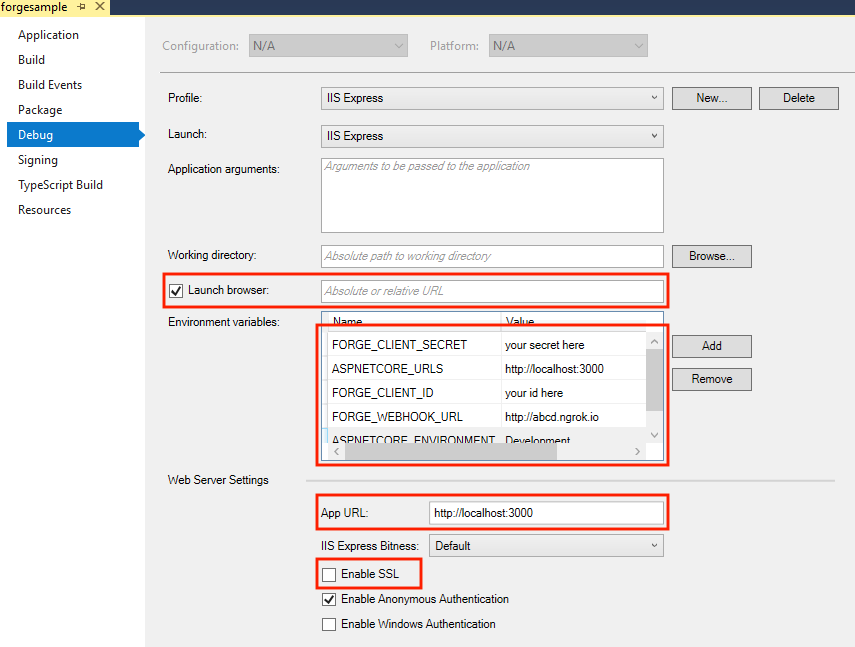
Right-click on the project, then go to Debug. Adjust the settings as shown below.
The environment variables you need to set should be as above, most of them are same as detailed in Design Automation Sample Tutorial. The only one you need to notice is FORGE_DESIGN_AUTOMATION_NICKNAME, if you already set a NickName for your Forge App, e.g. revitiomycompanyname, please input the value of NickName here, if you don't set a NickName, you can ignore this environment variable, just leave it as it is.
ASPNETCORE_ENVIRONMENT:Development,ASPNETCORE_URLS:http://localhost:3000,FORGE_CLIENT_ID:Your Forge App Client Id,FORGE_CLIENT_SECRET:Your Forge App Client Secret,FORGE_WEBHOOK_URL:your ngrok address here: e.g. http://abcd1234.ngrok.io,FORGE_DESIGN_AUTOMATION_NICKNAME: ``,
Revit plugin
A compiled version of the Revit plugins (.bundles) are included on the WebApp module, under wwwroot/bundles folder. Any changes on these plugins will require to create a new .bundle, the Post-build event should create it. Please review the readme for CountItApp & DeleteElementsApp
Start the app from Visual Studio (or Visual Code).
Open http://localhost:3000 to start the app.
To use the sample, the workflow should be:
- Build the solution to create 2 AppBundle under
wwwroot/bundles; - Create/Update AppBundle & Activity in
Configuredialog; - Create a bucket and upload a Revit project file;
- Select a Revit project file, translate it and open it in Forge viewer;
- Select different element types you want to Count/Delete, select activity, click
Start workitemto post a workitem. - The result file(
.txtor.rvt) will be put in the same bucket, you can translate and view it, or you can download the file to check out.
Documentation:
Desktop APIs:
- Sometimes you may fail to delete some Revit element depends on the Revit project file.
This sample uses .NET Core and should work fine on both Windows and MacOS, did not verify on MacOS yet, but you can check this tutorial for MacOS if you want to try.
This sample is licensed under the terms of the MIT License. Please see the LICENSE file for full details.
Zhong Wu, Forge Partner Development


