This sample monitors a BIM 360 Folder for version.added event, when a new IPT file (or version) is uploaded, it triggers Design Automation for Inventor to convert it to .SAT file. Then triggers Design Automation for Revit to import this SAT file into a new Revit Family RFA (using a predefined Revit Family Template, RFT). Then opens a Revit RVT file (on the same folder where the IPT was uploaded) and updade the family. The resulting Revit file is uploaded back to BIM 360 as a new version.
This sample is based on this Webhook sample. Learn more about Webhooks and 3-legged Refresh & Access Token at this blog post. Also based on the Learn Forge Tutorial.
Whatch the recording at Youtube.
Try it at inventor2revit.herokuapp.com. Sample files provided at this folder.
Instructions:
- Go to BIM 360 Document Manager, create a folder under
Project Files. - Using BIM 360, upload Table_Chair.rvt and Chair_Orientation.ipt to the folder.
- Go to the app live version, sign in using your Autodesk credentials and enable the app within your BIM 360 Account (see Enable my BIM 360 Account steps at the app top-right).
- Expand the tree view and select the newly created folder, click on Start monitoring this folder.
- Back to BIM 360 Document Manager, upload this new version of the Chair_Orientation.ipt (with headrest).
- After the new IPT version is uploaded, the process will start (IPT to SAT, SAT into a new RFA and RFA replaced on the RVT), monitor at the Hangfire queue dashboard.
- After the new version of the RVT is created, view it using BIM 360 Document Manager.
- Forge Account: Learn how to create a Forge Account, activate subscription and create an app at this tutorial.
- Visual Studio: Either Community (Windows) or Code (Windows, MacOS).
- .NET Core basic knowledge with C#
- ngrok: Routing tool, download here
- MongoDB: noSQL database, learn more. Or use a online version via Mongo Altas (this is used on this sample)
- AWS Account: S3 buckets are used to store temporary files
- Inventor 2019: required to compile changes into the plugin
- Revit 2019: required to compile changes into the plugin
Clone this project or download it. It's recommended to install GitHub desktop. To clone it via command line, use the following (Terminal on MacOSX/Linux, Git Shell on Windows):
git clone https://github.com/autodesk-forge/design.automation-csharp-inventor2revit
Visual Studio (Windows):
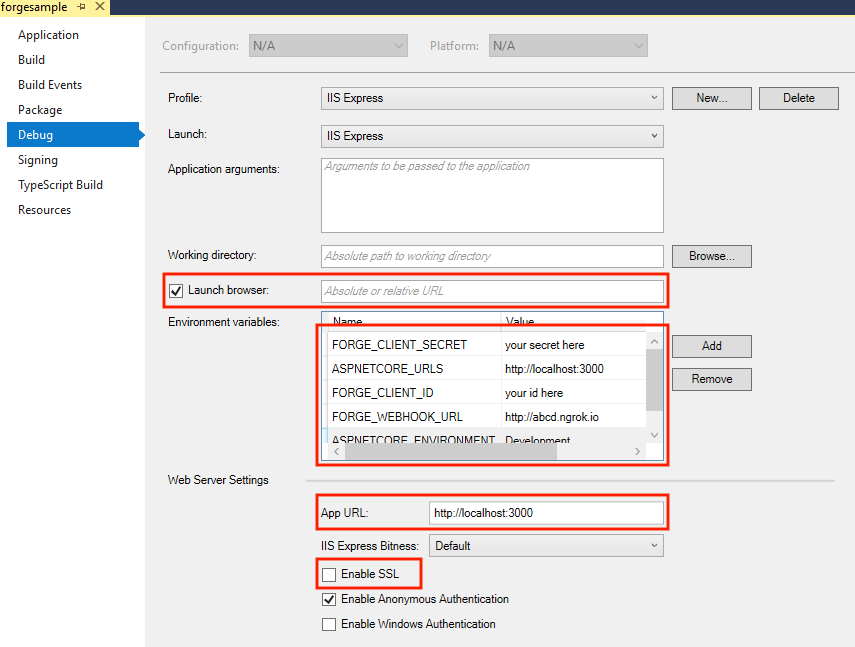
Right-click on the project, then go to Debug. Adjust the settings as shown below.
Visual Sutdio Code (Windows, MacOS):
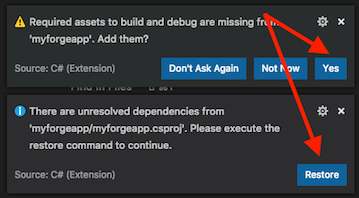
Open the folder, at the bottom-right, select Yes and Restore. This restores the packages (e.g. Autodesk.Forge) and creates the launch.json file. See Tips & Tricks for .NET Core on MacOS.
Important: For Visual Code (Windows or MacOS) open only the /web/ folder. This IDE doesn't recognize the Inventor & Revit plugins, so opening the entire solution may fail.
MongoDB
MongoDB is a no-SQL database based on "documents", which stores JSON-like data. For testing purpouses, you can either use local or live. For cloud environment, try MongoDB Atlas (offers a free tier). With MongoDB Atlas you can set up an account for free and create clustered instances, intructions:
- Create a account on MongoDB Atlas.
- Under "Collections", create a new database (e.g. named
inventor2revit) with a collection (e.g. namedusers). - Under "Command Line Tools", whitelist the IP address to access the database, see this tutorial. If the sample is running on Heroku, you'll need to open to all (IP
0.0.0.0/0). Create a new user to access the database.
At this point the connection string should be in the form of mongodb+srv://<username>:<password>@clusterX-a1b2c4.mongodb.net/inventor2revit?retryWrites=true. Learn more here
There are several tools to view your database, Robo 3T (formerly Robomongo) is a free lightweight GUI that can be used. When it opens, follow instructions here to connect to MongoDB Atlas.
AWS Account
Create an AWS Account, allow API Access, the access key and secret key will be used on this sample.
ngrok
Run ngrok http 3000 -host-header="localhost:3000" to create a tunnel to your local machine, then copy the address into the FORGE_WEBHOOK_URL environment variable.
Environment variables
At the .vscode\launch.json, find the env vars and add your Forge Client ID, Secret and callback URL. Also define the ASPNETCORE_URLS variable. The end result should be as shown below:
"env": {
    "ASPNETCORE_ENVIRONMENT": "Development",
    "ASPNETCORE_URLS" : "http://localhost:3000",
    "FORGE_CLIENT_ID": "your id here",
    "FORGE_CLIENT_SECRET": "your secret here",
    "FORGE_CALLBACK_URL": "http://localhost:3000/api/forge/callback/oauth",
    "OAUTH_DATABASE": "mongodb+srv://<username>:<password>@clusterX-a1b2c4.mongodb.net/inventor2revit?retryWrites=true",
    "FORGE_WEBHOOK_URL": "your ngrok address here: e.g. http://abcd1234.ngrok.io",
    "AWS_ACCESS_KEY": "your AWS access key here",
    "AWS_SECRET_KEY": "your AWS secret key here"
},
Before running the sample, it's recomended to already upload a RVT project and a IPT file into a BIM 360 Folder. See /samplefiles folder.
A compiled version of the Inventor and Revit plugins (.bundles) are included on the web module. Any changes on these plugins will require to create a new .bundle as a .zip file, the Post-build event should create them. These file names are hardcoded.
Before start, upload the Table_Chair.rvt and Chair_Orientation.ipt to a BIM 360 folder.
Start the app from Visual Studio (or Visual Code). Open http://localhost:3000 to start the app, select a folder to start monitoring. Upload a new version of the IPT (Chair with headrest/Chair_Orientation.ipt, same name, but with headrest) file and the process should start. You can monitor the Jobs via Hangfire dashboard: http://localhost:3000/hangfire.
To deploy this application to Heroku, the Callback URL for Forge must use your .herokuapp.com address. After clicking on the button below, at the Heroku Create New App page, set your Client ID, Secret and Callback URL for Forge.
Forge Documentation:
Desktop APIs:
Other APIs:
- Hangfire queueing library for .NET
- MongoDB for C# driver
- Mongo Altas Database-as-a-Service for MongoDB
- This sample hardcode the Revit project to upload the IPT.
This sample uses .NET Core and works fine on both Windows and MacOS, see this tutorial for MacOS. Important: For Visual Code (Windows or MacOS) open only the /web/ folder.
-
Cannot see my BIM 360 projects: Make sure to provision the Forge App Client ID within the BIM 360 Account, learn more here. This requires the Account Admin permission.
-
error setting certificate verify locations error: may happen on Windows, use the following:
git config --global http.sslverify "false"
This sample is licensed under the terms of the MIT License. Please see the LICENSE file for full details.
Forge Partner Development team:
- Augusto Goncalves @augustomaia
- Naveen Kumar T
- Sajith Subramanian


