| services | platforms | author |
|---|---|---|
iot-hub, functions |
node |
olivierbloch |
Simple "ping" solution to help validate a device connectivity to Azure IoT Hub. The solution consists in an Azure IoT Hub and an Azure Function deployed at once. The Azure Function is triggered when a new message is received on the IoT Hub and will send the same message content back to the device that sent it. The project contains all the code and deployment configuration needed for the solution. It also contains a simple device sample written in JavaScript for Node.js.
Important: while this sample shows a simple way to send a message from a device back to himself, and can be adapted to send messages from a device to another one through Azure IoT Hub and Azure Functions, it is NOT recommended to allow such patterns in a production environment unless you manage a proper security/authorization mechanism in the Cloud (in the Azure Functions for example) to ensure you have full control over who's talking to who.
If you are deploying from the azure-sample web page, read below. If you are deploying from the GitHub Readme.md file, skip next chapter and go directly to the "Deploying with the Deploy button on the GitHub Readme.md page" one.
When deploying from the azure-samples web page, you will be redirected to the Azure portal for login and the custom deployment of the ARM template will start.
- Enter parameters for the solution in the "Parameters" blade appearing when clicking on parameters:
- Region: pick the region you want the services to be deployed to.
- Choose a solution name: Important, the solution name should be all lower case, only ascii caracters and no longer that 16 characters.
- IoT Hub Sku: select the Sku you want for the IoT Hub : F1 (Free), S1 or S2. Note that you can only have 1 instance of F1 per Azure subscription.
- Function Sku: select the Sku you wnat for the Azure Function.
- Subscription: this is the subscription you want the services to be deployed to if you have several Azure subscriptions.
- Resource Group: The services will be deployed and grouped under the specified resource group allowing a simpler management in the Azure portal. You can choose to create a new one, or to use an existing resource group.
- Review Legal Terms
Once you have validated the parameters and reviewed and accepted the legal terms, the solution will be deployed to your solution. You can skip to the Message Format section below.
Click on the blue button below

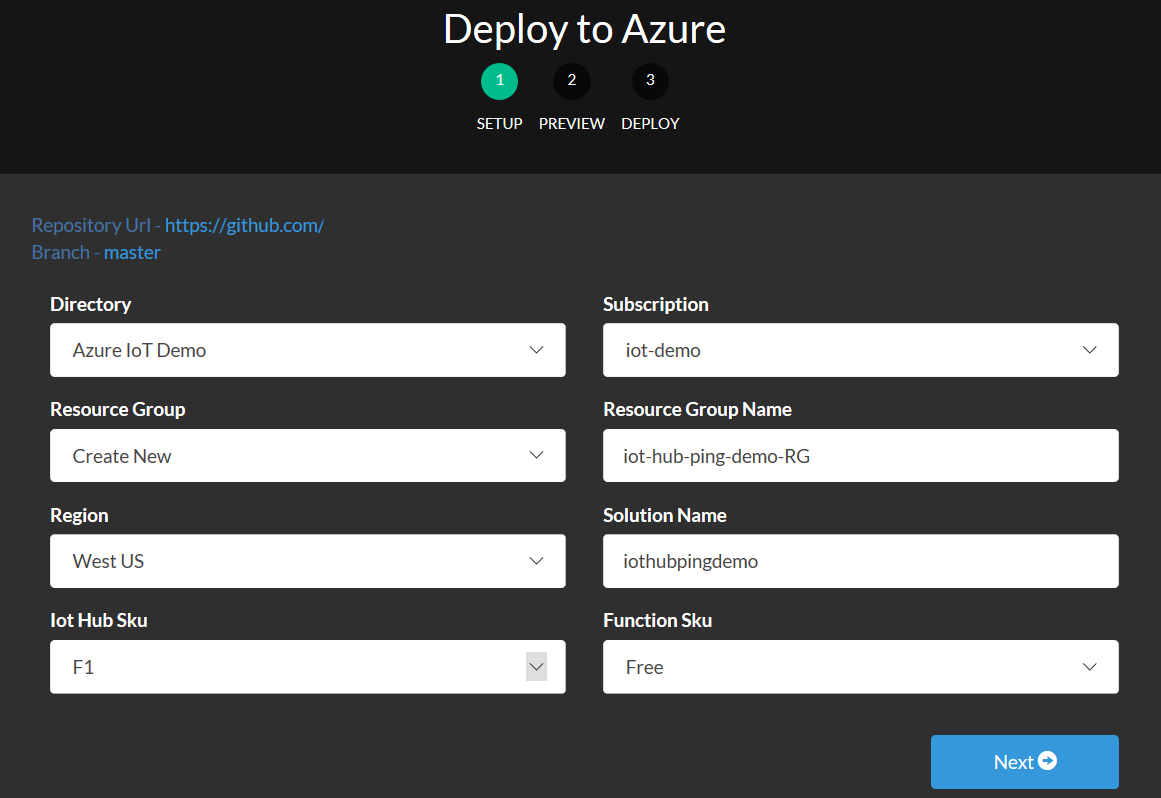
Once you have clicked on the button, you will be asked to login with your Azure subscription's credentials. When you are logged in, you will be prompted for entering parameters for the solution:
- Directory: Your Azure acount is bound to an Azure Active Directory. Usually the default one is the only one, but in some cases, you might be using several, in which case you can select the one you want your solution to be secured with.
- Subscription: this is the subscription you want the services to be deployed to if you have several Azure subscriptions.
- Resource Group/Resource Group Name: The services will be deployed and grouped under the specified resource group allowing a simpler management in the Azure portal. You can choose to create a new one, or to use an existing resource group.
- Region: pick the region you want the services to be deployed to.
- Choose a solution name: Important, the solution name should be all lower case, only ascii caracters and no longer that 16 characters.
- IoT Hub Sku: select the Sku you want for the IoT Hub : F1 (Free), S1 or S2. Note that you can only have 1 instance of F1 per Azure subscription.
- Function Sku: select the Sku you wnat for the Azure Function.
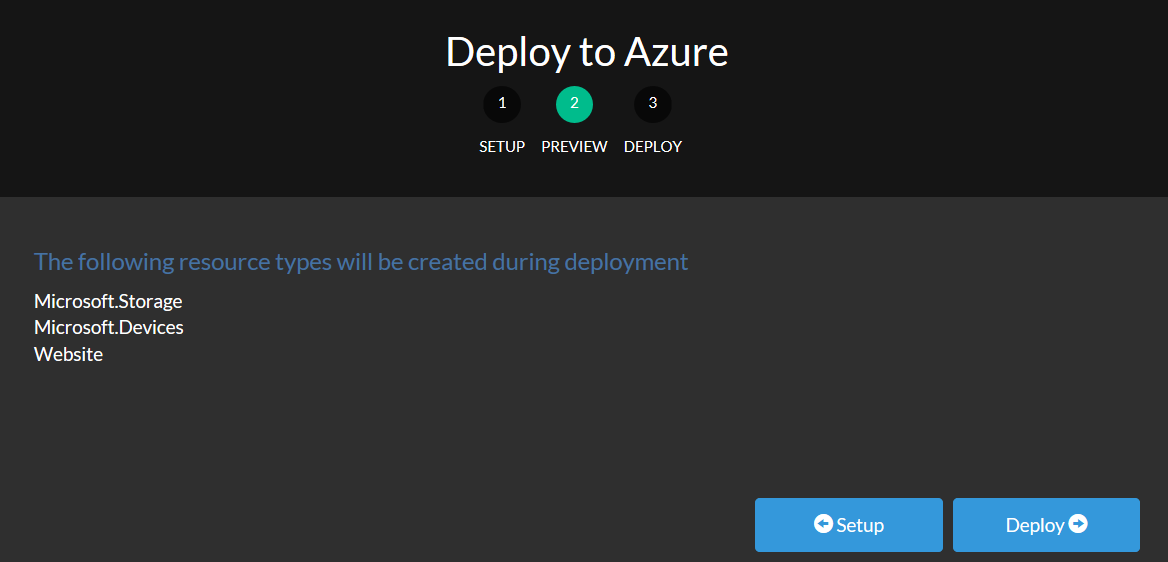
Hit Next The wizard checks the selected parameters and lists the services it will deploy:
- Microsoft.Storage is the an Azure storage service required by both IoT Hub and Function
- Microsoft.Devices is the Azure IoT Hub service
- Website is the Azure Function service.
Hit Deploy in the wizard and wait a couple minutes for the services to be deployed and configured.
To visualize the newly deployed services in the Azure portal, you can simply click on the "Manage your resources" link displayed in the final screen of the deployment wizard.
Now that the services are deployed, you can look at how you can connect devices to Azure IoT Hub following instructions from the Azure IoT SDKs repository.
Refer the section below on 'Manually installing Node.js packages dependencies' if you see errors on your function app related to a specific dependency that can't be found.
In order for a device to send a ping and receive the response from the solution, it needs to send a JSON message using the following format:
{
    "deviceId":"<deviceId>",
    "message":"Hello IoT World"
}
Where 'deviceId' is the device's ID as created in the Azure IoT Hub device registry. The message the device will receive back will contain the "message" itself.
Now that you have your IoT Hub ping solution deployed, you can test any of your devices that you are trying to connect to Azure IoT Hub using the Azure IoT Hub SDKs.
The Azure IoT Hub SDKs are portable and can run on most types of devices out there, but if you want to get started on a device that has been certified for Azure IoT Hub, look into the list of devices certified for Azure IoT.
And if you are looking for some cool cheap device to get started fast, ckeck out the Azure IoT Starter Kits.
... Or you can test and play around with the samples provided in this repository in the folder devicesample:
The deployment of the function is done by Azure Resource Manager from the GitHub repository directly. You will notice that the code for the Function's code is "Read Only" when you bring up the Azure portal blade for the Function. If you want to edit the code in the portal to customize the function, you will need to disconnect your instance of the function from source control. In order to do so:
- bring up the Function blade in the Azure portal,
- click on the "Function App settings" link in the top right corner,
- select "Configure Continuous Integration".
- You should see the Deployments blade appearing and showing a deployment from GitHub, select it then click on "Disconnect" in the menu bar of the blade.
- Once you have disconnected the deployment from GitHub you will certainly need to manually redeploy the required node modules dependencies (see next paragraph)
When the Function is deployed by the Azure Resource Manager, packages dependencies are automatically installed in the Function environment for you. But in some situations, the Function might get updated and you might have to manually reinstall the dependencies. You will need to do this if you see an error message at the execution of the function that you are getting some syntax error or that it is using undeclared functions. Here is how to manually deploy the required dependencies for the node.js code:
-
bring up the Function blade in the Azure portal,
-
click on the "Function App settings" link at the bottom of the left menu,
-
select "Go to Kudu".
-
in the console, type the following commands:
cd site/wwwroot/iothubpingfunction
npm install
Once you have run these commands, you can go back to the Function code and check that you are not getting the errors any longer.
If you want to get started with Azure IoT Hub, visit Azure.com/iotdev.


