| page_type | languages | products | description | urlFragment | ||
|---|---|---|---|---|---|---|
sample |
|
|
Spring Boot - Secure Communications Using End-to-end TLS/SSL |
spring-boot-secure-communications-using-end-to-end-tls-ssl |
This guide explains how to secure communications for Spring Boot apps using end-to-end TLS/SSL and SSL certificates managed in Azure Key Vault.
Azure Spring Cloud is used for illustration. You can apply the same approach to secure communications when you deploy Spring Boot apps to Azure Kubernetes Service, App Service or Virtual Machines.
You will:
- Deploy Spring Boot micro services
- Secure communications using end-to-end TLS/SSL
- Use Azure Key Vault to realize zero-trust model.
In order to deploy a Java app to cloud, you need an Azure subscription. If you do not already have an Azure subscription, you can activate your MSDN subscriber benefits or sign up for a free Azure account.
In addition, you will need the following:
| Azure CLI version | Java 8 | Maven | Git |
The TLS/SSL protocol establishes identity and trust, and encrypts communications of all types, making secure Internet communications possible - particularly Web traffic carrying commerce data and personally identifiable information.
Based on the principle of "never trust, always verify", Zero Trust helps secure all communications by eliminating unknown and un-managed certificates and only trusts certificates that are shared by verifying identity prior to granting access to those certificates.
You can use any of the following types of certificates:
- CA (Certificate Authority) Certificate issued by a certificated authority (CA)
- EV (Extended Validation) Certificate is a certificate that conforms to industry standard certificate guidelines
- Wildcard Certificate supports any number of sub domains based on *.site.com
- Self-Signed Certificates - client browsers do not trust these certificates and will warn the user that the certificate is not part of a trust chain. Of course, self-signed certificates are good for dev and testing environments. Production workloads should never use self-signed certificates.
To securely load certificates into Spring Boot apps, we are using the Azure Key Vault Certificates Spring Boot Starter.
<dependency>
   <groupId>com.microsoft.azure</groupId>
   <artifactId>azure-spring-boot-starter-keyvault-certificates</artifactId>
</dependency>You can secure communications using end-to-end TLS/SSL in Azure Spring Cloud. Pictorially -
| # | TLS/SSL Segment |
|---|---|
| 1 | Consumers to service |
| 2 | Service ingress controller to target app, e.g. Spring Cloud Gateway |
| 3 | Spring Cloud Gateway to Spring Cloud Service Registry |
| 4 | Spring Cloud Gateway to Spring Boot app (app to app) |
| 5 | Spring Boot app to external systems |
You can secure communications end-to-end or terminate transport level security at any communication point for Spring Boot apps. You can also automate the provisioning and configuration for all the Azure resources needed for securing communications.
Install or update the Azure Spring Cloud extension(>=2.10.0) using the following command.
az extension update --name spring-cloud
az extension add --name spring-cloud
Let us start ...
Create a bash script with environment variables by making a copy of the supplied template.
cp .scripts/setup-env-variables-azure-template.sh .scripts/setup-env-variables-azure.shOpen .scripts/setup-env-variables-azure.sh and enter the following information:
# Customize SPRING_CLOUD_SERVICE - set your name for Azure Spring Cloud
export SPRING_CLOUD_SERVICE=secure

# Customize KEY_VAULT value - set your name for Key Vault
export KEY_VAULT=certs-2020

# Customize CUSTOM_DOMAIN - set your custom domain for the main entry gateway
export CUSTOM_DOMAIN=secure-gateway.spring-microservices.com

# Customize CONTAINER_REGISTRY - set your name for the Container Registry
export CONTAINER_REGISTRY=springbootimages
Then, set the environment:
source .scripts/setup-env-variables-azure.shLogin to the Azure CLI and choose your active subscription.
az loginCreate a Resource Group and configure defaults.
# ==== Create Resource Group ====
az group create --name ${RESOURCE_GROUP} --location ${REGION}

az configure --defaults group=${RESOURCE_GROUP} location=${REGION} \
    spring-cloud=${SPRING_CLOUD_SERVICE}
Create a Key Vault and self-signed certificate.
# ==== Create Key Vault, self-signed certificate ====
az keyvault create --name ${KEY_VAULT} -g ${RESOURCE_GROUP}
export KEY_VAULT_URI=$(az keyvault show --name ${KEY_VAULT} | jq -r '.properties.vaultUri')

az keyvault certificate create --vault-name ${KEY_VAULT} \
    -n ${SERVER_SSL_CERTIFICATE_NAME} \
    -p "$(az keyvault certificate get-default-policy)"
Optionally, you may turn on custom domain and TLS/SSL for segment 1, consumers to Azure Spring Cloud:
- Purchase a certificate from an SSL certificate shop and download
certificate artifacts for
Apache. - Convert the certificate into a format accepted by Key Vault.
- Import the converted certificate into Key Vault.
# ==== You may have to merge certificates into 1 file ====
# ==== SAMPLE SCRIPT =====================================
openssl pkcs12 -export -out myserver2.pfx -inkey privatekey.key -in mergedcert2.crt
az keyvault certificate import --file myserver2.pfx \
    --name ${CUSTOM_DOMAIN_CERTIFICATE_NAME} \
    --vault-name ${KEY_VAULT} --password 123456
Deploy the external-service to Azure Container Instances and turn on TLS/SSL
using certificates managed by Key Vault.
source .scripts/deploy-external-service.shCreate Azure Spring Cloud and apply config.
# ==== Create Azure Spring Cloud ====
az spring-cloud create --name ${SPRING_CLOUD_SERVICE} --resource-group ${RESOURCE_GROUP} \
    --location ${REGION}

# ==== Apply Config ====
az spring-cloud config-server set --config-file application.yml --name ${SPRING_CLOUD_SERVICE}

# ==== Configure Defaults ===
az configure --defaults \
        group=${RESOURCE_GROUP} \
        location=${REGION} \
        spring-cloud=${SPRING_CLOUD_SERVICE}
Optionally, you may import the custom domain into Azure Spring Cloud.
# ==== Import custom domain certificate ====
# First grant Azure Spring Cloud Domain Manager access to Key Vault
export CUSTOM_DOMAIN_FPA_OBJECT_ID=$(az ad sp show --id 03b39d0f-4213-4864-a245-b1476ec03169 | jq -r '.objectId')

az keyvault set-policy --name ${KEY_VAULT} \
    --object-id ${CUSTOM_DOMAIN_FPA_OBJECT_ID} \
    --certificate-permissions get list \
    --secret-permissions get list

az spring-cloud certificate add --name ${CUSTOM_DOMAIN_CERTIFICATE_NAME} \
    --vault-uri ${KEY_VAULT_URI} \
    --vault-certificate-name ${CUSTOM_DOMAIN_CERTIFICATE_NAME}
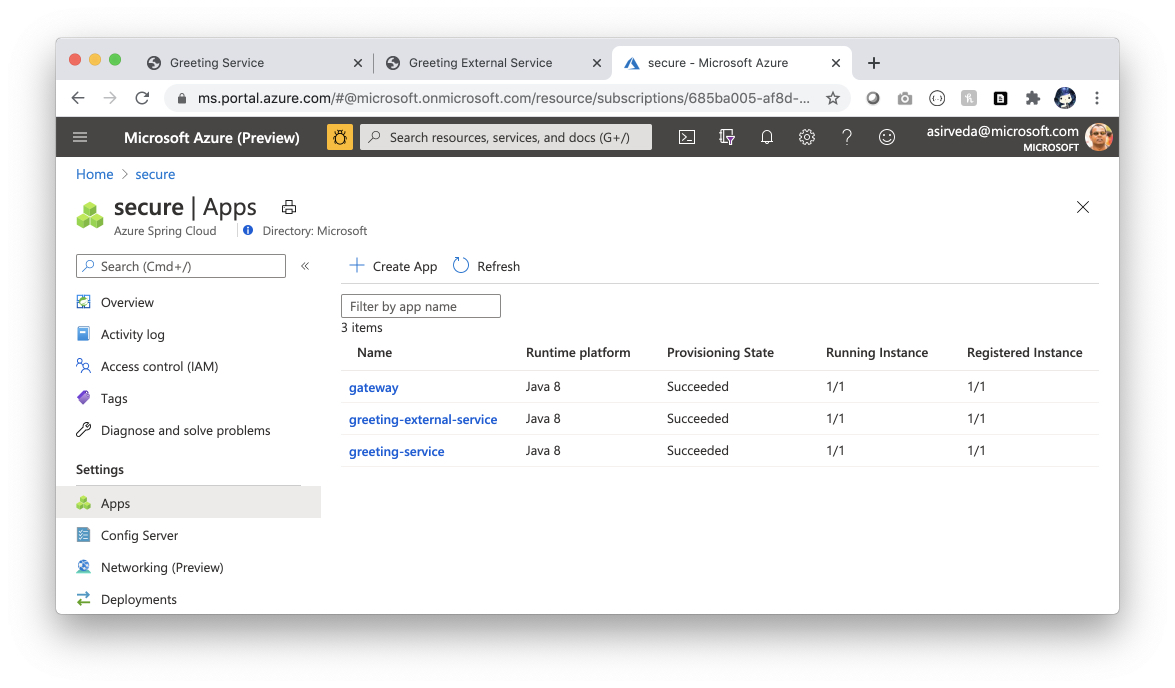
Create gateway app, enable managed identities and
grant them access to the Key Vault where certificates are stored.
# ==== Create the gateway app ====
az spring-cloud app create --name gateway --instance-count 1 --is-public true \
    --memory 2 \
    --jvm-options='-Xms2048m -Xmx2048m -XX:+UnlockExperimentalVMOptions -XX:+UseCGroupMemoryLimitForHeap -XX:+UseG1GC -Djava.awt.headless=true -Djava.awt.headless=true -Dreactor.netty.http.server.accessLogEnabled=true' \
    --env KEY_VAULT_URI=${KEY_VAULT_URI} \
          SERVER_SSL_CERTIFICATE_NAME=${SERVER_SSL_CERTIFICATE_NAME}

# ==== Assign System Assigned Managed Identity to the gateway app ====
az spring-cloud app identity assign --name gateway
export GATEWAY_IDENTITY=$(az spring-cloud app show --name gateway | \
    jq -r '.identity.principalId')

# ==== Grant gateway app with access to the Key Vault ====
az keyvault set-policy --name ${KEY_VAULT} \
   --object-id ${GATEWAY_IDENTITY} --certificate-permissions get list \
   --key-permissions get list --secret-permissions get list

export SECURE_GATEWAY_URL=$(az spring-cloud app show --name gateway | jq -r '.properties.url')
Optionally, if you are using a custom domain for the gateway app, then bind the domain and
add a DNS record with your domain service to map the domain name to
${SECURE_GATEWAY_URL}.
# ==== Manual step to add a DNS record to map domain name to ${SECURE_GATEWAY_URL}
# ==== Bind custom domain ====
az spring-cloud app custom-domain bind --app gateway \
    --domain-name ${CUSTOM_DOMAIN} --certificate ${CUSTOM_DOMAIN_CERTIFICATE_NAME} \
    --enable-end-to-end-tls
Create greeting-service and greeting-external-service apps, enable managed identities and
grant them access to the Key Vault where certificates are stored.
# ==== Create the greeting-service app ====
az spring-cloud app create --name greeting-service --instance-count 1 \
    --memory 2 \
    --jvm-options='-Xms2048m -Xmx2048m -XX:+UnlockExperimentalVMOptions -XX:+UseCGroupMemoryLimitForHeap -XX:+UseG1GC -Djava.awt.headless=true' \
    --env KEY_VAULT_URI=${KEY_VAULT_URI} \
          SERVER_SSL_CERTIFICATE_NAME=${SERVER_SSL_CERTIFICATE_NAME}

az spring-cloud app identity assign --name greeting-service
export GREETING_SERVICE_IDENTITY=$(az spring-cloud app show --name greeting-service | \
    jq -r '.identity.principalId')

az keyvault set-policy --name ${KEY_VAULT} \
   --object-id ${GREETING_SERVICE_IDENTITY} --certificate-permissions get list \
   --key-permissions get list --secret-permissions get list

# ==== Create the greeting-external-service app ====
az spring-cloud app create --name greeting-external-service --instance-count 1 \
    --memory 2 \
    --jvm-options='-Xms2048m -Xmx2048m -XX:+UnlockExperimentalVMOptions -XX:+UseCGroupMemoryLimitForHeap -XX:+UseG1GC -Djava.awt.headless=true -Dreactor.netty.http.server.accessLogEnabled=true' \
    --env KEY_VAULT_URI=${KEY_VAULT_URI} \
          SERVER_SSL_CERTIFICATE_NAME=${SERVER_SSL_CERTIFICATE_NAME} \
          EXTERNAL_SERVICE_ENDPOINT=${EXTERNAL_SERVICE_ENDPOINT} \
          EXTERNAL_SERVICE_PORT=${EXTERNAL_SERVICE_PORT}

az spring-cloud app identity assign --name greeting-external-service
export GREETING_EXTERNAL_SERVICE_IDENTITY=$(az spring-cloud app show \
    --name greeting-external-service| jq -r '.identity.principalId')

az keyvault set-policy --name ${KEY_VAULT} \
   --object-id ${GREETING_EXTERNAL_SERVICE_IDENTITY} --certificate-permissions get list \
   --key-permissions get list --secret-permissions get list
Deploy gateway, greeting-service and greeting-external-service to Azure Spring Cloud.
# ==== Build for cloud ====
mvn clean package -DskipTests -Denv=cloud

# ==== Deploy apps ====
az spring-cloud app deploy --name gateway --jar-path ${GATEWAY_JAR}

az spring-cloud app deploy --name greeting-service --jar-path ${GREETING_SERVICE_JAR}

az spring-cloud app deploy --name greeting-external-service \
--jar-path ${GREETING_EXTERNAL_SERVICE_JAR}Let us open the app and test it.
echo ${SECURE_GATEWAY_URL}/greeting/hello/Manfred-Riem
open ${SECURE_GATEWAY_URL}/greeting/hello/Manfred-Riem
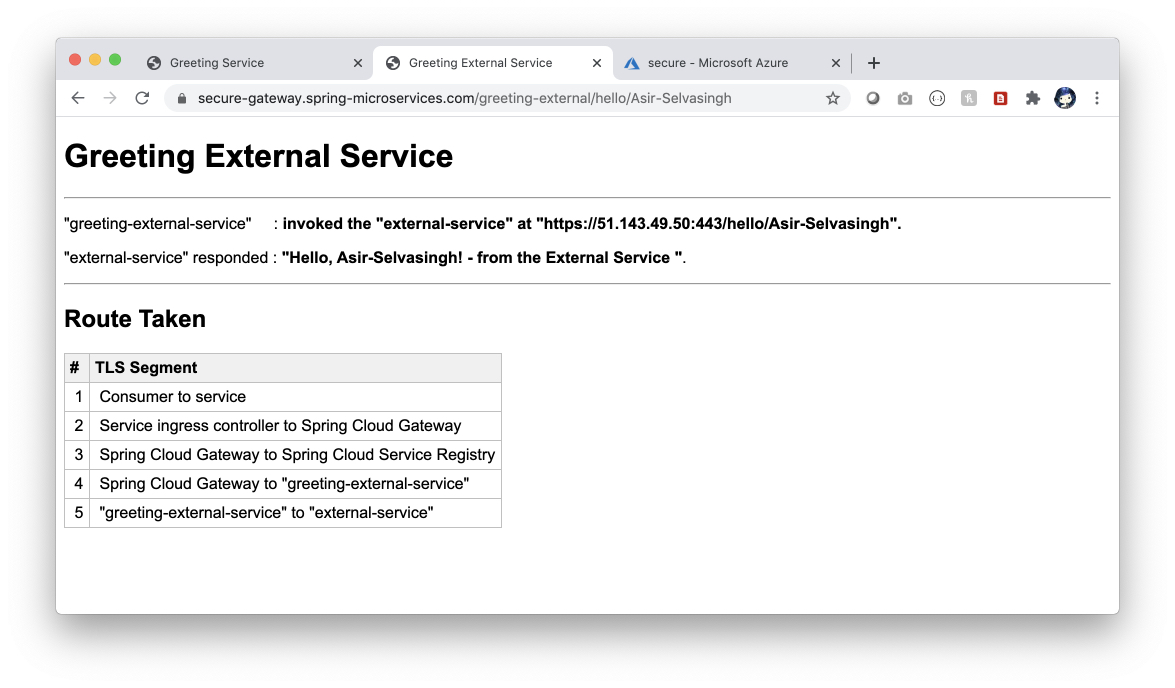
echo ${SECURE_GATEWAY_URL}/greeting-external/hello/Asir-Selvasingh
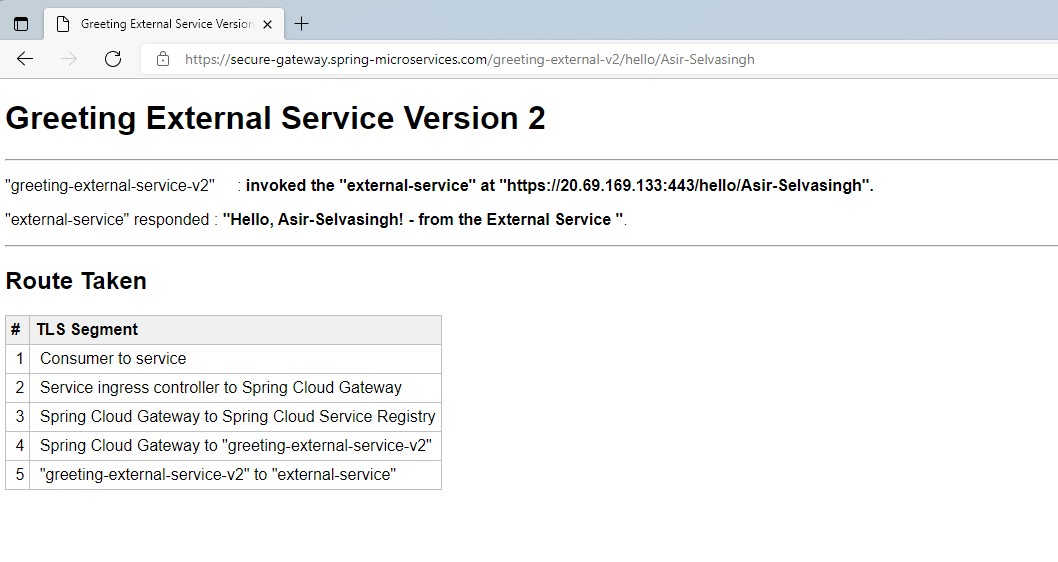
open ${SECURE_GATEWAY_URL}/greeting-external/hello/Asir-SelvasinghHere we provided a new app greeting-external-service-v2 to show how to make use of azure spring cloud provided feature to call external service.
In this app, we only use Azure Key Vault Certificates Spring Boot Starter to perform secure communication with gateway app.
For the secure communication with external service, azure spring cloud would take care of it.
Grant Azure Spring Cloud access to your key vault
export TLS_FPA_OBJECT_ID=$(az ad sp show --id e8de9221-a19c-4c81-b814-fd37c6caf9d2 | jq -r '.objectId')

az keyvault set-policy --name ${KEY_VAULT} \
   --object-id ${TLS_FPA_OBJECT_ID} --certificate-permissions get list
Import public certificate from Key Vault into azure spring cloud service
az spring-cloud certificate add --name ${CLIENT_SSL_CERTIFICATE_NAME} --service ${SPRING_CLOUD_SERVICE} --vault-certificate-name ${CLIENT_SSL_CERTIFICATE_NAME} --vault-uri ${KEY_VAULT_URI} --only-public-cert trueCreate app greeting-external-service-v2 in Azure Spring Cloud.
az spring-cloud app create --name greeting-external-service-v2 \
     --instance-count 1 --memory 2 --jvm-options='-Xms2048m -Xmx2048m -XX:+UnlockExperimentalVMOptions -XX:+UseCGroupMemoryLimitForHeap -XX:+UseG1GC -Djava.awt.headless=true -Dreactor.netty.http.server.accessLogEnabled=true' \
     --env KEY_VAULT_URI=${KEY_VAULT_URI} \
           SERVER_SSL_CERTIFICATE_NAME=${SERVER_SSL_CERTIFICATE_NAME} \
           EXTERNAL_SERVICE_ENDPOINT=${EXTERNAL_SERVICE_ENDPOINT} \
           EXTERNAL_SERVICE_PORT=${EXTERNAL_SERVICE_PORT}

az spring-cloud app identity assign --name greeting-external-service-v2

export GREETING_EXTERNAL_SERVICE_IDENTITY_V2=$(az spring-cloud app show \
    --name greeting-external-service-v2| jq -r '.identity.principalId')

az keyvault set-policy --name ${KEY_VAULT} \
   --object-id ${GREETING_EXTERNAL_SERVICE_IDENTITY_V2} --certificate-permissions get list \
   --key-permissions get list --secret-permissions get list
Load the public certificate imported from key vault into greeting-external-service-v2's trust store.
az spring-cloud app append-loaded-public-certificate \
    --name greeting-external-service-v2 --service ${SPRING_CLOUD_SERVICE} \
    --certificate-name ${CLIENT_SSL_CERTIFICATE_NAME} --load-trust-store true
Build and deploy greeting-external-service-v2
mvn clean package -DskipTests -Denv=cloud

az spring-cloud app deploy --name greeting-external-service-v2 \
    --jar-path ${GREETING_EXTERNAL_SERVICE_V2_JAR}
Open the app and test it.
echo ${SECURE_GATEWAY_URL}/greeting-external-v2/hello/Asir-Selvasingh
open ${SECURE_GATEWAY_URL}/greeting-external-v2/hello/Asir-SelvasinghIn this guide, you secured communications for Spring Boot apps using end-to-end TLS/SSL and SSL certificates managed in Azure Key Vault. You can learn more.
- Azure Spring Cloud
- Azure Spring Cloud docs
- Deploy Spring microservices from scratch
- Deploy existing Spring microservices
- Azure for Java Cloud Developers
- Spring Cloud Azure
- Spring Cloud
This project welcomes contributions and suggestions. Most contributions require you to agree to a Contributor License Agreement (CLA) declaring that you have the right to, and actually do, grant us the rights to use your contribution. For details, visit https://cla.opensource.microsoft.com.
When you submit a pull request, a CLA bot will automatically determine whether you need to provide a CLA and decorate the PR appropriately (e.g., status check, comment). Simply follow the instructions provided by the bot. You will only need to do this once across all repos using our CLA.
This project has adopted the Microsoft Open Source Code of Conduct. For more information see the Code of Conduct FAQ or contact opencode@microsoft.com with any additional questions or comments.


