Jinsun Park, Kyungdon Joo, Zhe Hu, Chi-Kuei Liu and In So Kweon
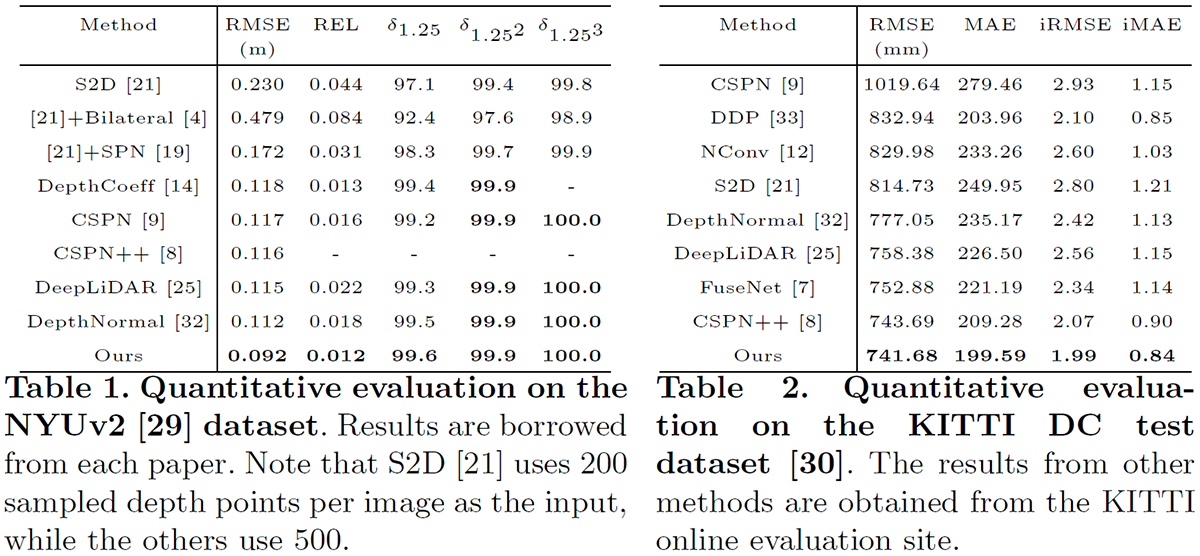
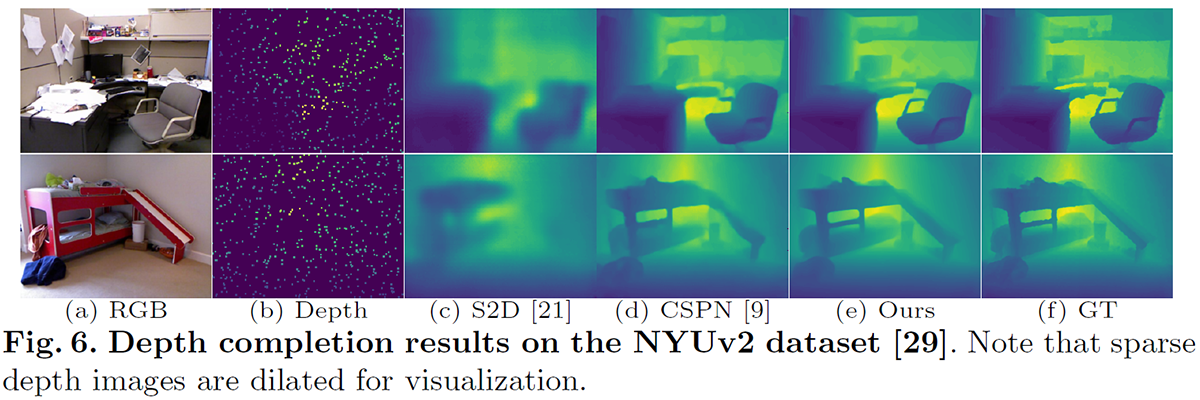
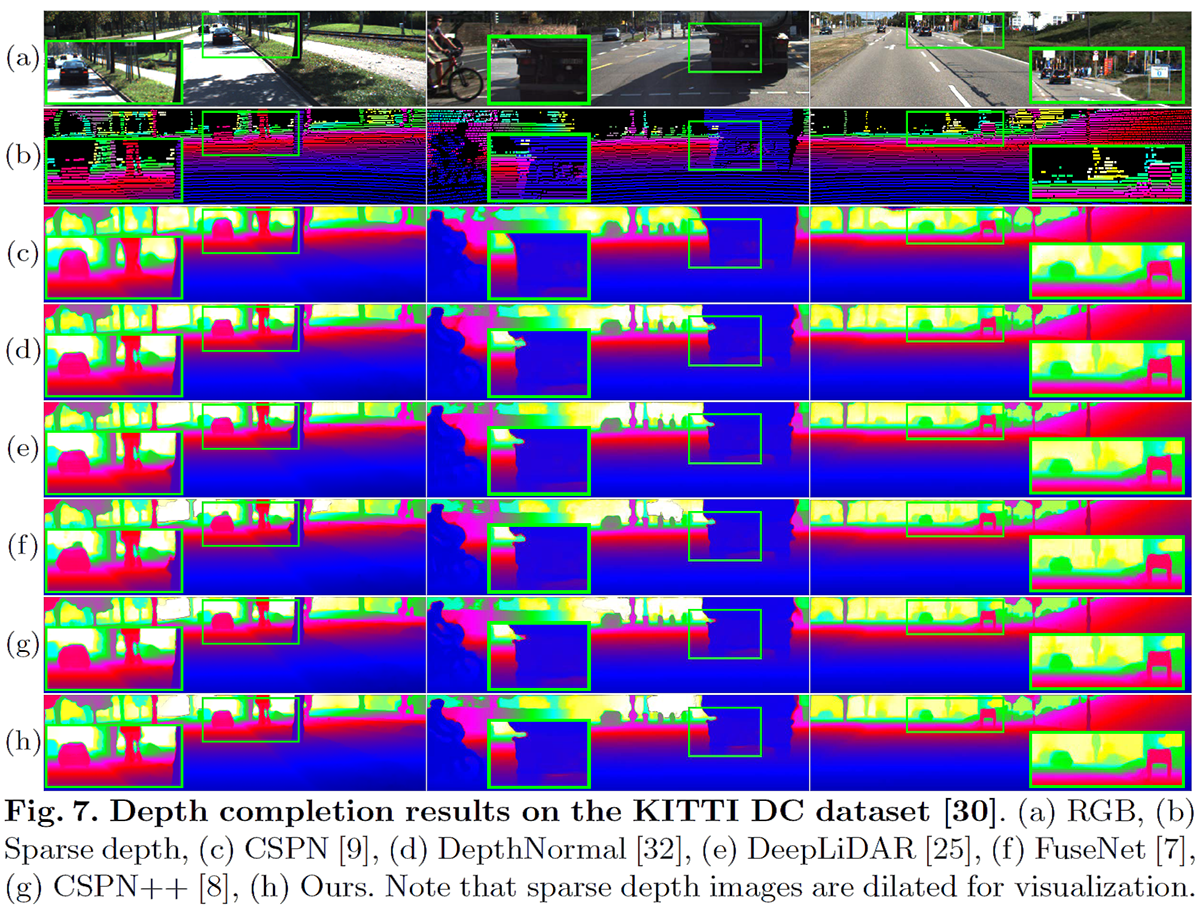
In this paper, we propose a robust and efficient end-to-end non-local spatial propagation network for depth completion. The proposed network takes RGB and sparse depth images as inputs and estimates non-local neighbors and their affinities of each pixel, as well as an initial depth map with pixel-wise confidences. The initial depth prediction is then iteratively refined by its confidence and non-local spatial propagation procedure based on the predicted non-local neighbors and corresponding affinities. Unlike previous algorithms that utilize fixed-local neighbors, the proposed algorithm effectively avoids irrelevant local neighbors and concentrates on relevant non-local neighbors during propagation. In addition, we introduce a learnable affinity normalization to better learn the affinity combinations compared to conventional methods. The proposed algorithm is inherently robust to the mixed-depth problem on depth boundaries, which is one of the major issues for existing depth estimation/completion algorithms. Experimental results on indoor and outdoor datasets demonstrate that the proposed algorithm is superior to conventional algorithms in terms of depth completion accuracy and robustness to the mixed-depth problem. Our implementation is publicly available on the project page.
Our paper is available in ECCV 2020 Proceedings or arXiv.
@inproceedings{park2020non,
    title={Non-Local Spatial Propagation Network for Depth Completion},
    author={Park, Jinsun and Joo, Kyungdon and Hu, Zhe and Liu, Chi-Kuei and Kweon, In So},
    booktitle={Proc. of European Conference on Computer Vision (ECCV)},
    year={2020}
}
Our released implementation is tested on:
- Ubuntu 16.04 / Ubuntu 18.04
- Python 3.8 (Anaconda 4.8.4)
- PyTorch 1.6 / torchvision 0.7
- Tensorboard 2.3
- NVIDIA CUDA 10.2
- NVIDIA Apex
- Deformable Convolution V2
- 4x NVIDIA GTX 1080 TI / 4x NVIDIA Titan RTX GPUs
We used NVIDIA Apex (commit @ 4ef930c1c884fdca5f472ab2ce7cb9b505d26c1a) for multi-GPU training.
Apex can be installed as follows:
$ cd PATH_TO_INSTALL
$ git clone https://github.com/NVIDIA/apex
$ cd apex
$ git reset --hard 4ef930c1c884fdca5f472ab2ce7cb9b505d26c1a
$ pip install -v --no-cache-dir --global-option="--cpp_ext" --global-option="--cuda_ext" ./ Build and install DCN module.
$ cd NLSPN_ROOT/src/model/deformconv
$ sh make.sh
The DCN module in this repository is from here but some function names are slightly different.
Please refer to the PyTorch DCN for the original implementation.
We used two datasets for training and evaluation.
We used preprocessed NYUv2 HDF5 dataset provided by Fangchang Ma.
$ cd PATH_TO_DOWNLOAD
$ wget http://datasets.lids.mit.edu/sparse-to-dense/data/nyudepthv2.tar.gz
$ tar -xvf nyudepthv2.tar.gz
After that, you will get a data structure as follows:
nyudepthv2
├── train
│    ├── basement_0001a
│    │    ├── 00001.h5
│    │    └── ...
│    ├── basement_0001b
│    │    ├── 00001.h5
│    │    └── ...
│    └── ...
└── val
    └── official
        ├── 00001.h5
        └── ...
Note that the original full NYUv2 dataset is available at the official website.
After preparing the dataset, you should generate a json file containing paths to individual images.
$ cd NLSPN_ROOT/utils
$ python generate_json_NYUDepthV2.py --path_root PATH_TO_NYUv2
Note that data lists for NYUv2 are borrowed from the CSPN repository.
KITTI DC dataset is available at the KITTI DC Website.
For color images, KITTI Raw dataset is also needed, which is available at the KITTI Raw Website.
Please follow the official instructions (cf., devkit/readme.txt in each dataset) for preparation.
After downloading datasets, you should first copy color images, poses, and calibrations from the KITTI Raw to the KITTI DC dataset.
$ cd NLSPN_ROOT/utils
$ python prepare_KITTI_DC.py --path_root_dc PATH_TO_KITTI_DC --path_root_raw PATH_TO_KITTI_RAW
After that, you will get a data structure as follows:
.
├── depth_selection
│    ├── test_depth_completion_anonymous
│    │    ├── image
│    │    ├── intrinsics
│    │    └── velodyne_raw
│    ├── test_depth_prediction_anonymous
│    │    ├── image
│    │    └── intrinsics
│    └── val_selection_cropped
│        ├── groundtruth_depth
│        ├── image
│        ├── intrinsics
│        └── velodyne_raw
├── train
│    ├── 2011_09_26_drive_0001_sync
│    │    ├── image_02
│    │    │     └── data
│    │    ├── image_03
│    │    │     └── data
│    │    ├── oxts
│    │    │     └── data
│    │    └── proj_depth
│    │        ├── groundtruth
│    │        └── velodyne_raw
│    └── ...
└── val
    ├── 2011_09_26_drive_0002_sync
    └── ...
After preparing the dataset, you should generate a json file containing paths to individual images.
$ cd NLSPN_ROOT/utils

# For Train / Validation
$ python generate_json_KITTI_DC.py --path_root PATH_TO_KITTI_DC

# For Online Evaluation Data
$ python generate_json_KITTI_DC.py --path_root PATH_TO_KITTI_DC --name_out kitti_dc_test.json --test_data$ cd NLSPN_ROOT/src
# An example command for NYUv2 dataset training
$ python main.py --dir_data PATH_TO_NYUv2 --data_name NYU --split_json ../data_json/nyu.json \
--patch_height 228 --patch_width 304 --gpus 0,1,2,3 --loss 1.0*L1+1.0*L2 --epochs 20 \
--batch_size 12 --max_depth 10.0 --num_sample 500 --save NAME_TO_SAVE
# An example command for KITTI DC dataset training
$ python main.py --dir_data PATH_TO_KITTI_DC --data_name KITTIDC --split_json ../data_json/kitti_dc.json \
--patch_height 240 --patch_width 1216 --gpus 0,1,2,3 --loss 1.0*L1+1.0*L2 --epochs 20 \
--batch_size 12 --max_depth 90.0 --num_sample 0 --top_crop 100 --test_crop --save NAME_TO_SAVEPlease refer to the config.py for more options.
During the training, tensorboard logs are saved under the experiments directory. To run the tensorboard:
$ cd NLSPN_ROOT/experiments
$ tensorboard --logdir=. --bind_all
Then you can access the tensorboard via http://YOUR_SERVER_IP:6006
$ cd NLSPN_ROOT/src

# An example command for NYUv2 dataset testing
$ python main.py --dir_data PATH_TO_NYUv2 --data_name NYU  --split_json ../data_json/nyu.json \
    --patch_height 228 --patch_width 304 --gpus 0,1,2,3 --max_depth 10.0 --num_sample 500 \
    --test_only --pretrain PATH_TO_WEIGHTS --save NAME_TO_SAVE

# An example command for KITTI DC dataset testing
$ python main.py --dir_data PATH_TO_KITTI_DC --data_name KITTIDC --split_json ../data_json/kitti_dc.json \
    --patch_height 240 --patch_width 1216 --gpus 0,1,2,3 --max_depth 90.0 --num_sample 0 \
    --test_only --pretrain PATH_TO_WEIGHTS --save NAME_TO_SAVE
To generate KITTI DC Online evaluation data:
$ cd NLSPN_ROOT/src
$ python main.py --dir_data PATH_TO_KITTI_DC --data_name KITTIDC --split_json ../data_json/kitti_dc_test.json \
    --patch_height 240 --patch_width 1216 --gpus 0,1,2,3 --max_depth 90.0 --num_sample 0 \
    --test_only --pretrain PATH_TO_WEIGHTS --save_image --save_result_only --save NAME_TO_SAVE
Images for submission can be found in experiments/NAME_TO_SAVE/test/epoch%04d.
- Our original implementation was based on old libraries (e.g., PyTorch 1.2 / torchvision 0.4 / Python 3.6). We cleaned and updated our implementation for this release.
- The original NYUv2 / KITTI DC results in the paper were obtained with a powerful machine equipped with 8 NVIDIA P40 GPUs. From my experiences, the larger batch you use, the better performance you get.


