Code for the AMV18 Paper "LoANs: Weakly Supervised Object Detection with Localizer Assessor Networks". You can read a Preprint on Arxiv.
This page contains information on everything you need to know to train a model using our weakly supervised approach. In order to successfully train a model you'll need to following ingredients:
- a specific type of object that you want to be localized.
- Images that contain this object (you might also take a video of some minutes length and extract each frame).
- Some background images on which the object might appear.
- Some template images of your object from different view points.
- The code from this repository.
- A decent GPU.
- ...
- Profit.
This README will guide you through the process of training a model, using our approach.
We will train a model that can localize a figure skater on a given image and apply the trained model
on a test video. While going through each step, we will provide further information on each option
our scripts provide.
In order to successfully train a model for localizing figure skaters, we will first need to setup the code of this repository on your computer. Second, we will gather some training data. We will then use this data to train a model. After training the model, we will use some visualization scripts to have a look at the results of our training.
In order to make full usage of the code in this repository you will need to perform the following steps:
- Install a Python Version
>= 3.6. It is important to have a Python version that is greater than 3.6, because the code won't work with older python versions. - Create a new
virtualenvironmentfor this code. You can use the excellent Virtualenvwrapper for this purpose. - Make sure you have
CUDA,cuDNNand if you like alsoNCCLinstalled. - Install all requirements with
pip install -r requirements.txt. - Sit back and have a coffee/tea, while
cupycompiles. - If you want to follow this README, it makes sense to install
youtube-dl.
We will need to prepare two kinds of data for training the model. As the overall model consists of two independent neural networks, we need training data for each of these networks.
Getting the data for the localizer is fairly easy. You basically have to go to YouTube and find some figure skating videos. We've already prepared some videos that you can download and use for training:
- Alina Zagitova (Olympic Games 2018)
- Yuzuru Hanyu (Olympic Games 2018)
- Yulia Lipnitskaya (Olympic Games 2014)
- Jason Brown (US Open 2014)
For validating our model, we will use the following video:
- Yuna Kim (Olympic Games 2014)
You can download each video with youtube-dl and save it in a directory on your PC.
We will assume that we downloaded all videos into a directory called videos that is
located directly in the root directory of this repository. Make sure to save the
validation video in a different spot!
We will now extract every single frame from the downloaded videos and save those
in the folder train_data/localizer. In order to do this, you can use
the script extract_frames_from_video.py that you can find in the video_analysis
directory.
The usage of this script is as follows:
python video_analysis/extract_frames_from_video train_data/localizer -i videos/* -r 512

train_data/localizer: output directory
-i: all videos you want to use for training
-r: Resize all extracted frames in such a way that the longest side has a
dimension of 512px (mainly useful for saving space and speeding up the training
later on)
The directory training_data/localizer will contain a subdirectory for each video
and also a file gt.csv that lists all extracted images.
This concludes this section, as there is nothing more to do for the localizer.
Getting and preparing the data for training the Assessor is nearly as easy as getting
the data for the localizer.
You need some background images and also some template images.
Let's start with getting the background images. In our case we are looking at figure skaters.
Figure skating mostly takes place in ice arenas and therefore we will use images of ice arenas
that we can find via image search. We gathered 8 different background images that you can
download here.
Once we have the background images we just need some template images. A template image is a view of the object we want to localize that only contains the object, or in simpler words just the object cropped from an image without any background. We will need different views of the object in order to successfully train a model. You can now search the internet for images of figure skaters or just take the ones we already prepared and that you can find here.
The next step is to use the gathered images to create the actual dataset.
In order to create this dataset we will use the script datasets/sheep/paste_and_crop_sheep.py.
We assume that the background images are in the directory train_data/assessor/backgrounds
and the template images in the directory train_data/assessor/templates. We want to save
the generated dataset to train_data/assessor/dataset.
Let's have a look at how we can use the script:
python datasets/sheep/paste_and_crop_sheep.py train_data/assessor/backgrounds \
    train_data/assessor/dataset \
    --stamps train_data/assessor/templates/*.png \
    --num-samples 10000 \  # number of samples to create 10,000 is a good value
    --output-size 75 100 \  # size of the created images, in this case 75px wide and 100px high
    --zoom-mode  # crop based on intersection over union of object and view
You could also supply the option --base-bboxes <path to json file>. Using this option the pasted images
will be resized to the size of boxes that might naturally occur. Samples created with this method
normally produce better results. You can use the bounding boxes that we created for the sheep dataset.
You can download the fully annotated sheep dataset here.
Once you got this dataset, locate the file train_info_single_images.json in the directory
set_all/small and provide this file as argument for --base-bboxes. If you want to
emulate a larger bounding box you can add the command line argument --enlarge-region specifying
with 4 digits by how many pixels each side of the bounding box shall be enlarged. The
sides are left, top, right, bottom.
The script will save all created images in the directory train_data/assessor/dataset.
There you'll also find the groundtruth file images.csv.
And you are done with creating a dataset for the assessor 🎉
As we are now done with gathering all data necessary for training our model, we can now start the training. You might have noticed that we do not have a way to validate that the localizer actually generalizes well on the given train data. For this you can take the validation video, extract some images from there and then create a bounding box label by hand. You can also use the validation dataset that we already created for you. You can find the dataset here. This page also holds the train datasets for assessor and localizer that you could have created by following this README.
The training as such is quite easy to start. You'll have to use the script train_sheep_localizer.py.
You can find this script in the root directory of this repository.
You should use it like this (assume we use the same paths as before, and we have saved the validation
datset as train_data/localizer/validation/gt.json):
python train_sheep_localizer.py train_data/localizer/gt.csv \  # localizer train data
    train_data/localizer/validaton/gt.json \  # localizer validation data
    train_data/assessor/dataset/images.csv \  # assessor train dataset
    --target-size 100 75 \  # output size of localizer shall be 75px wide and 100px high
    --batch-size 64 \  # set the batch size, adjust to your environment
    --gpu 0 \  # run the training on GPU
    --learning-rate 1e4 \  # set the learning rate to 0.0001
    --log-name figure_skating \  # set the name of the log dir to figure_skating
    --use-resnet-18 \  # use resnet 18 as feature extractor of localizer (omit this and resnet 50 will be used)
Give the training some time. If you want to inspect the train process while it is running, you
can have a look at the subdirectory bboxes in the log directory. In this directory you can
find the prediction of the trained network for every 10 iterations of the training in form
of an image. We also provide a script that lets you directly see those images while the training
is running. In order to do so start the script train_utils/show_progress.py, make sure to start
the script before the training. If you see the error:
[Errno 111] Connection refused
could not connect to display server, disabling image rendering
You can restart sending the images to the script by entering enablebboxvis into the terminal
where your training is running. There is an interactive command prompt running that allows to
issue some commands while training. You can get a list of all commands by entering help or having a look
the file commands/interactive_train.py.
Besides the standard command line arguments you can also add the following commands:
--no-validationdo not run validation on the localizer just supply a random string instead of the path to the validation dataset.--image-sizeresize the input images of the localizer to the given size (default is 224x224)-lor--log-dirsave the log file to a different log directory--num-epochspecify the number of epochs to run--snapshot-inervalinterval in which snapshots shall be saved in iterations--no-snapshot-every-epochif your epochs are very short (i.e. less than 1000 iterations) you can disable saving a snapshot after every epoch with this argument--log-intervalinterval after which number of iterations to log to the log file and stdout--portthe port used to send the current state of the network to theshow_progressscript--test-imagespecify the path to an image that is to be used for progress visualization, default is to use the first image of the validation dataset--rlresume the training from a saved localizer snapshot--rdresume the training from a saved assessor snapshot--localizer-targetspecify the target value the localizer shall try to reach (default is 1.0 as we want to have perfect IOU)--no-imgaugdisable the imgaug library and use a more naive ImageAugmentation strategy, very useful for training on the sheep dataset.
If you have a look at the log folder that is created for each train run, you will notice the following:
- A new log folder is created for each training. The naming scheme is as follows:
<timestamp>_<log_name>. You can figure the<log_name>part by providing a log name during the startup of your training. - In the log folder you can find several files:
logcontains the actual train log, including configuration informationmodel.dotcontains a plot of the network structure, which needs to be rendered by a tool likegraphvizbefore being usefulupdater.pycontains a copy of the updater implementation for the current train runlocalizer.pycontains a copy of the localizer implementation for the current train rundiscriminator.pycontains a copy of the network definition for the assessor*.npzcontains the saved models for the given iterationbboxesthis directory contains images showing the current state of the network on a validation sample
Once you have a model and want to see the performance on a validation dataset, you can use
the evaluation script we provide.
Before showing you how to use the script, let's assume that we saved the results of our training
in the directory sheep_logs/2018-11-12:12:35:4_figure_skating and we want to test all snapshots,
we also have a snapshot called SheepLocalizer_120000.npz in our log dir.
If you want to evaluate your model use the evaluate.py script like so:
python evaluate.py train_data/localizer/validaton/gt.json \  # path to evaluation gt file
    sheep_logs/2018-11-12:12:35:4_figure_skating \ # path to directory where model is saved
    SheepLocalizer_ \  # prefix of all models that shall be tested (you can also just test one snapshot, by supplying its full name, e.g SheepLocalizer_120000
    -g 0 \  # the gpu to use for running evaluation (omit for using the CPU)
Once it is done the script will tell you which model is the best of all tested models.
You will also find a file plot.png in the log folder that shows how the average precision
develops over the course of all tested models.
The script evaluate.py also supports further arguments that we describe here:
--log-nameif you changed the code in such a way that the file holding the logged information is not namedloganymore you'll need to set the name here--num-samplesif you do not want to run the evaluation on all samples but just a subset of the validation dataset, set the number of samples here--batchsize, or-bthe batch size for evaluating, set the number of images to evaluate at once. Default is 1. This is not guaranteed to work--iou-thresholdset the minimum IOU that is necessary for a prediction to be counted as correct. Default is0.5--save-predictionssaves the prediction of the model for each validation sample. Is helpful for inspecting the weaknesses of the model. The predictions will be saved in a subdirectory calledeval_bboxesthat you can find in thelog dir--assessorspecify the path to a trained assessor model that is applied after the localizer and can be used to inspect the quality of the assessor--render-gtif you are using the--save-predictionsoption, this option also adds the groundtruth bounding box to the saved images--force-resetif you already started an evaluation and abort it, the evaluation process will resume from the model it did last. If you do not want, you can reset the evaluation progress with this option.
Once you think that your training went well and you have a model that you would like to test, you can use the visualization scripts we provide.
On the one hand, you can use the script evaluate.py with the option --save-predictions and
have a look at the prediction of the model on the validation dataset.
On the other hand you can analyse a video or still images with the scripts
video_sheeping.py or image_sheeping.py.
Lets's have a look at how to use video_sheeping.py with our trained model and
the validation video of Yuna Kim that we downloaded before.
Let's assume we saved the video of Yuna Kim as the following file:
validation_data/yuna_kim/video.mp4.
We could then use our trained model SheepLocalizer_120000.npz as follows:
python video_sheeping.py sheep_logs/2018-11-12:12:35:4_figure_skating/SheepLocalizer_120000.npz \  # path to saved model
    sheep_logs/2018-11-12:12:35:4_figure_skating/log \  # path to log file that has all configuration information
    -i validation_data/yuna_kim/video.mp4 \  # path to video that shall be analyzed (you can also supply multiple paths at once)
    -g 0 \  # gpu to use
    -o validation_data/yuna_kim/analyzed_video.mp4  # where to save the analyzed video
The script also supports the following options:
--assessorsupply a trained assessor model to provide a measure of how good the prediction of the localizer is-tor--score-thresholdset the threshold that determines when a prediction counts as a good prediction. Use this only in conjunction with the--assessoroption-vrender a visual backprop overlay on top of each frame that visualizes which parts of the image the network is most attracted to
The next script we want to discuss is the image_sheeping.py script.
Let's assume we have some .png images in the directory validation_data/images that
we want to analyze. We can use the script like this:
python image_sheeping.py sheep_logs/2018-11-12:12:35:4_figure_skating/SheepLocalizer_120000.npz \  # path to saved model
     sheep_logs/2018-11-12:12:35:4_figure_skating/log \  # path to log file that has all configuration information
     -i validation_data/images/*.png \  # path to all images we want to analyze
     -g 0 \  # the gpu to use
     -o validation_data/images/analyzed  # where to save the analyzed images
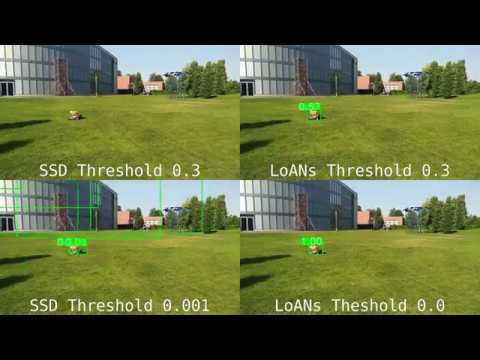
This concludes our walkthrough of the options you have with our code. Have a look at some examples (click the image to see the video):
Comparison of fully supervised model and our approach on sheep dataset:
You, of course do not need to train a model on your own. We also provide some pre-trained models and also links to download the datasets on this page. We provide models for our experiments with the sheep dataset and also for our experiments with the figure skating datasets that we described in this README. You can use all models with the scripts described above and also the datasets for training your own models
You can find the slides of our talk and the poster we presented at the "1st International Workshop on Advanced Machine Vision for Real-life and Industrially Relevant Applications", if you follow this link.
In case you find our work useful, please cite our paper:
@inproceedings{DBLP:conf/accv/BartzYBM18,
  author    = {Christian Bartz and
               Haojin Yang and
               Joseph Bethge and
               Christoph Meinel},
  title     = {LoANs: Weakly Supervised Object Detection with Localizer Assessor
               Networks},
  booktitle = {Computer Vision - {ACCV} 2018 Workshops - 14th Asian Conference on
               Computer Vision, Perth, Australia, December 2-6, 2018, Revised Selected
               Papers},
  pages     = {341--356},
  year      = {2018},
  url       = {https://doi.org/10.1007/978-3-030-21074-8\_29},
  doi       = {10.1007/978-3-030-21074-8\_29},
  timestamp = {Wed, 25 Sep 2019 18:07:03 +0200}
}
This code is licensed under the GPLv3 license, please have a look at the LICENSE for further information about the license. In case you might have problems with this license, please contact us and we might find a way to sort this out.
If you have any problems or suggestions, you are invited to open an issue or submit a pull request to this repository.