This project is maintained in gitlab and is no more updated here.
This project has been moved to gitlab: https://gitlab.com/Basilisvirus/atmel-studio-examples-atmega328p-avrc
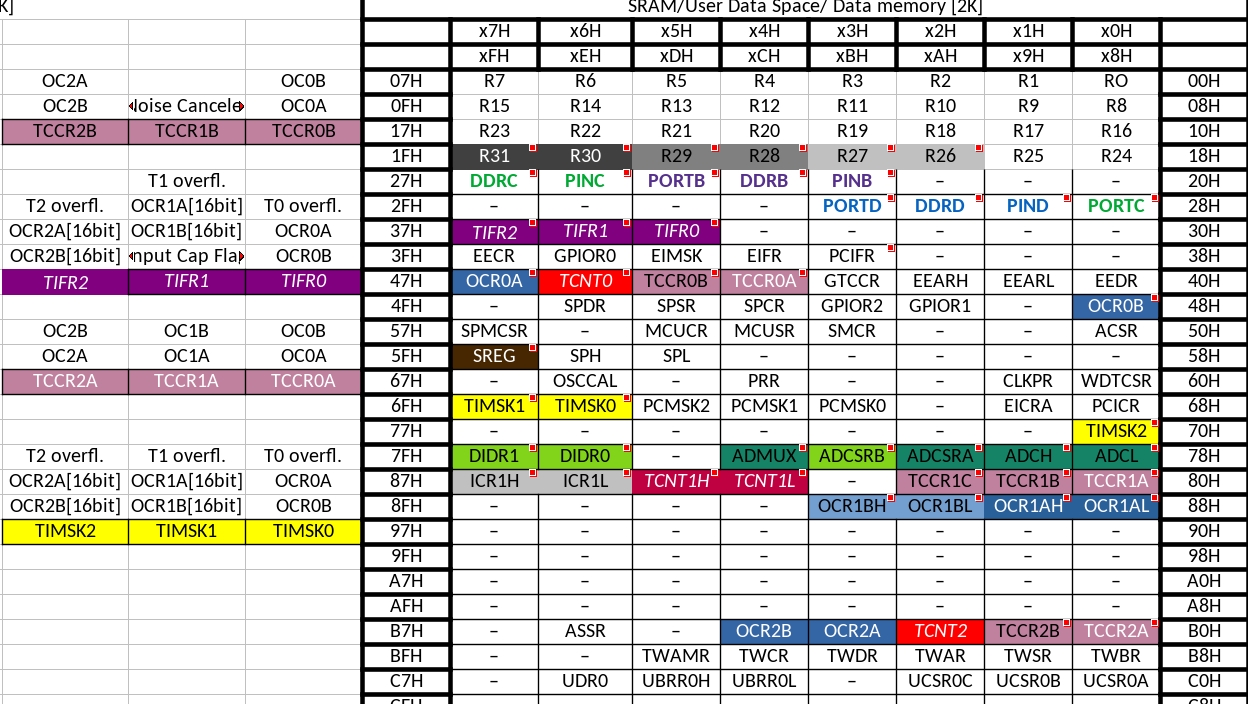
Examples on how to use atmel studio on atmega328p microcontroller, using AVR C Library. Memory map of Atmega328p is also added.
By making these examples i assume that you already know the basics of how to write assembly code on any microcontroller (i learned to write on 8051 microcontroller before i started studying avr C to write on atmega micro controller)
Memory map preview:
Notes:
FOR WINDOWS
You will need to install atmel studio.
*How to set up your atmel studio: https://www.youtube.com/watch?v=zEbSQaQJvHI
*If you get toolchain error while building or opening a project, download avr toolchain from their website and install in on your computer.
*Download doxygen via tools/extensions & updates, it may be usefull. It will be installed on: C:\Users\basil\AppData\Local\Atmel\AtmelStudio\7.0\Extensions\sm3hzemz.snp\Doxygen
FOR Ubuntu [hope it works for other linux OSs]
- Installing avr-gcc and avrdude:
To install avr-gcc:
sudo apt-get install gcc-avr avr-libc avrdude
It may pop you up an error, reccomending you to use : apt --fix-broken install. If it does, type sudo apt --fix-broken install and wait for it to finish.
Avrdude was already installed in my ubuntu, but you may look it up to see if its installed. If not, install it.
- Compiling and burning the code:
Lets try to compile a simple file. make a file named main.c and paste the following code inside it:
int
main(void)
{

        while (1);
}
Right click on the directory (in the same folder) you saved the file, then open in terminal and paste: sudo avr-gcc -Wall -g -Os -mmcu=attiny13 -o main.bin main.c
Now on the above code, you may need to change the 'attiny13' into the name of your atmega microcontroller. in my case, 'atmega328p'
Hit enter. Your main.c should be compiled, and you should see another file in the same folder, called 'main.bin'.
After performing successful compilation, you can check program and data memory size with this command: avr-size -C main.bin
- Generating .HEX
You will need to make a third file, in order to upload the code. Without closing the terminal, paste sudo avr-objcopy -j .text -j .data -O ihex main.bin main.hex and hit enter.
You should see a third file, called 'main.hex' in the same folder.
- Burning
Connect your board to usb. I use an FTDI basic to program my atmega328p. Using an Aduino board will work as well, the same.
With the command below, the file main.hex will be burned into the flash memory. The -p attiny13 option lets avrdude know that we are operating on an ATtiny13 chip. In other words – this option specifies the device. The full list of supported parts can be found here: https://www.nongnu.org/avrdude/user-manual/avrdude_4.html. Note that full-length names are also acceptable (i.e. t13 equals attiny13).
avrdude -p attiny13 -c usbasp -U flash:w:main.hex:i -F -P usb
Now, in my case i needed to make those changes:
sudo avrdude -p m328p -c arduino -U flash:w:main.hex:i -F -P /dev/ttyUSB0
-Since i use atmega328p, i changed to -p m328p.
-From Arduino IDE (that i have already installed in ubuntu), i found the usb port that my programmer(and atmega) uses. (if you open Arduino IDE its under Tools/port), which for me was /dev/ttyUSB0.
Hit enter. the program should be uploaded. I remember the first time it poped me an error saying
avrdude: AVR device initialized and ready to accept instructions.

NOTE: "flash" memory has been specified, an erase cycle will be performed
         To disable this feature, specify the -D option.
avrdude: erasing chip
If that happens, just run the command again, it will work the second time, after the auto-initialization error.
Summary & a trick:
If you want to compile (twice as needed) the main.c file, and then upload it, using the terminal once, you can run all three commands at terminal, seperatking each command with a semicolon.
avr-gcc -Wall -g -Os -mmcu=atmega328p -o main.bin main.c ; avr-objcopy -j .text -j .data -O ihex main.bin main.hex ; avrdude -p m328p -c arduino -U flash:w:main.hex:i -F -P /dev/ttyUSB0
Later on, you may need to use the serial port to debug your program (on my examples i have a code for serialWrite command). If you have arduino IDE installed, you can use its Serial Monitor, and see the output of yout atmega from there. If not, or you want to use the terminal (a more professional way) to check the serial, you can run:
sudo cat /dev/ttyUSB0 , and it will show you the output of the usb port ttyUSB0. Your port might be different from ttyUSB0. If you want to see the ports, run the command ls /dev/. Your port will be some of the ttyUSBxx options. After you succeed, you may notice that sometimes, the port wont work when you sudo cat /dev/ttyUSB0, because it is "stuck", and the output will output.. nothing. If that happens, you will need to unplug and plug again the usb, and start the sudo cat /dev/ttyUSB0 again. But there is another option, to 'unplug and plug' it programatically.
To do that we first need to find our driver that will help us 'unplug and plug' the usb. Type: ls /sys/bus/usb/drivers which should print something like this: btusb ftdi_sio hub usb usbfs usbhid usbserial_generic uvcvideo. These, are all the drivers for each usb device. Now, obviously mine is ftdi_sio , since i use ftdi to program my atmega328p. I am not sure how arduino board would show up.
Now, you can see the driver's commands using:
ls /sys/bus/usb/drivers/ftdi_sio/, which will print something like: 1-4:1.0 bind module uevent unbind, Where 1-4:1.0 is the device's characteristic code, and the bind and unbind command, which are the 'plug' and 'unplug' command respectively.
Now, if i want to unplug programatically the ftdi usb port, i will type:
echo -n "1-4:1.0" > /sys/bus/usb/drivers/ftdi_sio/unbind
and, to plug it again:
echo -n "1-4:1.0" > /sys/bus/usb/drivers/ftdi_sio/bind
Now, we can combine all the commands together, so that everytime we want to see the atmega's serial monitor, we first unplug the device, then plug it again to make sure it wont stuck, and then open the serial communication.
echo -n "1-4:1.0" > /sys/bus/usb/drivers/ftdi_sio/unbind ; echo -n "1-4:1.0" > /sys/bus/usb/drivers/ftdi_sio/bind ; sudo cat /dev/ttyUSB0
Let me thank those tutorials, from where i toot all the above steps:
https://blog.podkalicki.com/how-to-compile-and-burn-the-code-to-avr-chip-on-linuxmacosxwindows/
Extra:
How to make your atmea328p-pu standalone: https://github.com/Basilisvirus/Atmega328p-standalone