Bi Sheng was the Chinese inventor of the first known movable type technology.
bisheng is designed to transform Markdown(and other static files with transformers) into static websites and blogs using React.
You can create a PR to extend this list with your amazing website which is built with BiSheng.
bisheng is based on dora & webpack & React & react-router, and it has the following features:
- Support
browserHistory, even in GitHub Pages. - Lazy load for Markdown data.
- Plugin system to extend default behaviour.
- Server-side render for SEO.
Installation:
npm install --save-dev bishengThen, add start to npm scripts:
{
  "scripts": {
    "start": "bisheng start"
  }
}
Create bisheng.config.js, otherwise bisheng will use the default config:
module.exports = {
  source: './posts',
  output: './_site',
  theme: './_theme',
  port: 8000,
};
Note: please make sure that source and theme exists, and theme should not be an empty directory. Just use bisheng-theme-one, if you don't know how to develop a theme. See a simple demo here.
Now, just run npm start.
We can install bisheng as a cli command and explore what it can do by bisheng -h. However, the recommended way to use bisheng is to install it as devDependencies.
$ npm install -g bisheng
$ bisheng -h
  Usage: bisheng [command] [options]

  Commands:

    start [options]     to start a server
    build [options]     to build and write static files to `config.output`
    gh-pages [options]  to deploy website to gh-pages
    help [cmd]          display help for [cmd]

  Options:

    -h, --help     output usage information
-V, --version output the version numberbisheng will read bisheng.config.js as its config file, but we can set the config file name by --config, something like this bisheng --config another.config.js.
The content of bisheng.config.js looks like this:
module.exports = {
  port: 8000,
  source: './posts',
  output: './_site',
  theme: './_theme',
  htmlTemplate: path.join(__dirname, '../template.html'),
  devServerConfig: {},
  webpackConfig(config) {
    return config;
  },

  entryName: 'index',
  root: '/',
};default: 8000
To set the port which will be listened when we start a local server.
default: './posts'
To set directory/directories where we place Markdown files.
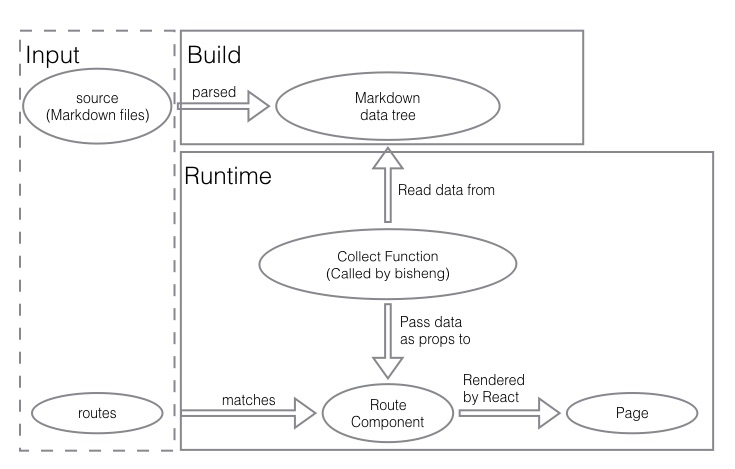
And all the Markdown files in source will be parsed and then structured as a tree data, for example:
posts
└── dir1
  ├── a.md
  └── b.md
Will output a Markdown data tree:
{
  dir1: {
    a: {...},
    b: {...},
  },
}
And each Markdown file will be parsed as a Markdown data. Actually, a Markdown data is the returned value of mark-twain, and it could be preprocessed by plugins.
default: null
If you want to exclude some files in your source, just use exclude. Then bisheng will not parse files which match exclude.
default: './_site'
To set directory where bisheng will generate (HTML & CSS & JavaScript) files to.
default: './_theme'
To set directory where we put the theme of website, and it also can be a npm package name.
undefined
A set of configuration that your theme provides, and then your theme can read it from props.themeConfig.
Note:
themeConfigwill beJSON.stringifybefore it's passed to props, so you cannot pass function/RegExp throughthemeConfig.
default:
bisheng/lib/template.html
The HTML template which will be use to generate HTML files which will be sent to users.
Note: template will be parsed by nunjucks, and you can use the following variables in this template:
root- all attribute of htmlTemplateExtraData
default:
{}
The Extra Data which will be used to render htmlTemplate.
default: {}
You can consult webpack-dev-server's documentation.
default: {
    plugins: [
      rucksack(),
      autoprefixer({
        browsers: ['last 2 versions', 'Firefox ESR', '> 1%', 'ie >= 8', 'iOS >= 8', 'Android >= 4'],
      }),
    ],
  }
You can consult wenpack postcss-loader's documentation.
default: (config) => config
To modify the webpack config, you can extend the config like this.
[{ test: /.md$/, use: MarkdownTransformer }]
A list of transformers that will be used to transform static files.
default: 'index'
The name of files which will be generated by webpack, such as [entryName].js & [entryName].css.
default: '/'
If the website will be deployed under a sub-directory of a domain (something like http://benjycui.github.io/bisheng-theme-one/), we must set it (such as /bisheng-theme-one/).
MIT


