This is a practical coding assessment for the frontend developer intern role in Zupple Labs. I am eagerly looking forward to the opportunity and collaborating with the team.
- The authorization key field has a length limit of 10 characters.
- The title field can contain a maximum of 10 characters.
- The description field allows a maximum of 50 characters.
- Uploaded files must not exceed 5 MB
These assumptions are made to prevent overloading the server with large payloads.
Some additional assumptions :
- Users are restricted from selecting a future date; only today's date or any past date within the last 100 years is allowed.
- Supported thumbnail image formats include .jpg, .jpeg, .png, and .webp.
- Only PDF files are accepted as the source file format.
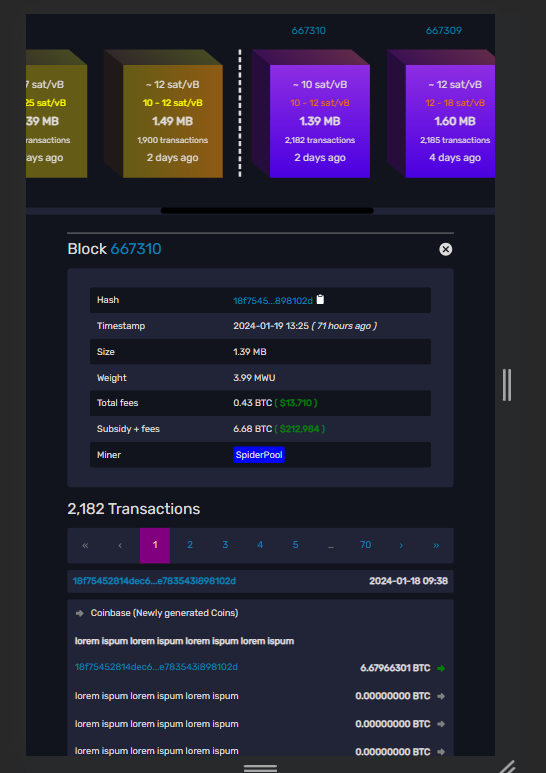
- There are two types of blocks: those displayed in the violet gradient have been incorporated into a network, while those in the yellow gradient are pending addition to the network.
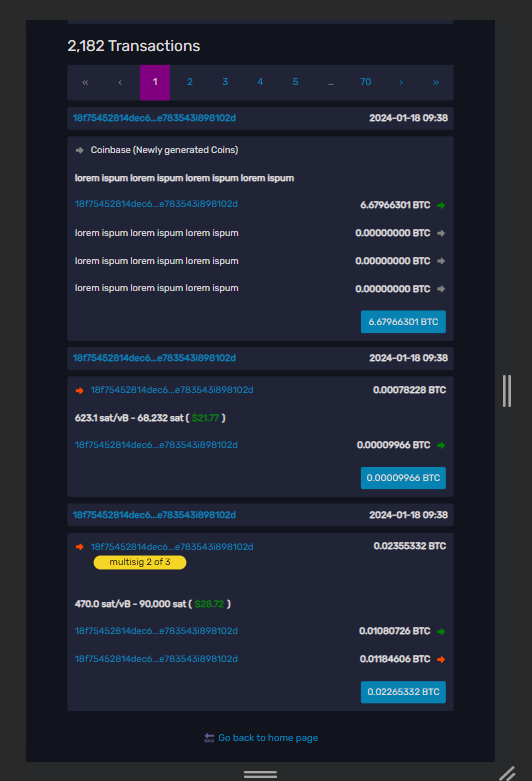
- Users can access detailed information, including transaction history, for the blocks already added to the network.
- Detailed information for blocks not yet added to the network is not visible to the user.
- Upon page load, the details of the most recently added block to the network will be presented.
- Recently conducted transactions, along with block information, are fetched from a cache instance. Additional transactions are fetched from the database as users navigate through the pages.
- Form validation on submitting the form
- Functional pagination of transaction history.
- Hash value copied to clipboard ( functional ).
- Modal displaying info about the blocks can be closed by clicking on the cancel button present at top left corner.
Lazy loading of pages to reduce chunk sizes send over network. This results in increased performance.
- HTML / CSS / JS
- React JS + Typescript ( Vite )
- Some Material UI components like Textfield, Button, Autocomplete, etc.
- Zod for form validation
- Axios for API call
https://zupple-labs.vercel.app/
(Deployed on Vercel like we discussed over mail)
- Desktop View : (This is a scrollable page)

- Mobile View : (Zoomed out to 50%. This is also a scrollable page)

- Desktop View : (This is a scrollable page)


- Mobile View (Zoomed out to 50%. This is also a scrollable page)


The following steps will get you up and running :
-
Fork the repo (click the Fork button at the top right of this page)
-
Clone your fork locally
git clone https://github.com/Bismay5467/ZuppleLabs.git
-
Setup all the dependencies and packages by running
npm installafter moving to ZuppleLabs directory. This command will install all the global dependencies. -
Start the development server by executing the command
npm run dev
Now you are good to go!! Start collaborating to add more features! 🚀✨
Additional commands :
npm run build && npm run previewto build the project and start the production server.npm run lintto check for linting