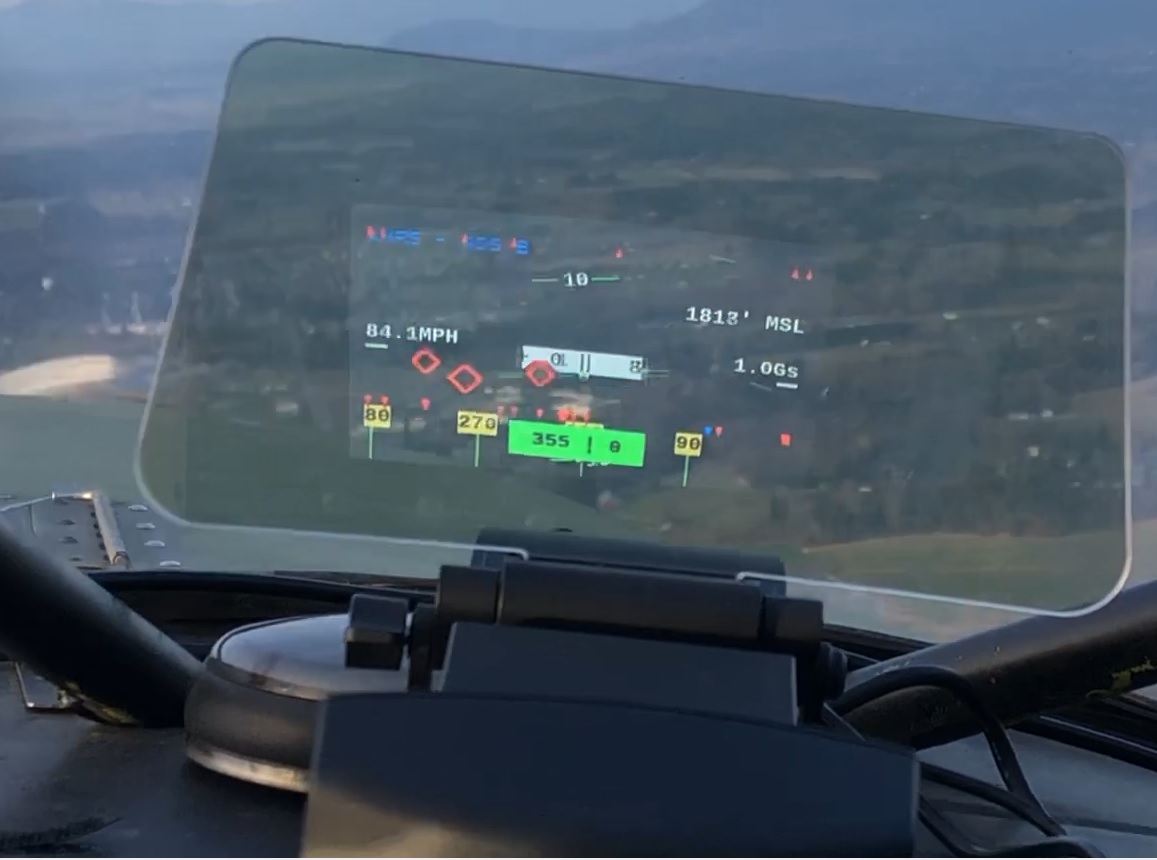
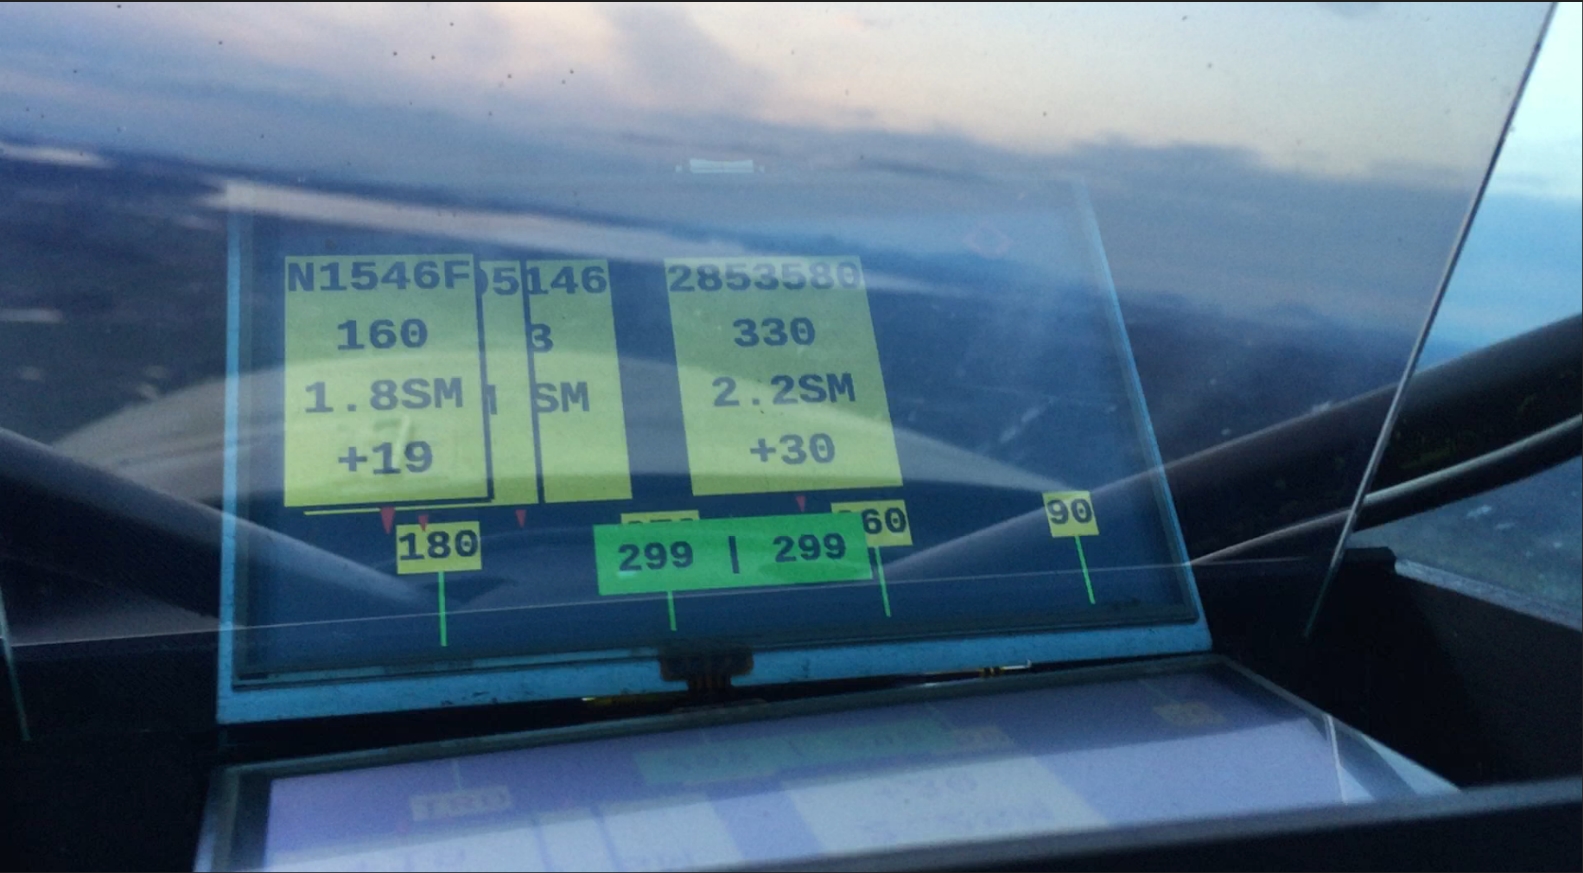
This project aims to bring an affordable heads up display system into ANY cockpit.
The focus is to improve traffic awareness and to reduce the amount of time pilots reference tablets or an EFB.
NOTE: This project relies on having a Stratux build with AHRS and GPS. A suitable build can be done for less than $150 (USD).
There are two versions that can be built:
Using the "Kivic HUD 2nd Gen" projector and a Raspberry Pi 3.
Estimated cost is $270
- $40 for RaspberryPi 3
- $195 for Kivic 2nd Gen projector
- Fans, case, cables
Uses 5V USB power.
NOTE: This project initially used and reccomendedly the "HUDLY Classic" projector which is no longer available.
A self contained system that uses a 3D printed case and teleprompter glass. This version can be built for the cost of a Raspberry Pi and the 3D print.
NOTE: This version does have visibility issues in daylight conditions. Using an automotic HUD projector will result in full daylight visibility.
Estimated Cost is $140
- $40 for a RaspberryPi 3
- $45 for the LCD screen
- $20 for Teleprompter Glass and shipping.
- Cost of 3D printing the special case.
- Cables
Can be powered by a USB powerbank or USB power.
You may use a number pad as input device. I used velcro to secure the number pad to my dashboard.
| Key | Action |
|---|---|
| Backspace | Tell the Stratux that you are in a level position. Resets the AHRS to level. |
| + | Next view |
| - | Previous view |
| = | Toggle rendering debug information |
| Esc | Send shutdown commands to both the HUD controller and the Stratux |
| q | (Full keyboard only) Quit to the command line. |
| 0/Ins | Force a connection reset between the HUD and the Stratux |
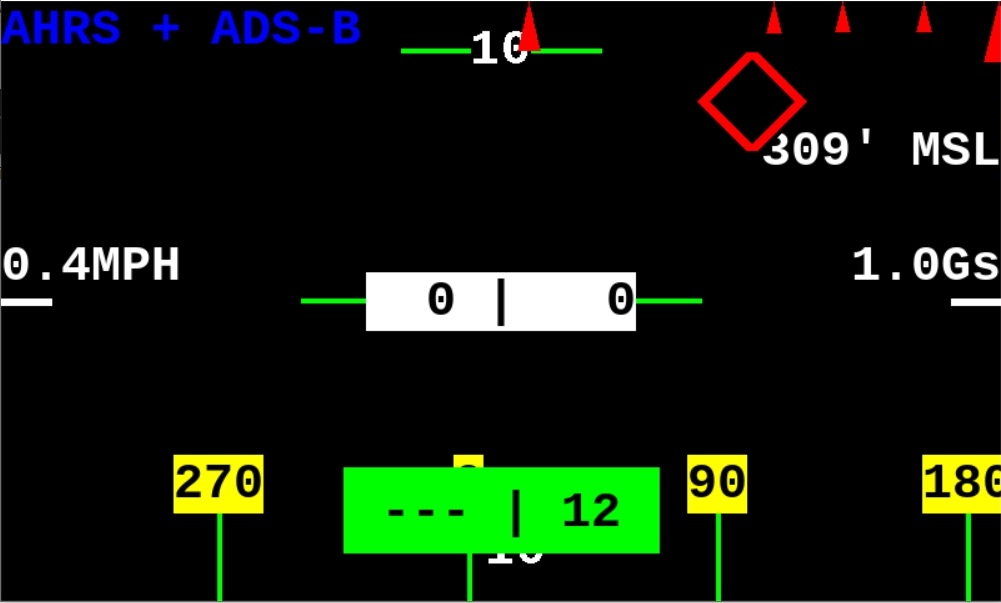
- AHRS + ADS-B
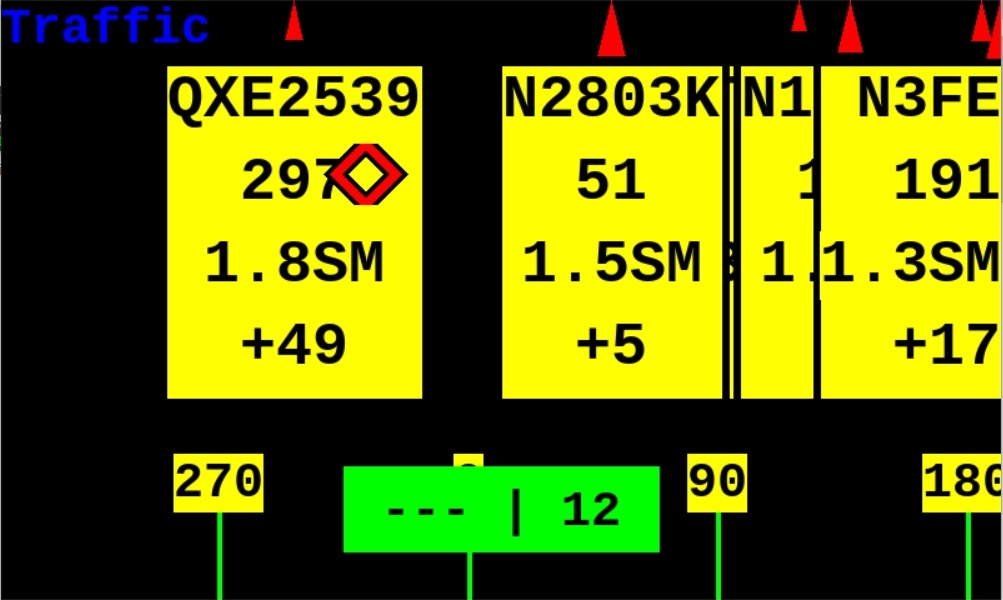
- Traffic
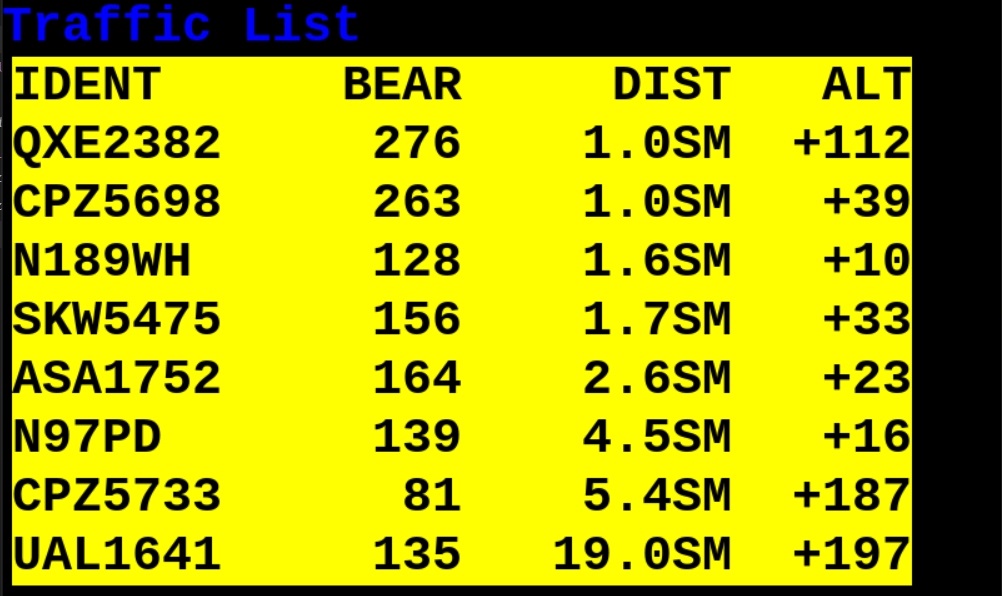
- Traffic List
- Universal Time
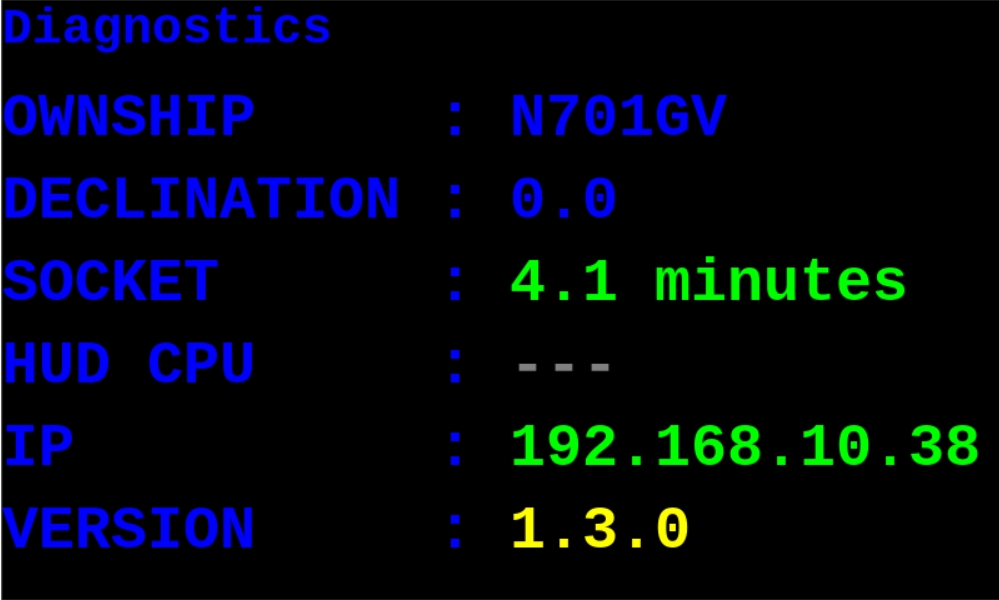
- Diagnostics
- (Blank)
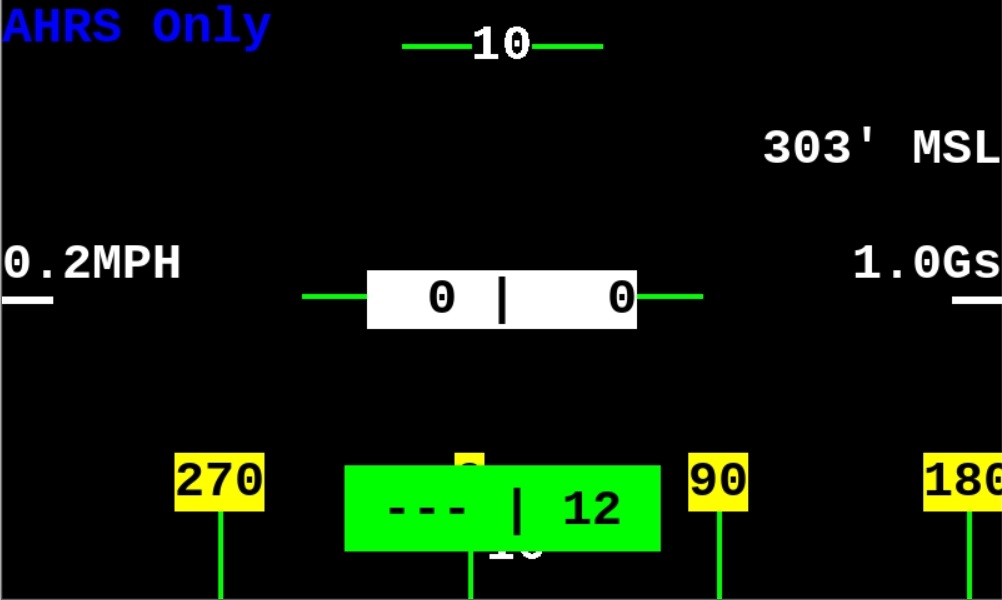
- AHRS Only
This view shows attitude information along with targetting bugs that show the relative position and distance of traffic.
In this example:
- There are five potential targets, all at a higher altitude. Three are relatively far away. The one directly behind us (far right hand side) is the closest.
- One of the five targets is within our field of view and has a targetting reticle.
- With are at a level pitch and roll.
- We are 309 feet MSL.
- We are traveling forward a 0.4MPH (taxing)
- We have a GPS heading of 12, but do not have enough forward speed to obtain a heading from the AHRS chip. If the AHRS chip is unable to produce a reliable heading,
---is shown for that portion of the heading.
NOTE: This is the default view on startup. If you would like to switch to the AHRS Only You may press - on the keypad.
This view shows a heading strip, target bugs, targetting reticles, and "information cards" about our potential traffic.
In this example, N2803K is almost directly ahead of us (middle of the screen).
The plane is 1.5 statute miles away, with a bearing of 51 degrees. We are currently on a heading of 012 degrees. The traffic is 500 feet above us.
This shows us at most the eight closest planes.
The *IDENT(ifier will be the tail number when available, otherwise the IACO identifier or callsign may be used. The BEARing is the heading to take to fly to that target. The DISTance is the distance to the target. The *ALT*itude is given in relative terms, with two digits dropped.
In this example, the closest target is QXE2382. We may see that plane if we looked out the cockpit at a heading of 276. The plane is only 1 statue mile away, and 11,200 feet above us.
The diagnostics view is designed to help give some troubleshooting ability. If a value is set for "OWNSHIP" (See the configuration file section), then any report from that tailnumber is ignored. The IP addressis provided so you may use the configuration webpage if you set it up.
Shows the current time in UTC at the bottom of the screen.
A blank screen so no information is displayed.
This is a similar view to AHRS + ADS-B, but removes any AHRS information.
NOTE: This does not include a power source. You will need to supply ship power from a 5V USB port or from a battery.
- Raspberry Pi 3
- Case For Raspberry Pi
- Cooling Fan for Raspberry Pi
- Micro USB Cable
- Micro SD Card
- Rottay Mechanical Keypad
- Flash the latest Raspbian to an SD card
- Plug in a keyboard and a monitor
- Plug in the power to the Pi.
- Press ctrl+alt+f1 to quit from the GUI to the desktop
sudo raspi-configBoot Options->Desktop / CLI->Console AutologinAdvanced Options->Expand FilesystemAdvanced Options->Memory Split-> "128"- "OK"
- "Finish"
- "Yes"
- Wait for the reboot
sudo raspi-config- "Network options" -> "WiFi"
- Choose your country. Pressing "u" will take you to USA.
- Enter your network name and password.
- "Interfacing Options" -> "Enable SSH"
- "Localization" -> "Change Keyboard Layout" -> "Generic 104"
- "Other" -> "English US" -> "Default" -> "No compose" -> "Yes"
- "Finish"
If you are using a 3B+, it may suffer from undervoltage alerts. These may be relieved by the following command to update your Linux install to the latest:
sudo apt-get update && sudo apt-get dist-upgrade -yMake sure you are using a high quality power cable if you are using a Pi 3B+
- Enter
ping google.com. Press ctrl+c after a while. This will confirm that you have internet access. If you do not, then use rasp-config to re-enter your wi-fi cd ~git clone https://github.com/JohnMarzulli/StratuxHud.gitcd StratuxHudpython --version. Verify that your version is 2.7.14sudo python setup.py developsudo raspi-config- Choose "WiFi" again, and enter
stratuxas the SSID. No password. sudo vim /etc/wpa_supplicant/wpa_supplicant.conf- Delete the section that contains your WiFi network, leaving the section that contains the Stratux network.
- More info on configuring Linux WiFi: https://www.raspberrypi.org/forums/viewtopic.php?t=160620
- Save and quit.
- Type "crontab -e"
- Select "Nano" (Option 1)
- Enter the following text at the bottom of the file:
@reboot sudo python /home/pi/StratuxHud/stratux_hud.py &- Save and quit.
- Install the Kivic projector per the Kivic directions. Please note that there is a release clip and the unit is removable. Also note that the combiner glass can be adjusted fore and aft.
- Plug in the 3.5mm TRS cable between the Raspberry Pi and the Kivic. This is the same hole as the audio adapter for the Pi.
- Plug the number pad into the Raspberry Pi.
- You will need to run two Micro USB (5v) power cables. One to the HUD and one to the Raspberry Pi processing unit. These may be run from a battery bank, or from the ship's power if you have 5V USB outlets.
- You may use the optional sleeving to help keep the install tidy.
- Print the case.
- Attach the LCD screen to the "GPIO Board" of the Raspberry Pi
- Download the LCD drivers. https://s3.amazonaws.com/sunfounder/Raspberry/images/LCD-show.tar.gz
- Install the LCD driver per SunFounder's instructions. http://wiki.sunfounder.cc/index.php?title=5_Inch_LCD_Touch_Screen_Monitor_for_Raspberry_Pi
- Edit the StratuxHud config.json file so "flip_vertical" is True.
- Plug the number pad into the Raspberry Pi
| Date | Version | Major Changes |
|---|---|---|
| 2019-03-31 | 1.4 | Add connection reset button. Fixes issues with the Diagnostic view running of of space. Initial port to Python 3.7 |
| 2019-01-31 | 1.3 | Improvements to the communication with the Stratux. Update directions for Kivic install. |
| 2018-10-13 | 1.2 | Major performance increases |
| 2018-09-07 | 1.1 | New system to allow views to be configurarable |
| 2018-07-17 | 1.0 | Initial release |
| Board | Screen | Frames Per Second (AHRS View Only) |
|---|---|---|
| Rasp Pi 2 | Sun Founder 5" | ~25FPS to ~30FPS |
| Rasp Pi 3 (stand alone) | Kivic | Pending Retesting |
| Rasp Pi 3 (Running on Stratux) | Kivic | 30FPS |
| Rasp Pi 3B+ | Kivic | 50FPS |
Please note that the frame rate is capped at 60FPS. Drawing any faster will not be detectable using the reccomended output systems. Reducing the framerate will reduce the powerdraw.
This project uses the Liberation family of fonts. They can be found at https://pagure.io/liberation-fonts/
The initial project was inspired by Kris Knigga's PyAhrs project https://github.com/kdknigga/pyahrs
The following components are used:
- Python
- PyGame
- Ws4Py
... and of course Stratux
This project is covered by the GPL v3 license.
Please see LICENSE
