Welcome to Barber's Shop!
Let's Create an account for admins using behind-the-scene database, then sign in client-side to view customer names and their appointment time. Customer in client-side can sign-up, then generate token and set appointment or sign-in to set up appointment quickly.
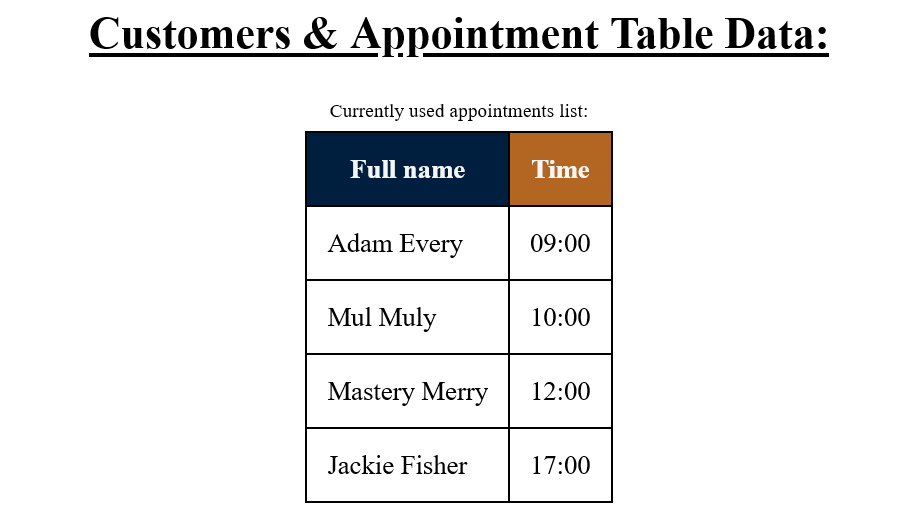
A sample barber's admin viewing customer name & appointment time in table data preview:
Prerequisites
-
NodeJS | Package manager to run
npm/nodecommands. -
Choose one Databases Software + GUI (or you can use a different product not from list as long as it supports SQL)
-
Visual Studio Code | Install some extensions (Recommended):
- Live Server | Run HTML to host live.
- Better Comments | (Optional) To make comments more readable & colored texts. I have documented some of it (it highlights important or alert etc.)
How It Works
According to /demo/barber.sql database table structure with encrypted password using bcrypt, so the following 3 samples of visual table here:
admins
| id | first_name | last_name | password | |
|---|---|---|---|---|
| 1 | John | Smith | johnsmith@example.com | MTIzNA== |
customer
| id | first_name | last_name | phone | password | |
|---|---|---|---|---|---|
| 1 | Johnny | Walker | johnnywalker@example.com | 1234567890 | @!IzNX== |
Example decrypted passwords for admins & customer are "1234" in sign-in page (without quotation)
appointments
| id | time | customer_id | available |
|---|---|---|---|
| 1 | 09:00 | 1 | 0 |
| 2 | 10:00 | NULL | 1 |
There will be connection this with a customer table above. Also availability value: 0 is unvailable while 1 is avilable.
Usage
In my case, I use XAMPP for this guide, or if you use Workbench, the process should be similar, so skip to step 2: In Toolbar
Create Schemawith the same file namebarber, then head to toolbar and clickServer -> Data Import
- Now let's get started by running
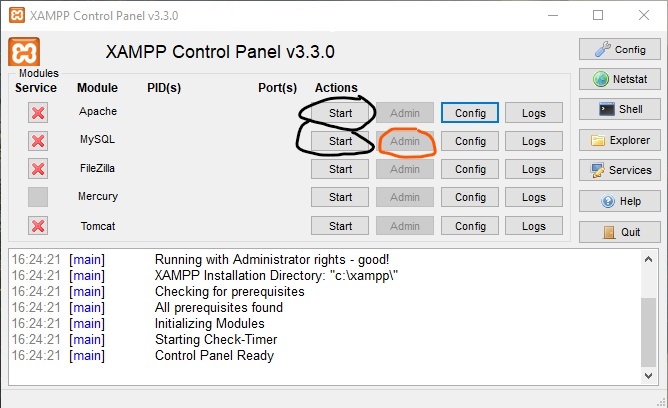
XAMPP Control Panel, then clickStartApache & MySQL, and clickAdminon MySQL tab to open phpMyAdmin database.
-
Create a new database named
barber(Example name DB) -
While on Database: barber page, click
Import tabon top bar then browse database fromdemo/barber.sql, after that, click run, now you have barber DB with 3 tables has been inserted. -
Now, dotenv has already preconfigured with sample input (no need to edit anything), including
JWT_TOKEN_SECRET. Create new.envfile in root directory and paste the following code:
# Use XAMPP or MySQL Workbench to access database "barber"

MYSQL_HOST=localhost
MYSQL_USER=root
# If you have setup your password by XAMPP/Workbench or other software, insert it here, otherwise leave it empty (no password)
MYSQL_PASSWORD=
MYSQL_DATABASE=barber

# Sample verification token key, you can renew token in a login page and click
# "Don't have token? Fetch new token to access your account with appointment!"
# link and rename it here with generated token key
JWT_TOKEN_SECRET = eyJhbGciOiJIUzI1NiIsInR5cCI6IkpXVCJ9.eyJuYW1lIjoiQmFyYmVyIFNob3AiLCJpYXQiOjE2MzQ2Mzc1NjZ9.GNrfgLCGYfqLA8gduo3h6B5xU5SoPSgqARgq5qdnHJ0-
Redirect to
barber-shop/root directory with VS Code. -
Run NodeJS server-side:
npm install
node index.js # Running server-side-
While server is running, let's open client-side by redirecting to
frontend/and right click then open live serverlogin.htmlorsignUp.htmlas homepage. -
Finally, try out making new appointment for customer or admin to view customer's data. Also use XAMPP to create admin account or view appointment table, customer in database. Look at VS Code terminal for console logging activity such as checking if user is signed up or detailed error or login etc.

