This section of the workshop documentation focuses on setting up and running the initial monolithic GraphQL server, which uses static JSON files as its data store. This setup serves as the starting point for our workshop on migrating to a supergraph architecture.
Before starting, ensure you have the following installed and set up:
-
Node.js: Install the latest stable version of Node.js. Verify the installation using
node -vto check the version. -
Apollo Studio Account: Access to Apollo Studio (Enterprise Edition) is required, which can be accessed using Starbucks Single Sign-On (SSO). This tool will be used for testing and observing our GraphQL queries and mutations.
-
NPM Packages: Run
npm installto install all dependencies necessary for the server to run.
Our monolithic server uses static JSON files to simulate database interactions, simplifying the setup and focusing on GraphQL schema and resolver logic.
-
Start the Server: Use
npm run startto launch the GraphQL server. This command sets up the server on localhost:4000. -
Access GraphQL Playground: Open your web browser and visit http://localhost:4000. Here you can interact with the GraphQL API through the integrated Playground. Supported Queries and Mutations
-
Execute the following GraphQL operations to interact with the system. Examples are provided for both queries and mutations:
Query 1: Get Partner By Id
query Partner($partnerId: ID!) {
  partner(id: $partnerId) {
    id
    email
    name
    position
  }
}
{
  "partnerId": "1"
}
Query 2: Get All Products
query Query {
  products {
    id
    name
    sku
    image
    price
    stock
    category
    availability
  }
}
No variables required.
Mutation 1: Create Partner
mutation CreatePartner($partner: PartnerInput!) {
  createPartner(partner: $partner) {
    success
    message
    partner {
      id
      email
      name
      position
    }
  }
}
{
  "partner": {
    "email": "test@user.com",
    "name": "Starbucks User 3",
    "position": "Barista"
  }
}
Mutation 2: Update Product
mutation UpdateProduct($updateProductInput: UpdateProductInput!, $productId: ID!) {
  updateProduct(productId: $productId, updateProductInput: $updateProductInput) {
    success
    message
    product {
      id
      name
      price
      sku
      image
      category
      availability
    }
  }
}
{
  "updateProductInput": {
    "price": 5.99,
    "stock": 10
  },
  "productId": "2"
}
-
Sign in to Apollo Studio: https://studio.apollographql.com/ using Starbucks SSO
-
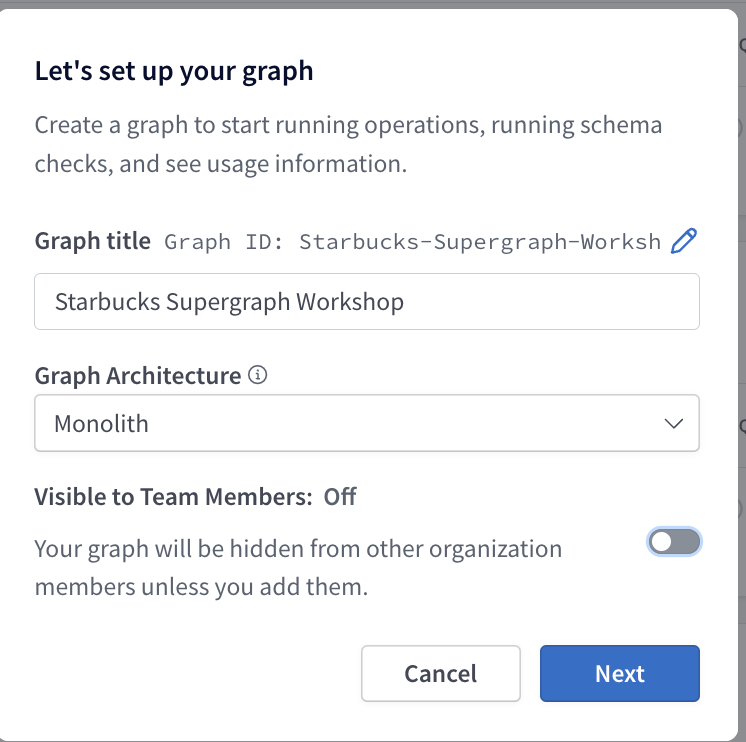
Create a new graph
-
Copy the
APOLLO_KEY,APOLLO_GRAPH_REFto your.envfile at the root level -
Run the following to obtain all necessary modules to push to studio:
npm install apollo-server apollo-server-express @apollo/federation @apollo/gateway -
Install Rover CLI, which is Apollo's command-line interface for managing and maintaining graphs with GraphOS:
mac:
curl -sSL https://rover.apollo.dev/nix/latest | shwindows:
iwr 'https://rover.apollo.dev/win/latest' | iex -
Run the following, which will configure out API key and graph ref stored in the .env file for pushing via rover cli:
rover config auth -
Run the following to publish our schema:

rover graph publish Starbucks-Supergraph-Worksh@current --schema ./schema.graphql


First, the monolith graph will be converted into a subgraph. This means all of the schema's types, fields, and behavior will still be preserved and working as usual.
Next, we're going to publish the subgraph to the Apollo schema registry. This triggers composition. If composition fails, we get error messages we'll need to fix! If composition succeeds, Uplink will be updated with our new supergraph schema.
Then, the router will fetch this schema and be ready to handle incoming queries using this new schema!
This is only the start of our supergraph journey! After this process, we'll go back to the start and split off another subgraph from the monolith subgraph. After we make changes to a subgraph, we'll need to publish our subgraph schemas again and follow the flow.
Composition: Composition is the process of combining a set of subgraph schemas into a supergraph schema. Composition has a few rules:
- Multiple subgraphs can't define the same field on an object type, unless that field is shareable
- A shared field must have both a compatible return type and compatible argument types across each defining subgraph
- If multiple subgraphs define the same type, each field of that type must be resolvable by every valid GraphQL operation that includes it
Entity: An object type that can resolve its fields across multiple subgraphs. Each subgraph can contribute different fields to the entity and is responsible for resolving only the fields that it contributes.
An entity's @key must not include:
- Fields that return a union or interface
- Fields that take arguments
npm install @apollo/subgraph- We will need to specify that we would like to build a subgraph schema, but including the following in our monolith/index.js file:
At the top:
const { buildSubgraphSchema } = require('@apollo/subgraph');
and in startApolloServer:
const server = new ApolloServer({
  schema: buildSubgraphSchema({
    typeDefs,
    resolvers,
  }),
});
- Change the port to run on 4001 (line 19):
const port = 4001; - Finally, to allow us to specify directives, we can use the following at the top of our schema:
extend schema
  @link(url: "https://specs.apollo.dev/federation/v2.5",
        import: ["@key"])
npm startand we can visit http://localhost:4001 to execute an example query!
To publish the subgraph, we can utilize rover cli's rover subgraph publish similar to the rover graph publish:
rover subgraph publish Starbucks-Supergraph-Worksh@current \
  --schema ./schema.graphql \
  --name monolith \
  --routing-url http://localhost:4001
Ahh, we need to specify we are converting this into a supergraph! Luckily rover cli has a simple flag we can include to do so:
rover subgraph publish Starbucks-Supergraph-Worksh@current \
  --schema ./schema.graphql \
  --name monolith \
  --routing-url http://localhost:4001 \
  --convert
We can now verify that this subgraph has been successfully published to our newly converted federated supergraph!

Start by creating a router folder at the root level.
Now we are going to configure the router. The router is a high-performance routing runtime for a supergraph, with efficient distribution of a single request to multiple subgraphs through a customizable processing pipeline.
The Apollo Router serves as the orchestration layer for your supergraph. It efficiently manages queries across multiple subgraphs, improving scalability and performance. Below, you'll find guidance on setting up and configuring the Apollo Router using command arguments, environment variables, and a YAML config file.
You can download it here: https://www.apollographql.com/docs/router/quickstart#manual-download or by running commands below:
Change directory into the newly created router folder and run the following command (or save the above into the router folder)
curl -sSL https://router.apollo.dev/download/nix/v1.37.0 | sh
Please also add a .env file in the router folder. The folder should look like:

We are going to keep the router configuration very simple, but you can view the full configuration spec here: https://www.apollographql.com/docs/router/configuration/overview/
Below is the router configuration:
include_subgraph_errors:
  all: true # Propagate errors from all subgraphs
Now in a separate terminal, we will need to run the router: In a new terminal, navigate to the router directory.
To start the router, we'll type in our APOLLO_KEY and APOLLO_GRAPH_REF. (Remember, you can find these variables inside of your .env file!) Then, start the router with ./router, and finally add the --config flag with the path to the config.yaml file.
(Windows): Download the router from the release page. Set the env vars:
$env:APOLLO_KEY='<APOLLO_KEY>'
$env:APOLLO_GRAPH_REF='<APOLLO_GRAPH_REF>'
Then run:
.\router.exe --config .\config.yaml
(Mac):
APOLLO_KEY=<APOLLO_KEY> APOLLO_GRAPH_REF=<APOLLO_GRAPH_REF> ./router --config config.yaml
We should see output messages in the terminal, with our router running at 127.0.0.1:4000.
Remember port 4000 was where the original monolith GraphQL server was running? Now we've successfully replaced it with the router! Clients don't have to do anything extra to change their endpoints, they can keep querying as usual.

Deciding on where to start splitting off subgraphs can feel overwhelming. This is especially true if you have a large, complex graph, with multiple teams contributing and clients depending on its continued operation. We recommend keeping in mind a core principle of federation: incremental adoption. We'll break off the monolith subgraph's functionality one concern at a time.
Copy the subgraph-template folder and paste it in the root directoy. We will rename it to subgraph-products.
Modify the index.js file to update the port and subgraphName:
  const port = 4002; // TODO: change port number
  const subgraphName = 'products'; // TODO: change to subgraph name
Now we can cd into the subgraph-products folder, and run the following to start it up:
npm install
npm start
Visiting http://localhost:4002 should look familiar!
Great, now we have the base down! We need to start migrating entry points to our new subgraph schema. A good thing to know is that we don't have to do this all at once! We can first migrate the types, then the queries, then the mutations!
Starting with the types, we can easily identify which types the partners subgraph should own!
We have a pretty easy understanding on which subgraph would own what. The monolith we will treat as our first subgraph, and it will contain all Partner logic. Let's start by moving the Product types, queries and mutations to the subgraph-products schema file:
We can copy and paste pretty much everything, it should look like (keep in mind the import at the top, which will come after):
extend schema
  @link(url: "https://specs.apollo.dev/federation/v2.0",
        import: ["@key"])

type Query {
  products: [Product!]!
  product(id: ID!): Product!
}

type Mutation {
  createProduct(product: ProductInput!): CreateProductResponse
  updateProduct(productId: ID!, updateProductInput: UpdateProductInput!): UpdateProductResponse
}

type Product {
  id: ID!
  name: String!
  sku: Int!
  image: String
  price: Float!
  stock: Int!
  category: ProductCategory!
  availability: Boolean!
}

type Partner @key(fields: "id") {
  id: ID!
  favoriteProduct: Product
}

enum ProductCategory {
  Beverage
  Food
  Merch
}

input ProductInput {
  name: String!
  sku: Int!
  image: String
  price: Float!
  stock: Int!
  category: ProductCategory!
}

input UpdateProductInput {
  name: String
  sku: Int
  image: String
  price: Float
  stock: Int
  category: ProductCategory
}

interface MutationResponse {
  code: Int!
  success: Boolean!
  message: String!
}

type CreateProductResponse implements MutationResponse {
  code: Int!
  success: Boolean!
  message: String!
  product: Product
}

type UpdateProductResponse implements MutationResponse {
  code: Int!
  success: Boolean!
  message: String!
  product: Product
}
And the monolith:
extend schema
  @link(url: "https://specs.apollo.dev/federation/v2.0",
        import: ["@key"])

type Query {
  partners: [Partner!]!
  partner(id: ID!): Partner!
}

type Mutation {
  createPartner(partner: PartnerInput!): CreatePartnerResponse
  updatePartner(partnerId: ID!, updatePartnerInput: UpdatePartnerInput!): UpdatePartnerResponse
}

"A Starbucks employee, both retail and non-retail"
type Partner @key(fields: "id") {
  id: ID!
  name: String!
  position: EmployeePosition!
  email: String!
}

input PartnerInput {
  name: String!
  position: EmployeePosition!
  email: String!
}

enum EmployeePosition {
  Barista
  Manager
  Engineer
  CEO
}

input UpdatePartnerInput {
  name: String
  position: EmployeePosition
  email: String
}

interface MutationResponse {
  "Similar to HTTP status code, represents the status of the mutation"
  code: Int!
  "Indicates whether the mutation was successful"
  success: Boolean!
  "Human-readable message for the UI"
  message: String!
}

type CreatePartnerResponse implements MutationResponse {
  "Similar to HTTP status code, represents the status of the mutation"
  code: Int!
  "Indicates whether the mutation was successful"
  success: Boolean!
  "Human-readable message for the UI"
  message: String!
  "The newly created product"
  partner: Partner
}

type UpdatePartnerResponse implements MutationResponse {
  "Similar to HTTP status code, represents the status of the mutation"
  code: Int!
  "Indicates whether the mutation was successful"
  success: Boolean!
  "Human-readable message for the UI"
  message: String!
  "The newly updated partner"
  partner: Partner
}
Now we can add the following schema extension to both monolith and subgraph schema files:
extend schema
  @link(url: "https://specs.apollo.dev/federation/v2.0",
        import: ["@key"])
With this line, we can specify the various directives we'd like to use within our schema file (such as @key, as shown in the import).
Now we want to setup our resolvers, so in our subgraph-products/resolvers.js we can add the following:
const resolvers = {
  Query: {
    products: (_, __, { dataSources }) => {
      return dataSources.productsAPI.getProducts();
    },
    product: (_, { id }, { dataSources }) => {
      return dataSources.productsAPI.getProduct(id);
    },
  },
  Mutation: {
    createProduct: async (_, { product }, { dataSources }) => {
      return await dataSources.productsAPI.createProduct(product)
    },
    updateProduct: async (_, { productId, updateProductInput }, { dataSources }) => {
      return await dataSources.productsAPI.updateProduct(productId, updateProductInput);
    },
  },
  Partner: {
    favoriteProduct: (partner, _, { dataSources }) => {
      return dataSources.productsAPI.getFavoriteProduct(partner.id);
    }
  },
  Product: {
    availability: (product, _, { dataSources }) => {
      return dataSources.productsAPI.getProductAvailability(product.id);
    }
  }
};

module.exports = resolvers;
and finally our datasources/products.js file (for now just copy and paste this).
So now we have an interesting scenario. If you notice, we reference the Product as a return type for our favoriteProduct field on partners:
type Partner {
  id: ID!
  name: String!
  position: EmployeePosition!
  email: String!
  favoriteProduct: Product!
}
We want to make sure that we aren't keeping track of duplicate types in both subgraph schemas, right? So to do so, we will introduce the concept of entities.
Entities are object types that can resolve their fields across multiple subgraphs. More on entities:
- We can define entities in subgraphs, and these subgraphs can contribute fields to the entity and resolve these fields independently.
- An entity can be referenced by using it as the return type for a field.
This makes Partner prime candidate for an entity! We need to define certain fields in our monolith aka partners subgraph, and (at least for now) one field that should be resolved via the products subgraph!
So, given this, in our subgraph-products we can implement this entity with the necessary fields that this subgraph would handle in terms of resolvability:
type Partner @key(fields: "id") {
  id: ID!
  favoriteProduct: Product
}
We can now remove the favoriteProduct field from our monolith schema, resulting in:
type Partner @key(fields: "id") {
  id: ID!
  name: String!
  position: EmployeePosition!
  email: String!
}
Notice how, aside from the id, the fields are distinct and unique to the subgraph? Now we should figure out if we need to do anything special for the resolvers!
Important note: Subgraphs that contribute fields to an entity use a special resolver called a reference resolver to resolve entities. This function enables the router to directly access entity fields that each subgraph contributes.
Reference resolvers can be a bit tricky. Let's think about it as if you're part of a detective team working on a complex case. Each detective is responsible for different aspects of the investigation, gathering specific pieces of evidence related to the case.
Suppose you're investigating a technology company, and you're in charge of gathering information about its partnerships. Each partner the company works with has an ID number, but that's all you have from your segment. You need more details, like what these partners do, how they collaborate with the company, etc.
Here’s where the __resolveReference function comes into play, similar to consulting a specific detective for the detailed info they have:
Initial Clue: You have the ID of a partner but not the full details.
Consulting the Expert: You go to the detective who specializes in detailed profiles of each partner. You show them the ID and say, "Hey, can you give me more info on this partner?"
Gathering Full Details: The detective looks up their records, finds the full details of the partner, and shares them with you.
Solving the Case: Now you have the complete information, and you can incorporate it into your investigation, making your part of the case complete and connected to the whole investigation.
Similarly, in a computer system that uses Apollo Federation for managing its data, the __resolveReference function acts like consulting the detective who can provide the full details based on an initial clue (like the partner ID). This function ensures that even though the data is managed in parts, anyone who needs the complete data can get it efficiently and accurately from the right source.
Every reference resolver has the name __resolveReference. It's a function with three arguments:
reference: The entity representation object that's passed in by the router, which includes the entity's __typename and @key fields. This tells the subgraph which instance of an entity is being requested.
context: The object shared across all resolvers that are executing for a particular operation, as in normal resolvers. (Note that by convention, we refer to this __resolveReference argument as context, rather than contextValue as in other resolvers!)
info: Information about the operation's execution state, including the field name and the path to the field from the root, as in normal resolvers.
That being said, we need to add a reference resolver for the Partners' resolver.
Below is the subgraph-products resolver:
const resolvers = {
  Query: {
    products: (_, __, { dataSources }) => {
      return dataSources.productsAPI.getProducts();
    },
    product: (_, { id }, { dataSources }) => {
      return dataSources.productsAPI.getProduct(id);
    },
  },
  Mutation: {
    createProduct: async (_, { product }, { dataSources }) => {
      return await dataSources.productsAPI.createProduct(product);
    },
    updateProduct: async (_, { productId, updateProductInput }, { dataSources }) => {
      return await dataSources.productsAPI.updateProduct(productId, updateProductInput);
    },
  },
  Product: {
    availability: (product, _, { dataSources }) => {
      return dataSources.productsAPI.getProductAvailability(product.id);
    }
  },
  Partner: {
    favoriteProduct: ({ id }, _, { dataSources }) => {
      return dataSources.productsAPI.getFavoriteProduct(id);
    },
  }
};

module.exports = resolvers;
And the partners (monolith) resolver:
const resolvers = {
  Query: {
    partners: (_, __, { dataSources }) => {
      return dataSources.partnersAPI.getPartners();
    },
    partner: (_, { id }, { dataSources }) => {
      return dataSources.partnersAPI.getPartner(id);
    },
  },
  Mutation: {
    createPartner: async (_, { partner }, { dataSources }) => {
      return await dataSources.partnersAPI.createPartner(partner);
    },
    updatePartner: async (_, { partnerId, updatePartnerInput }, { dataSources }) => {
      return await dataSources.partnersAPI.updatePartner(partnerId, updatePartnerInput);
    },
  },
  Partner: {
    __resolveReference(partner, { dataSources }) {
      return dataSources.partnersAPI.getPartner(partner.id)
    },
  }
}

module.exports = resolvers;
And finally the index.js, let's be sure only to specify the single datasource:
const { ApolloServer } = require('@apollo/server');
const { startStandaloneServer } = require('@apollo/server/standalone');
const { buildSubgraphSchema } = require("@apollo/subgraph");
const { readFileSync } = require('fs');
const gql = require('graphql-tag');

const typeDefs = gql(readFileSync('./schema.graphql', { encoding: 'utf-8' }));
const resolvers = require('./resolvers');

const PartnerDataSource = require('./datasources/partners');

async function startApolloServer() {
  const server = new ApolloServer({
    schema: buildSubgraphSchema({
      typeDefs,
      resolvers,
    }),
  });

  const port = 4001;

  try {
    const { url } = await startStandaloneServer(server, {
      context: async ({ req }) => {
        return {
          dataSources: {
            partnersAPI: new PartnerDataSource(),
          },
        };
      },
      listen: {
        port,
      },
    });

    console.log(`🚀  Server ready at ${url}`);
  } catch (err) {
    console.error(err);
  }
}

startApolloServer();
const { ApolloServer } = require('@apollo/server');
const { startStandaloneServer } = require('@apollo/server/standalone');
const { buildSubgraphSchema } = require('@apollo/subgraph');

const { readFileSync } = require('fs');
const axios = require('axios');
const gql = require('graphql-tag');

const typeDefs = gql(readFileSync('./schema.graphql', { encoding: 'utf-8' }));
const resolvers = require('./resolvers');
const ProductsDataSource = require('./datasources/products');

async function startApolloServer() {
  const server = new ApolloServer({
    schema: buildSubgraphSchema({
      typeDefs,
      resolvers,
    }),
  });

  const port = 4003;
  const subgraphName = 'products';

  try {
    const { url } = await startStandaloneServer(server, {
      context: async ({ req }) => {
        const { cache } = server;

        return {
          dataSources: {
            productsAPI: new ProductsDataSource(),
          },
        };
      },
      listen: {
        port,
      },
    });

    console.log(`🚀 Subgraph ${subgraphName} running at ${url}`);
  } catch (err) {
    console.error(err);
  }
}

startApolloServer();
Now we are ready to publish our subgraph schemas!
rover subgraph publish <APOLLO_GRAPH_REF> \
    --schema ./monolith/schema.graphql \
    --name monolith \
    --routing-url http://localhost:4001
rover subgraph publish <APOLLO_GRAPH_REF> \
    --schema ./subgraph-products/schema.graphql \
    --name products \
    --routing-url http://localhost:4002
Examples are provided for both queries and mutations:
Query 1: Get Partner By Id
query Partner($partnerId: ID!) {
  partner(id: $partnerId) {
    id
    email
    name
    position
  }
}
{
  "partnerId": "1"
}
Query 2: Get All Products
query Query {
  products {
    id
    name
    sku
    image
    price
    stock
    category
    availability
    isExclusive
  }
}
No variables required.
Mutation 1: Create Partner
mutation CreatePartner($partner: PartnerInput!) {
  createPartner(partner: $partner) {
    success
    message
    partner {
      id
      email
      name
      position
    }
  }
}
{
  "partner": {
    "email": "test@user.com",
    "name": "Starbucks User 3",
    "position": "Barista"
  }
}
Mutation 2: Update Product
mutation UpdateProduct($updateProductInput: UpdateProductInput!, $productId: ID!) {
  updateProduct(productId: $productId, updateProductInput: $updateProductInput) {
    success
    message
    product {
      id
      name
      price
      sku
      image
      category
      availability
    }
  }
}
{
  "updateProductInput": {
    "price": 5.99,
    "stock": 10
  },
  "productId": "2"
}
And we've successfully converted our monolith to a supergraph with subgraphs!