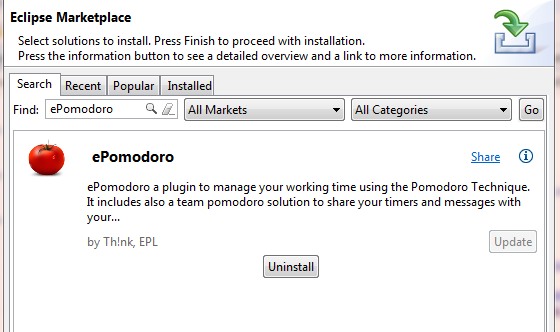
To install ePomodoro plugin you can download the project zip file (for example from here: http://code.google.com/p/e-pomodoro/downloads/list), decompress it and copy the jar file in your eclipse installation. If you have Eclipse installed, for example, in /etc/eclipse folder, you should copy your jar file in /etc/eclipse/plugins and then restart your eclipse to activate the plugin.
The best and easy way in naturally using the update site (or the eclipse marketplace). All required operations will be accomplished automatically.
After the eclipse restart you should see the pomodoro timer in your status bar
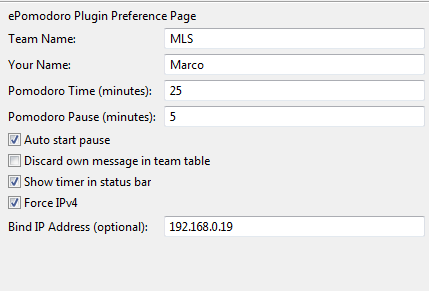
In your Eclipse preferences page, you can access going to Windows->Preferences menu, you can change settings for ePomodoro plugin.
- Team Name: is the name of your team used to exchange pomodoro messages. Messages are sent only to users with the same team name configured
- Your Name: is an optional parameter. By default the name of your machine is sent to others members, but if you want you can personalize your name changing this parameter.
- Pomodoro Time: time of your pomodoro (we could call it working time). By default it's set to 25 minutes, the default for the Pomodoro Technique
- Pomodoro Pause: pause timer after any working time. Default to 5 minutes
- Auto start pause: if you select this property (true by default) you are saying you want to auto start your pause timer. After the 25 minutes pomodoro you will receive a popup message saying that your working time is finished, and then the pause timer is started up.
- Discard own messages in team table: by default to false. This is used to set if you want to see your timer in Team Table view or not.
- Show timer in status bar: by default is true. You can decide to use timer inside the Pomodoro Timer view or showing it directly in your eclipse status bar. To prevent the usage of many additional views, by default we put the timer on the status bar. After the installation, if all worked well, you should see your pomodoro in the status bar
- Force IPv4: is used to configured the communication part of ePomodoro (to share messages with your team). If you have IPv6 configured on your system but your network does not support IPv6 you won't be able to send messages. Forcing the usage of IPv4 the problem should be fixed.
- Bind IP Address: optional parameter. If you have for example more interfaces and you want to start ePomodoro just on one of these insterface, you can enter in this box the IP address you want to use.
Usage of ePomodoro is really simple. Play button on the status bar start your timer (you should see countdown changes); Reset button is used to restore the timer; Pause when timer is started, the play button changes to pause button. Pressing it you put your timer in pause.
Same things could be done in the ePomodoro Countdown Timer view (windows->show view->others->ePomodoro). To see your team you have to show the Team Status view (windows->show view->others->ePomodoro).
Here you have a simple table with all team members listed and status of each Pomodoro timer. With a rigth-click on a machine name you can select to send a message to the selected user(s) (multiple selection allowed in the table). These messages will be shown to target users only when they finished the "work pomodoro", no message will be shown when you are working.
In ePomodoro 1.0.8 we updated the version of JGroups plugins, used for pomodoro communication. We are actually using the final stable release (3.4.2.Final). If you have, on the eclipse log, warning messages like:
WARNING: JGRP000010: packet from 127.0.0.1:45588 has different version (3.1.0)
than ours (3.4.2); packet is discarded
It means the specified client (in this example 127.0.0.1) are sending packet with an old version of ePomodoro, using JGroups 3.1.0. You must be update ePomodoro for any team member.
On Linux JDK, the setting to force JGroups to use IPv4 stacks does not work at runtime. It's just read during the JVM startup procedure. If you have, on the eclipse log, errors like this one:
SEVERE: exception sending bundled msgs: java.lang.Exception:
dest=/228.8.8.8:45588 (497 bytes):, cause: java.io.IOException: Invalid argument
Means your Eclipse is trying to use an IPv6 address with the configured IPv4 udp stack. On Windows and MacOSx all should work without problems.
At the moment, the only way to fix this, is to add the ipv4 property in your eclipse.ini file:
-preventMasterEclipseLaunch
-startup
plugins/org.eclipse.equinox.launcher_1.3.0.v20131104-1241.jar
--launcher.library
plugins/org.eclipse.equinox.launcher.gtk.linux.x86_64_1.1.200.v20131104-1241
-showsplash
org.eclipse.platform
--launcher.XXMaxPermSize
256m
--launcher.defaultAction
openFile
--launcher.appendVmargs
-vmargs
-Xms128m
-Xmx512m
-Dorg.eclipse.swt.browser.UseWebKitGTK=true
-Dhelp.lucene.tokenizer=standard
-XX:CompileCommand=exclude,org/eclipse/core/internal/dtree/DataTreeNode,forwardDeltaWith
-XX:CompileCommand=exclude,org/eclipse/jdt/internal/compiler/lookup/ParameterizedMethodBinding,<init>
-XX:CompileCommand=exclude,org/eclipse/cdt/internal/core/dom/parser/cpp/semantics/CPPTemplates,instantiateTemplate
-XX:CompileCommand=exclude,org/eclipse/cdt/internal/core/pdom/dom/cpp/PDOMCPPLinkage,addBinding
-XX:CompileCommand=exclude,org/python/pydev/editor/codecompletion/revisited/PythonPathHelper,isValidSourceFile
-XX:CompileCommand=exclude,org/eclipse/tycho/core/osgitools/EquinoxResolver,newState
-Dorg.eclipse.equinox.p2.reconciler.dropins.directory=/usr/share/eclipse/dropins
-Declipse.p2.skipMovedInstallDetection=true
-Djava.net.preferIPv4Stack=true
This one is an example, and the property to add is the last one -Djava.net.preferIPv4Stack=true. Then restart your eclipse and all should work.


