- For this exercise we will be practicing our system admin skills by creating a simple application using a gem called Paperclip.
- You can find the documentation here: https://github.com/thoughtbot/paperclip
- You will need to download the starter files here first.
- Your job is to make the application work and then deploy it to AWS.
- In production, environment variables allow you to set up single-use secrets that are to be shared across the application.
- An example would be an API key or database password.
- An excellent gem for handling these environment variables can be found here.
- Since the gem automatically adds application.yml to .gitignore, you will have to copy the file to your Ubuntu server manually:
scp -i AllAccessKey.pem path_to_local_file ubuntu@ip_address:path_to_remote_directory
- AWS is a powerful suite of services that give you access to many infrastructure options.
- Let's review some of the options in the control panel.
- EC2 is the main virtual machine, cloud computing arm of AWS, and where we will go to create our Linux machines to run our software.
- We will go through setting up an EC2 virtual machine.
- Setting up a virtual machine consists of the following steps:
- Selecting the operating system version: we will be using Ubuntu 14.04
- Setting up the security group to whitelist IPs
- Setting up a PEM file that will be used for authentication
- Logging into the machine via SSH
- Create AWS account here.
- Go to EC2 dashboard.
- Click "Launch Instance"
- Select Ubuntu.
- Click "Next"
- Click "Review and Launch"
- Click "Edit Security Groups"
- If you don't already have a security group set up, create a new one.
- Click "Add Rule" and add HTTP to the security group.
- Click "Review and Launch" again.
- Click "Launch".
- Create a new PEM file key if you don't have one already. You can only download this once so keep it safe!
When the server is up and running, you will be able to log into it. This is handled through the terminal using Secure Shell (SSH).
- From the EC2 dashboard, select your instance.
- You will see a "public DNS" option showing your instance's current URL. It will look something like this: ec2-54-148-134-239.us-west-2.compute.amazonaws.com.
- CD into your directory containing your
- Open your terminal and type the following command:
ssh -i YourPemFile.pem ubuntu@yourpublicdnsurl
- When it asks you if you want to continue type "yes" and hit enter.
- If PEM file is refused you will have to update its permissions:
chmod 400 YourPemFile.pem
Update the Ubuntu package manager:
sudo apt-get update
Install Git:
sudo apt-get install git
Install RVM: https://rvm.io/
It will prompt you to run a command like this to get RVM to work:
source /home/ubuntu/.rvm/scripts/rvm
Install Ruby:
rvm install ruby
Install Rails:
gem install rails --no-ri --no-rdoc
-
Git clone your project.
-
Bundle install.
-
Rake db:migrate.
- May need to install postgresql and nodeJS
sudo apt-get install libpq-dev`sudo apt-get install nodejs` -
Start the server.
-
Good to go!
RAILS_ENV=production rake assets:precompile
config.public_file_server.enabled = ENV['RAILS_SERVE_STATIC_FILES'].present?- We will need to add this boolean value to our Figaro configuration.
rvmsudo rails s -p 80 -d
- Most production infrastructure is built to withstand a lot of traffic.
- There are a lot of aspects to take into consideration when planning a production-ready architecture.
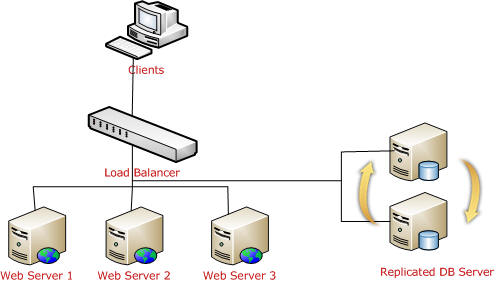
- A very common approach is multiple instances over a load balancer with a master-master replicated database:
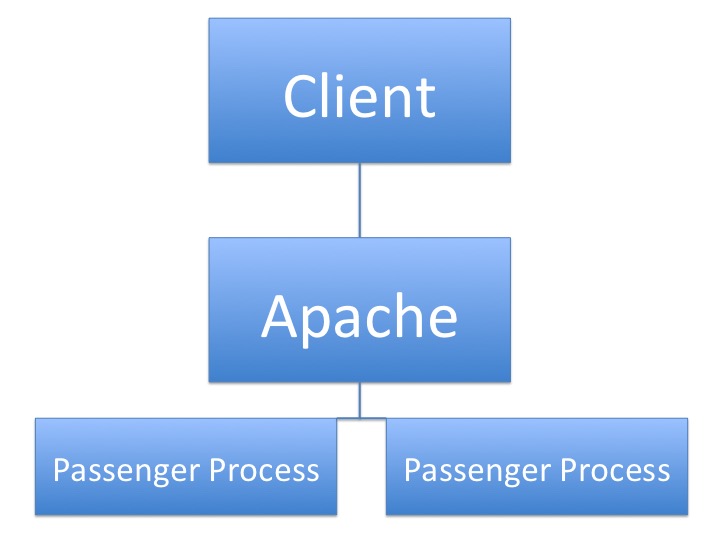
- Similarly, instances themselves with have a multi-tiered architecture.
- Apache will be responsible for serving the static files (html, css, js, images), and Passenger will handle all of the Rails related logic.
- Passenger is a Ruby server, so it is the only piece that can understand Ruby code.
- Running Rails in production with Passenger and Apache is industry-standard for the web.
- A great tutorial by Digital Ocean can be found here.
- Here are the steps from their tutorial:
sudo apt-get install apache2
sudo apt-key adv --keyserver keyserver.ubuntu.com --recv-keys 561F9B9CAC40B2F7
Create the passenger list file:
sudo nano /etc/apt/sources.list.d/passenger.list
Add this line to it:
deb https://oss-binaries.phusionpassenger.com/apt/passenger trusty main
Change permissions for the list file:
sudo chown root: /etc/apt/sources.list.d/passenger.list
sudo chmod 600 /etc/apt/sources.list.d/passenger.list
sudo apt-get update
sudo apt-get install libapache2-mod-passenger
sudo a2enmod passenger
sudo service apache2 restart
Step 9: Deploy Rails application with Git and check to make sure all checks are done for it to run in production mode.
sudo cp /etc/apache2/sites-available/000-default.conf /etc/apache2/sites-available/testapp.conf
Open config:
sudo nano /etc/apache2/sites-available/testapp.conf
- You will have to edit the DocumentRoot and Directory with your appropriate path to your Rails public directory.
<VirtualHost *:80>
	ServerName example.com
	ServerAlias www.example.com
	ServerAdmin webmaster@localhost
	DocumentRoot /home/rails/testapp/public
	RailsEnv production
	ErrorLog ${APACHE_LOG_DIR}/error.log
	CustomLog ${APACHE_LOG_DIR}/access.log combined
	<Directory "/home/rails/testapp/public">
		Options FollowSymLinks
		Require all granted
	</Directory>
</VirtualHost>
sudo a2dissite 000-default
sudo a2ensite testapp
sudo service apache2 restart
Your app should now be available at http://your-ip
sudo apt-get update && sudo apt-get upgrade
Restart after upgrade to make sure changes are implemented:
sudo service apache2 restart
- Spend a few minutes and try to work through the above tutorial and get your member list application running in production through Apache-Passenger.
- As a first step I would recommend running the standard Rails server in production first to make sure all is well before trying to tackle Apache:
rails s -e production -b 0.0.0.0
- Working with databases is its own beast.
- Databases are complex because they are being hit all by themselves by an enomous amount of traffic.
- To combat this, techniques such as indexing, master-master replication, and multi-az deployment are implemented.
- Databases like any other server are vulnerable to failure, so they are generally monitored closely by a professional database administrator (DBA).
- Who has time and energy to do all this?! That's why Amazon invented the Relational Database Service (RDS).
- RDS is a database-as-a-service provider which handles these tough database issues for you at a price.
- We will be implementing a RDS database with our member list app together. To do this we will have to edit our database.yml file:
production:
  adapter: postgresql
  encoding: unicode
  database: database name here
  username: database username here
  password: database password here
  host: database host here
port: 5432- We will also need to install the PostgreSQL adapter to allow our Rails application to "talk" to PostgreSQL:
Install PostgreSQL Gem:
Install postgres: apt-get install postgresql
Create a user and database:
sudo su - postgres
psql

CREATE USER yourname WITH PASSWORD 'passwordhere';
CREATE DATABASE metals-directory_production  WITH OWNER yourname;
GRANT ALL PRIVILEGES ON DATABASE metals-directory_production TO yourname;
Update database.yml
development:
  adapter: postgresql
  encoding: unicode
  database: metals-directory_development
  pool: 5
  username: yourname
  password: passwordhere   ### password you have specified within psql
  host: localhost
  port: 5432               ### you can configure it in file postgresql.conf
gem "pg"
- In this lab we will be using RDS and Figaro to break the database of our member list app off to a RDS server.
- You will be configuring the database to use PostgreSQL and environment variables to store sensitive information.
- Another important aspect of a production application is serving large files effectively.
- If the same servers that serve the main Netflix app had to also transfer the large video files, Netflix would either work terribly or not at all.
- Services like S3 allow us to store and serve files separately from the main application server.
- We will install it to store our member list files.
- Here are the steps we will need to follow:
gem 'aws-sdk', '~> 2.3.0'
config/initializers/paperclip.rb
Paperclip::Attachment.default_options[:storage] = :s3

Paperclip::Attachment.default_options[:s3_region] = "us-west-2"

Paperclip::Attachment.default_options[:s3_protocol] = "https"

Paperclip::Attachment.default_options[:s3_host_name] = "s3-us-west-2.amazonaws.com"

Paperclip::Attachment.default_options[:default_url] = lambda { |image|
    ActionController::Base.helpers.asset_path('sample.jpg')
}

Paperclip::Attachment.default_options[:s3_credentials] = {
    bucket: ENV["S3_BUCKET_NAME"],
    access_key_id: ENV["AWS_ACCESS_KEY_ID"],
    secret_access_key: ENV["AWS_SECRET_ACCESS_KEY"]
}class User < ActiveRecord::Base
has_attached_file :avatar, :styles => { :medium => "300x300>", :thumb => "100x100>" }
validates_attachment_content_type :avatar, :content_type => /\Aimage\/.*\Z/
end- To find your secret key and ID go up to your name in the top right corner and click on "Security Credentials."
- Then navigate over to "Access Keys."

