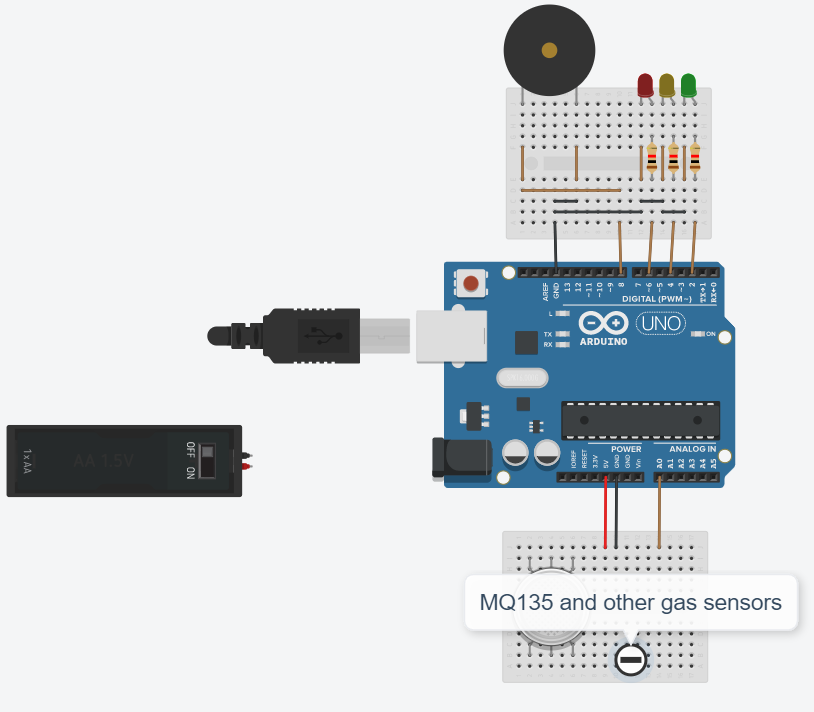
A simple Arduino-based Gas Leak Detection Device that can warn users about toxic environments, including abnormally high carbon dioxide levels
- MQ-135 Air quality sensor
- Any or none of the following air quality and gas sensor modules:
- MQ-2 (Methane, butane, LPG, smoke sensor)
- MQ-5 (Natural gas, LPG sensor)
- MQ-9 (Carbon monoxide sensor)
- MQ-136 (Hydrogen sulphide sensor)
- MQ-137 (Ammonia sensor)
- Arduino UNO board,
- Arduino-compatible USB cable,
- Breadboard,
- Breadboard wires,
- Red, Green, and Yellow (Optional) LEDs,
- Buzzer
- Resistors
- 2 batteries, each 1.5 V
Arduino IDE. Available on https://www.arduino.cc/en/software.
For the sensors which show high reading in hazardous environments and low reading in safe environments (e.g. MQ-135): The basic algorithm to determine if an environment is safe is as follows:
BEGIN
if ((sensor_1 OR sensor_2 OR sensor_3 OR ... sensor_n) == HIGH) then
    // Hazardous environment
else:
    // Safe environment
end if
END
For the sensors which show low reading in hazardous environments and high reading in safe environments: The basic algorithm to determine if an environment is safe is as follows:
BEGIN
if ((sensor_1 AND sensor_2 AND sensor_3 AND ... sensor_n) == LOW) then
    // Hazardous environment
else:
    // Safe environment
end if
END
Given that the implementation of both these kind of sensors exist, our approach involves the use of a hazard flag. For the following algorithm, assume that:
- A sensor S0 shows high reading in hazardous environments and low reading in safe environments
- A sensor S1 shows low reading in hazardous environments and high reading in safe environments
- The hazard flag is 1 in a hazardous environment and 0 in a safe environment
Then the approach is as follows:
BEGIN

int hazardflag = -1;

if (S0 == HIGH){
    set_hazardflag(1);
} else {
    set_hazardflag(0);
}

if (S1 == HIGH) {
    set_hazardflag(0);
} else {
    set_hazardflag(1);
}

function set_hazardflag(int n) {
    if (n > hazardflag) {
        return n;
    } else {
        return hazardflag;
    }
}

if (hazardflag == 1) {
    // Hazardous environment
} else {
    // Safe environment
}
The inference is as follows:
- If any one sensor indicates hazardous environment, then the program should run under the assumption of a hazardous environment.
- Indicate safe area only if all sensors indicate safe area.
- The breadboard above the Arduino UNO contains the LEDs and buzzers. The LEDs should be visible and the buzzer should be audible.
- The breadboard below the Arduino UNO contains the MQ Gas sensors. For neatness, the connections to the sensors are not shown. The connections are as follows:
- Red wire: +5V
- Black wire: GND (Ground)
- Brown wires: A0, A1, A2, A3, A4 and/or A5, any of the analog pin(s) can be used. Each pin connects to Analog Output pin of the Gas sensor.
- Either download this repository or git clone using
$ git clone https://github.com/BurraAbhishek/toxic_place_detection.git - The source code is in src/toxicdetection.ino. Open it using an Arduino IDE.
- Connect the Arduino board to your local machine using an Arduino-compatible USB Cable.
- Set the appropriate port number in the Arduino IDE (One port will be displayed, for example,
COM1) - Compile the program and run it.
- To use battery power instead of USB power, shift the jumper in the Arduino board from USB to EXT (External power). The jumper is located next to the USB slot.
A simulation of the above is hosted on Tinkercad. To see a demo of how this program runs, check https://www.tinkercad.com/things/28n51KBNIkE, a functional version (remix) of the above prototype.
NOTE: The code on Tinkercad is different from the code in this repository. This is because Tinkercad supports only one kind of gas sensor which has a different interfacing code.
Testing:
- Go to https://www.tinkercad.com/things/28n51KBNIkE.
- Click on the 'Simulate' button and wait for the program to load.
- To test the working, click on 'Start Simulation'.
- Wait for 20 seconds. Then, click on the sensor. Black gas clouds should be visible somewhere in the test area.
- To experiment with hazardous environment, drag the gas clouds closer to the sensor.
- The source code in this repository is licensed under the Terms of the MIT License.
