SAM-IoT WG Development Board (EV75S95A) Provisioning Tools Package for Windows
Overview
This Windows tools package is required for provisioning a Microchip SAM-IoT WG development board (Part No. EV75S95A) for use with Amazon Web Services (AWS) or Microsoft Azure Device Provisioning Service (DPS). These Cloud services require IoT edge devices to authenticate themselves via TLS client authentication, which means X.509-based signer and client certificates need to be generated and stored in the WINC1510 Wi-Fi network controller on the SAM-IoT WG development board.
NOTE: This tools package will only work for Microchip development board Part No. EV75S95A. Other variants of the SAM-IoT board (designated by different part numbers) will require different provisioning tools corresponding to those other boards.
The Google Cloud Platform (GCP) does not use TLS client authentication (it uses JSON Web Token (JWT) in the MQTT password), so this provisioning tool is not required for use with GCP services.
The following two tasks are required to properly configure & provision the WINC1510 Wi-Fi network controller on the SAM-IoT WG development board:
-
WINC1510 Internal Firmware Upgrade
The WINC1510 internal firmware version must be at least 19.6.5 to support TLS client authentication using X.509 certificates. It is recommended to use the latest firmware version that has been published on the WINC1500 product page. View the contents of the SAM_IoT_WINC_Upgrader folder for the various versions of firmware included in this tools package.
-
Device Certificate Generation and Storage into the WINC1510
The X.509 device certificate (which is uniquely specific to each SAM-IoT development board) needs to be generated and then stored into the WINC1510. The signer certificate needs to be stored into the WINC1510 as well. Both signer and device certificates need to be used by the WINC1510 in order to complete the TLS handshake with the authentication server.
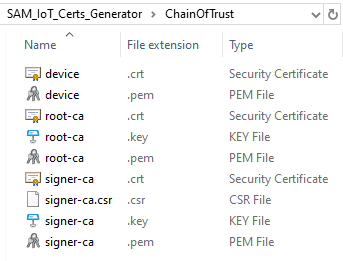
Chain of Trust
By default, this provisioning tool is configured to create a mock chain of trust before generating the device certificate (the ChainOfTrust folder is initially empty so the tool will recognize this). To use specific root and/or signer credentials, those files need to be copied into the ChainOfTrust folder (the exact file names as shown below need to be used in order for the tool to recognize the purpose/contents of each file).

In summary, at the time the provisioning script is launched:
- If the ChainOfTrust folder is empty (the default state before the provisioning script is executed for the first time), the tool will generate a mock chain of trust (root key/certificate, signer key/certificate/CSR)
- If the ChainOfTrust folder is populated, the tool uses that set of files for the Chain of Trust
- Whatever set of Chain of Trust files is used during provisioning will be automatically saved to the ChainOfTrust folder so that the same root and/or signer credentials will be used the next time the tool is invoked (i.e. whenever the provisioning script is launched again)
Examples of Mock Certificates
The following shows a set of mock certificates that the provisioning tool can generate (using a mock chain of trust is only recommended for evaluation purposes):
-
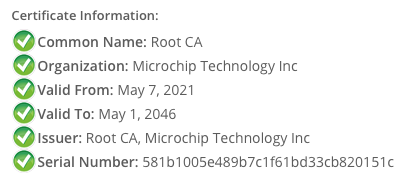
Root certificate issued by "Root CA" to "Root CA"
-
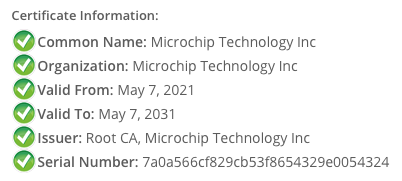
Signer certificate issued by "Root CA" to "Microchip Technology Inc"
-
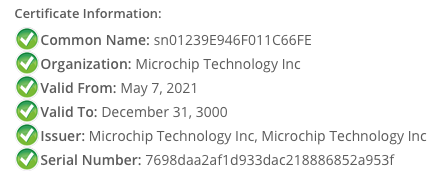
Device certificate issued by "Microchip Technology Inc" to "sn01239E946F011C66FE"


Software Prerequisites
As a prerequisite to using this provisioning tools package, Python is required to be installed in order to run the automated scripts. Even if some version of Python has already been installed previously, it is recommended to update to the latest version.
-
Download the latest Python release
-
Launch the installation setup program and then do the following (do not click
Install Nowjust yet):
-
Check
Add Python <X.Y> to PATHand clickCustomize installation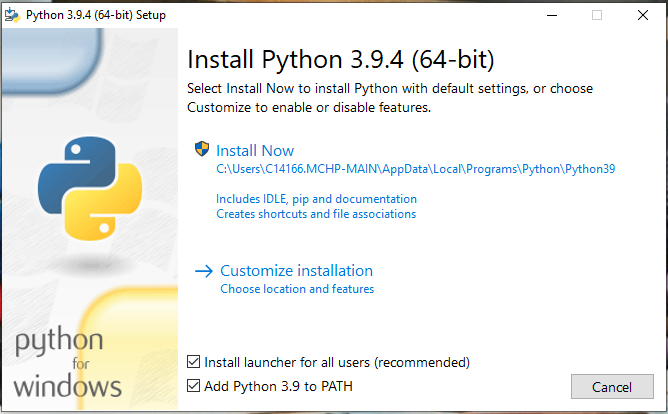
-
Confirm
pip (download and install other Python packages)is checked and clickNextto start the installation process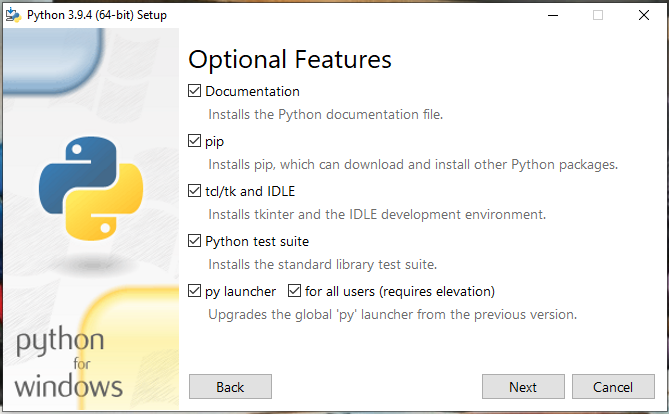


Provisioning Procedure
-
If you have Git installed, clone this tools package onto your local PC by issuing the following command in a
Command PromptorPowerShellwindowgit clone https://github.com/randywu763/sam-iot-provision
Alternatively, you can simply download/extract a ZIP archive file by clicking on the
Codebutton (located at the top of this GitHub page) and then selectingDownload ZIP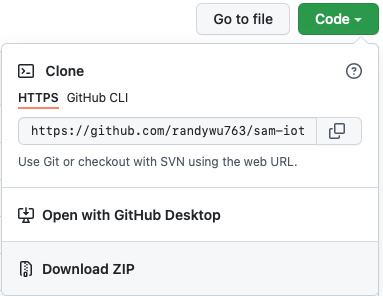
-
Connect the SAM-IoT WG Development Board to the Host PC (must be running Windows) using a standard micro-USB cable
-
Open a File Explorer window and determine the drive
letterthat Windows assigned toCURIOSITY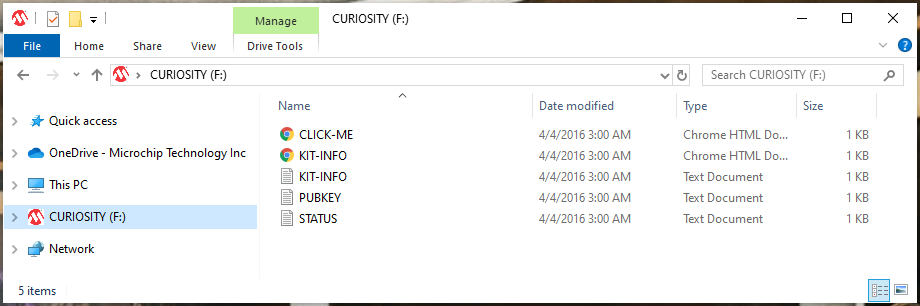
-
Determine the active COM port number for your
Curiosity Virtual COM port. You can find the COM port number by opening the Windows Device Manager > expandPorts(COM & LPT)> take note of the specific(COM<X>)associated with the Curiosity Virtual COM Port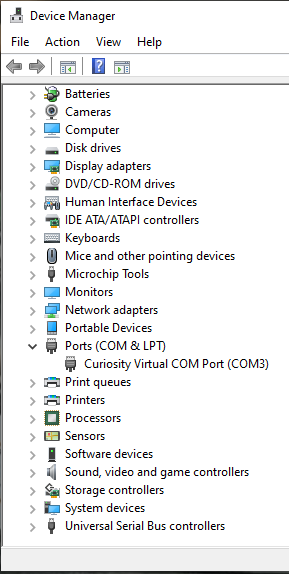
-
Using any text editor of choice, open the
iotprovision.batfile located in your local copy of this tools package -
Locate the following line in the batch file and note that all 4 command line arguments need to be set
CALL sam-iot-provision.bat
[cloud_service] [winc_ver] [com_port] [drive_letter]-
Set the first argument for the desired Cloud service (aws, azure, gcp); for example
CALL sam-iot-provision.bat
azure[winc_ver] [com_port] [drive_letter] -
Set the second argument which determines the target WINC firmware version to be programmed (view the contents of the SAM_IoT_WINC_Upgrader folder for the various versions of firmware available for upgrade); for example
CALL sam-iot-provision.bat azure
19.7.3[com_port] [drive_letter] -
Set the third argument to match the Curiosity Virtual COM port
number; for exampleCALL sam-iot-provision.bat azure 19.7.3
3[drive_letter] -
Set the fourth argument for the
lettercorresponding to the CURIOSITY drive; for exampleCALL sam-iot-provision.bat azure 19.7.3 3
F
-
-
Save the changes to the batch file and exit the text editor
-
Open a command line window (e.g. Command Prompt, PowerShell) and execute
.\iotprovision.batNOTE: The WINC firmware update process can take anywhere from 15 to 30 minutes, so now may be a good time to take a coffee break or work on something else

-
When the provisioning script has completed execution, the files for the security certificates (
*.crt/*.pem), keys (*.key), and signing requests (*.csr) can all be accessed from the ChainOfTrust folder