- The APsystems EZ1 Home Assistant Integration can be used to interact with APsystems EZ1 Microinverters. It provides a convenient way to communicate with the microinverter over your local network allowing you to read and set various device parameters like power status, alarm information, device information, and power limits and use those for automation.
- This Home Assistant Integration is based on our APsystems API library which you can find here: https://github.com/SonnenladenGmbH/APsystems-EZ1-API
This HA integration is published, maintained, and developed by Sonnenladen GmbH. Our collaboration with the APsystems R&D Team has been instrumental in making this API a reality. At Sonnenladen GmbH, we are committed to providing top-notch solar energy solutions and are excited to offer this library to enhance the experience of using APsystems inverters.
For those interested in purchasing APsystems inverters, please visit our German online shop at Sonnenladen. We offer a range of APsystems products, backed by our expertise in solar energy solutions.
- Easy & Fast Setup within Home Assistant
- Get detailed device information
- Retrieve alarm status information (coming soon)
- Fetch output data (power output, energy readings)
- Set and get maximum power limits (30 W up to 800 W)
- Manage device power status
- Calculate combined power output and total energy generated
- Use all of these values for anything within Home Assistant!
- and much more...
- This table includes all micro-inverters we tested and can confirm 100 % compatbility with this HA integration.
| Device | Name | Support / Compatibility | Available to purchase at: |
|---|---|---|---|
 |
APsystems EZ1-M (Firmware: V1.1.6) |
Sonnenladen GmbH - Online Shop IN STOCK | AUF LAGER |
The local API access needs to be activated once in the settings of the EZ1. Please follow our Step-By-Step Guide to do so:
- Step 1: Connect to the inverter using the "Direct Connection" method.
- Step 2: Establish a connection with your inverter.
- Step 3: Select the Settings menu.
- Step 4: Switch to the "Local Mode" section.
- Step 5: Activate local mode and select "Continuous"
- Step 6: Done! Make a note of the IP address for future reference. (To ensure a successful connection to your Wi-Fi network, it's essential to first set up your device using the standard procedure outlined in the APsystems Quickstart Guide. This initial setup is a crucial step before proceeding with any further configurations or usage.)
Please note that this is not a regular HA add-on that can be installed by just searching for it inside the add-on
store.
For this HA-Integration to work, you need to install HACS (Home Assistant Community Store) first.
Please follow our 4-Step guide to successfully get this Integration running:
- After you set up your Home Assistant instance, please follow this 3-minute video on how to install
HACS: How to install HACS within only 3 minutes [YouTube]
- Now that HACS is installed, go to its dashboard and click the three small dots in the upper right corner.
Select
Custom repositoriesand add this URL (Category = Integration)
https://github.com/SonnenladenGmbH/APsystems-EZ1-API-HomeAssistant- After adding our integration you can search for it by
APsystems Local APIusing the search of HACS. Then download and install it. - Before you can configure a new device, you need to restart Home Assistant.
- You have now successfully installed our APsystems HA Integration 🎉🌳
Adding your first APsystems inverter to Home Assistant is straightforward.
- Make sure that the integration is installed and Home Assistant has been restarted.
- Now, go to Setting -> Devices & Services and add a new integration in the bottom-right corner.
- Search for "APsystems Local API" and click on it.
- Add the details of your inverter.
Your IP address should be something like
192.168.1.123. For the name, you can enter any name, as it's purely for distinguishing between different ones if you should have more than one. If the device should be offline during setup, uncheck the box; otherwise we're trying to reach the inverter, which would fail. - Optional: Add to the energy dashboard by navigation to Settings -> Dashboards -> Energy and
add
APsystems Solar Today Productionunder "Solar production"
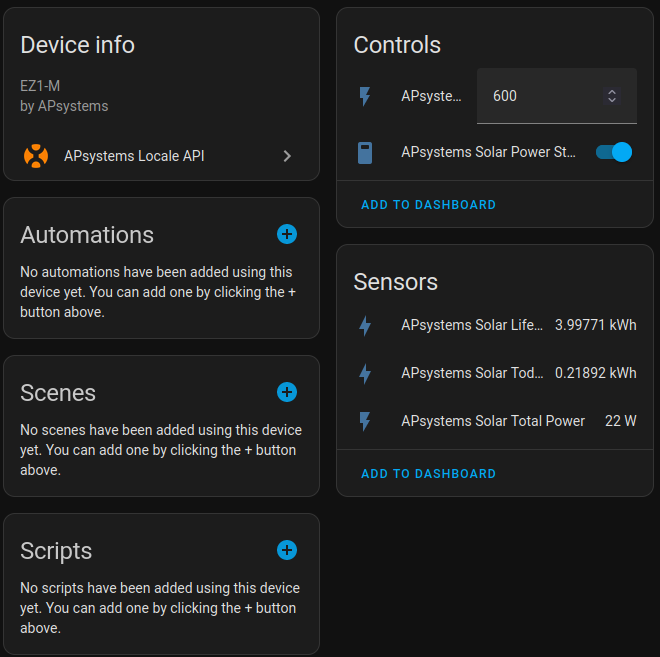
The sensors should be pretty self-explanatory, but the controls maybe aren't.
Max Output Power: Limits the maximal output of the inverter (in watts). It Has to be between 30 and 800.Power Status: Should be switched on. When it's off, the inverter won't output any power into the gird.
If you would like to know the per-panel statistics, consider using HomeAssistant component: attributes to extract the attributes (on all sensors) into its own sensors.
- We highly recommend setting a static IP for the inverter you want to interact with. This can be achieved by accessing your local router, searching for the inverter IP and setting it to "static ip" or similar. A quick Google search will tell you how to do it exactly for your specific router model.
- Everyone is invited to commit changes to this integration. This is considered a community project to realise countless projects that may need very specific new functionality. We're happy to see your ideas ;)
- You're also welcome to request new features to be built natively into the inverters API. We're in close contact with APsystems and happy to add new features in the future.
This project is released under the MIT License.
With help by @mawoka-myblock


