This project is a simulator for ReRam Crossbar devices. It can be compiled using cmake and running on Windows/Linux.
An updated version called XB-Sim-Star can be found at CRAFT-THU/XB-Sim-Star.
When using this software, please use the following citation:
@ARTICLE{8676276,
  author={Liu, He and Han, Jianhui and Zhang, Youhui},
  journal={IEEE Computer Architecture Letters},
  title={A Unified Framework for Training, Mapping and Simulation of ReRAM-Based Convolutional Neural Network Acceleration},
  year={2019},
  volume={18},
  number={1},
  pages={63-66},
  doi={10.1109/LCA.2019.2908374}}
- Install SystemC Library
- For Linux,download the code to local directory and unzip the source code. Step into its directory,
~/systemc-2.3.2e.g. and run following commands:
 # Init build directory
 mkdir build
 cd build
 # using cmake to compile systemc
 cmake ..
 make
- For Linux,download the code to local directory and unzip the source code. Step into its directory,
- (Option)Install Cuda Library
- Follow the instruction step on cuda website.
- Configuration
- Download this repo into your own path.
- For linux,using Cmake to compile the code。This project has already provide CMakeLists.txt, users could change the link libraries according your own needs. Execute following command in shell:
 # Init build directory
 mkdir build
 cd build
 # using cmake to compile
 # default not using GPU
 cmake .. -DCMAKE_BUILD_TYPE=Release
 # or using GPU
 cmake .. -DCMAKE_BUILD_TYPE=Release -DUSE_CUDA=on
 make
 # copy the executable file to upper directory and run
 cp simulator-windows ../
 ./simulator-windows
- The dataset used in this project is the Test part in cifar-10 dataset, 10000 pictures in total. And they are already transformed into 3*1024(32*32) and put into
input. - Labels of Testset is
labels.csvand put under source code directory.
-
Parameter Configuration
- Circuit parameters(
config.h)
DA Reference Voltage AD Reference Voltage DA width AD width Crossbar length Crossbar width Number of Crossbar in each Tile DA_V AD_V DA_WIDTH AD_WIDTH CROSSBAR_L CROSSBAR_W CROSSBAR_N - Neural Network parameters(
config.h)
Kernel size Input data size Channels of picture Size of picture Number of input picture pooling size KERNEL_SIZE INPUT_SIZE(KERNEL_SIZE*KERNEL_SIZE) CHANNELS_3/32/48/80/128 IMAGE_SIZE_32/16/8 PICTURE_NUM POOLING_SIZE_1/2/8 - Circuit parameters(
-
Code Generation of Neural Network Structure
- This project generate codes by pre-defined template module using Python code
cpp_gen.py. The template code of each module is:
conv_cpp.templateconv_buffer_cpp.templatelinear_cpp.templatelinear_buffer_cpp.templateConvolution layer module template Buffer module template between convolution layer Fully connected layer module template Buffer module between fully connected layer The network needed structure list stored in
cpp_gen.pyand users can change this file to generate different NN structure- The code generation command is
execute_processinCMakeLists.txt, and it is influenced by compile option USE_CUDA. Users don't have to run code generation command separately. The generated code will be put intogenerateddirectory.
It will generate the headers of NN structure
stage_conv_*.h,conv_buffer_*.h,stage_linear_*.h,linear_buffer_*.h.
And they will be included inheaders.cpp, usingsc_signalto connect layers inmain.cpp. - This project generate codes by pre-defined template module using Python code
- Accuracy
- AD/DA module included:83.5%
- with noise:82.4%
- Using VGG network to classify CIFAR-10 dataset
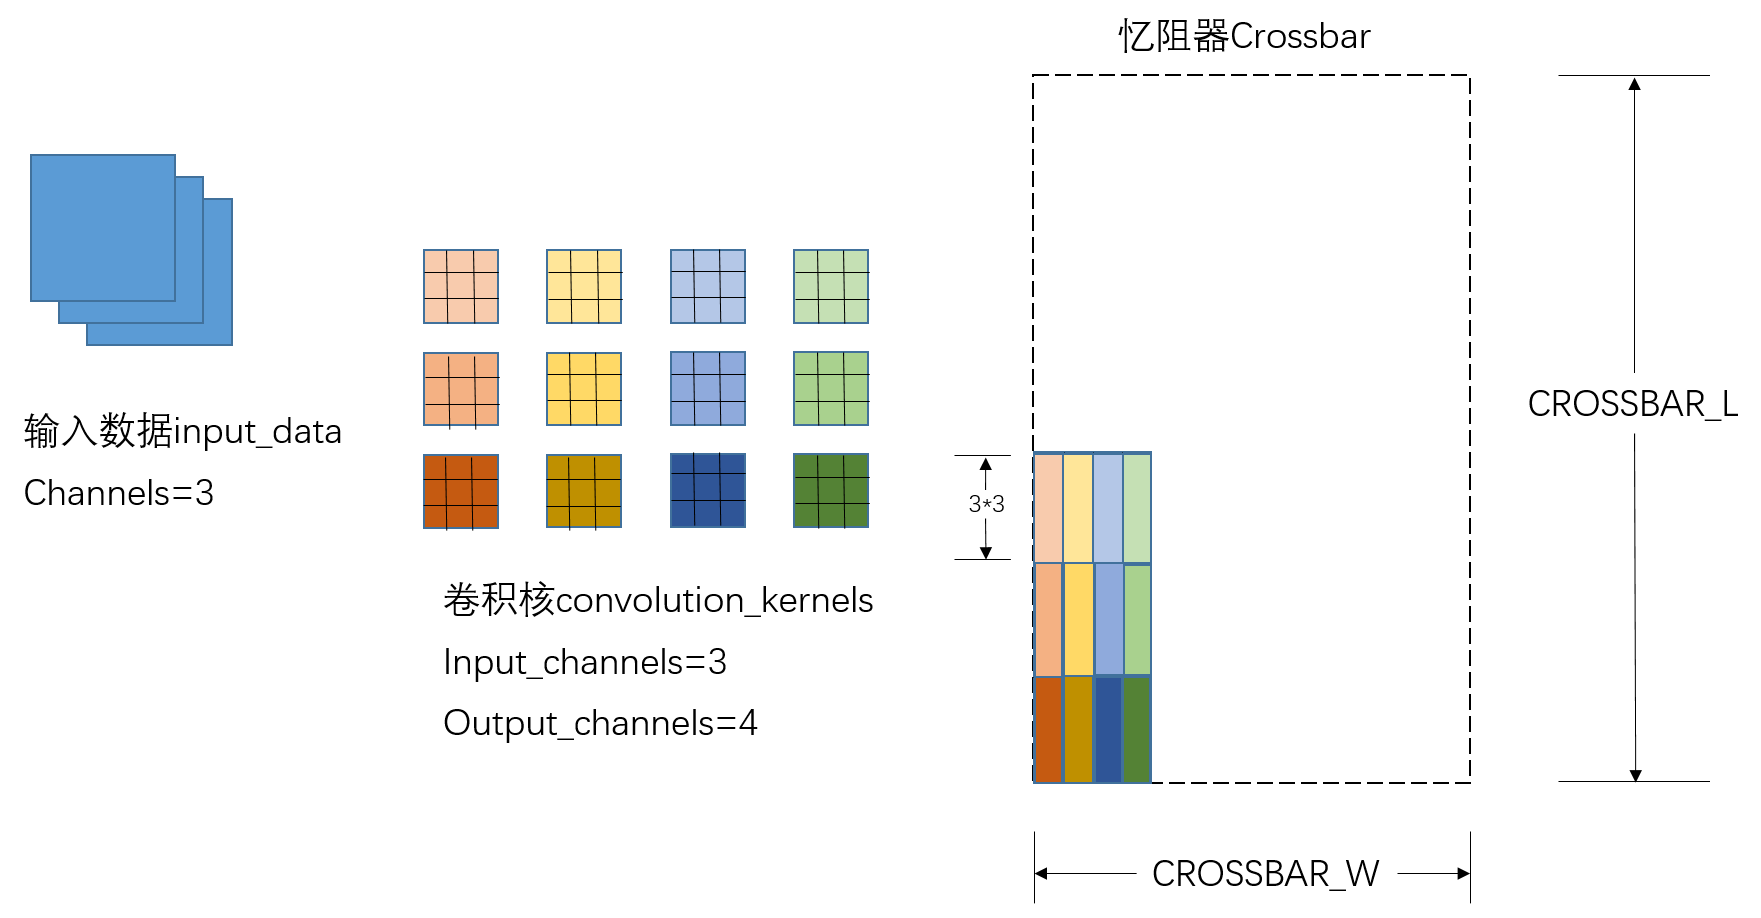
- This project generated a VGG network by default, it contains 15 convolution layers and 2 fully connected layers, all of the weights (high dimension convolution kernel) have been transformed into 2-D matrix in
CROSSBAR_L*CROSSBAR_Wfor hte computation of ReRam Crossbar. - All weight matrices has been transformed before and stored in
weights. The weight conversion just like the following figure:
- This project generated a VGG network by default, it contains 15 convolution layers and 2 fully connected layers, all of the weights (high dimension convolution kernel) have been transformed into 2-D matrix in
- Support module replication
- Multi Crossbars in each Tile
本项目是面向Crossbar器件的模拟器,支持Visual Studio和cmake编译,可运行在Windows和Linux(Mac)下。
- 安装SystemC库
- 对于Windows用户,将systemc代码下载到本地之后,解压缩代码包。进入systemc文件夹,如
E:\systemc-2.3.2\msvc10\SystemC中,用VS打开SystemC.vcxproj。对打开的项目分别用Debug模式和Release模式编译。 - 对于Linux/Mac用户,将代码下载到本地之后,解压缩代码包。进入systemc文件夹,如
~/systemc-2.3.2中,执行如下语句:
 # 创建build文件夹
 mkdir build
 cd build
 # 使用cmake对systemc编译
 cmake ..
 make
- 对于Windows用户,将systemc代码下载到本地之后,解压缩代码包。进入systemc文件夹,如
- (可选)安装Cuda库
- 可参照cuda官网的的安装教程进行安装。
- 配置工程文件
- 对于Windows用户,使用Visual Studio进行开发,可根据本项目中提供的Visual Studio的配置文件进行配置。注意,如下配置须自行修改:
(Debug和Release模式) 项目属性→C/C++→常规→附加包含目录→(SystemC库代码所在目录,如E:\systemc-2.3.2\src)
(Debug模式) 项目属性→链接器→常规→附加库目录→(Debug库所在目录,如E:\systemc-2.3.2\msvc10\SystemC\Debug)
(Release模式) 项目属性→链接器→常规→附加库目录→(Release库所在目录,如E:\systemc-2.3.2\msvc10\SystemC\Release) - 对于Linux/Mac用户,使用Cmake进行代码编译。本项目已提供CMakeLists.txt文件,可根据需要自行修改链接库的路径。编译代码时需执行如下语句:
 # 创建build文件夹
 mkdir build
 cd build
 # 使用cmake对systemc编译
 # 默认不使用GPU进行计算
 cmake .. -DCMAKE_BUILD_TYPE=Release
 # 或者使用GPU计算
 cmake .. -DCMAKE_BUILD_TYPE=Release -DUSE_CUDA=on
 make
 # 将可执行文件拷贝到外层文件夹并执行
 cp simulator-windows ../
 ./simulator-windows
- 对于Windows用户,使用Visual Studio进行开发,可根据本项目中提供的Visual Studio的配置文件进行配置。注意,如下配置须自行修改:
- 本项目所用测试数据为cifar-10数据集的测试部分,总计10000张图片,已经将输入数据转换为3*1024(32*32),并且放入
input文件夹下。 - 测试集标签为
labels.csv文件,放在项目源代码目录下。
-
参数配置
- 电路相关参数(
config.h)
DA参考电压 AD参考电压 DA宽度 AD宽度 Crossbar长度 Crossbar宽度 每个Tile中Crossbar个数 DA_V AD_V DA_WIDTH AD_WIDTH CROSSBAR_L CROSSBAR_W CROSSBAR_N - 网络模型相关参数(
config.h)
卷积核大小 输入数据大小 图像通道数 图像尺寸 输入图片数目 池化大小 KERNEL_SIZE INPUT_SIZE(KERNEL_SIZE*KERNEL_SIZE) CHANNELS_3/32/48/80/128 IMAGE_SIZE_32/16/8 PICTURE_NUM POOLING_SIZE_1/2/8 - 电路相关参数(
-
网络结构代码生成
- 本项目使用Python代码
cpp_gen.py,根据预先写好的模块模板来生成代码。各模块的模板文件为如下:
conv_cpp.templateconv_buffer_cpp.templatelinear_cpp.templatelinear_buffer_cpp.template卷积层模块模板 卷积层间Buffer模块模板 全连接层模块模板 全连接层间Buffer模块模板 在
cpp_gen.py文件中,存放了所需网络的结构列表,可通过修改该文件来生成不同的网络结构。- 代码生成语句为
CMakeLists.txt文件中的execute_process指令,受编译选项USE_CUDA影响,不需要单独执行代码生成指令。生成的代码将放入generated文件夹下。
可以生成所需的网络结构头文件
stage_conv_*.h,conv_buffer_*.h,stage_linear_*.h,linear_buffer_*.h.
在headers.cpp文件中包含以上生成的头文件,并且根据各层之间的连接关系,在main.cpp文件中通过sc_signal进行串联。 - 本项目使用Python代码
- 准确率
- 包括AD/DA模块:83.5%
- 加入噪音:82.4%
- 使用VGG-16网络对CIFAR-10数据进行分类
- 支持模块复用
- 每个Tile中多个Crossbar的完善