mimicbot-tiktok.mp4
Mimicbot enables the effortless yet modular creation of an AI chat bot model that imitates another person's manner of speech. For example, if mimicbot were based on Shakespeare, mimicbot will adjust its responses to elizabethan english. It offers a a general pipeline for creating a mimicbot from scratch provided data on the user to mimic, and another pipeline that runs entirely on Discord without the need for external data. The pipeline consists multiple other commands that are also available for modular use.
You can now create a mimicbot independent of the discord platform.
Type python -m mimicbot_cli --help to see a list of commands. Similarly you can use python -m mimicbot_cli <A_MIMICBOT_COMMAND> --help to see details on a specific command.
- Python 3.x (verify with
python --versionorpython3 --versionorpy --version)- Download from the official Python website
- git-lfs (verify with
git lfs --version)- Install with
git lfs installor follow the official git lfs installation guide.
- Install with
- pip (verify with
pip --version)- Install with
py get-pip.pyor follow the official pip installation guide.
- Install with
If you run into any issues, you dont know how to deal with. Utilize the mimicbot Dockerfile to spin up a functional environment.
- Run
pip install mimicbot-cli. - Run the command
python -m mimicbot_cli forge. This command will guide you through the creation of the bot from start to finish. - Opt to build a Discord bot.
- Once the mimicbot is activated on discord, you can interact with it by simply sending it a message as you would to the person it is imitating, with a
@<NAME_OF_MIMICBOT>mention somewhere in the text. The mimicbot will then reply with a message similar to how the original user would have said it.
- Clone the repository
git clone https://github.com/CakeCrusher/mimicbot.git - Navigate into the cloned directory
cd mimicbot - Install the dependencies
pip install -r requirements.txt. If you have CUDA installed usepip install -r requirements-gpu.txtinstead. (WARNING: the dependencies will consume a lot of space. If you have an environment with pytorch already installed it is advisable that you use that environment.) - Run the command
python -m mimicbot_cli forge. This command will guide you through the creation of the bot from start to finish. - Once the mimicbot is activated on discord, you can interact with it by simply sending it a message as you would to the person it is imitating, with a
@<NAME_OF_MIMICBOT>mention somewhere in the text. The mimicbot will then reply with a message similar to how the original user would have said it.
Although technically you could deploy your bot to any server using this repository it is not recommended primarily because of the heavy dependencies. Consequently, the mimicbot-deploy repository was built for ease of deployment. Follow the steps listed in its README to deploy your bot.
If you are still interested in deploying with this repository you can do so by either running forge on the server or passing the configuration files and data files to the appropriate paths on the server and then running activate.
(Feel free to contribute)
- Incorporate github actions to run the pytest tests.
- Enable bots to mention users in the channel.
- More error handling.
- Linux support.
- Add linting.
- github action.
- Use DiscordChatExporter cli as the primary source of mining data to be able to capture dm data in addition to guild data. It also does not require admin access for guilds. The only catch is its security is yet to be determined.
- Embed training settings into the CLI command
- More flexible with inputs
- Target user input
- Guild channel names
- Make sure the bot learns as it is being used.
- Create a public server for running through the pipeline and adding deploying the bot. Will work by simply downloading the bot and commanding it to copy a user, then wait a couple minutes and BAM! It's mimicing.
- Add testing
-
activatecommand unit tests -
traincommand unit tests - End to end tests
-
Quick guides to clear up the more confusing parts to getting up and running with mimicbot.
If you are running mimicbot_cli forge on the CLI make sure to complete this guide before submitting the API key.
- Create a discord developer account and log in.
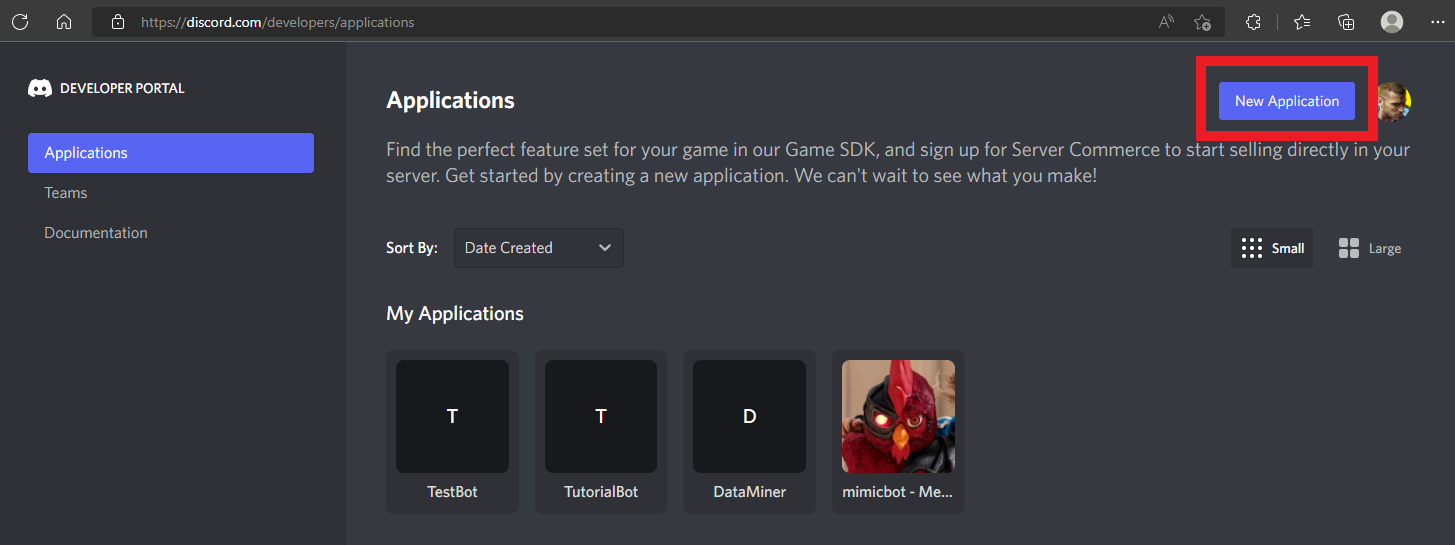
- Create a discord application in applications page of the developer portal.
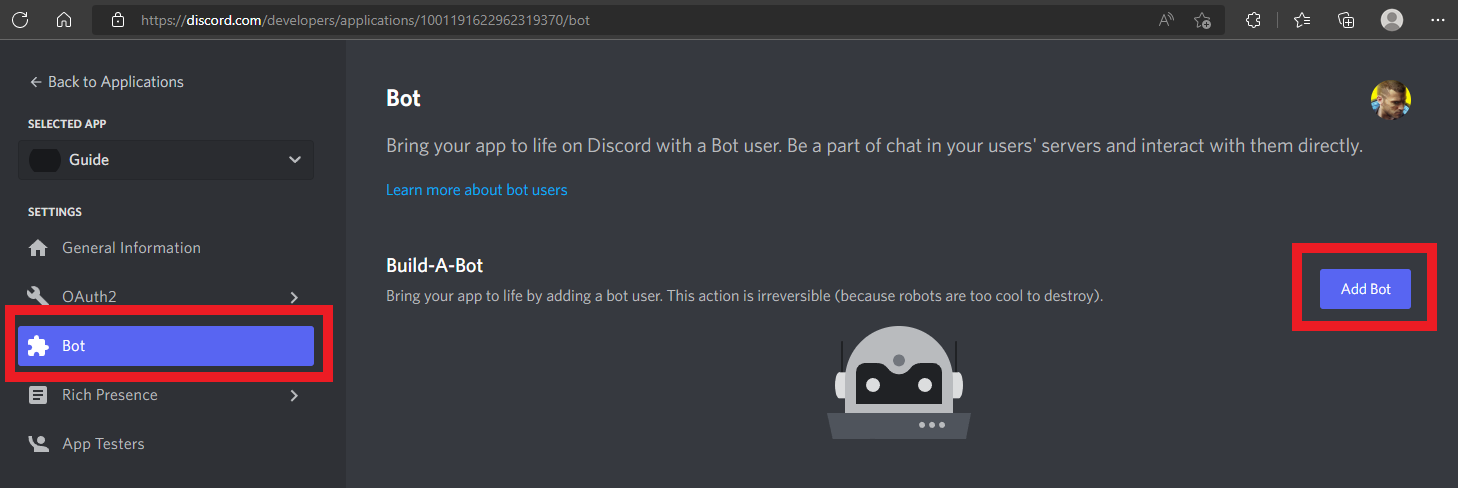
- Add a bot to the application in the bot settings inside your application.
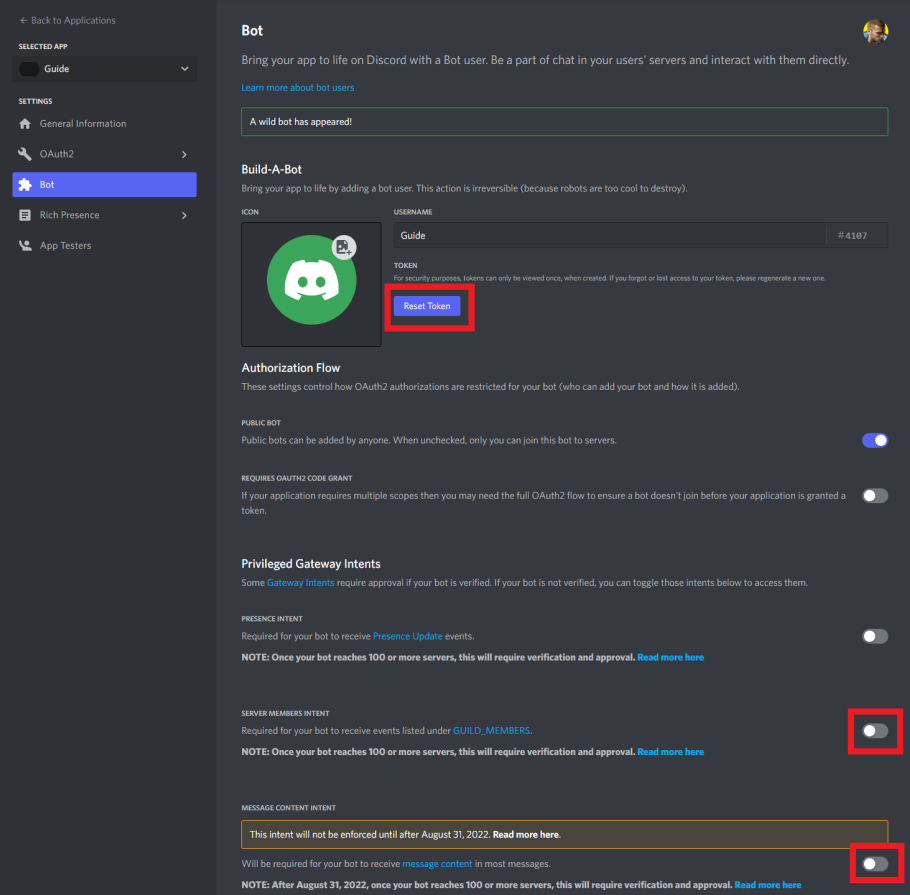
- Click on the reset token button which will then prompt you to copy the token, this is the token you will provide to mimicbot. Then activate the "server members intent" and the "message content intent".
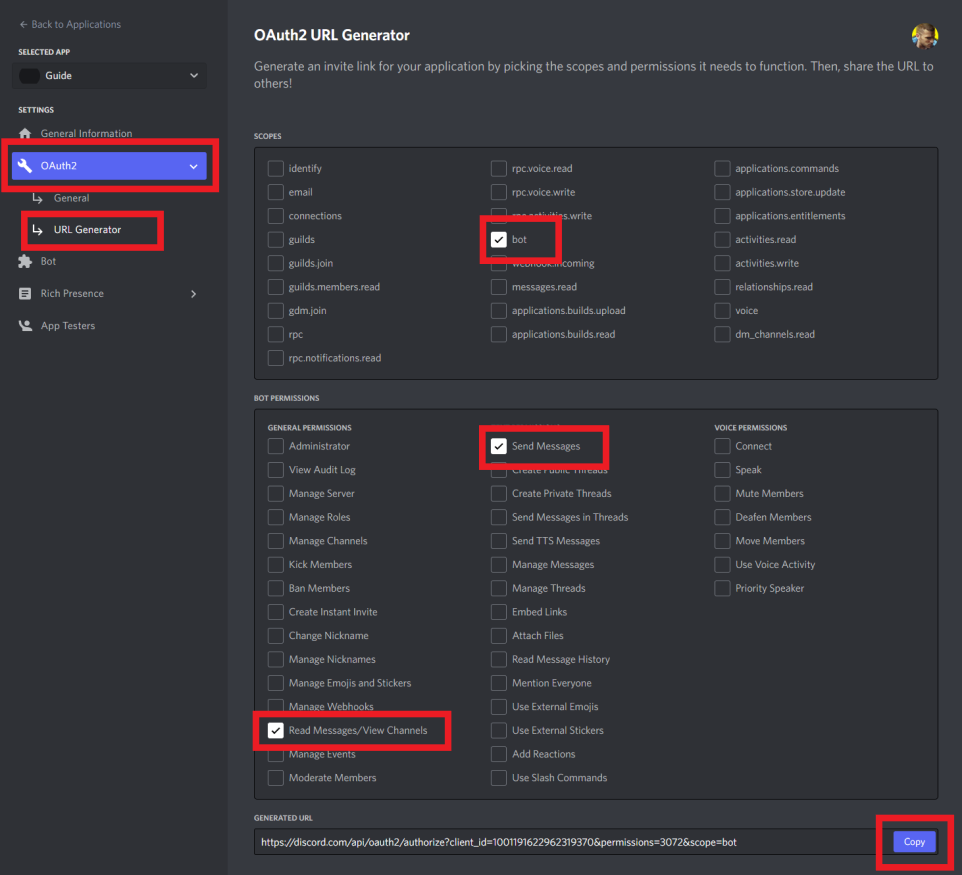
- Navigate to OAuth2 > URL Generator then check "bot" as the scope. Then check the "Read Messages/View Channels" general permission and "Send Messages" text permission. Finally, once all of those are checked copy the Generated URL.
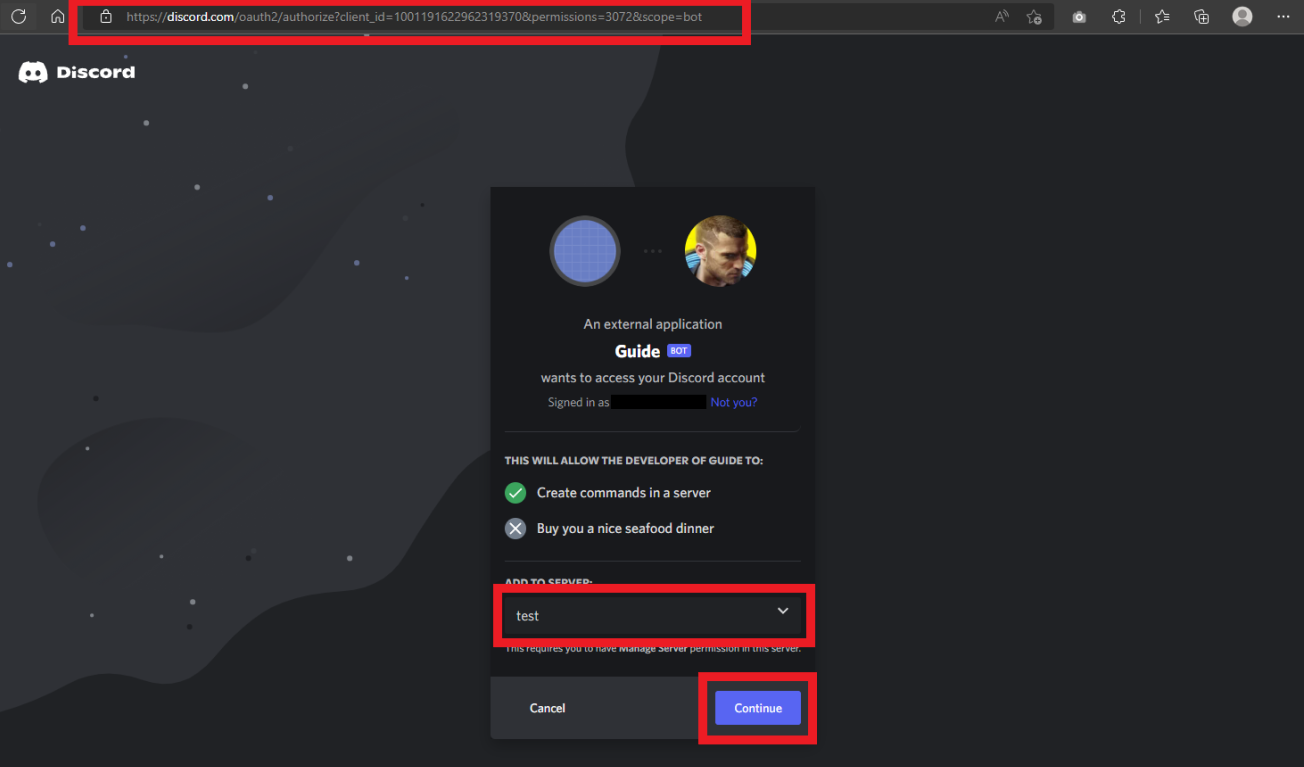
- (You must be signed into your discord account on the browser) Simply navigate to the URL you copied, then select the server (you must have admin privileges) where you want to both: mine data and activate the bot. Click create.
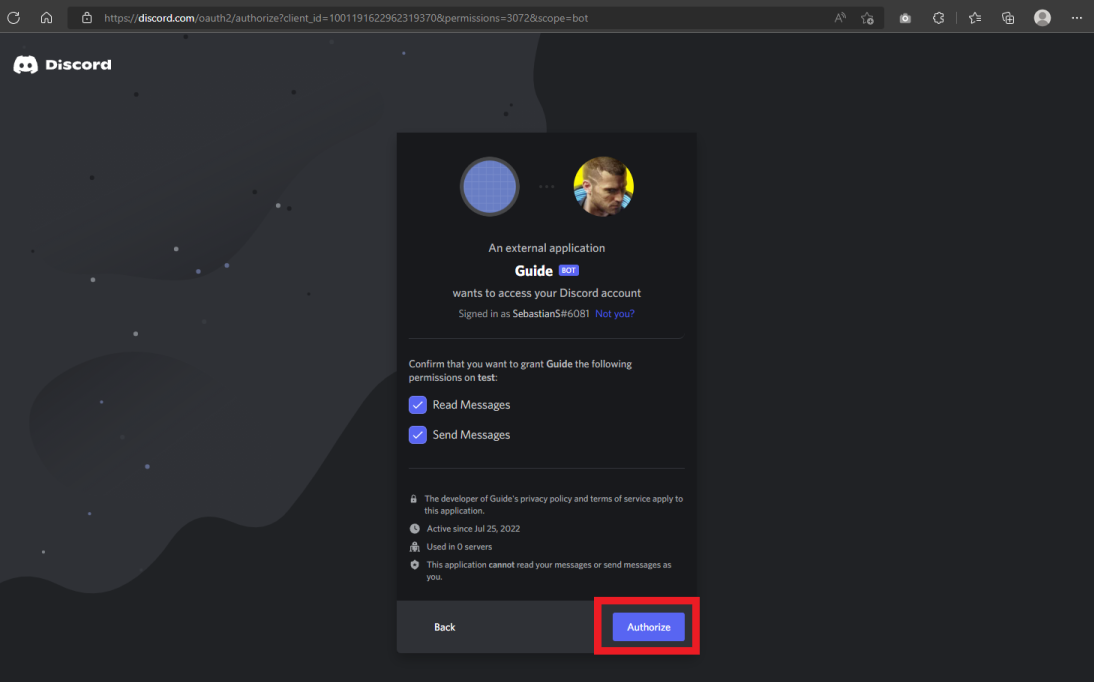
- Click authorize, click through Captcha, and you're done! Your discord bot is be ready to go!
- If you are running
mimicbot_cli forgemake sure to return to the CLI, enter your Discord API token and continue on the CLI.
If you are running mimicbot_cli forge on the CLI make sure to complete this guide before moving submitting the API key.
- Create a huggingface account and log in.
- Navigate to your settings.
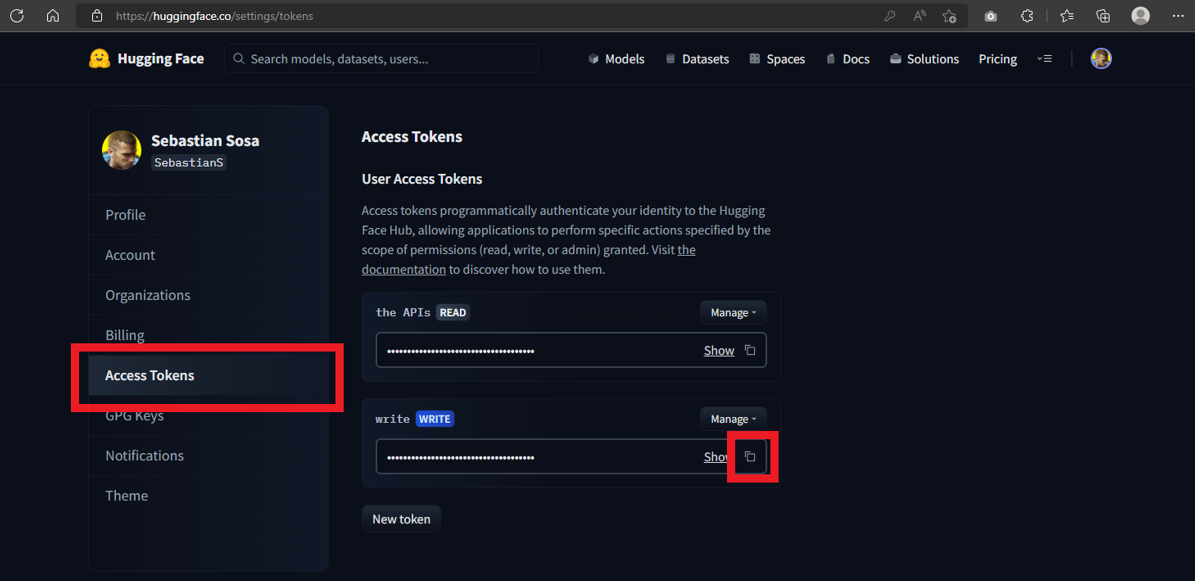
- Click on the "Access Tokens" tab, then create a "New Token". Then label it, select its "Role" as "write", and press "Generate a token".
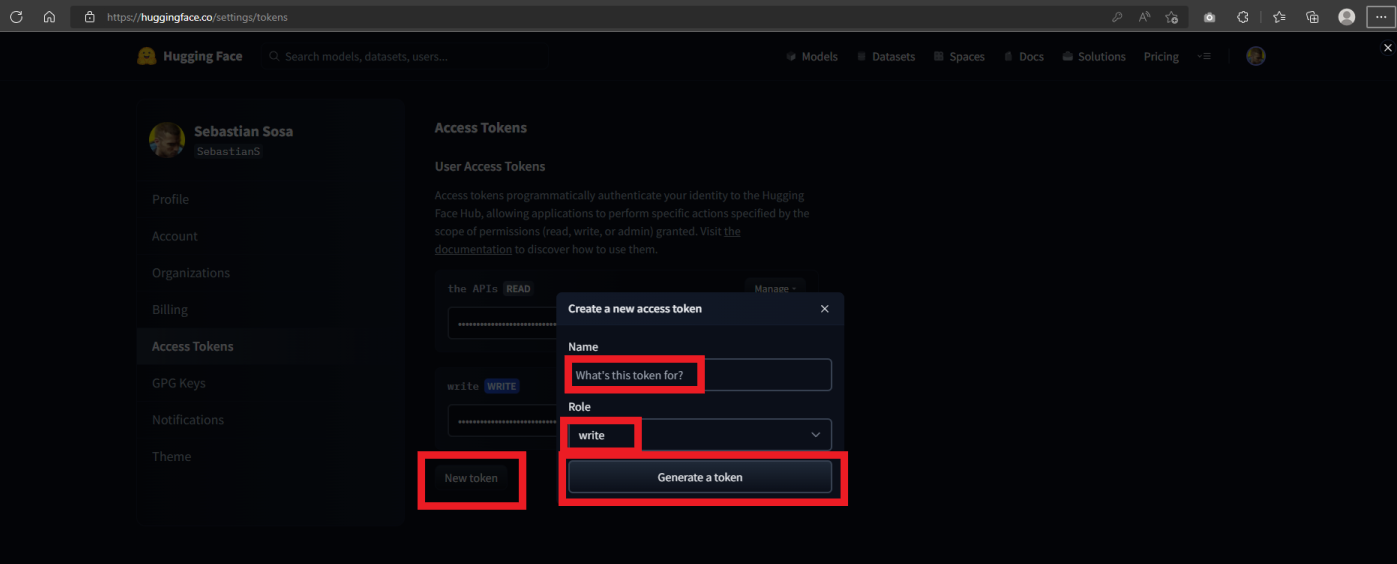
- Copy the "write" token, this is the token you will provide to mimicbot.
- If you are running
mimicbot_cli forgemake sure to return to the CLI, enter your Huggingface API token and continue on the CLI.
- Verify you have docker installed and running by using
docker ps. You may install it from their official installation page. - Create a new docker image by running
docker build -t mimicbot .. - Run the docker image with
docker run -it --name <ANY_NAME> mimicbot /bin/bash. - You are now ready to start using mimicbot's CLI.
- You may return to the same container by running
docker start -ai <ANY_NAME>
Errors may occur here are common ones with solutions.
- Visit this colab notebook.
- Copy all files in your
/DATA_PATH/colabinto the root directory of the notebook. (If you don't know what yourDATA_PATHis, enter the following command in a terminal:python -m mimicbot_cli config. Then find the line that with the textdata_path = ...yourDATA_PATHis listed there.)
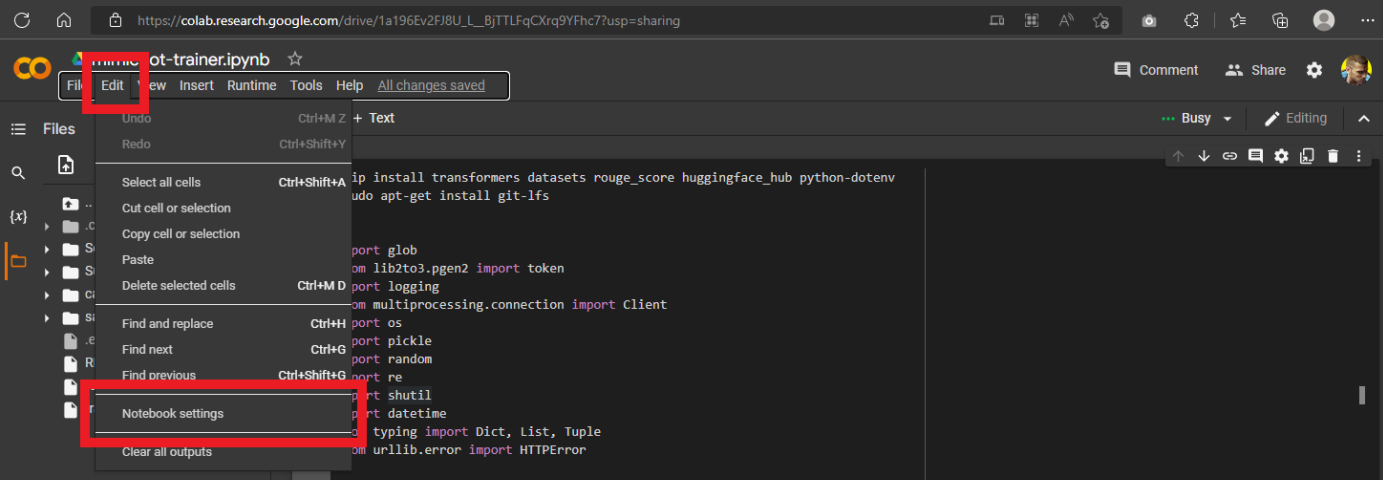
- Click on the "Edit" tab and then click on the "Notebook settings". Select "GPU" for Hardware accelerator, and finally click "Save".

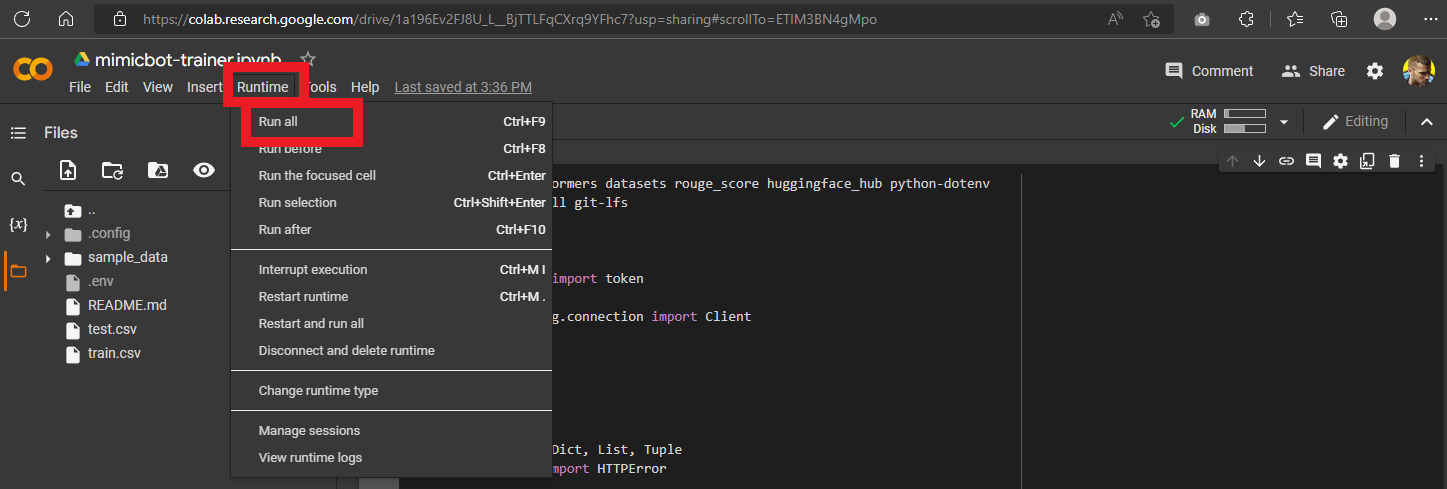
- Click on the "Runtime" tab, then click "Run all".
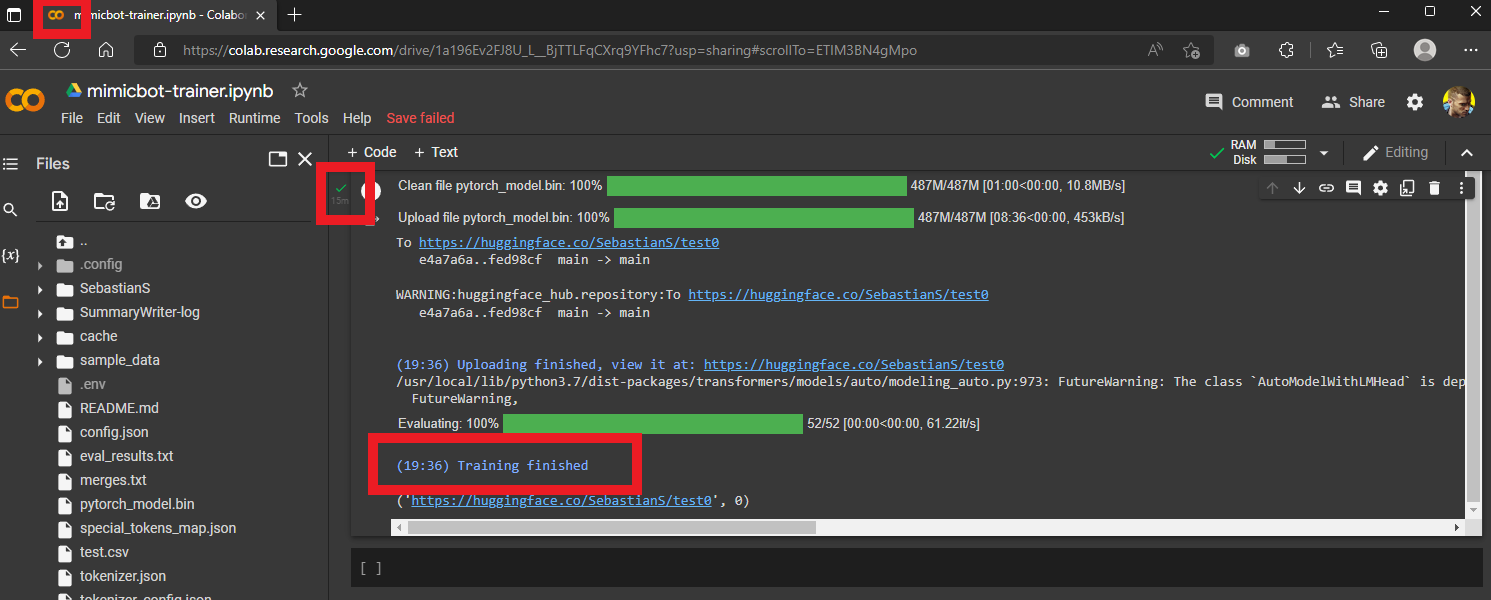
- Wait for the script to finish. You will know it is done with the following indicators: 1. The favicon is yellow, 2. There is a green checkmark next to the cell, and 3. Scroll all the way down to the bottom of the output and you should see a timestamped message saying "Training finished".
