This project serves as a shell for WCH demo applications. Initially it is an empty project, but it can be extended by adding NPM modules.
In this section we discuss how to add UI components to this shell using the browser, only.
- Make sure to have access to a WCH Tenant. You can subscribe for a free trial if you don't have any, yet.
- After subscribing you will you have access to an API URL, your username and your password. You will need this information triplet later on.
- Register for a GitHub account. You will need this to manage your version of the application.
- Register for a Travis CI account. You will beed this to trigger the build and deployment step.
The goal of this step is to create you custom version of the application in your GitHub repository. This will serve as the baseline for all future customizations. The following steps need to be executed only once per application.
- Sign in to GitHub.
- Locate this project by searching for DX-Samples/sample-wch-spa.
- Click on the Fork button in the upper right region of the page and select a target organization (if asked for).
Replace <YOUR_WCH_API_URL> with the API URL. Make sure to keep the quotation marks. If either the value contains a quotation mark, you need to escape it as \".
{
  "x-ibm-dx-tenant-base-url": "<YOUR_WCH_API_URL>"
}
For example, for the API URL https://my13.digitalexperience.ibm.com/api/d1b9fd9b-402a-4cd0-9d60-c2d8e18db4d0 the file looks like:
{
  "x-ibm-dx-tenant-base-url":
    "https://my13.digitalexperience.ibm.com/api/d1b9fd9b-402a-4cd0-9d60-c2d8e18db4d0"
}The goal of this step is to deploy your application to your WCH Tenant. We will make use of Travis CI to execute this deployment automatically, whenever you add new UI components. The following steps need to be executed only once per application.
- Sign in to Travis CI.
- Accept the GitHub access permissions confirmation.
- If this is the first time you are using Travis CI it will take a moment to synchronize your GitHub repositories. You can also force this sync by clicking the
Sync Accountbutton. - The UI displays a list of your repositories. Check the one that you have created in the previous step.
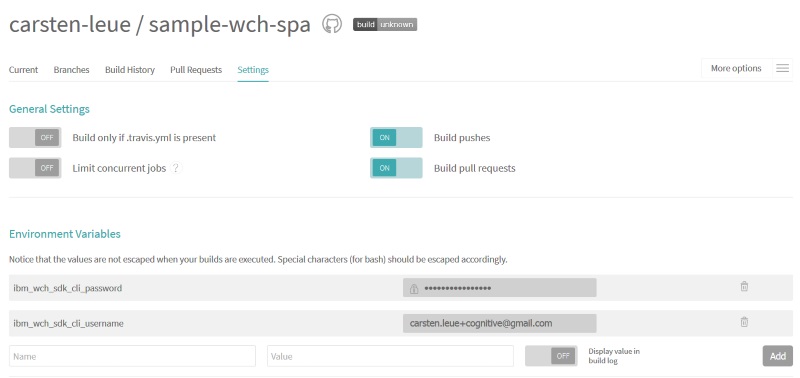
- Click on the project name to enter setting. Locate the
Environment Variablessection. - Register your deployment credentials as environment variables. Enter both name and value, decide whether or not the property should be logged, then click on
Add.ibm_wch_sdk_cli_usernameyour WCH username. This property can be visible.ibm_wch_sdk_cli_passwordyour WCH password. This property should be hidden.
Whenever you modify your application in GitHub, the commit of these modifications will trigger a deployment. We will trigger the first deployment by configuring the application to use the correct WCH Tenant.
- Navigate to the GitHub page of your forked application (make sure it's the forked application and not the original sample).
- Navigate to the
datafolder and click the file.wchtoolsoptions.json. - Use the pencil icon to edit this file and replace the
usernamewith your WCH username and thex-ibm-dx-tenant-base-urlwith your API URL. - Save your changes by hitting the
Commit Changesbutton.
This will trigger the build and deployment process and can take a moment or two. You can monitor the process by navigating to your Travis CI project on the Build History tab. Notice that the first time build will take longer than subsequent builds due to caching effects.
After a successful build you can access your application using the Live URL for your tenant.
After the first time deployment your application will just be the blank page, since we have not added any UI to the shell.
In order to display information in your application you need content and UI components that visualize the content. In this step we will add the UI components.
We assume that a developer has already designed and coded these components and that they are available as an npm module. In this section we will focus on how to add the components to your application using the creative-bootstrap-components components as an example. In general refer to the documentation of your component library for further instructions.
- Identify the name of the npm UI module you would like to add. In our example this is creative-bootstrap-components. In some cases you might want to use a specific version of that module, let's use
^6.0.0for our sample component. - We will also deploy demo content as an example. For a non-demo site you don't want to do this and have your business users add the content. But for the demo case it's more convenient. Let's use creative-bootstrap-content as the module that hosts the demo assets.
- Navigate to the GitHub page of your forked application (make sure it's the forked application and not the original sample).
- Click the file
package.jsonand use the pencil icon to edit this file. - Append the new modules to the
dependenciessection:
  "dependencies": {

    "@dx-samples/creative-bootstrap-components": "^6.0.0",
    "@dx-samples/creative-bootstrap-content": "^6.0.0"
  }
Notice the key/value format of the new entry and make sure to append the new entry with a comma , after the previous entry.
- Save your changes by hitting the
Commit Changesbutton. - Click the file
/src/app/app.module.tsand use the pencil icon to edit this file. - Make the following modification:
- add the
import { WchNgBootstrapComponentsModule } from '@dx-samples/creative-bootstrap-components';import statement. - add the imported
WchNgBootstrapComponentsModuleto the import section of the application.
- add the
- Save your changes by hitting the
Commit Changesbutton.
import { WchNgModule } from '@ibm-wch-sdk/ng';
import { environment } from '../environments/environment';
import { BrowserModule } from '@angular/platform-browser';
import { NgModule } from '@angular/core';

import { AppRoutingModule } from './app-routing.module';

import { AppComponent } from './app.component';

// modification start
import { BrowserAnimationsModule } from '@angular/platform-browser/animations';
import { WchNgEditModule } from '@ibm-wch-sdk/ng-edit';
import { WchNgBootstrapComponentsModule } from '@dx-samples/creative-bootstrap-components';
// modification end

@NgModule({
  declarations: [AppComponent],
  imports: [
    BrowserModule,
    AppRoutingModule,

    // modification start
    BrowserAnimationsModule,
    WchNgBootstrapComponentsModule,
    WchNgEditModule.forRoot(),
    // modification end

    WchNgModule.forRoot(environment)
  ],
  providers: []
  bootstrap: [AppComponent]
})
export class AppModule {}
After the Travis CI build step completes, the new UI components will be available to your application (takes about 4mn).
The process so far added UI components to the single page application running on top of WCH, including the installation of the type definitions used by these components. However there is no out-of-the-box demo content installed, so the application would still show an empty page. In order to add demo content you can:
- Install predefined demo content from yet another module (TBD).
- Create your own content using the WCH Authoring UI.
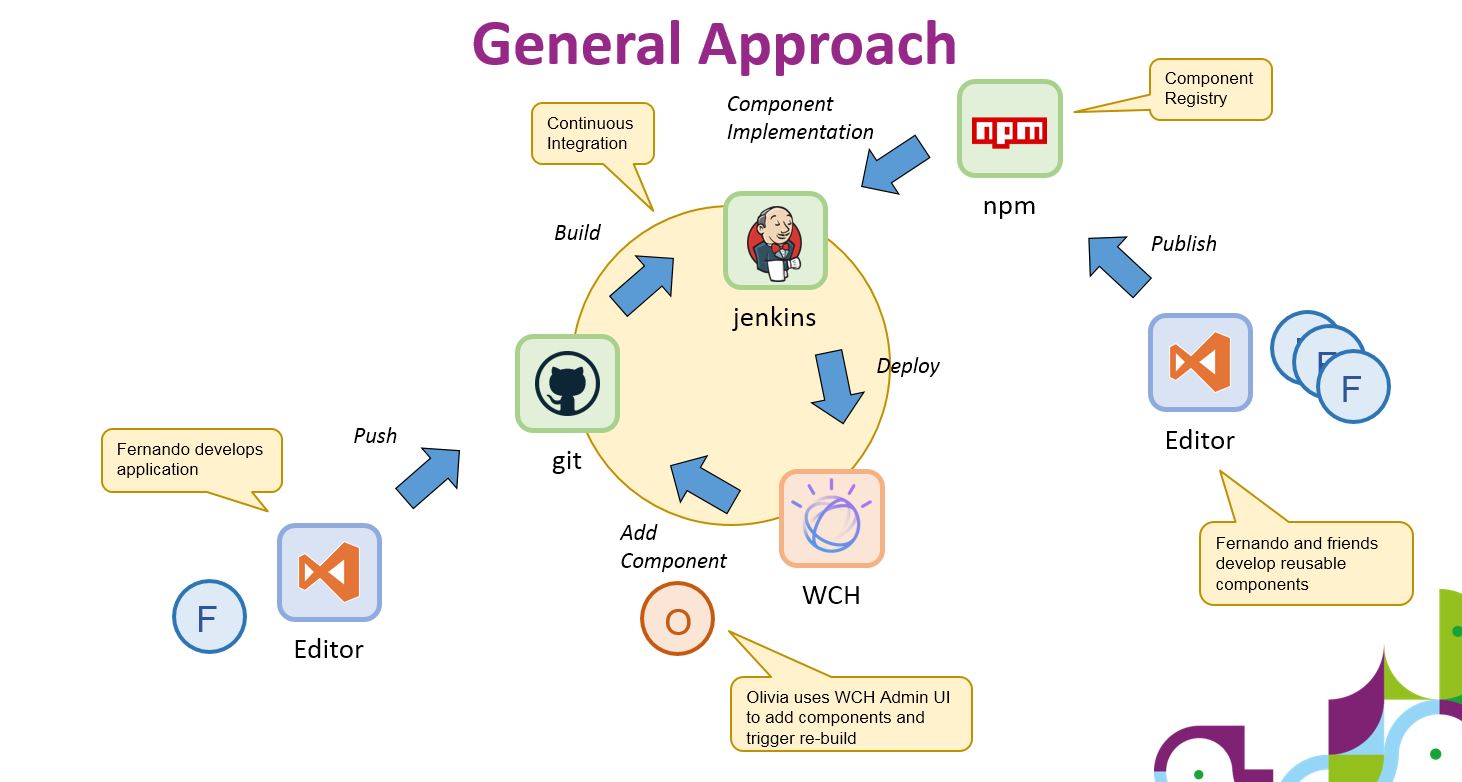
The following chart gives an overview of the intended development and deployment process.


