iOS 12 & Swift - The Complete iOS App Development Bootcamp
- Resolution
- Segues
- Navigation Controller
- Protocol and Delegate
- View
- Create Classes and Objects from Scratch
- Useful tools
- Sideloading
- CocoaPods
- Carthage
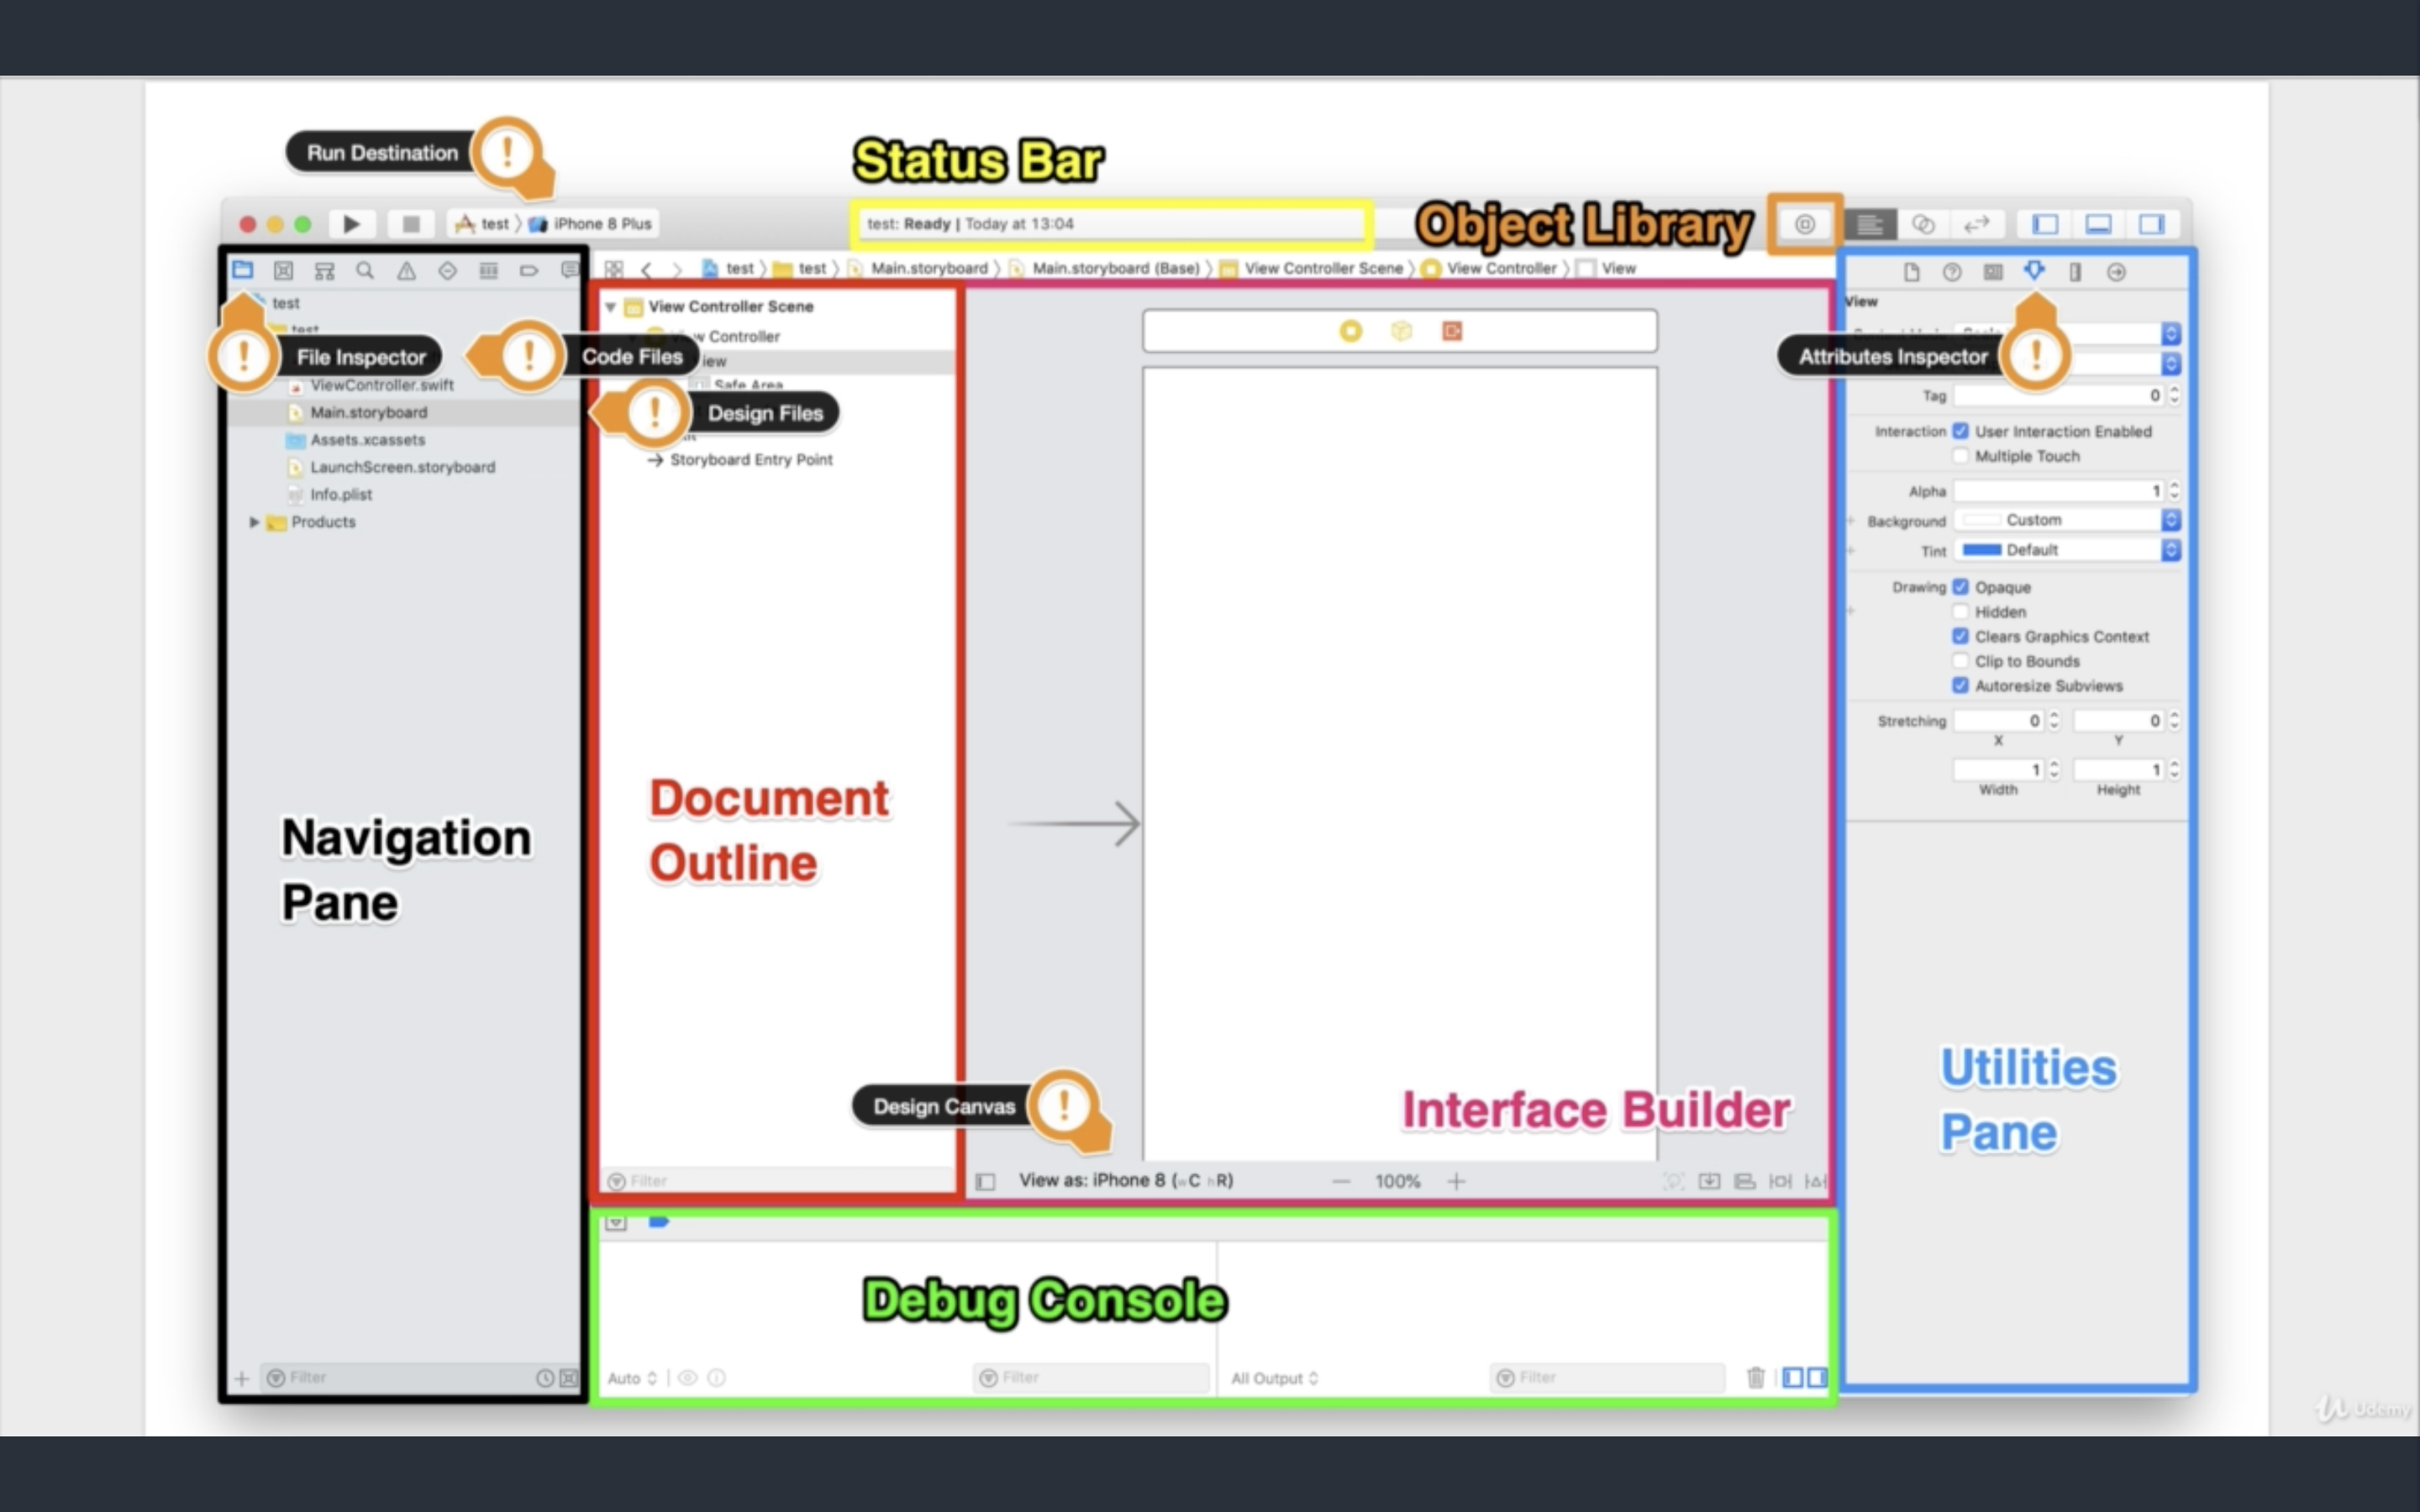
- The anatomy of an app
- Coding Style
- Delegation
- Applications
- Tips
- 6 ways to persistent Local Data Storage
- Databases
- Network Connection
- Machine Learning
- Explore more app services
- App distribution
- More useful resources
- Command Game
- Swift
- Reference
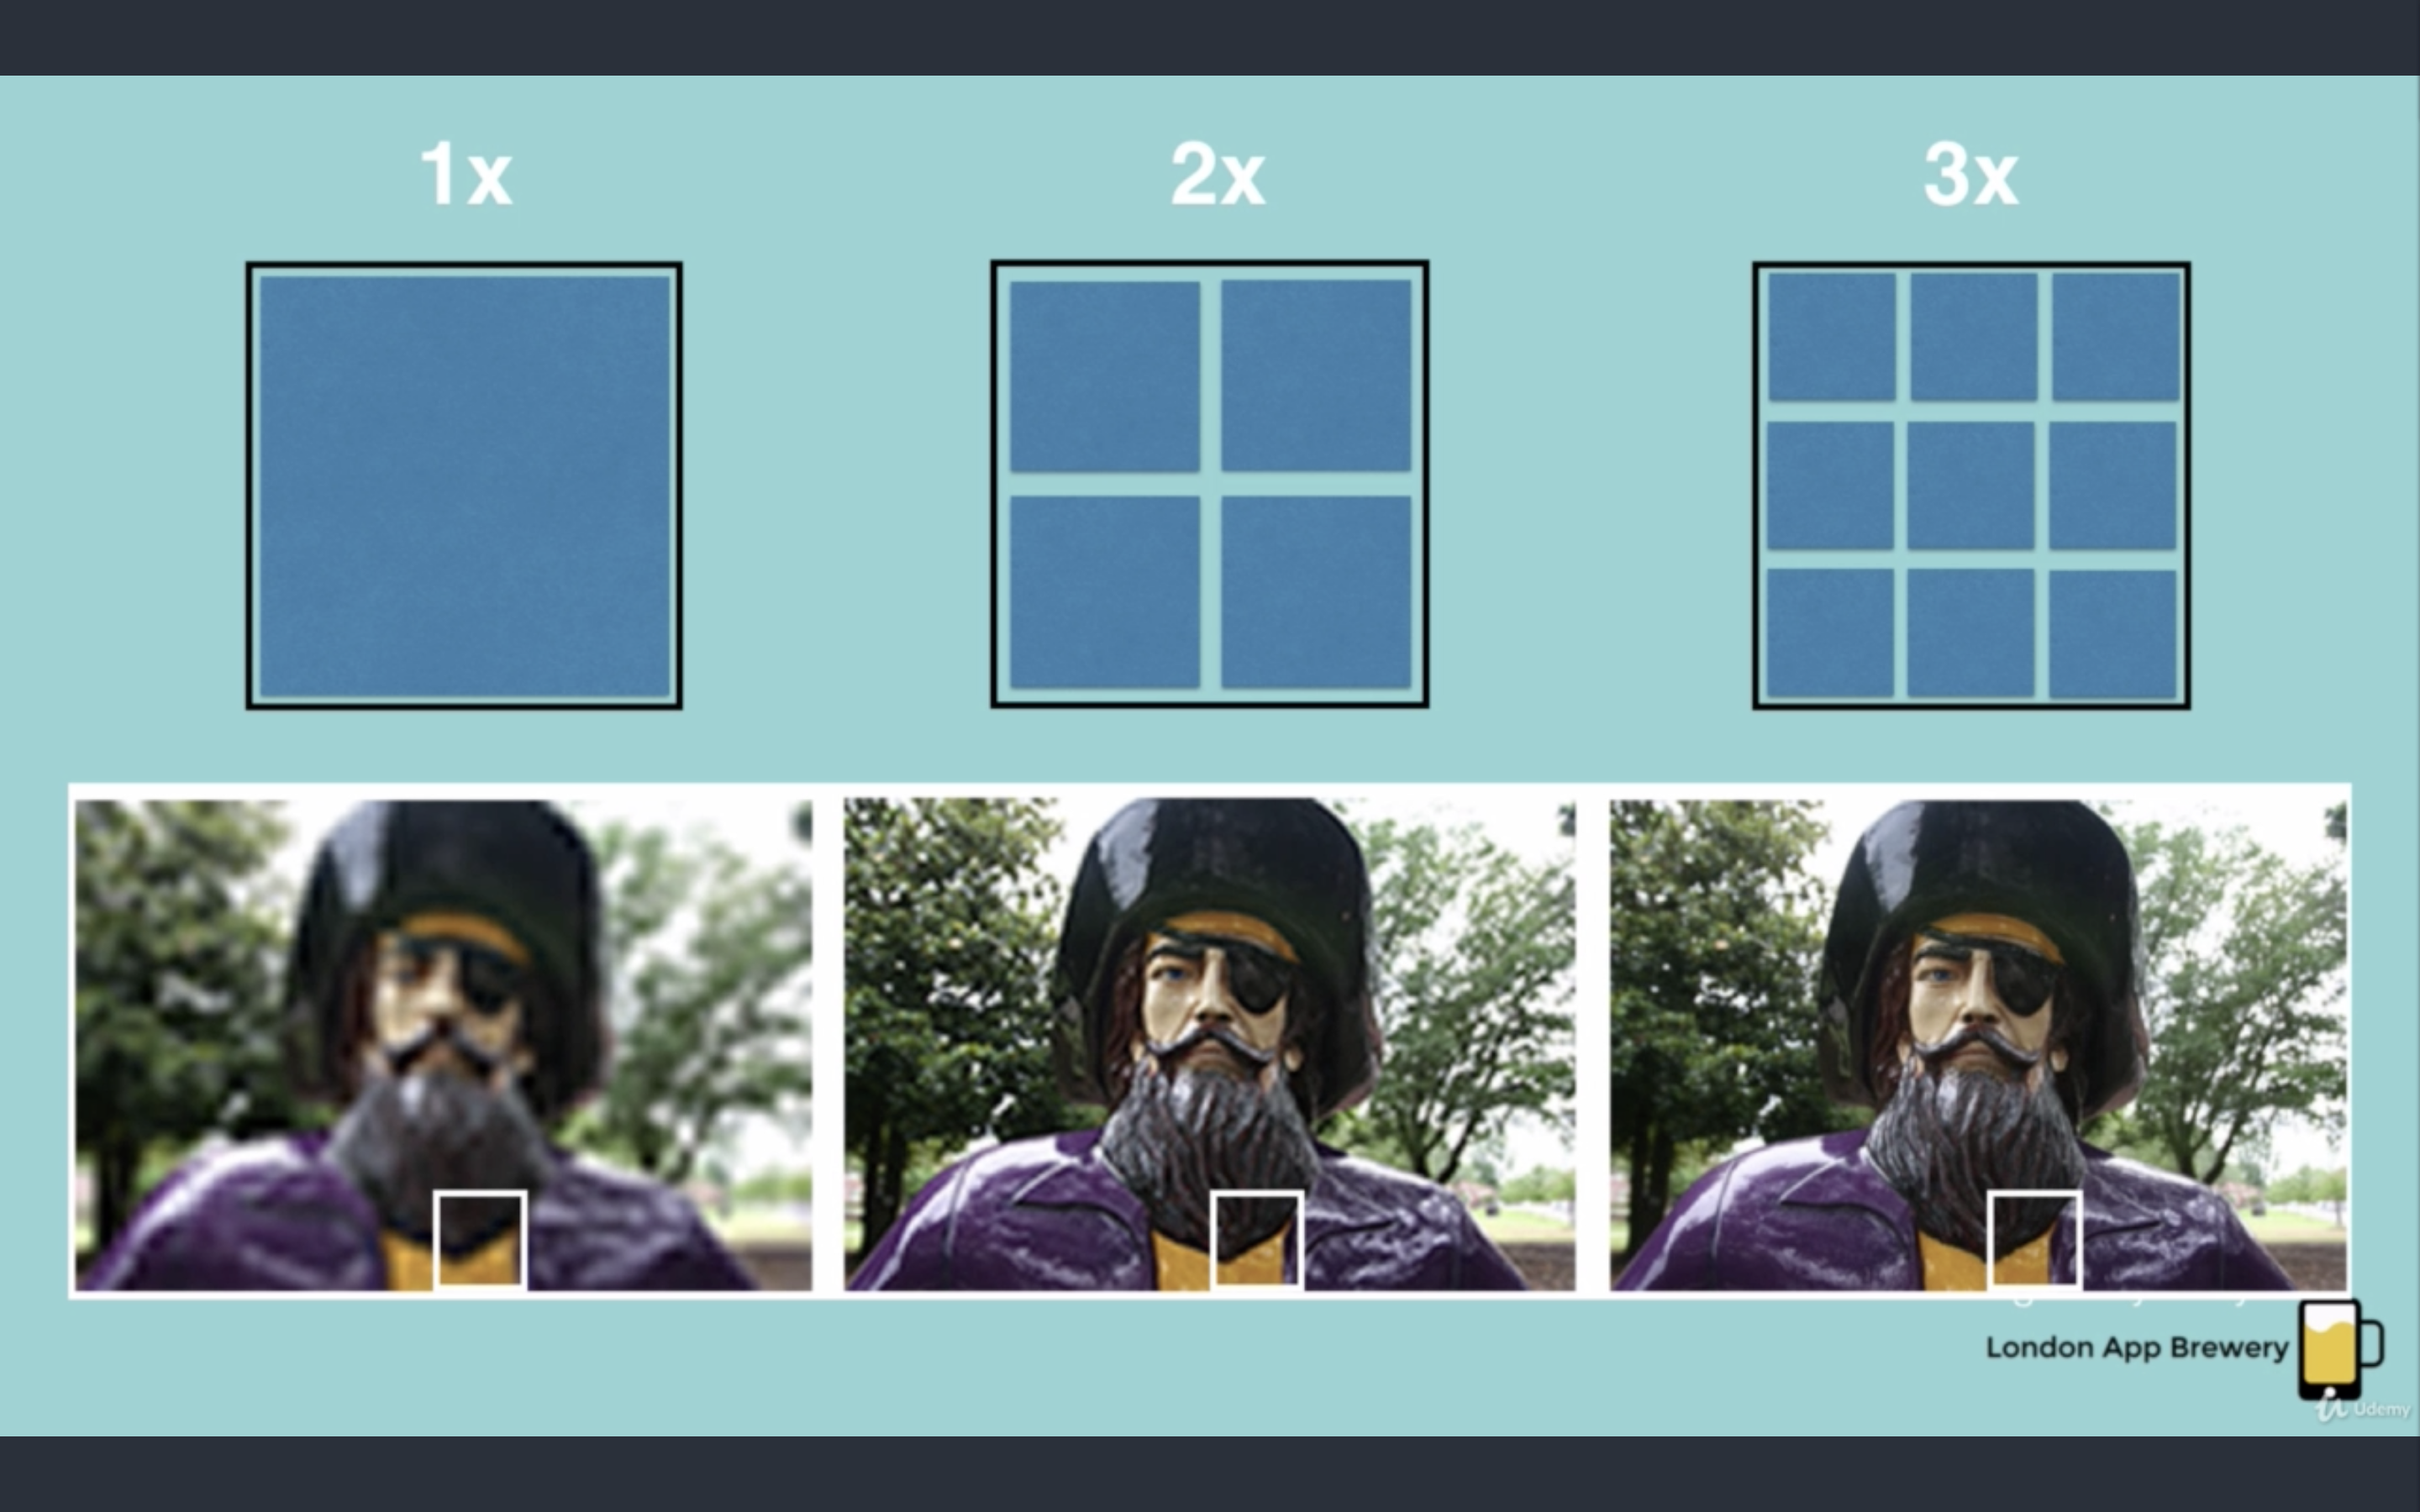
If we want to display beautiful, then we need to ensure that the resolution is height
- Pixel (Pix-El, Picture Element)
- Point
- ppi - e.g. 72 ppi = 72 pixels per inch
1 Inch = 72 Point
1x: In normal screens, 1 pixel = 1 point.
2x: In Retina screens, 4 pixels = 1 point.
3x: 9 pixels = 1 point.
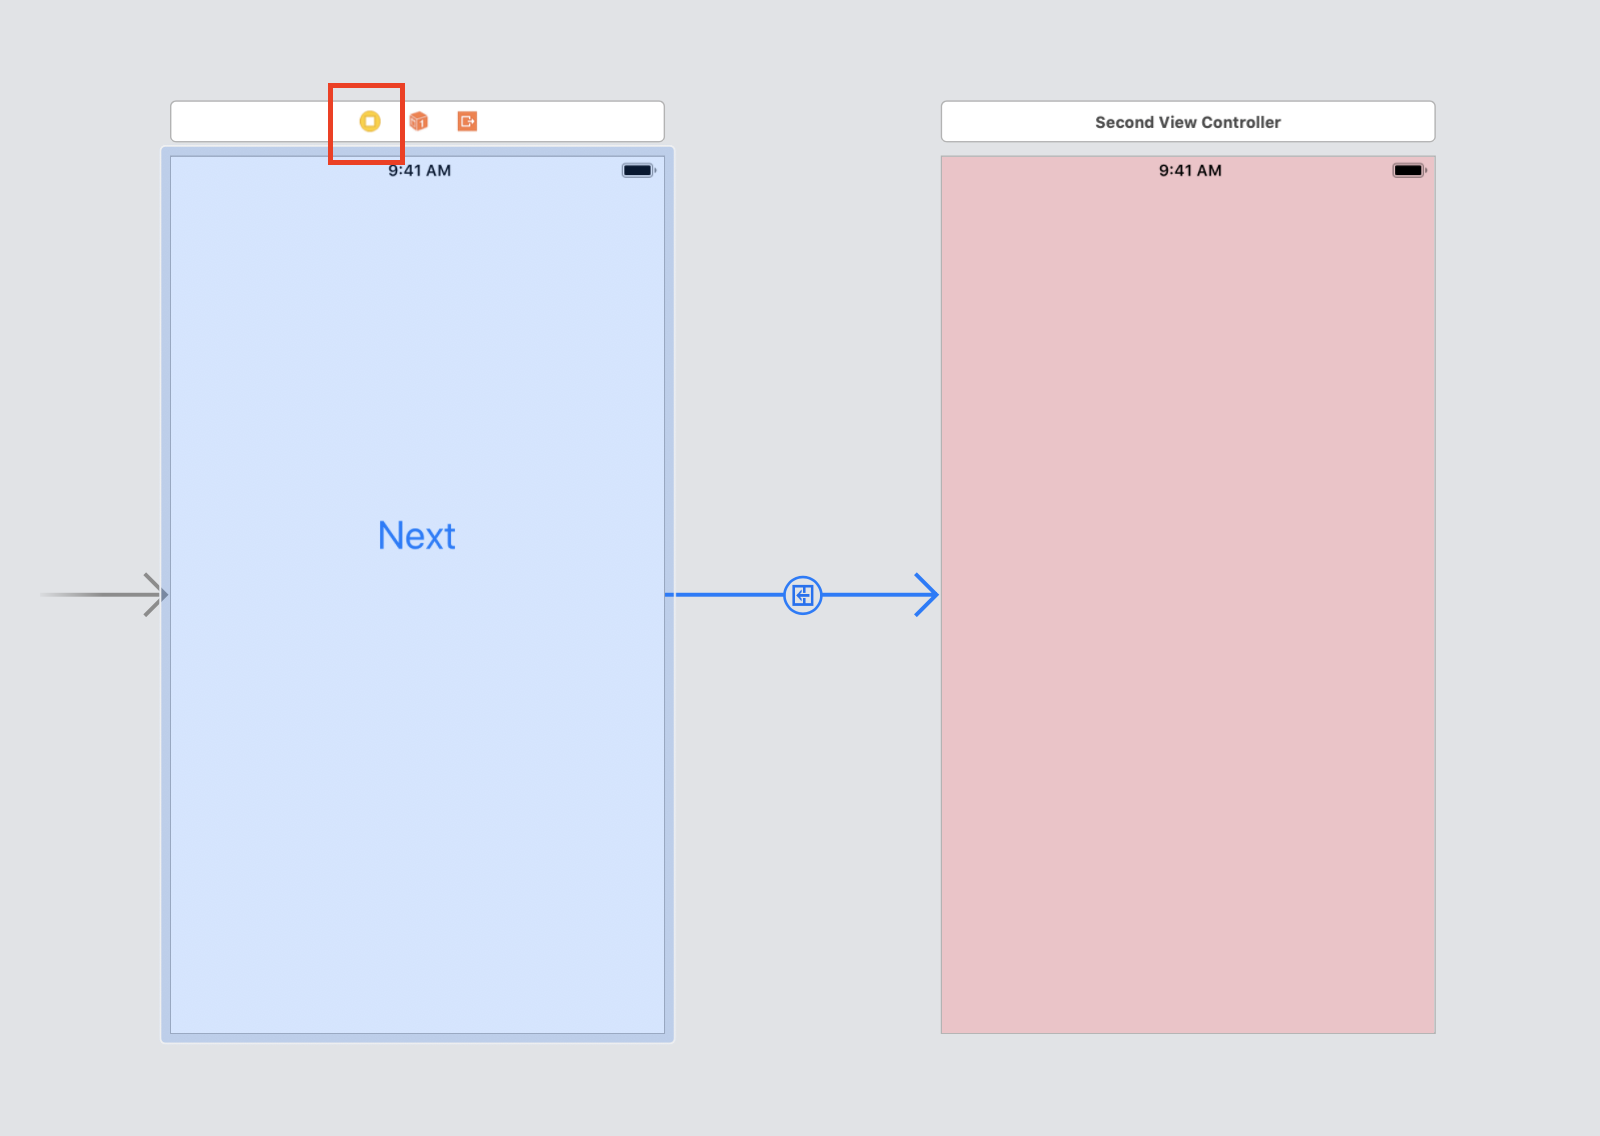
For example, I'd like to click "next" button to navigate to another page. In this case, I need segues.
-
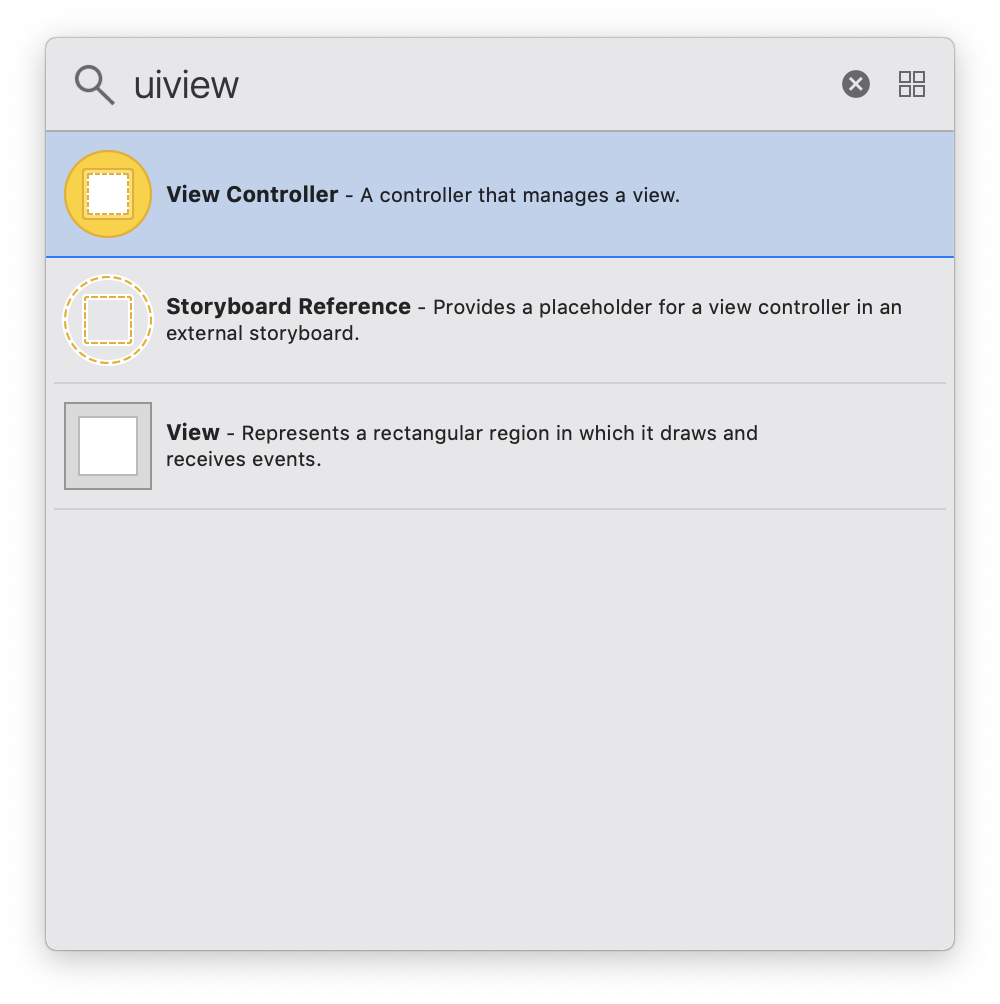
Create a UIViewController with a "next" button
-
Create another UIViewController by searching "uiviewcontroller" in the object libraries.
-
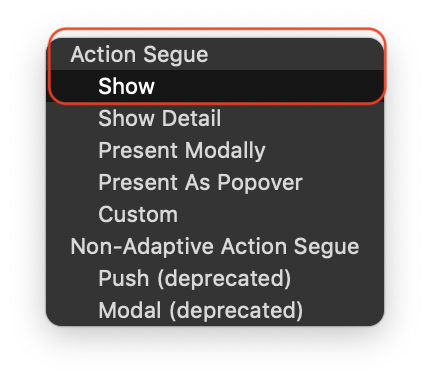
Click
⌃and the "next" button, drag to another UIViewController, select "show"
Now when you click the Next button, it will jump to the second page -
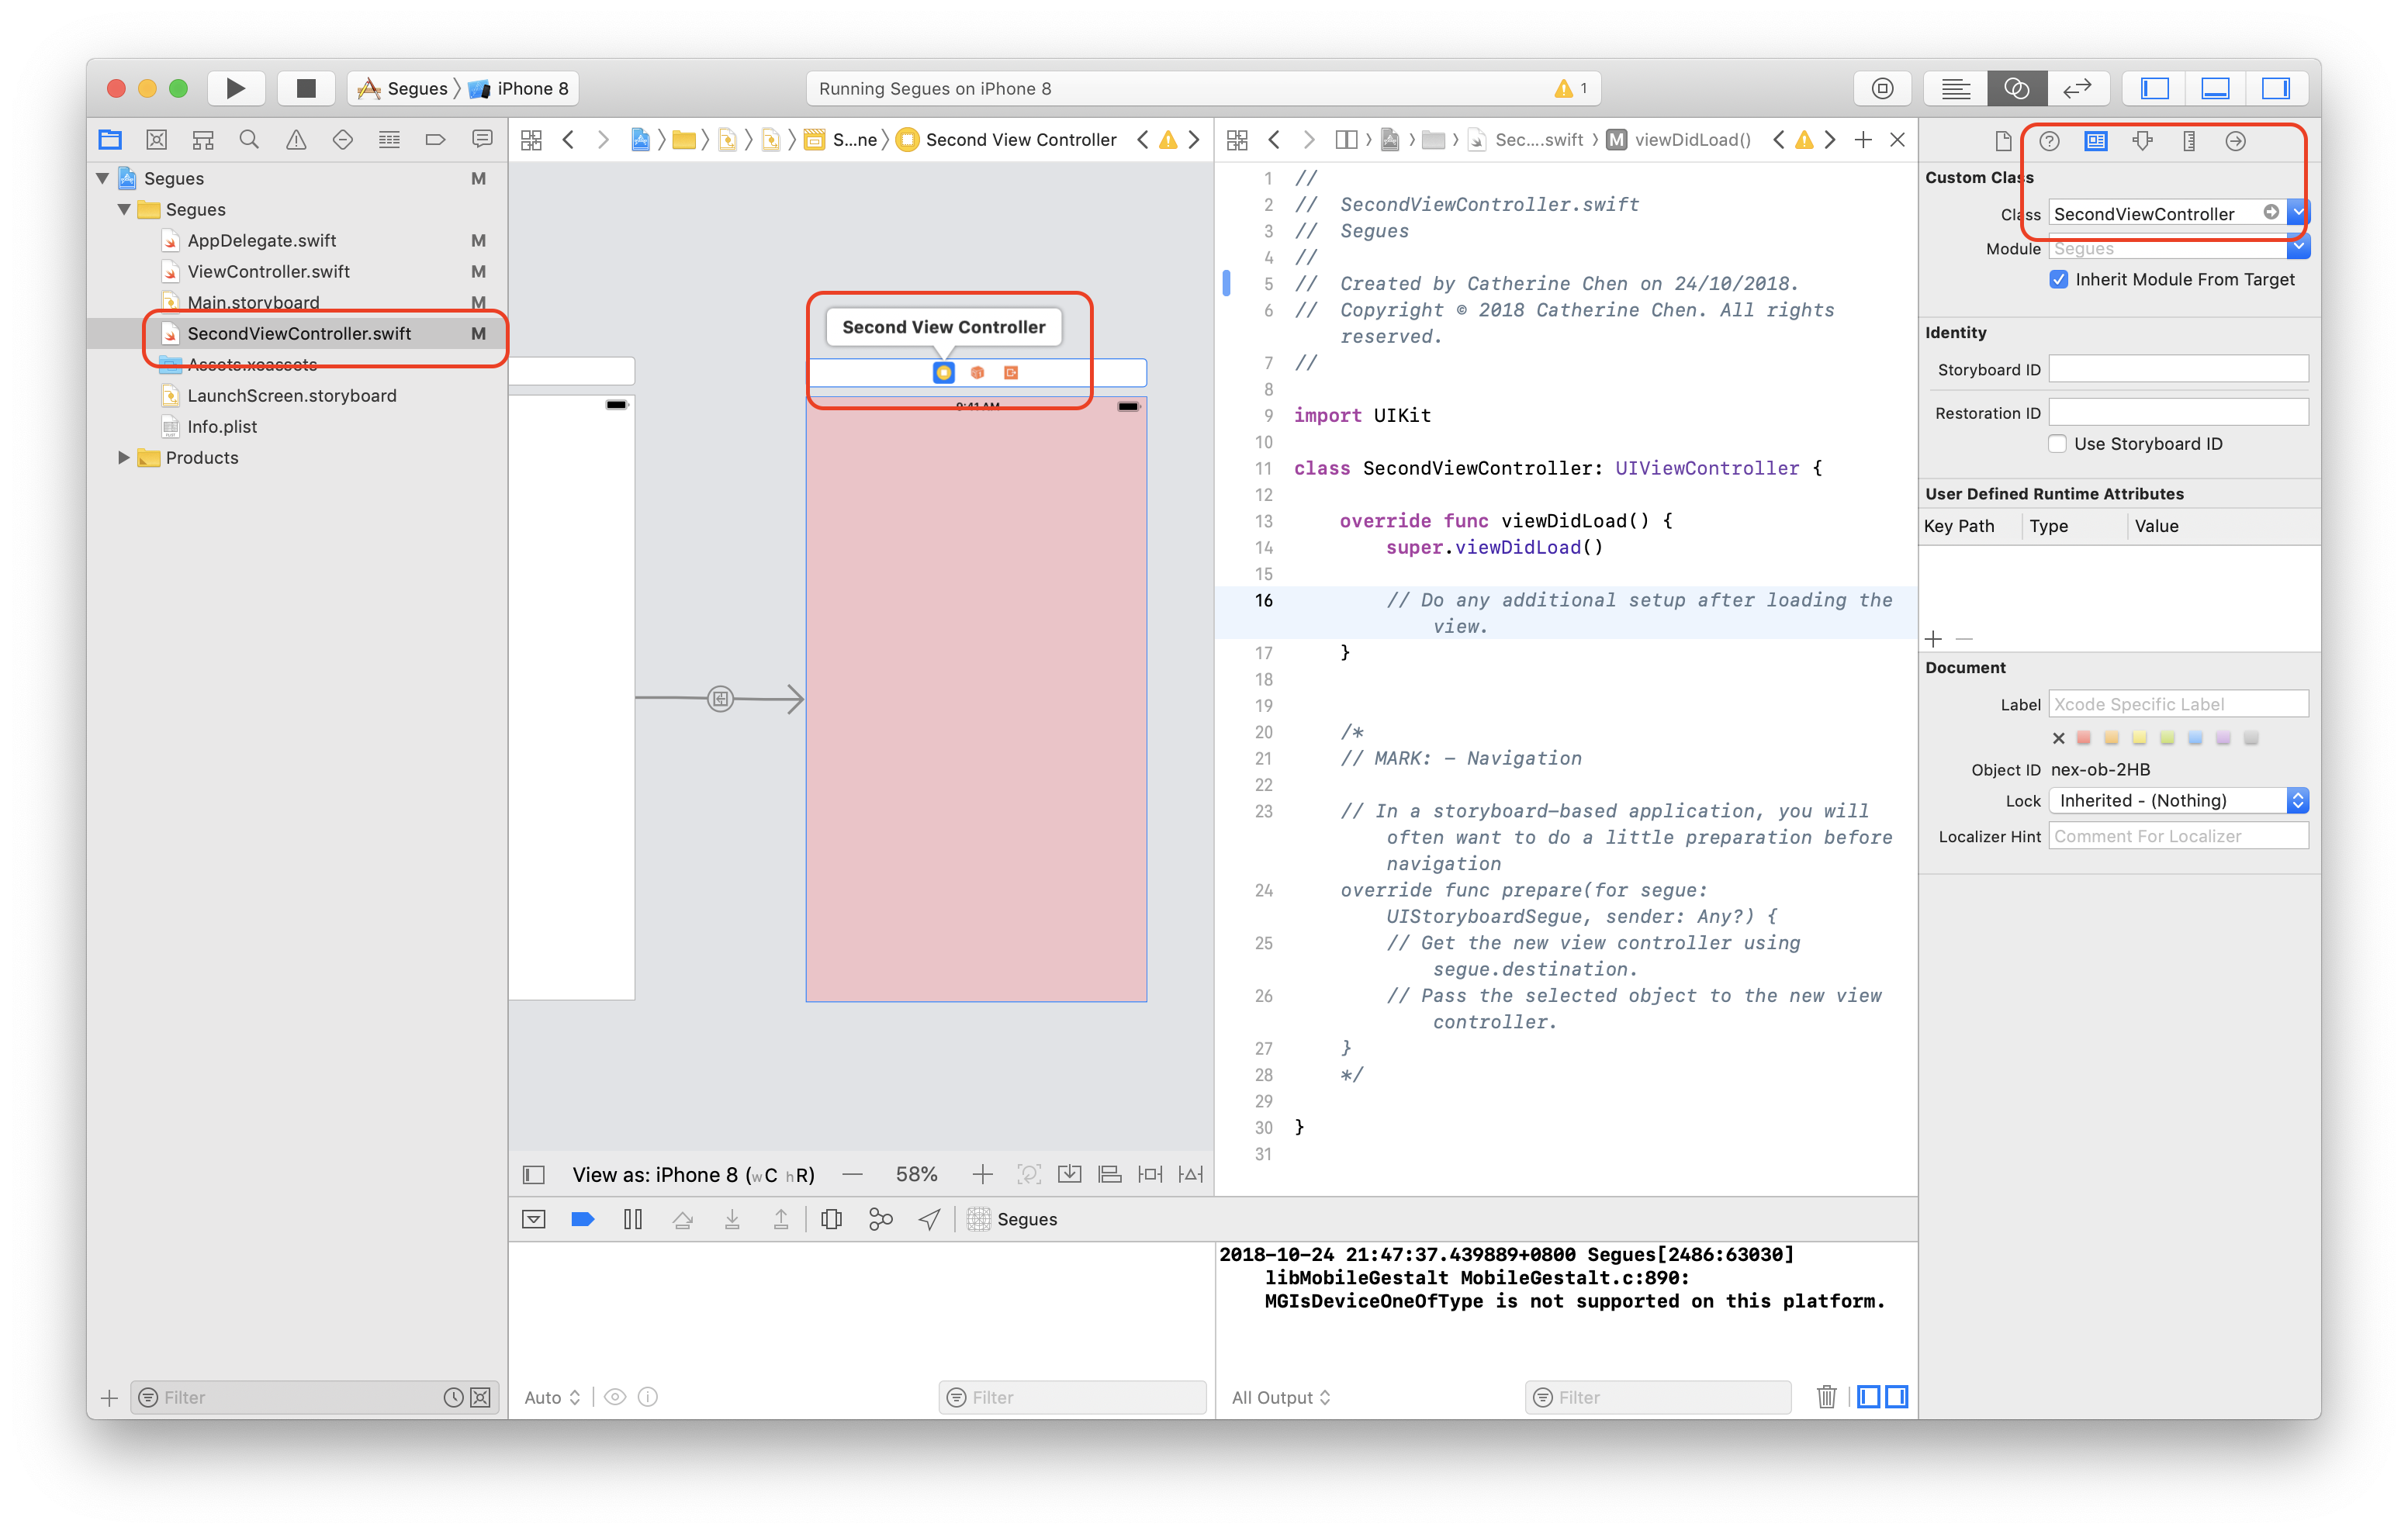
In order to customise the second page, go to File - New - File to create a new Cocoa Touch Class, named "SecondViewController"
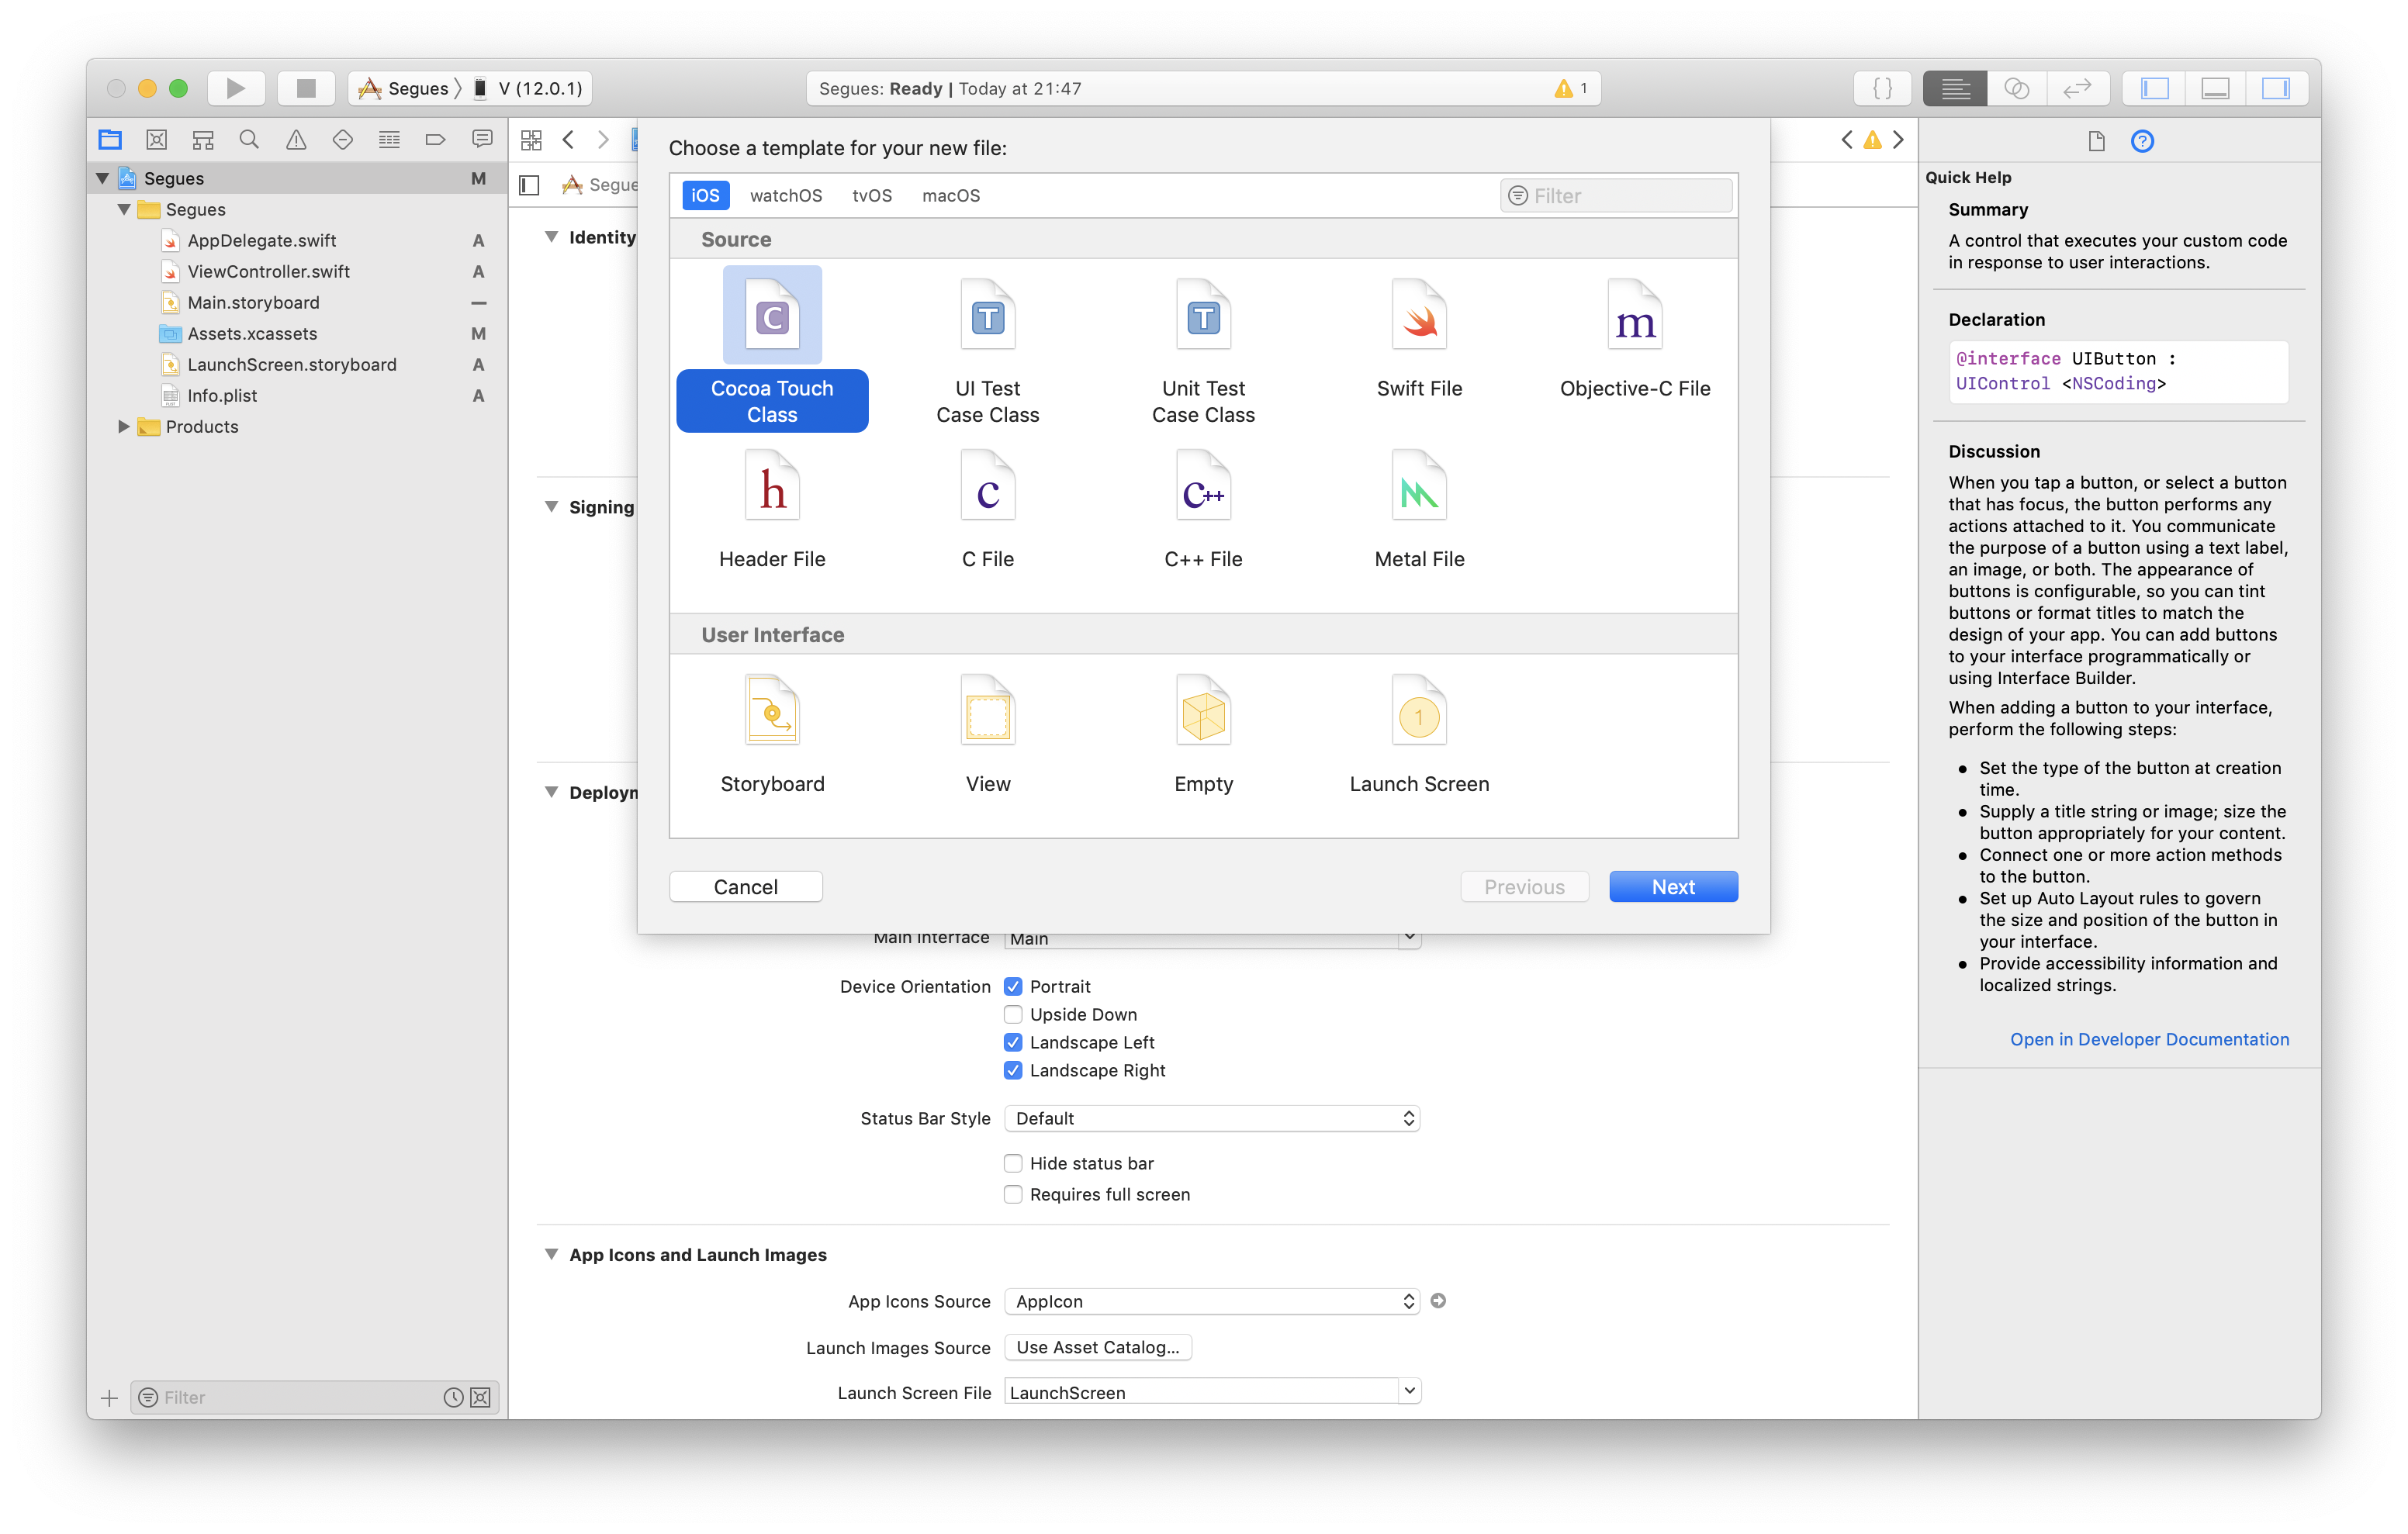
-
Link the segue we just created to SecondViewController
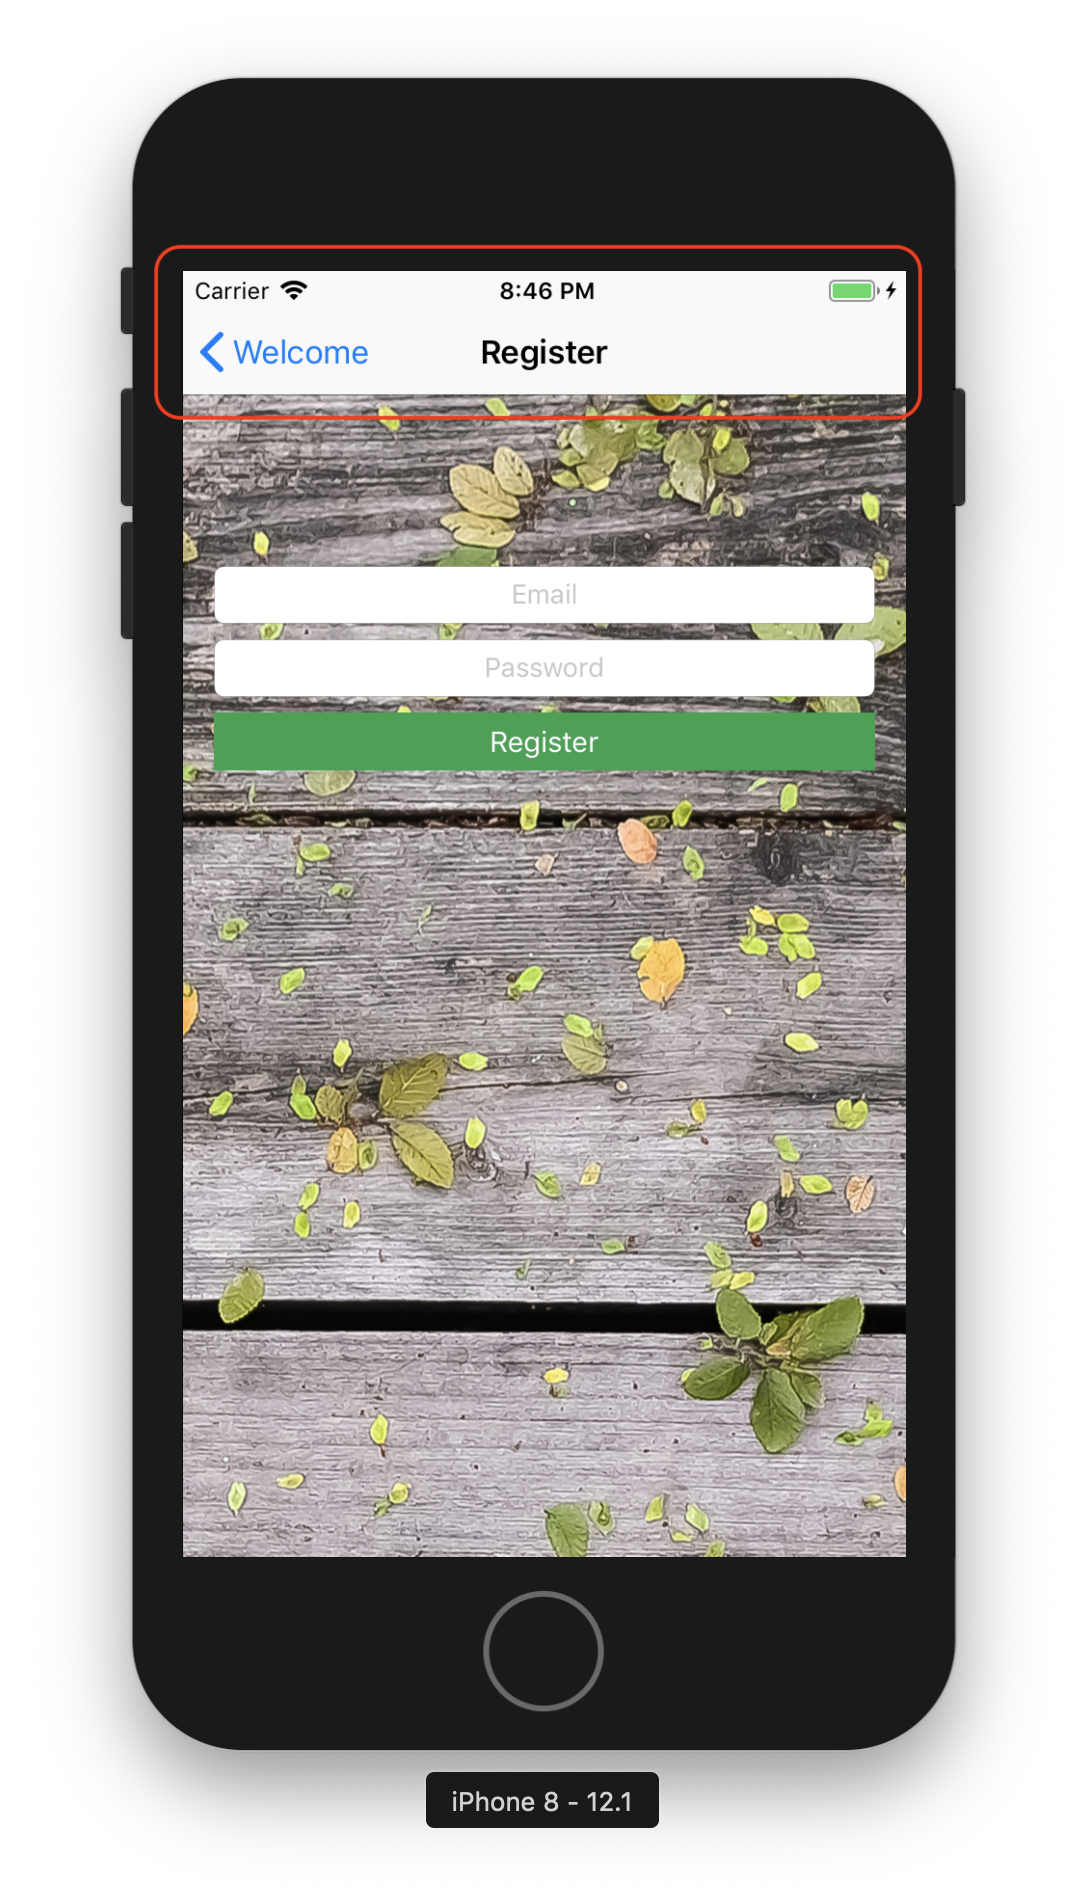

- Select the initial ViewController
- Editor - Embed in - Navigation Controller
- Click
⌃and the "View Controller" button, drag to another UIViewController, select "show"
- Set
IBActionof the Next button, and jump to another segue by callingperformSegue, select the segue to name Identifier
@IBAction func buttonPressed(_ sender: Any) {
  performSegue(withIdentifier: "GoToSecondScreen", sender: self)
}

override func prepare(for segue: UIStoryboardSegue, sender: Any?) {
  if segue.identifier == "GoToSecondScreen" {
    // We are not allowed to create a ViewController Object regularly, like
    // let destinationVC = SecondViewController()
    // Instead, we do
    let destinationVC = segue.destination as! SecondViewController
    destinationVC.textPassedOver = textField.text
  }
}
Who initialised the segue will be the sender, which in this case, will be the ViewController.

Inside the Clima application, we have a ChangeCityDelegate delegate on the second ViewController.
protocol ChangeCityDelegate{
    func userEnteredANewCityName(name: String)
}
We also defined the delegate variable in the class
var delegate: ChangeCityDelegate?While user clicks the button, sending data to the first ViewController and the second ViewController will be dismissed and go back to the first ViewController
if (delegate != nil) {
  delegate?.userEnteredANewCityName(name: city)
  // close this ViewController
  self.dismiss(animated: true, completion: nil)
}
-
Drag a TableView into your storyboard
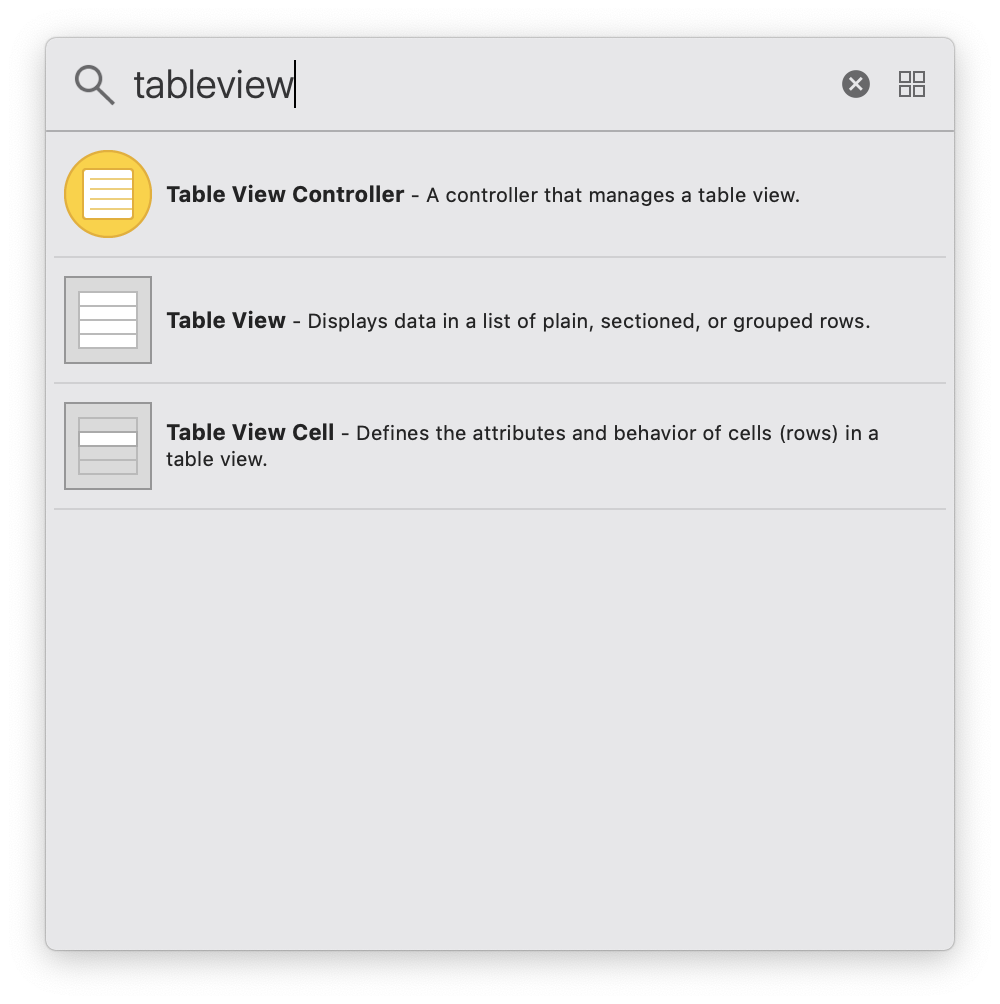
-
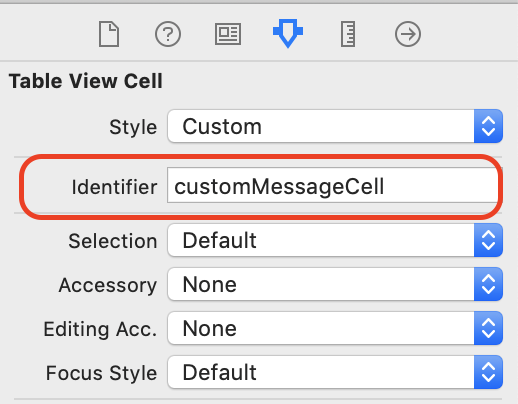
Create
.xibfile, and define the identifier and class
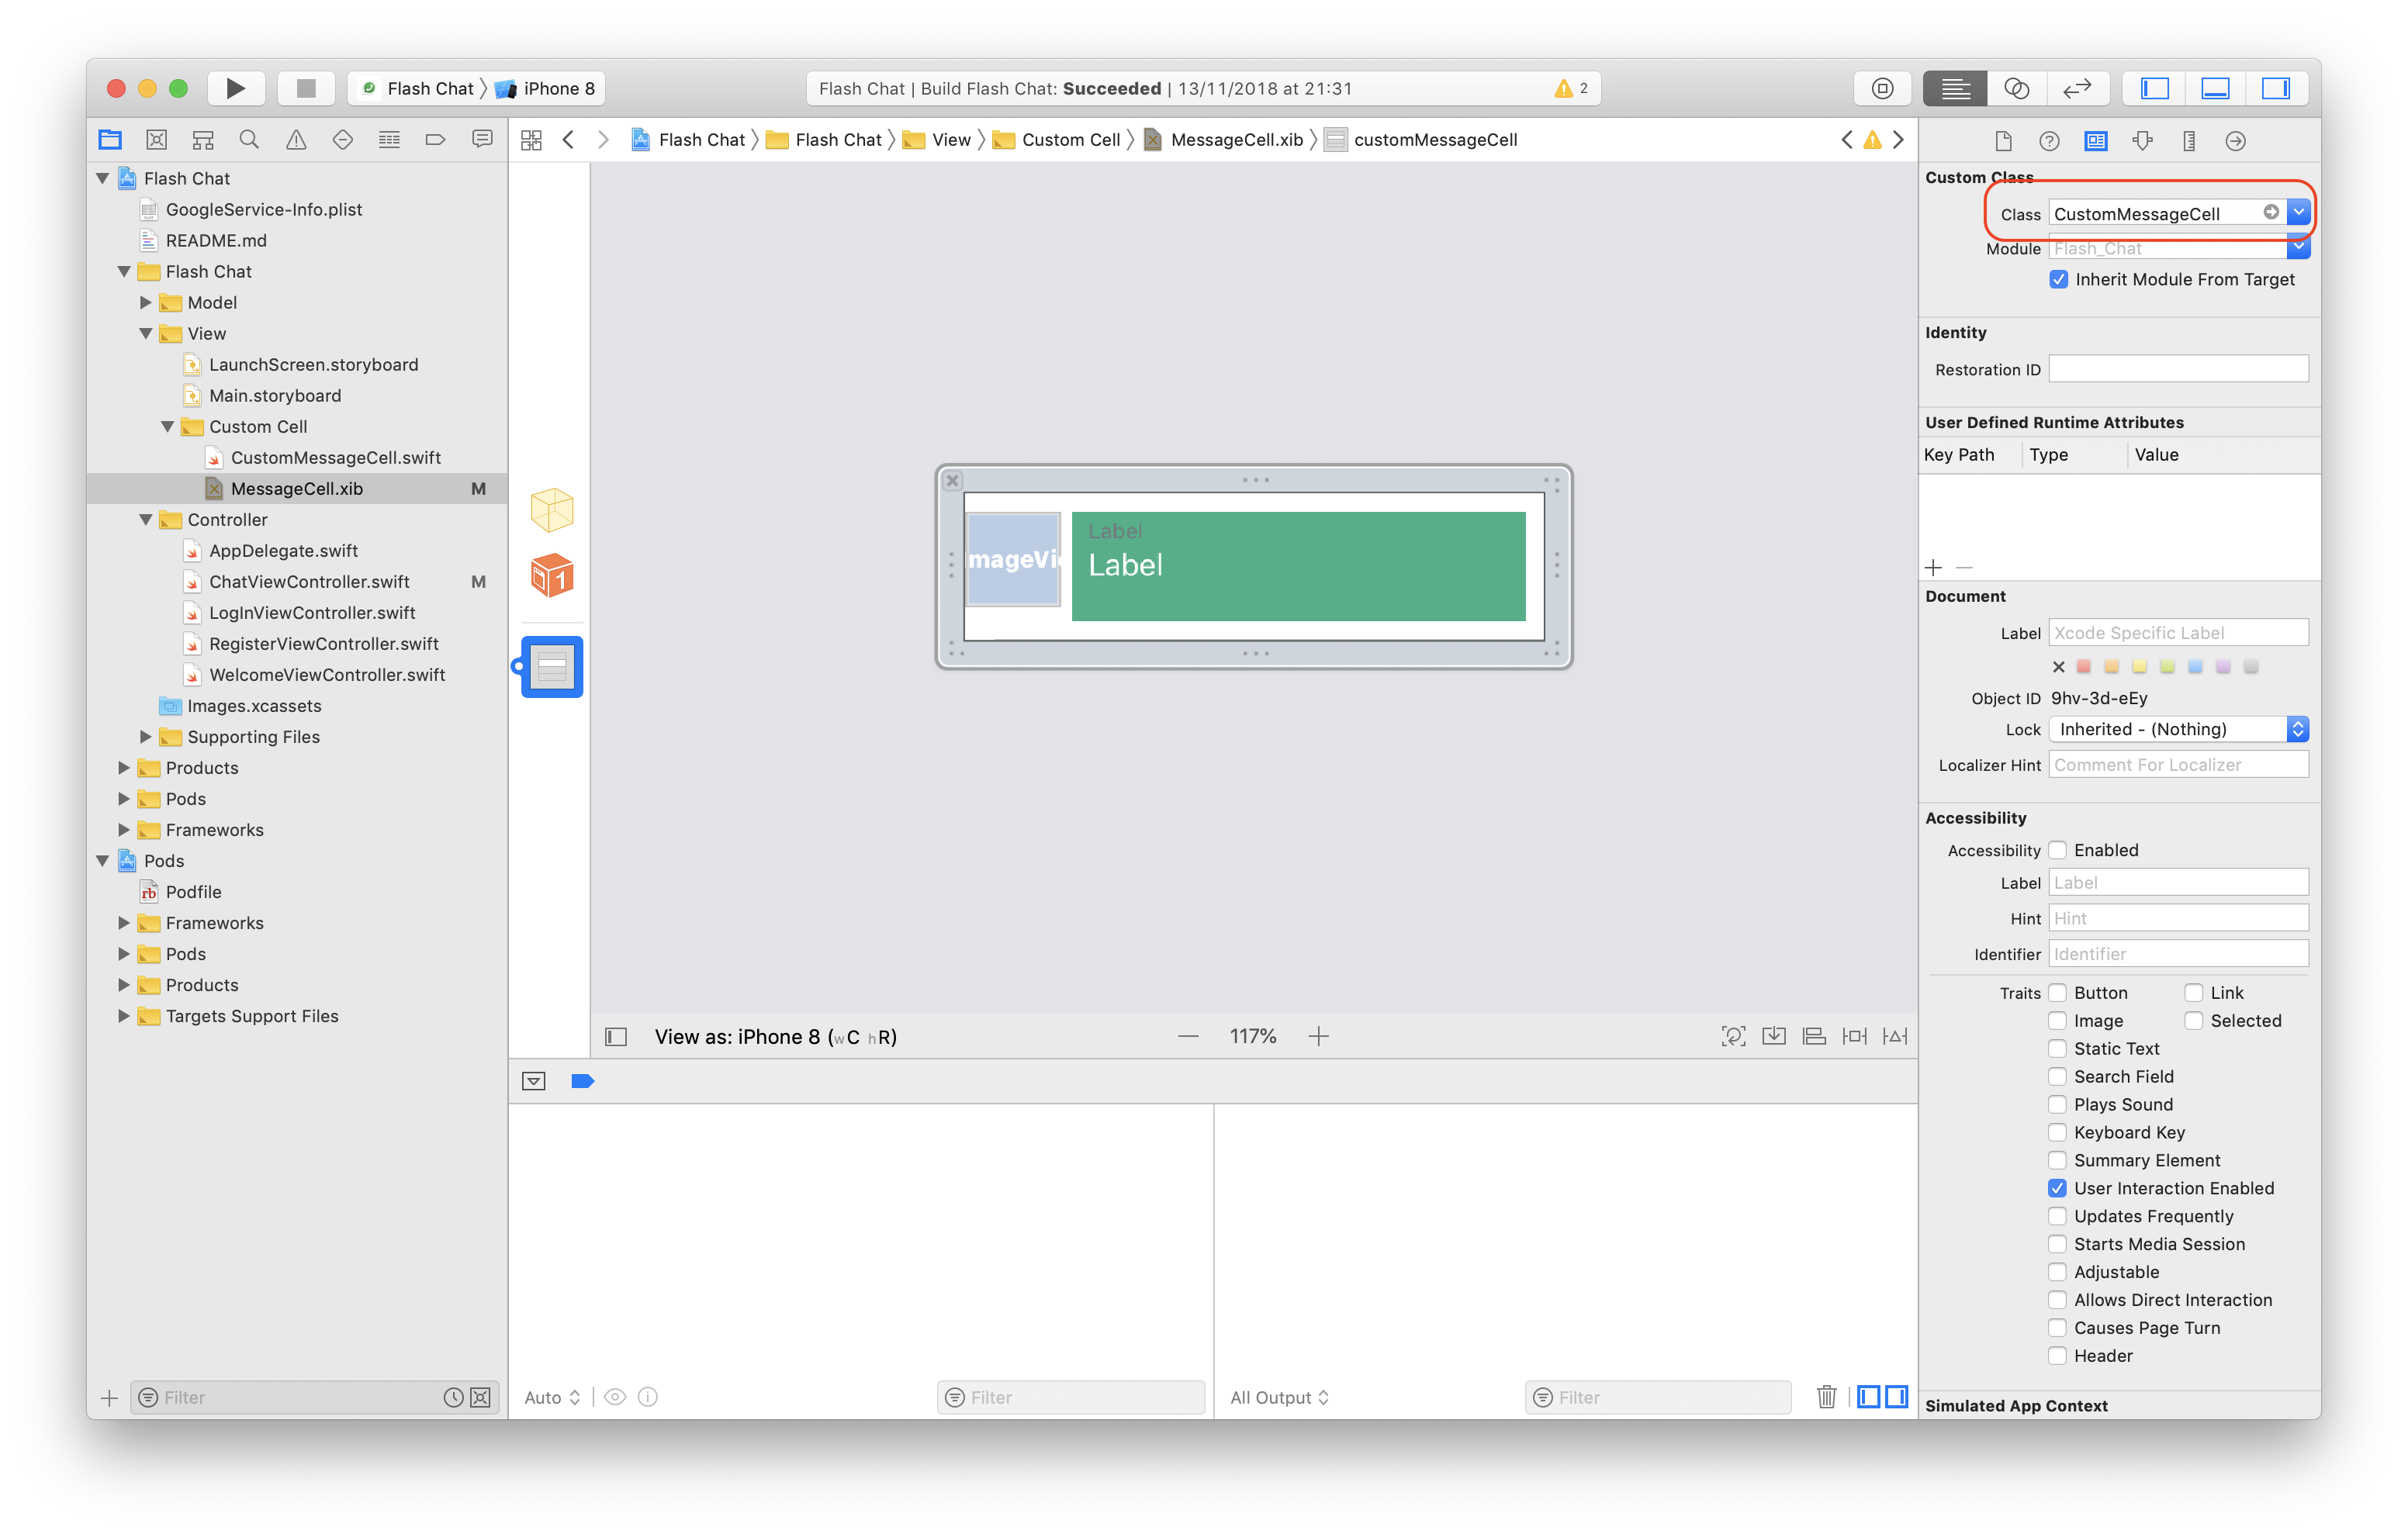
-
The class example
import UIKit

class CustomMessageCell: UITableViewCell {
    @IBOutlet var messageBackground: UIView!
    @IBOutlet var avatarImageView: UIImageView!
    @IBOutlet var messageBody: UILabel!
    @IBOutlet var senderUsername: UILabel!

    override func awakeFromNib() {
        super.awakeFromNib()
        // Initialization code goes here
    }
}- Import the TableView in the UIViewController
class ChatViewController: UIViewController, UITableViewDelegate, UITableViewDataSource {
  @IBOutlet var messageTableView: UITableView!

  override func viewDidLoad() {
    super.viewDidLoad()

    //TODO: Set yourself as the delegate and datasource here:
    messageTableView.delegate = self
    messageTableView.dataSource = self

    //TODO: Register your MessageCell.xib file here:
    messageTableView.register(UINib(nibName: "MessageCell", bundle: nil), forCellReuseIdentifier: "customMessageCell")
  }

  //TODO: Declare cellForRowAtIndexPath here:
  // This message gets called for every single cell that exists inside the tableView
  func tableView(_ tableView: UITableView, cellForRowAt indexPath: IndexPath) -> UITableViewCell {
      let cell = tableView.dequeueReusableCell(withIdentifier: "customMessageCell", for: indexPath) as! CustomMessageCell
      let messageArray = ["First message", "Second message", "Third message"]
      cell.messageBody.text = messageArray[indexPath.row]
      return cell
  }


  //TODO: Declare numberOfRowsInSection here:
  // Specify how many cells you want and what cells you want to display
  func tableView(_ tableView: UITableView, numberOfRowsInSection section: Int) -> Int {
      return 3
  }
}- Resize the cells. Let's say we want to reset the height
override func viewDidLoad() {
  super.viewDidLoad()

  //TODO: Set yourself as the delegate and datasource here:
  messageTableView.delegate = self
  messageTableView.dataSource = self

  //TODO: Register your MessageCell.xib file here:
  messageTableView.register(UINib(nibName: "MessageCell", bundle: nil), forCellReuseIdentifier: "customMessageCell")
  configureTableView()
}

//TODO: Declare configureTableView here:
func configureTableView() {
  messageTableView.rowHeight = UITableView.automaticDimension
  messageTableView.estimatedRowHeight = 120.0
}Example: CategorySheetFloatingPanel.swift
-
Drag a Search Bar in to main.storyboard
-
Indicate the delegate
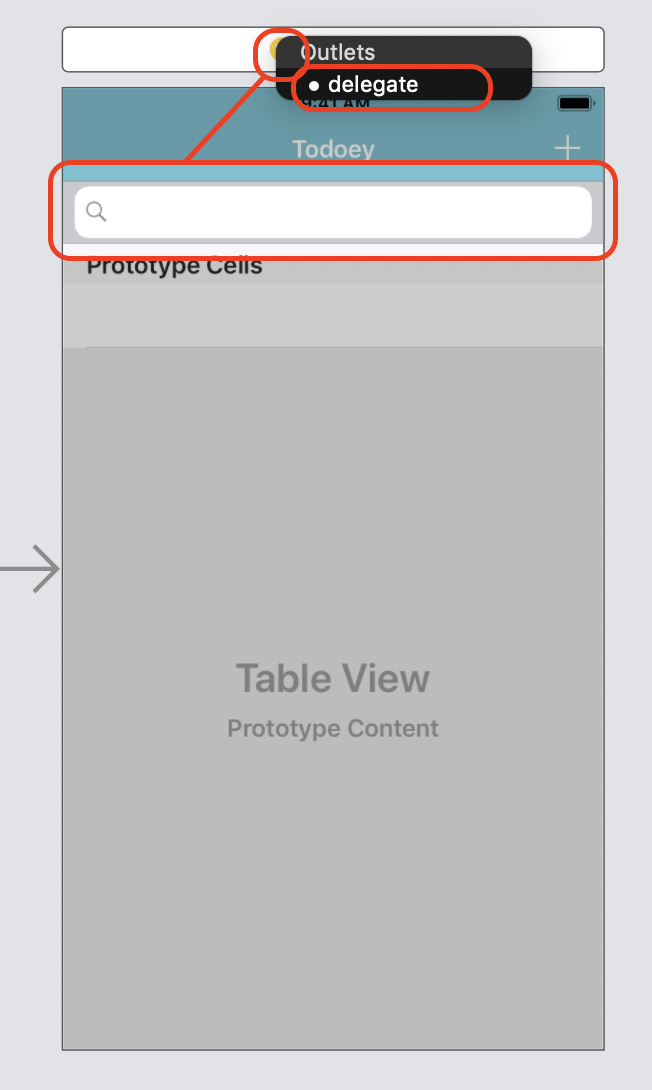
-
Implement
UISearchBarDelegatein our ViewController
extension TodoListViewController: UISearchBarDelegate {

    // This method will be triggered as "Enter" is typed
//    func searchBarSearchButtonClicked(_ searchBar: UISearchBar) {
//      queryData(text: searchBar.text!)
//    }

    // This method will be triggered as users are typing
    func searchBar(_ searchBar: UISearchBar, textDidChange searchText: String) {
      // Do something as users clear the Search Bar
      if searchBar.text?.count == 0 {
        reloadData()
      } else {
        // Query data as users are typing to improve user experience.
        queryData(text: searchBar.text!)
      }
    }
}Example: ItemViewController.swift
- Embed your UIViewController in Navigation Controller
- Implement delegates
class ItemViewController: UIViewController {

  var searchController : UISearchController!

  override func viewDidLoad() {
    super.viewDidLoad()

    // Set searchBar inside NavigationController
    initUISearchController()
  }
}

extension ItemViewController: UISearchControllerDelegate, UISearchBarDelegate {

    // This method will be triggered as "Enter" is typed
    //    func searchBarSearchButtonClicked(_ searchBar: UISearchBar) {
    //        updateTableView(text: searchBar.text!)
    //    }

    func initUISearchController() {
        searchController = UISearchController(searchResultsController: nil)
        searchController.delegate = self
        searchController.searchBar.delegate = self
        searchController.hidesNavigationBarDuringPresentation = true
        searchController.dimsBackgroundDuringPresentation = true

        navigationItem.searchController = searchController
        definesPresentationContext = true
    }

    func searchBar(_ searchBar: UISearchBar, textDidChange searchText: String) {
        // Reload all the data as users clear the Search Bar
        if searchBar.text?.count == 0 {
            loadItems()
            DispatchQueue.main.async {
                // No longer have the cursor and also the keyboard should go away
                searchBar.resignFirstResponder()
            }
        } else {
            // Query data as users are typing to improve user experience.
        }
    }
}
Install your apps on your physical iPhone for free.
- Ensure your Xcode version matches with your iOS version on your iPhone. E.g. Xcode 10.0 -> iOS 12.0, Xcode 10.1 -> iOS 12.1
- Go to Xcode, you need:
- A unique bundle identifier
- "Automatically manage signing" is ticked
- Create a team
- Go to Product -> Destination -> Choose your device
- Run the app on your iPhone
- On your iPhone, go to Settings -> General -> Device Management -> Trust
- Run the app on your iPhone again
- Have your iPhone plug in through USB
- Go to Window -> Devices and Simulators -> Find your phone and select "Connect via network"
- Unplug yor phone
- Run the app on your iPhone
https://cocoapods.org/
CocoaPods is what's known as dependency manager for Xcode project.
- Install CocoaPods on your computer
$sudo gem install cocoapods
$pod setup --verbose
- Install new pods in my Xcode project
Go to your Xcode project, e.g. /Users/catherine/Workspace/Clima-iOS12/, initialise CocoaPods.
$pod init
- You have a Podfile now. Open it by Xcode
$open -a Xcode Podfile
In Ruby, we don't use {} as code block, instead, we use
do

end
Add CocoaPods, the Pods we will use for our app
do
  pod 'SwiftyJSON'
  pod 'Alamofire'
  pod 'SVProgressHUD'
end
Check the current version of CocoaPods
$pod --version
Fix for CocoaPods v1.0.1 and below, add the following code in your Podfile
post_install do |installer|
  installer.pods_project.targets.each do |target|
    target.build_configurations.each do |config|
      config.build_settings['SWIFT_VERSION'] = '3.0'
      config.build_settings['MACOSX_DEPLOYMENT_TARGET'] = '10.10'
    end
  end
end
Install all the CocoaPods that we specified earlier in our Podfile
$pod install
Open xcworkspace file instead which contains all of our CocoaPods.
- Install Carthage
$brew update
$brew install carthage
- Create Cartfile file
Create a file called Cartfile, paste needed libraries. E.g. SVProgressHUD, and save it to project folder
github "watson-developer-cloud/swift-sdk"
github "SVProgressHUD/SVProgressHUD"
- Run
carthage updateto install libraries - Import all the libraries you needed (the file path will be in /Carthage/Build/iOS/xxx.framework)
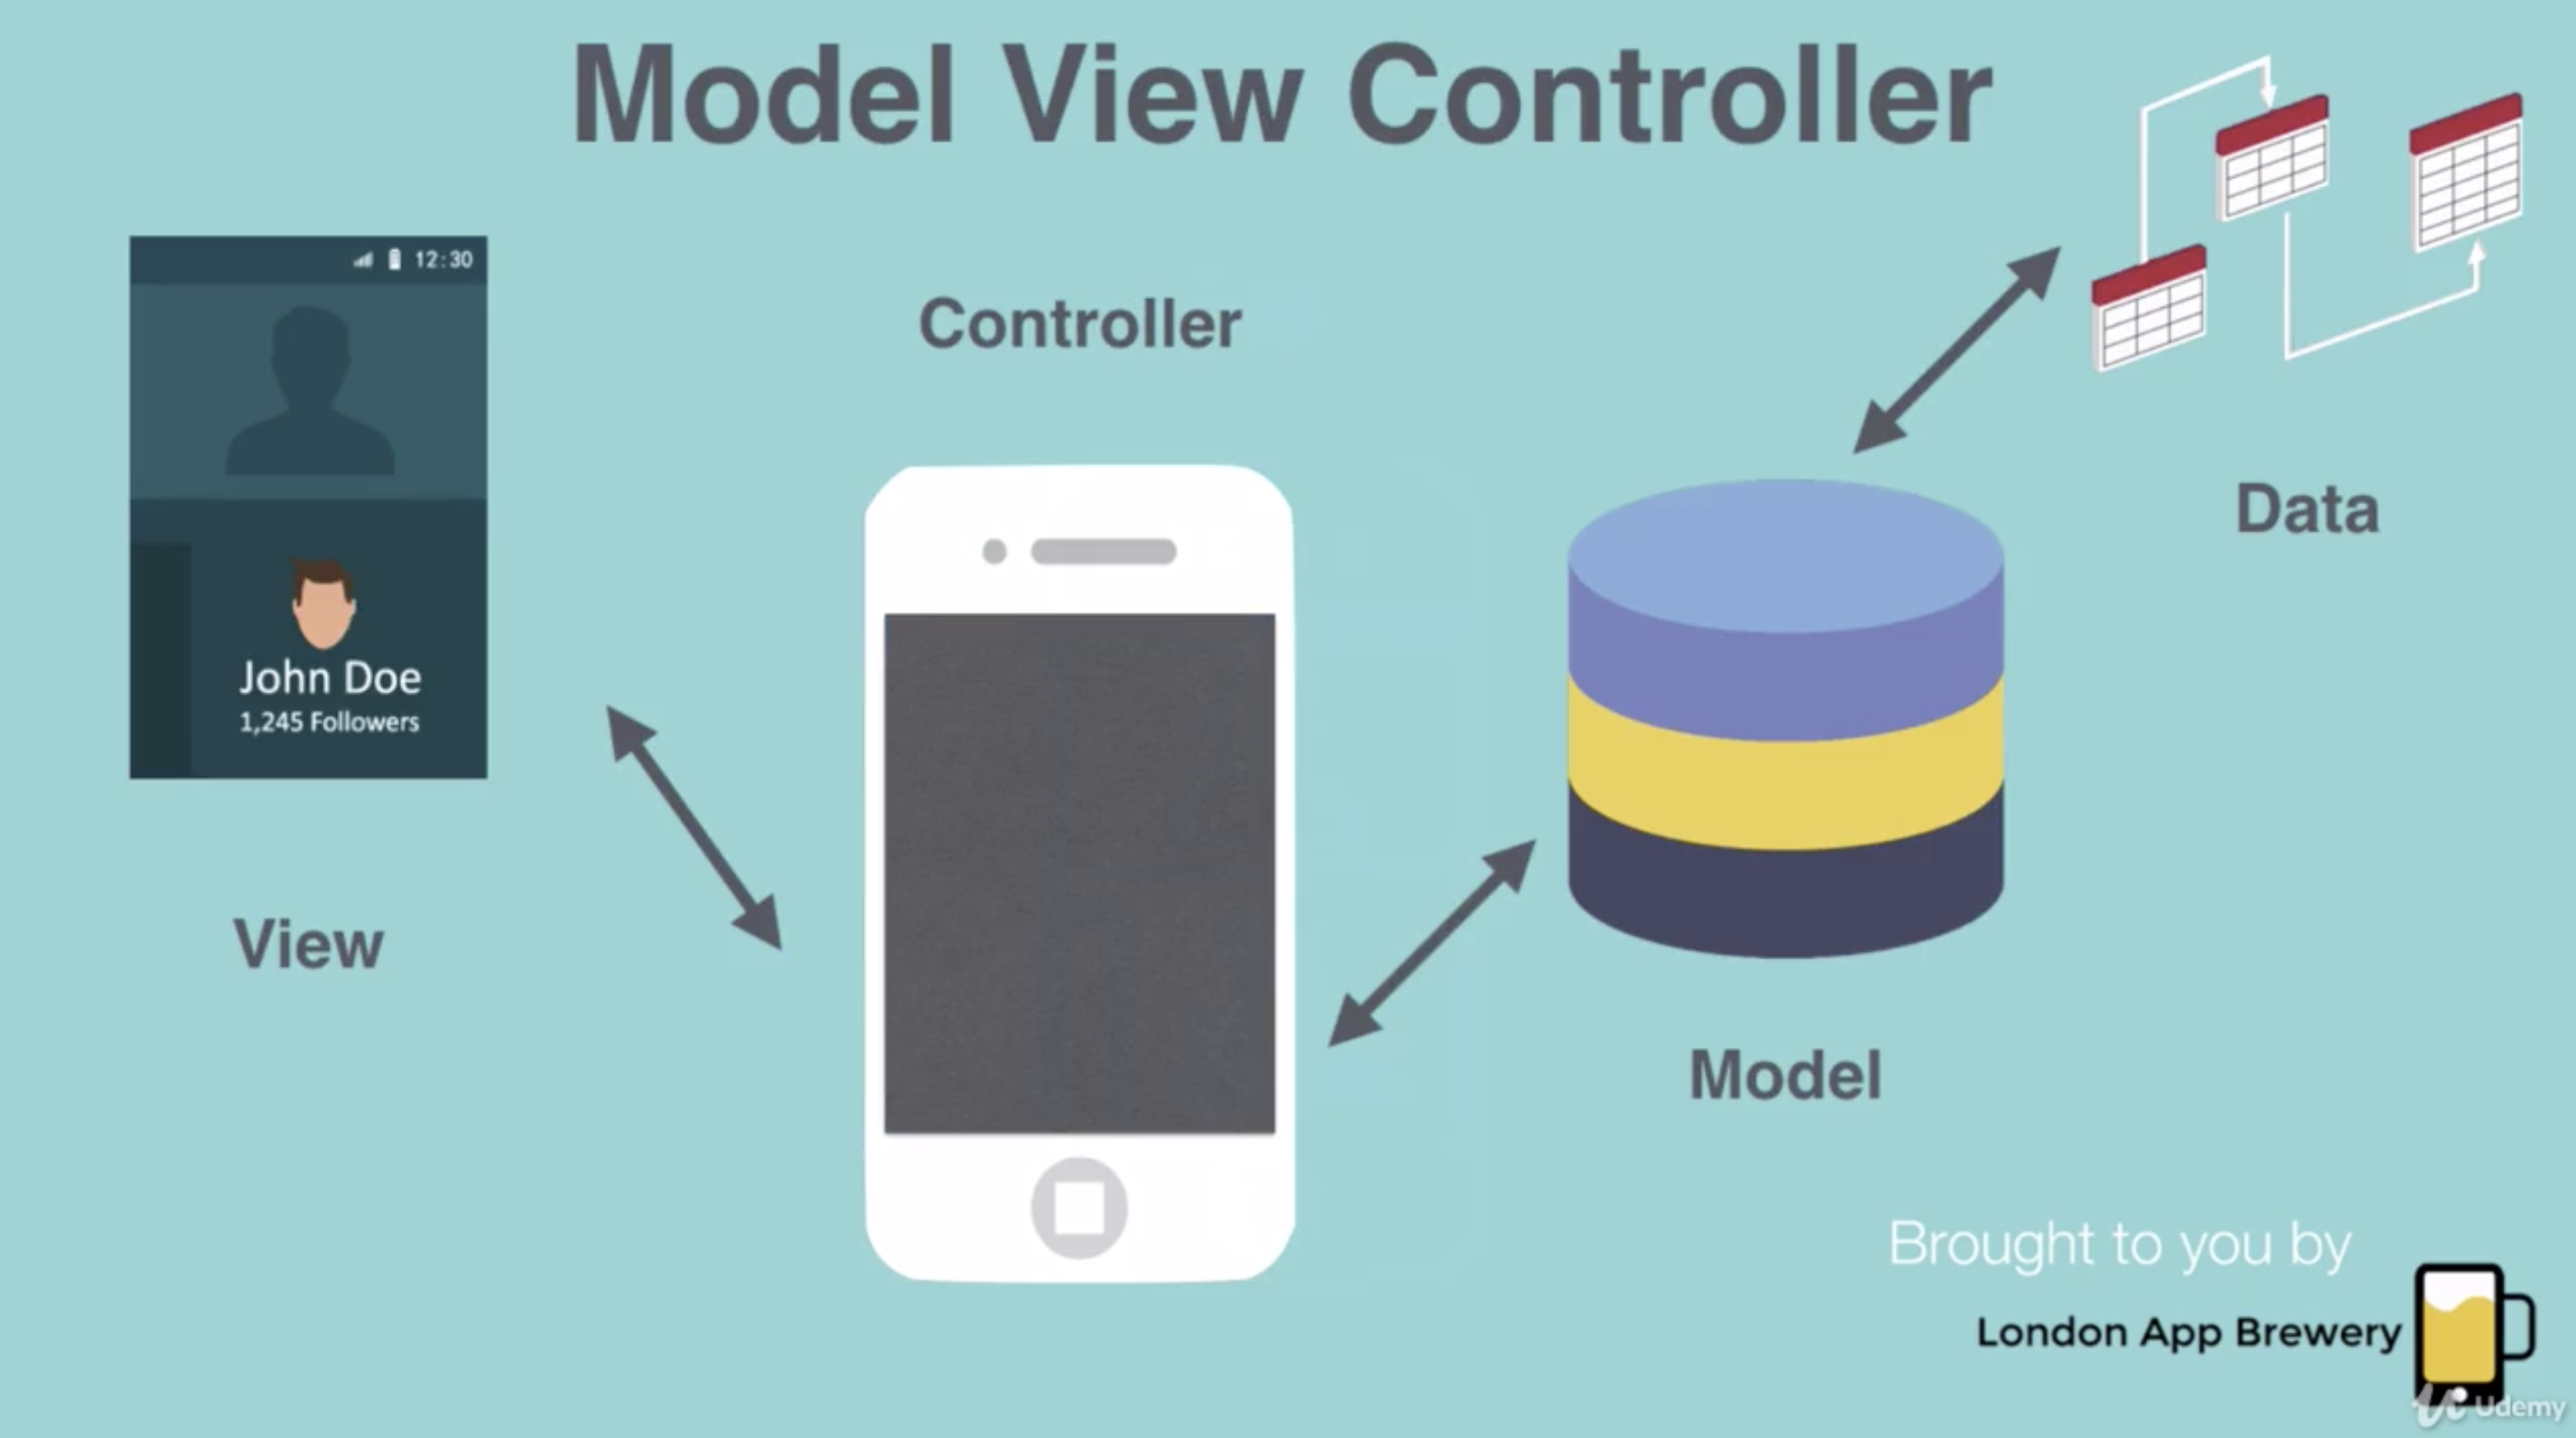
- View: What you see or what appear on the screen.
- ViewController: This goes behind the scene. This is the code that controls what should happen when the user taps a button, or what will happen when you have a piece of data to display on screen.
- Model: Model is what controls the data. It manipulates the data and prepares the date to be served up to the ViewController.
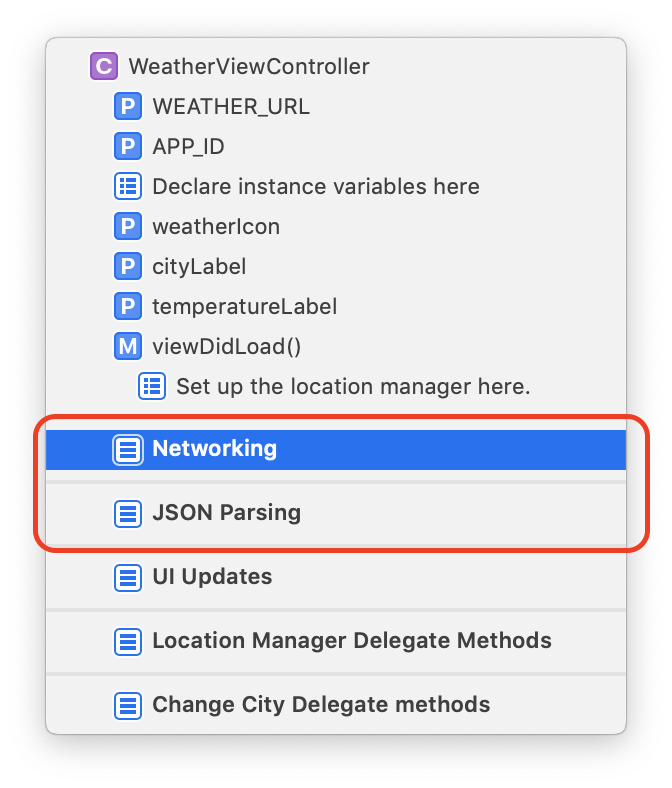
We can separate our code into describe sections by adding
//MARK: - Networking
func retrieveMessage() {
//TODO: Retrieve messages from Firebase

}


//MARK: - JSON Parsing
⌘ + ⌥ + ←
Instead of implement delegates directly, creating an extension
E.g. The original code might be:
class TodoListViewController: UISearchBarDelegate {
  func searchBarSearchButtonClicked(_ searchBar: UISearchBar) {
    <#code#>
  }
}
Split up the functionality of our ViewController, and we can have specific parts that are responsible for specific things.
class TodoListViewController {

}

//MARK: - SearchBar methods
extension TodoListViewController: UISearchBarDelegate {
  func searchBarSearchButtonClicked(_ searchBar: UISearchBar) {
    <#code#>
  }
}
Let's say we have a function
func fetchRequest(request: NSFetchRequest<MyTodoeyItem>) {
  do {
    itemArray = try context.fetch(request)
    } catch {
      print("Error fetching data from context \(error)")
    }
  }
Modify 'request' parameter with an external parameter.
The external parameter is with whereas the internal parameter: request.
Instead of calling the fetchRequest function with fetchRequest(request: request), we are using
fetchRequest(with: request)Let's say there's a property data in B, and we are going to pass data from class A to class B, the easiest way is to create an instance of B.
class A {
  let b = B()
  b.data = "xxx"
}
But what if we cannot access properties in class A which is provided by Apple lick UIButton, CoreLocation and so forth? For example, once the LocationManager has found the user's current location, it will send out an address, and how do we pass that address from the LocationManager (class A) into our own ViewController (class B)?
That's what delegation comes in.
Once the LocationManager finds a location, it will send it out to the delegation, if the delegation happens to be nil, then nothing happens to the information. But if the delegation happens to be sat, it will handle the data from the LocationManager.
- I Am Rich, I Am Poor
- Magic8Ball, Dicee
- Random number
- AutoLayout
- Quizzler, Destini
- MVC
- ProgressHUD
- Alert
- Xylophone
- Play wav audio
do catch
- Stack View Practice, Auto Layout Practice
- AutoLayout
- Stack View
- Segues
- Segue example
- Navigation ViewController
- Delegates and Protocols
- Pass data between View Controllers
- Segues
- Clima
- Ask for permissions
- Geo Location
- Delegation
- Fetching data via
Alamofireand handling JSON bySwiftyJSON
- BitcoinTicker
- UIPickerViewDelegate, UIPickerViewDataSource
- Fetching data via
Alamofireand handling JSON bySwiftyJSON
- FlashChat
- Authenticate with Firebase
- Firebase Realtime Database
- Completion Handler
- Navigation ViewController
- UITableView
- Popup keyboard animation (UI Animations + UITextFieldDelegate + UITapGestureRecognizer)
ProgressHUD(Loading + alert)- Get more colours via
ChameleonFramework
- CoreData Example
- Persistent standard types and object array with
UserDefaultsandCoreDatarespectively. - Persistent data with CoreData.
- UISearchBar
- UITableView
- [Swift] Error handling (
guard else,do catchandif try) - [Swift] Internal, external and default parameters (
loadItemsinTodoListViewController) - [Swift] extension
- Persistent standard types and object array with
- Todoey with Realm
- Persistent data with Realm
- 2 ways to use UISearchBar (put UISearchBar inside NavigationController or UIViewController)
- UITableView
- FloatingPanel
- ChameleonFramework gradient color + random flat color
- Customise NavigationController style
- Calculator
- Swift tips: struct, if-let statement and guard-let statement
- SeeFood
- UIImagePickerController (Pick out images from users' photos or camera)
- CoreML (Machine learning)
- WhatFlower
- UIImagePickerController (Pick out images from users' photos or camera)
- CoreML (Machine learning)
- Display Web images via SDWebImage
-
Set breakpoints

-
Step over
For example, Location Permissions.
let locationManager = CLLocationManager()
override func viewDidLoad() {
  super.viewDidLoad()

  locationManager.delegate = self
  locationManager.requestWhenInUseAuthorization();
}
In Info.plist,
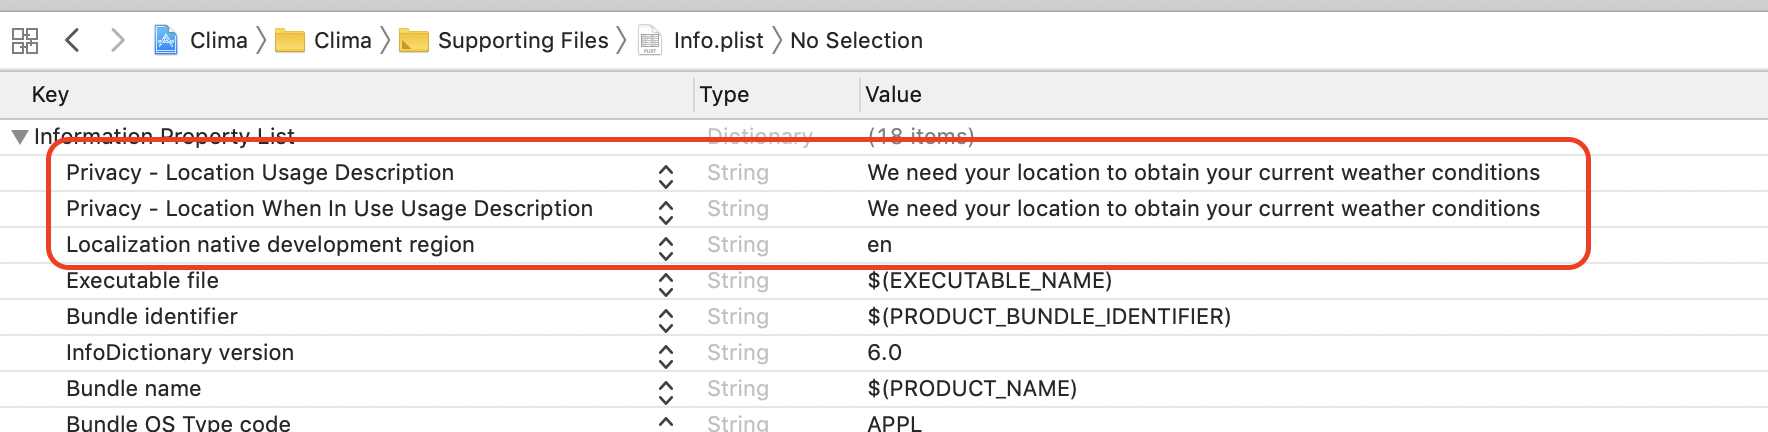
Update Locations
// Asynchronous method (It works in the background), call didUpdateLocations and didFailWithError methods to handle callbacks
locationManager.startUpdatingLocation()
func locationManager(_ manager: CLLocationManager, didUpdateLocations locations: [CLLocation]) {
// the laster the more accurate
let location = locations[locations.count - 1]
// Accuracy means the spread of possible locations.
// When that value is negative, that represents an invalid result
if (location.horizontalAccuracy > 0) {
// Unless you want to destroy users' battery, you should stop updating locations as soon as you get the valid data
locationManager.stopUpdatingLocation()
print("(\(location.coordinate.longitude), \(location.coordinate.latitude))")
}
}
func locationManager(_ manager: CLLocationManager, didFailWithError error: Error) {
// Location unavailable
print(error)
}If you get Error Domain=kCLErrorDomain Code=0 "(null)" error, 2 solutions to fix this:
- Run on an iPhone device
- In your simulator, click Debug - Location, select Apple's headquarter or Custom Location
Another example, in order to launch users' camera or open their photo albums, you need Privacy - Camera Usage Description and Privacy - Photo Library Usage Description.
Callback: Do something time consuming
class DataManager {
    func save(key: String, value: String, callback: (Bool, String) -> Void){
      // Do something time consuming
        let isSuccess = true
        let message = "\(key) saved"
        callback(isSuccess, message)
    }
}
class MyViewController: UIViewController {
func completion(isSuccess: Bool, message: String) {
print("isSuccess:\(isSuccess), message:\(message)")
}
@IBAction func registerPressed(_ sender: AnyObject) {
let dataManager = DataManager()
dataManager.save(key: "name", value: "Nick", callback: completion)
}
}or
let dataManager = DataManager()
dataManager.save(key: "name", value: "Nick") { (isSuccess, message) in
  print("isSuccess:\(isSuccess), message:\(message)")
}Run on background thread:
DispatchQueue.global(qos: .background).async {
  //do something
}
Run on main(UI) thread:
DispatchQueue.main.async {
  //do something
}
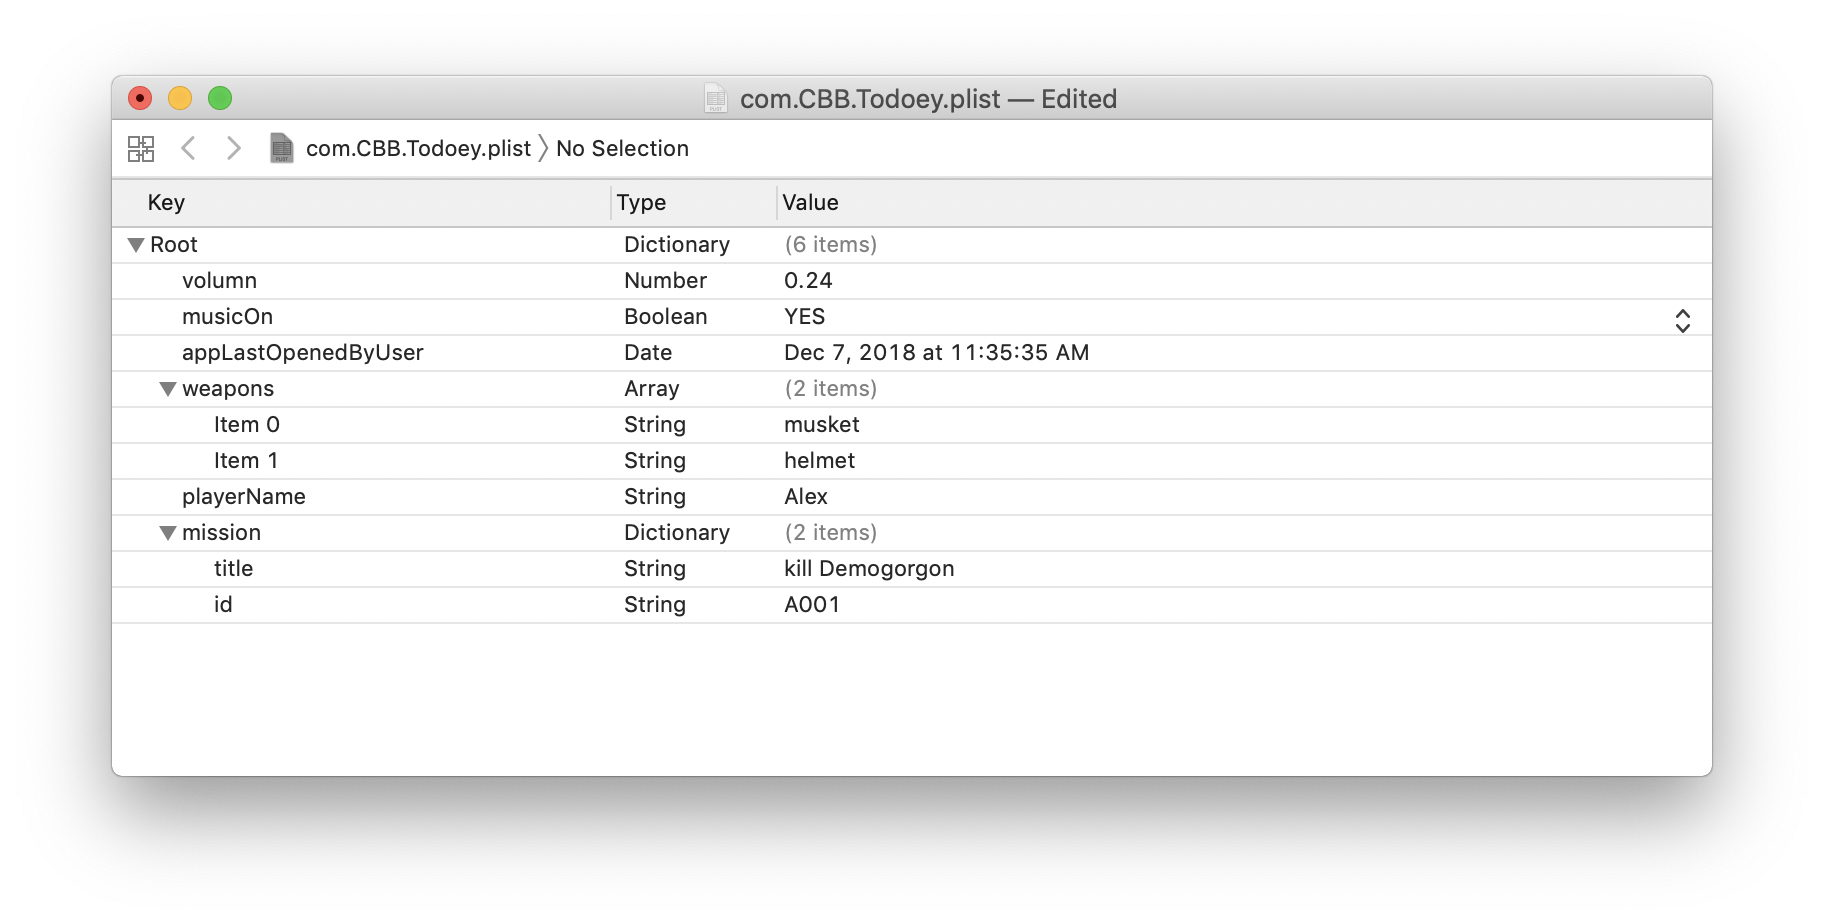
Persistent an array
let defaults = UserDefaults.standard
defaults.set(0.24, forKey: "volumn")
defaults.set(true, forKey: "musicOn")
defaults.set("Alex", forKey: "playerName")
defaults.set(["musket", "helmet"], forKey: "weapons")
defaults.set(["id": "A001", "title": "kill Demogorgon"], forKey: "mission")
defaults.set(Date(), forKey: "appLastOpenedByUser")
Retrieve the array from the local storage (plist)
if let volumn = defaults.float(forKey: "volumn") as? Float {
  print("volumn:\(volumn)")
}
if let musicOn = defaults.bool(forKey: "musicOn") as? Bool {
  print("musicOn:\(musicOn)")
}
if let playerName = defaults.string(forKey: "playerName") {
  print("playerName:\(playerName)")
}
if let appLastOpenedByUser = defaults.object(forKey: "appLastOpenedByUser") {
  print("appLastOpenedByUser:\(appLastOpenedByUser)")
}
if let weapons = defaults.array(forKey: "weapons") as? [String] {
  print("weapons:\(weapons)")
}
if let mission = defaults.dictionary(forKey: "mission") as? Dictionary<String, String> {
  print("mission:\(mission)")
}
To print the simulator and application path in AppDelegate
func application(_ application: UIApplication, didFinishLaunchingWithOptions launchOptions: [UIApplication.LaunchOptionsKey: Any]?) -> Bool {
    print(NSSearchPathForDirectoriesInDomains(.documentDirectory, .userDomainMask, true).last! as String)
    return true
}
We gonna get
/Users/catherine/Library/Developer/CoreSimulator/Devices/C2161038-1255-44C0-88EA-E61BEDD0EDE3/data/Containers/Data/Application/E927D9CE-FAF9-4229-8D6A-2D2B82EBF832/Documents
And the plist file is going to be actually saved in
/Users/catherine/Library/Developer/CoreSimulator/Devices/C2161038-1255-44C0-88EA-E61BEDD0EDE3/data/Containers/Data/Application/E927D9CE-FAF9-4229-8D6A-2D2B82EBF832/Library/Preferences/com.CBB.Todoey.plist
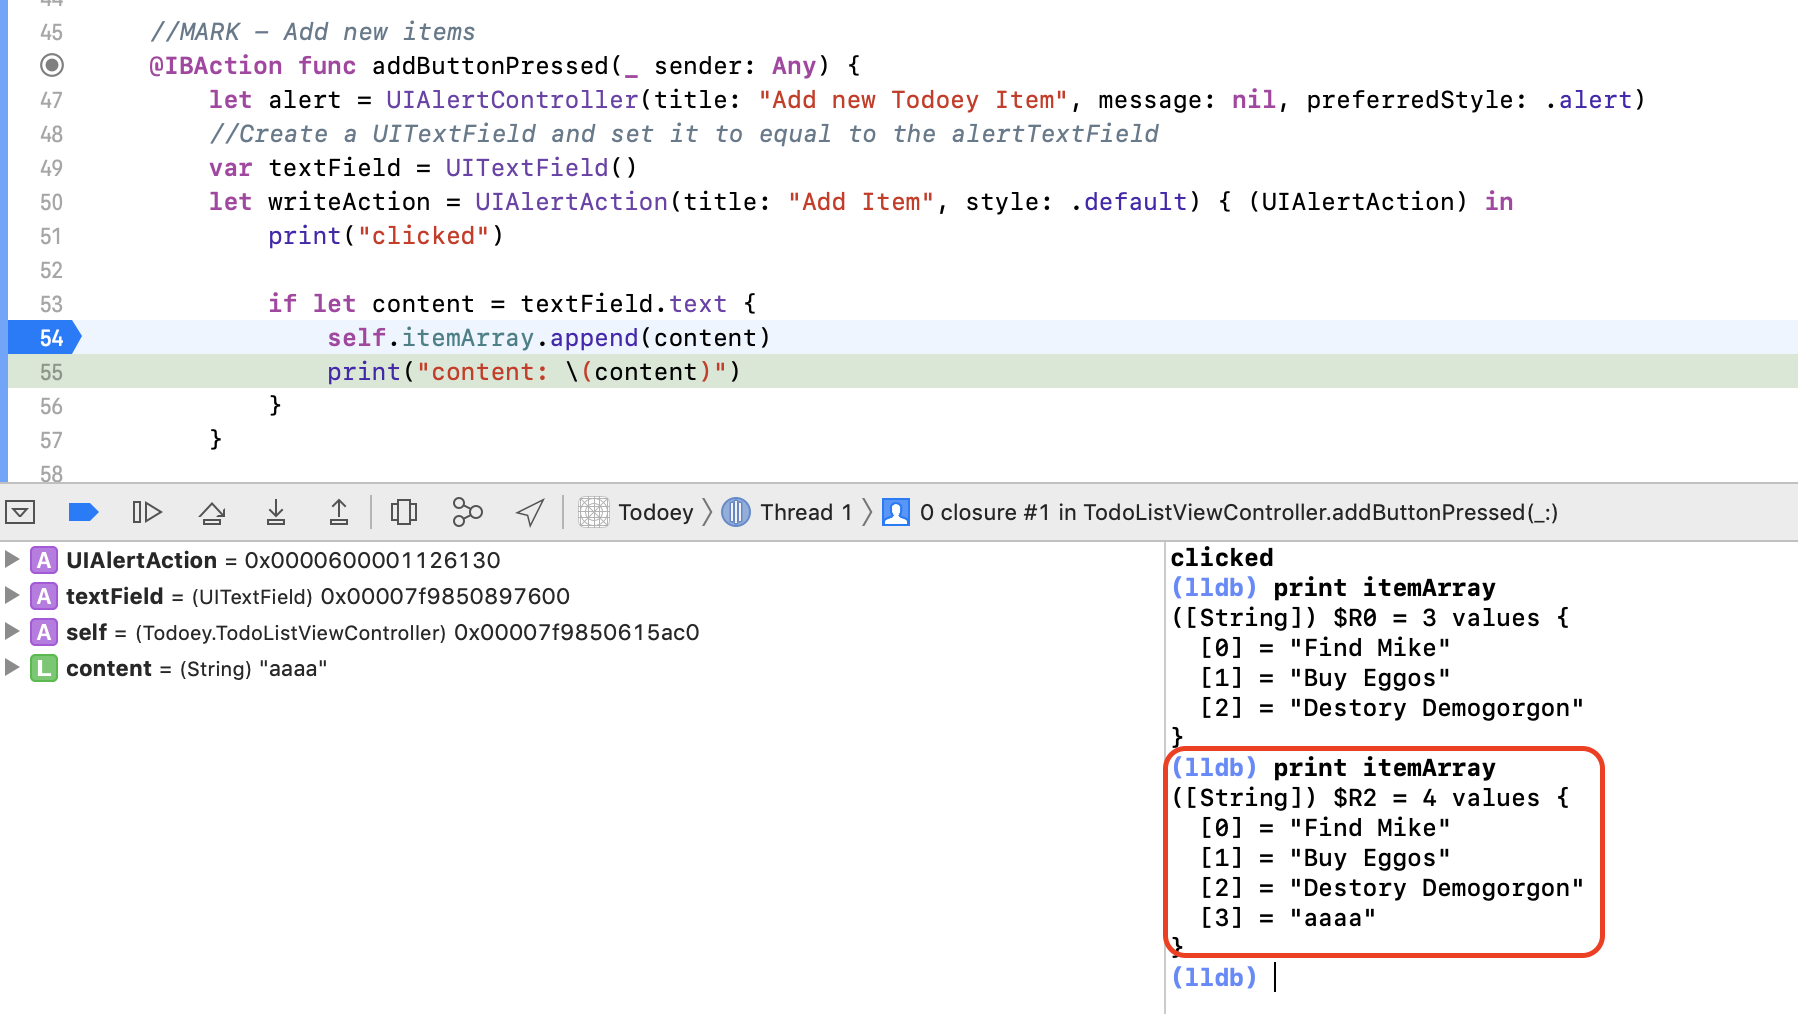
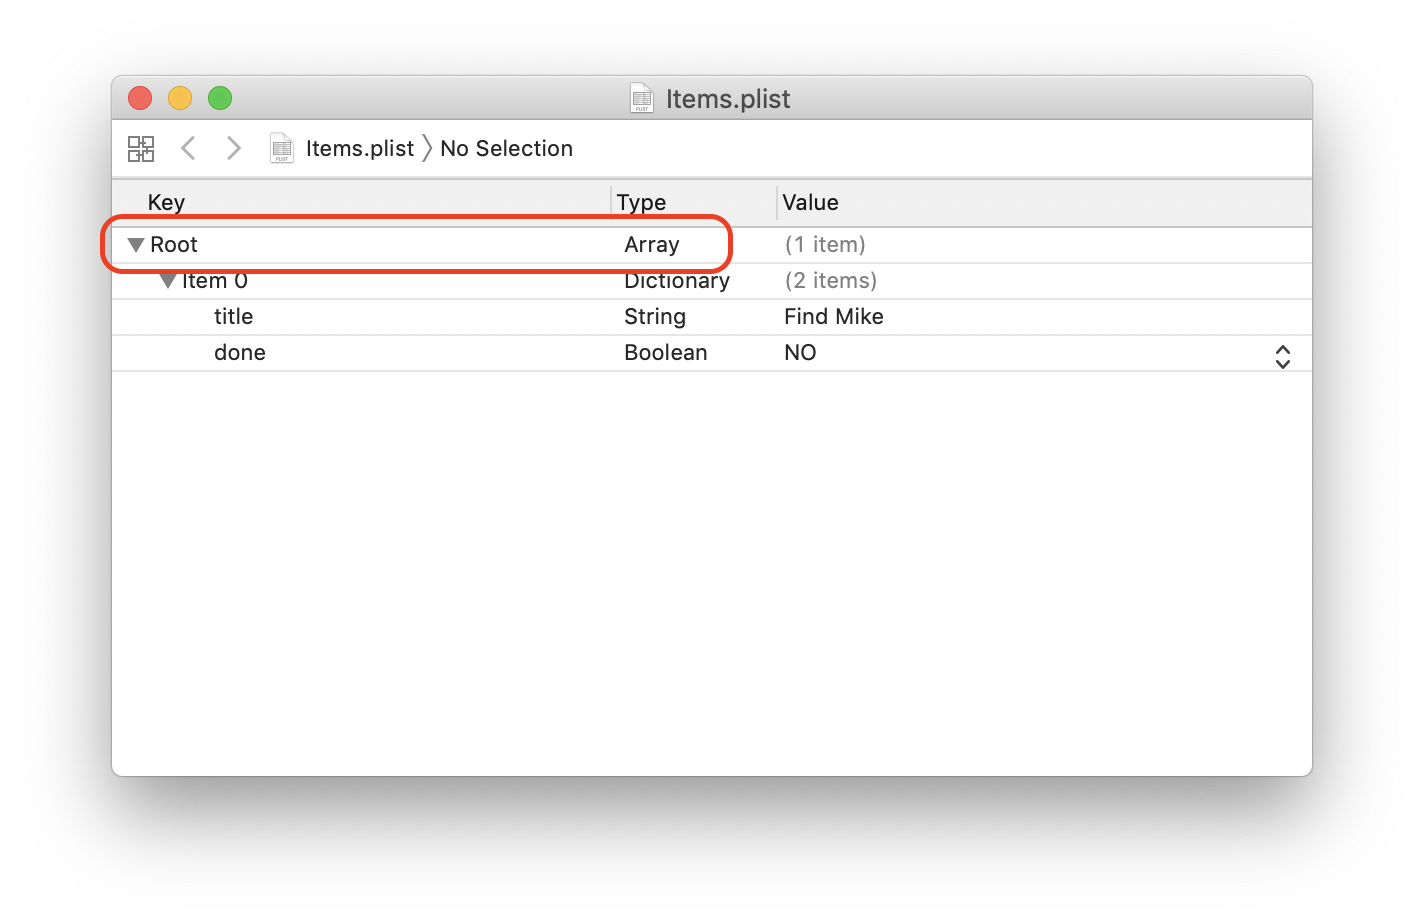
Notice: Object array is not allowed to persistent in local storage directly. Why not create our own plist by using
FileManager.
Initialise the file with a reasonable name
let dataFilePath = FileManager.default.urls(for: .documentDirectory, in: .userDomainMask).first?.appendingPathComponent("Items.plist")Make the object encodable
import Foundation

class TodoeyItem: Encodable {
    var title: String
    var done: Bool

    init(title: String, done: Bool) {
        self.title = title
        self.done = done
    }
}
Encode the item array and save
do {
  let encoder = PropertyListEncoder()
  let data = try encoder.encode(self.itemArray)
  try data.write(to: dataFilePath!)
  } catch {
    print("Error encoding item array")
  }
Make the object decodable (Encodabe + Decodable = Codable)
import Foundation

class TodoeyItem: Codable {
    var title: String
    var done: Bool

    init(title: String, done: Bool) {
        self.title = title
        self.done = done
    }
}
Retrieve and decode the item array
if let data = try? Data(contentsOf: dataFilePath!) {
  let decoder = PropertyListDecoder()
  do {
    itemArray = try decoder.decode([TodoeyItem].self, from: data)

    //Refresh the tableView
    self.tableView.reloadData()
    } catch {
      print("Error decoding item array, \(error)")
    }
} else {
  print("Error decoding item array")
}
Cp. The difference between UserDefaults and FileManager plist is the type of Root directory, and that's why UserDefaults is supposed to keep standard types rather than Object.

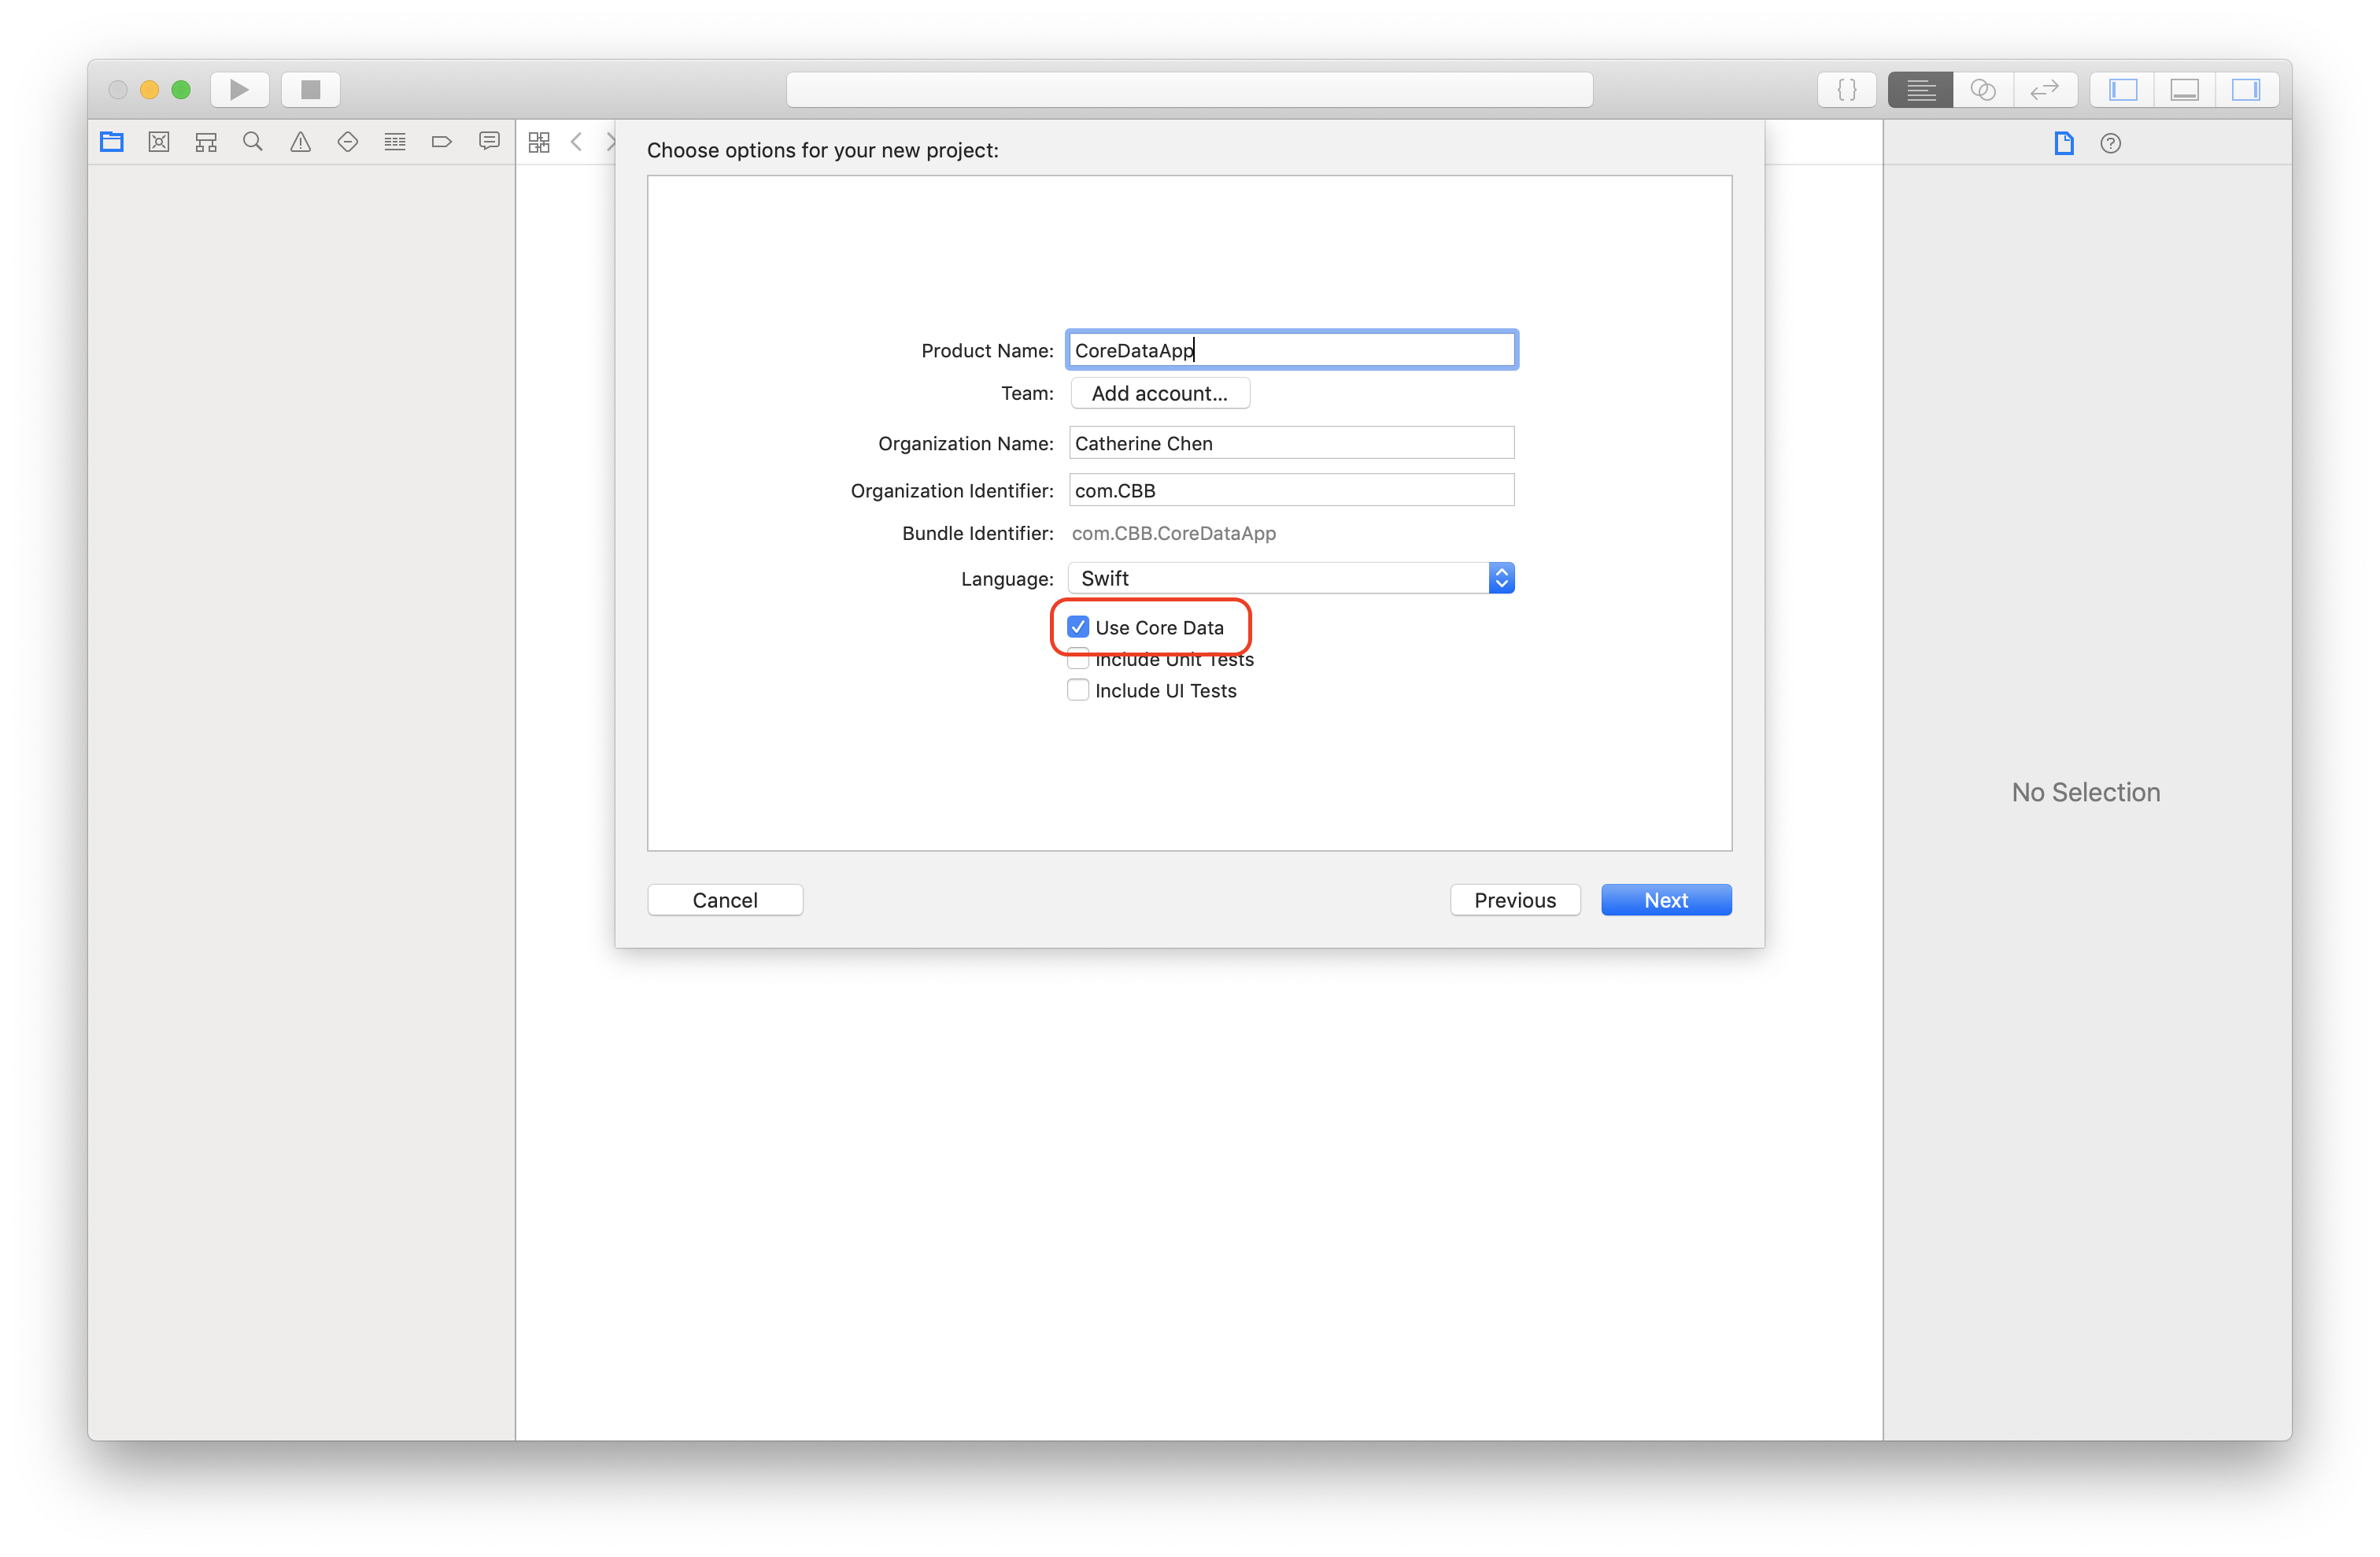
- Create a new project with CoreData
Or paste the following code in AppDelegate
import UIKit
import CoreData

@UIApplicationMain
class AppDelegate: UIResponder, UIApplicationDelegate {
    func applicationWillTerminate(_ application: UIApplication) {
        // Called when the application is about to terminate. Save data if appropriate. See also applicationDidEnterBackground:.
        // Saves changes in the application's managed object context before the application terminates.
        self.saveContext()
    }


    // MARK: - Core Data stack

    lazy var persistentContainer: NSPersistentContainer = {
        /*
         The persistent container for the application. This implementation
         creates and returns a container, having loaded the store for the
         application to it. This property is optional since there are legitimate
         error conditions that could cause the creation of the store to fail.
         */
        let container = NSPersistentContainer(name: "YOUR_DATA_MODEL_NAME")
        container.loadPersistentStores(completionHandler: { (storeDescription, error) in
            if let error = error as NSError? {
                // Replace this implementation with code to handle the error appropriately.
                // fatalError() causes the application to generate a crash log and terminate. You should not use this function in a shipping application, although it may be useful during development.

                /*
                 Typical reasons for an error here include:
                 * The parent directory does not exist, cannot be created, or disallows writing.
                 * The persistent store is not accessible, due to permissions or data protection when the device is locked.
                 * The device is out of space.
                 * The store could not be migrated to the current model version.
                 Check the error message to determine what the actual problem was.
                 */
                fatalError("Unresolved error \(error), \(error.userInfo)")
            }
        })
        return container
    }()

    // MARK: - Core Data Saving support

    func saveContext () {
        let context = persistentContainer.viewContext
        if context.hasChanges {
            do {
                try context.save()
            } catch {
                // Replace this implementation with code to handle the error appropriately.
                // fatalError() causes the application to generate a crash log and terminate. You should not use this function in a shipping application, although it may be useful during development.
                let nserror = error as NSError
                fatalError("Unresolved error \(nserror), \(nserror.userInfo)")
            }
        }
    }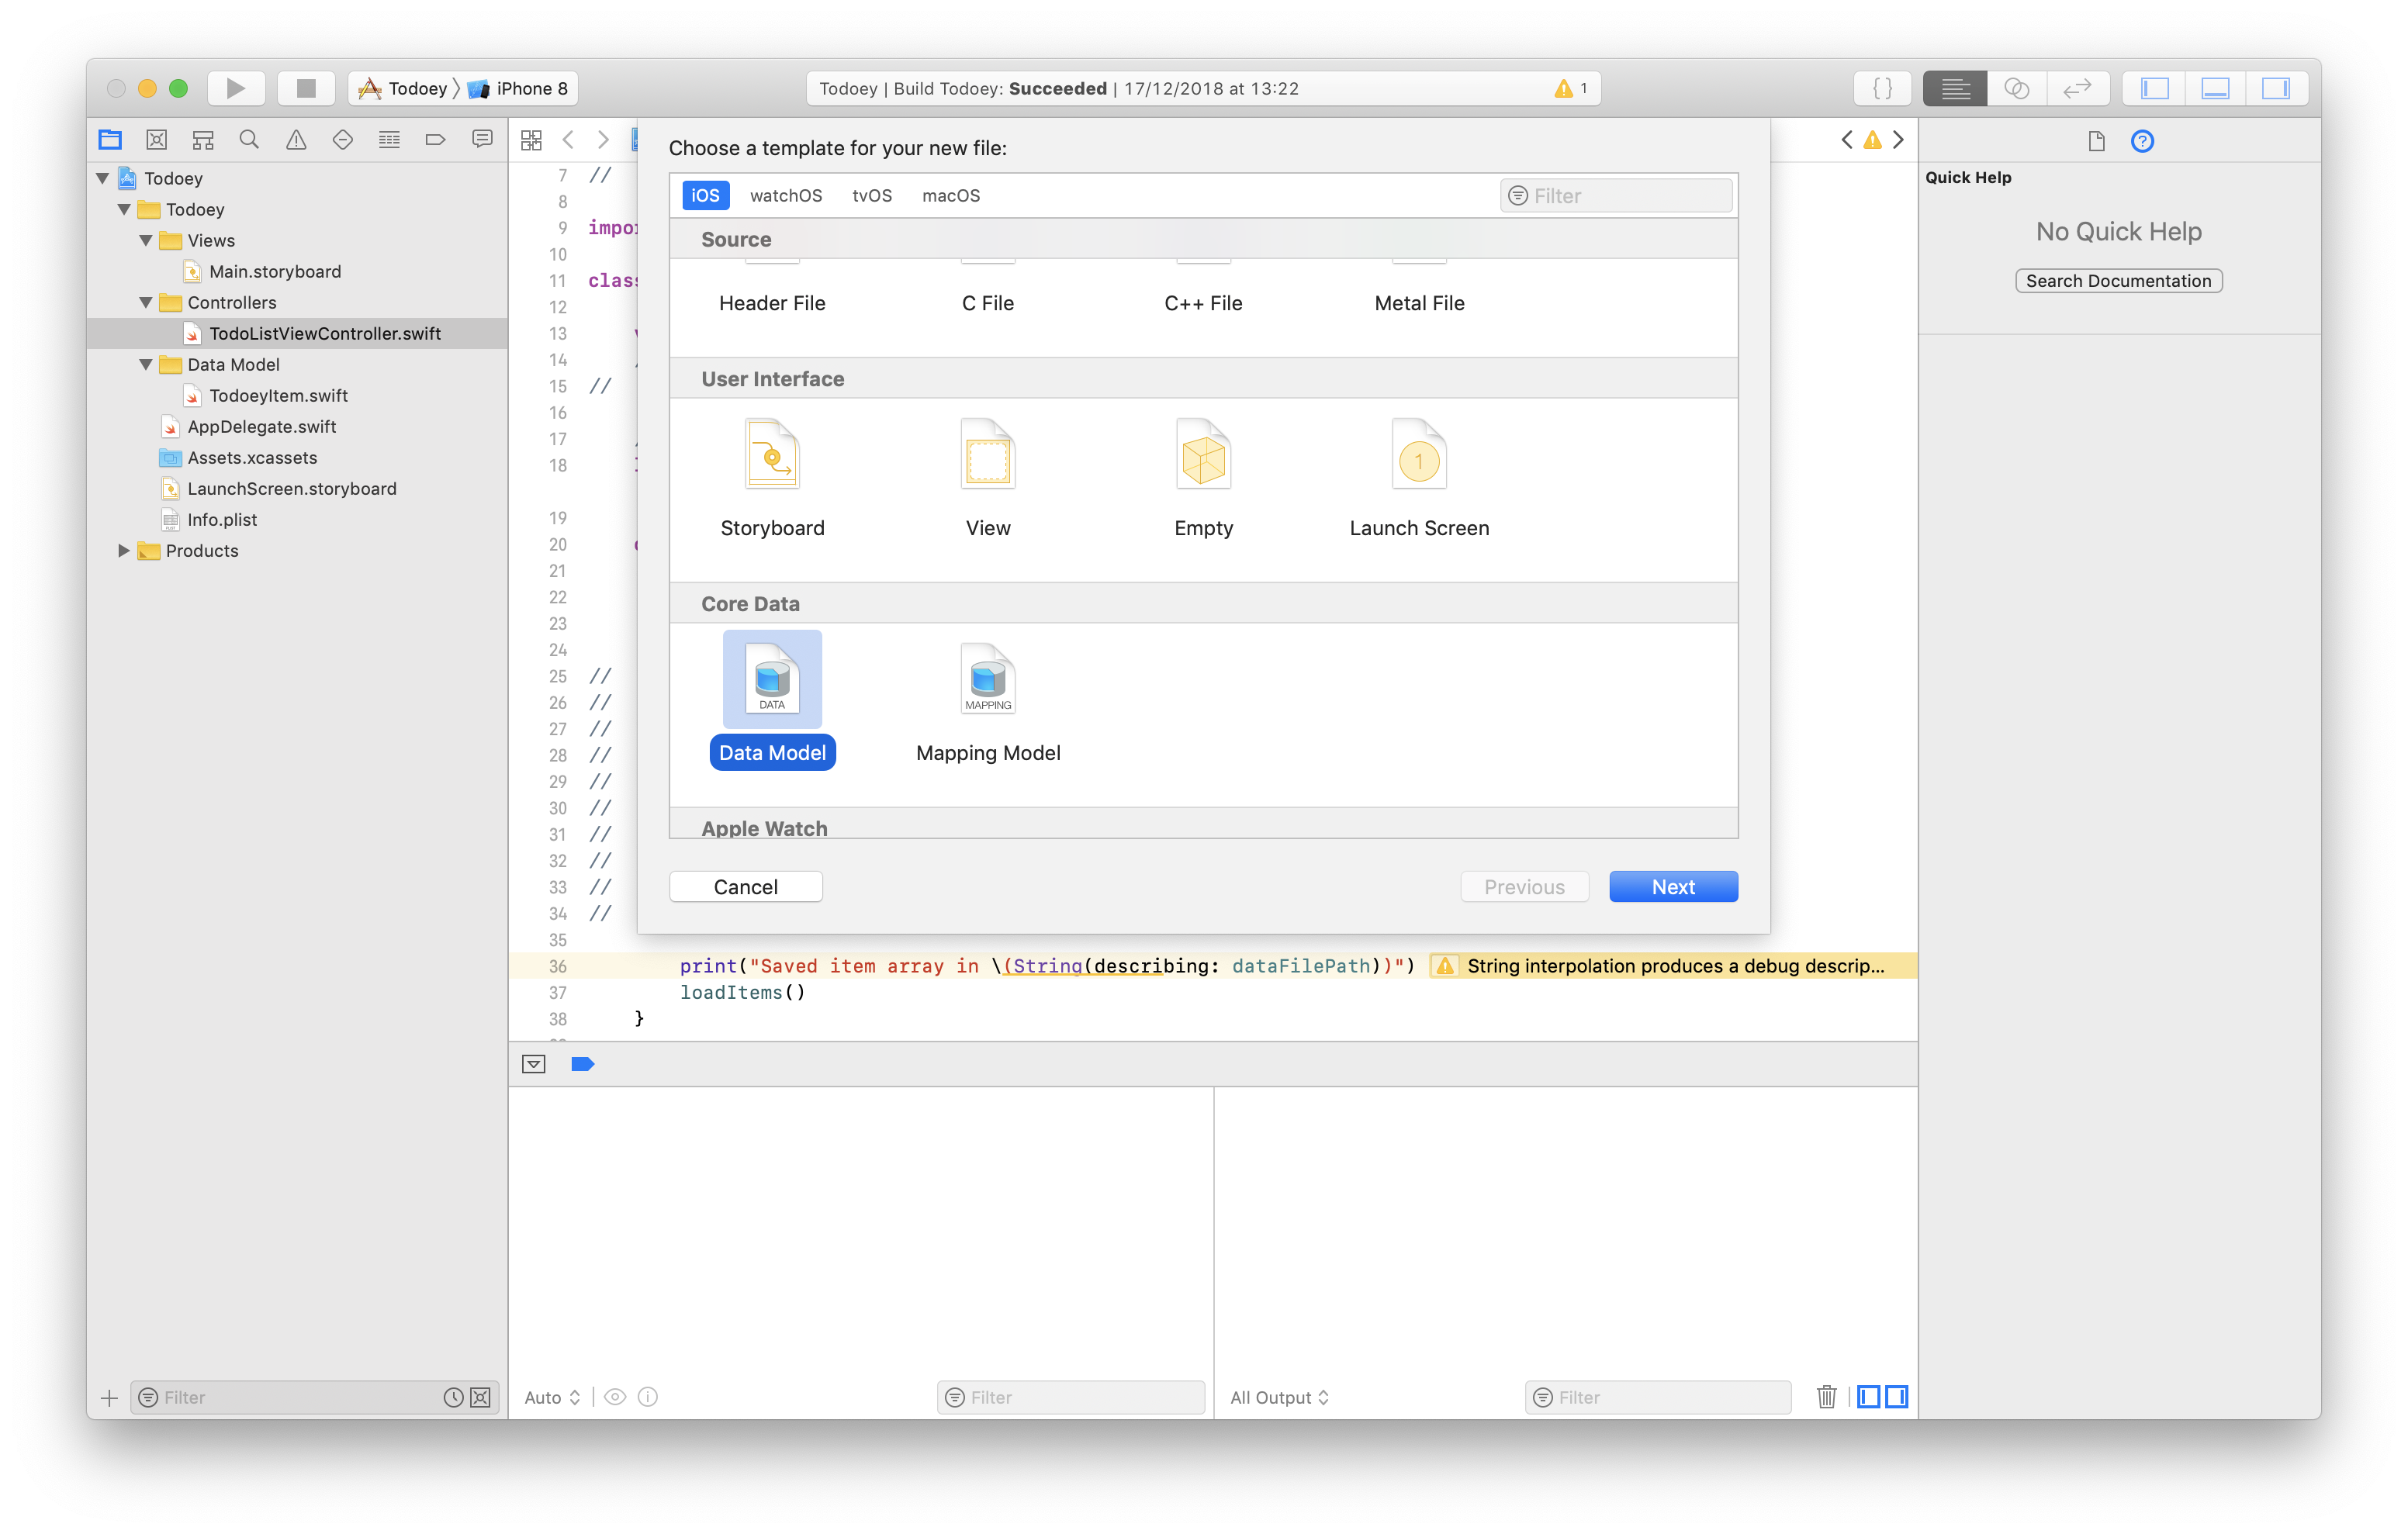
}-
Add a Core Data model DataModel
File -> New -> File, scroll to Core Data section
-
Match the file name to NSPersistentContainer in AppDelegate
let container = NSPersistentContainer(name: "DataModel")You might get CoreData: error: Failed to load model named xxx if you forget to update the name.
-
Go to DataModel, add a new Entity named
MyTodoeyItem
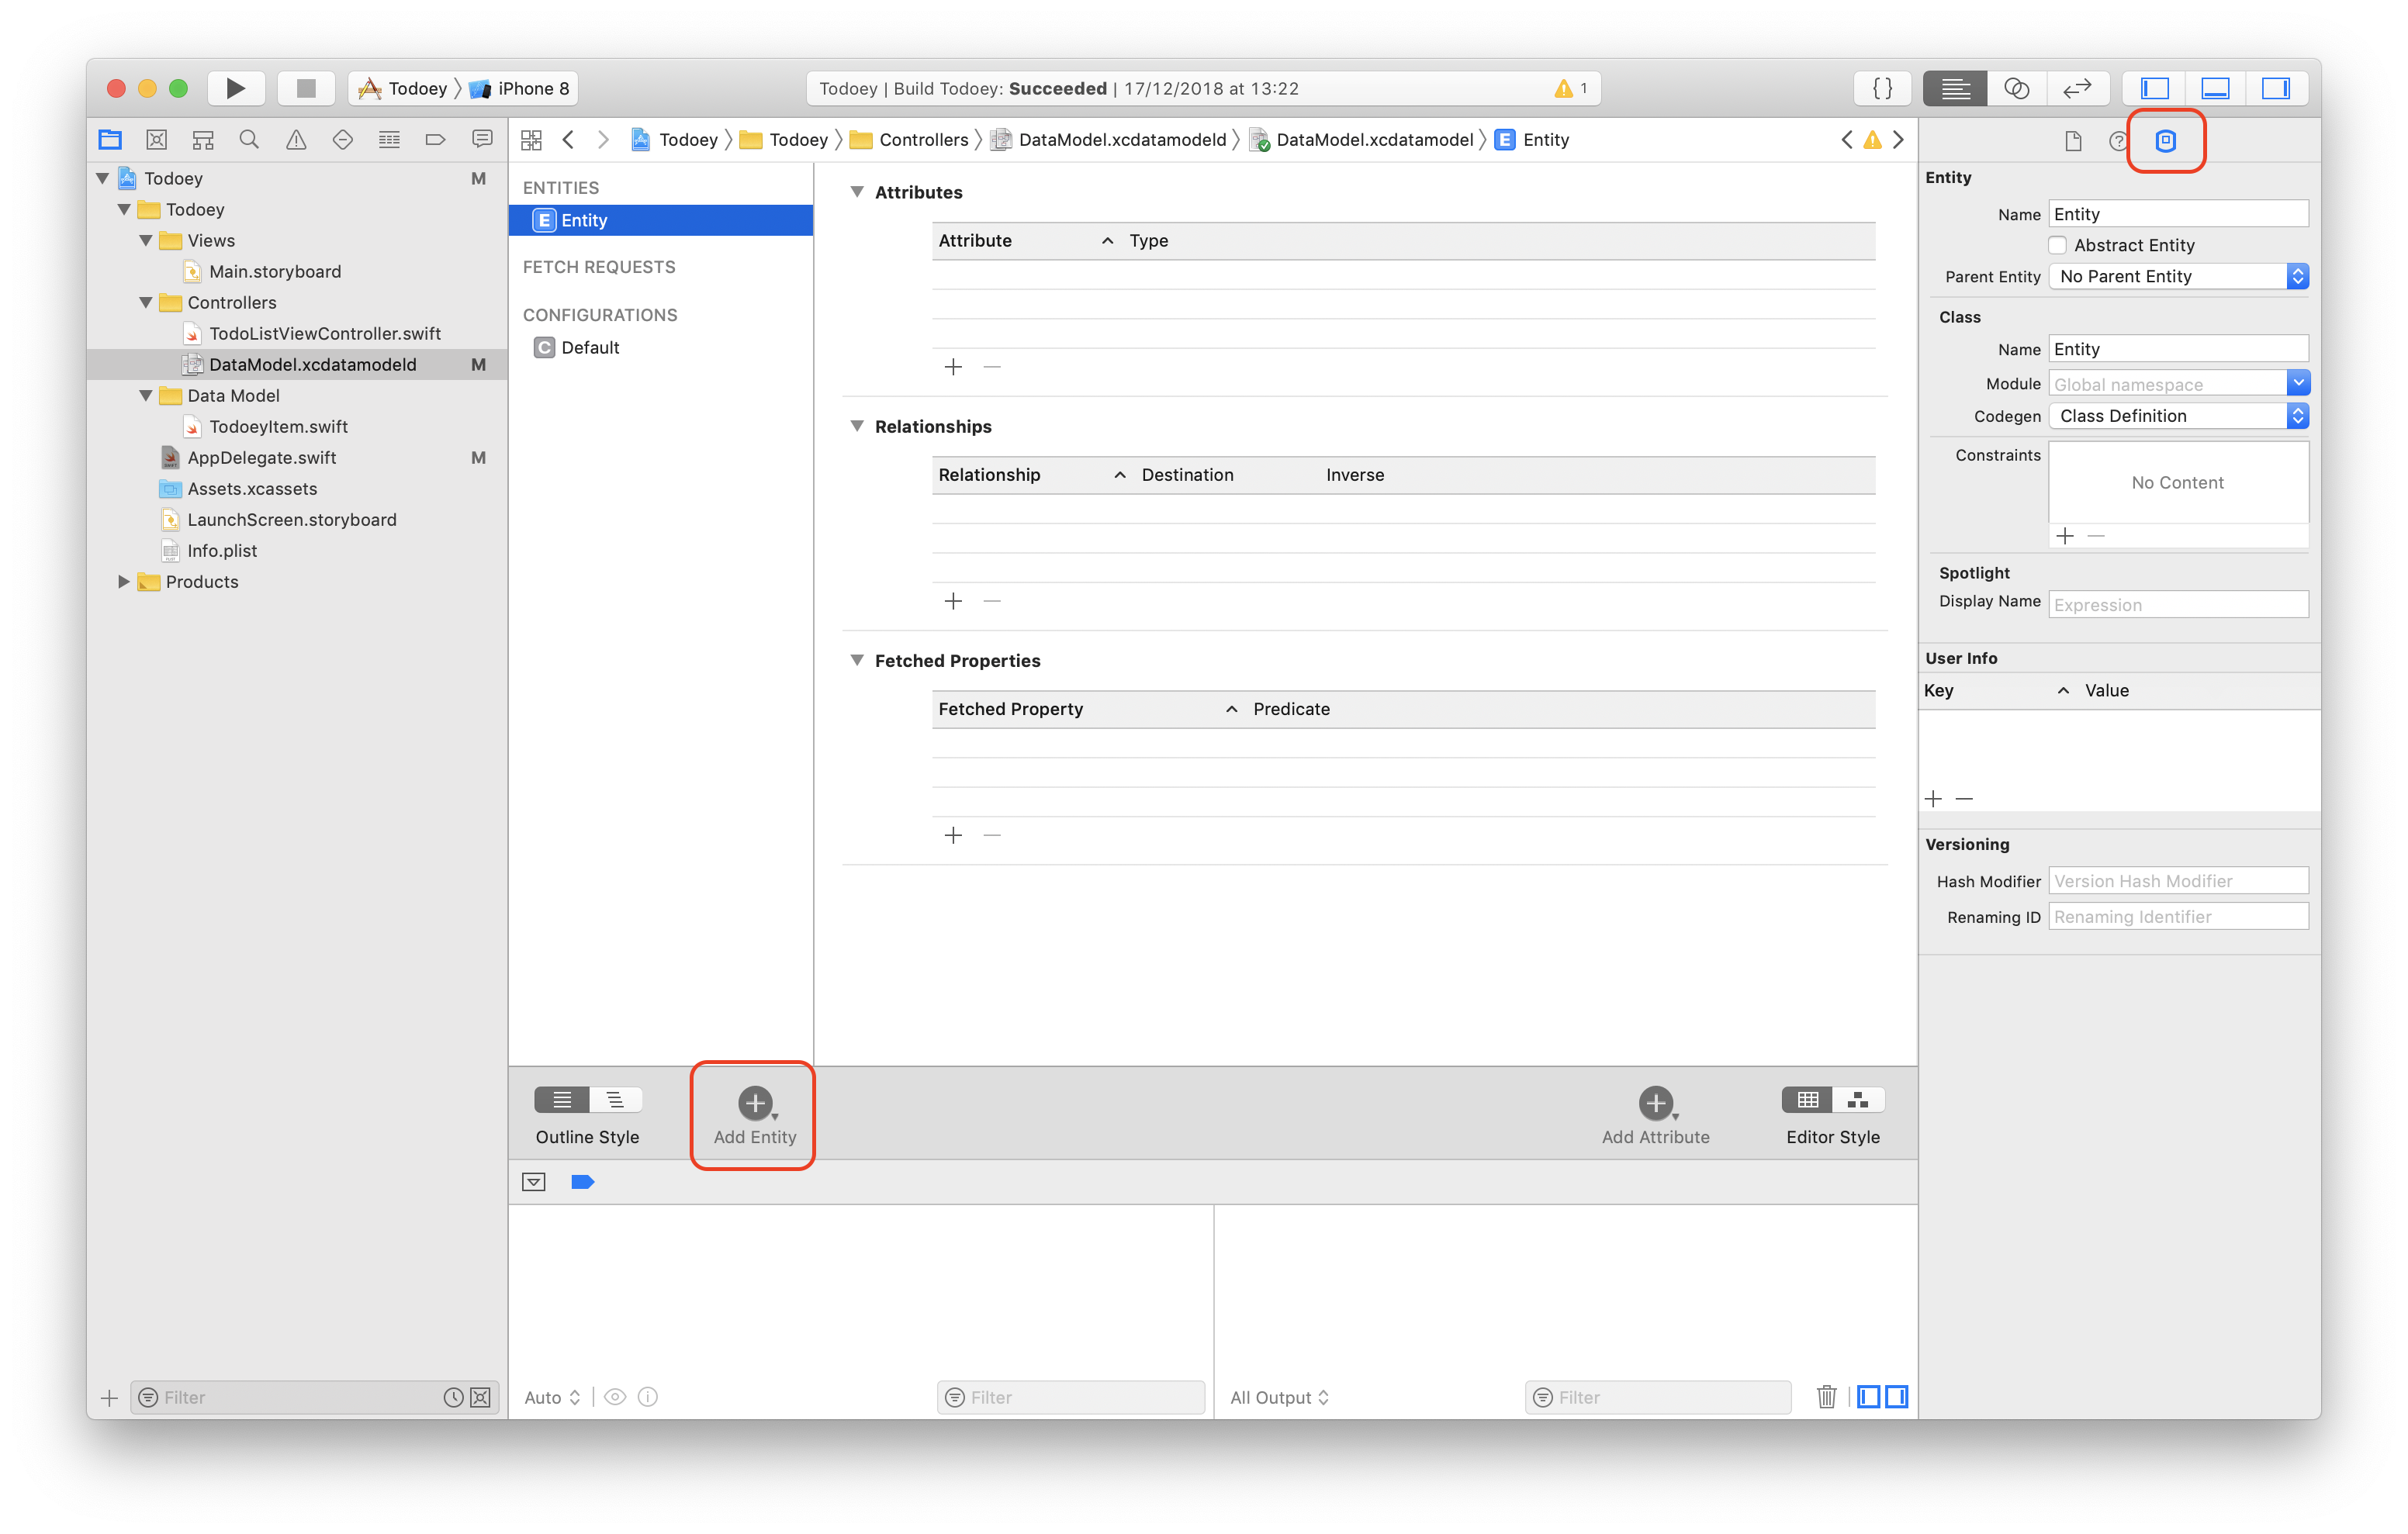
-
Add attributes and make them optional if you need

-
Change the module from 'Global namespace' to 'Current Product Module'
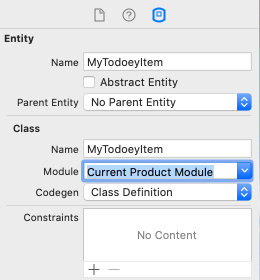
-
(Optional) You could either skip this step by setting 'Class Definition' as default, or select Category/Extension in Codegen if you are going to customise your entities, i.e. You have to create classes that are identically named to you entities.
Now you might notice that we essentially replace the TodoeyItem class with
TodoeyItem class:
import Foundation

class TodoeyItem: Codable {
    var title: String
    var done: Bool

    init(title: String, done: Bool) {
        self.title = title
        self.done = done
    }
}- Save data (Class name refers to the entity name)
let context = (UIApplication.shared.delegate as! AppDelegate).persistentContainer.viewContext
let newItem = MyTodoeyItem(context: context)
newItem.title = content
newItem.done = false

itemArray.append(newItem)
do {
  try context.save()
} catch {
  if let error = error as NSError? {
    fatalError("Unresolved error \(error), \(error.userInfo)")
  }
}- Load data
import CoreData

class TodoListViewController: UITableViewController {
  var itemArray:[MyTodoeyItem] = []
  func loadItems() {
    do {
      let request: NSFetchRequest<MyTodoeyItem> = MyTodoeyItem.fetchRequest()
      itemArray = try context.fetch(request)
      } catch {
        print("Error fetching data from context \(error)")
      }
  }
}- Update data
itemArray[indexPath.row].setValue("new value", forKey: "title")
itemArray[indexPath.row].setValue(true, forKey: "done")
do {
  try context.save()
} catch {
  print("Error saving context \(error)")
}- Delete data
This is a little tricky, we cannot delete the item like updating data we was doing.
We are going to callcontext.delete()andcontext.save().
// Delete data from our Core Data, then call 'context.save()' to save data
context.delete(itemArray[indexPath.row])
do {
  try self.context.save()
} catch {
  print("Error saving context \(error)")
}

// Does nothing for our Core Date, it merely update our itemArray which is used to populate our tableView
itemArray.remove(at: indexPath.row)- Query data Have a look at NSPredicate Cheatsheet and NSHelper.
- Check the DB file if you want
To print the simulator and application path in AppDelegate
func application(_ application: UIApplication, didFinishLaunchingWithOptions launchOptions: [UIApplication.LaunchOptionsKey: Any]?) -> Bool {
    print(NSSearchPathForDirectoriesInDomains(.documentDirectory, .userDomainMask, true).last! as String)
    return true
}
Then we got
/Users/catherine/Library/Developer/CoreSimulator/Devices/C2161038-1255-44C0-88EA-E61BEDD0EDE3/data/Containers/Data/Application/D6149CD2-A9F4-4051-AB2E-0314F26082B7/Documents
Go to the following path to check the sqlite file via Datum
/Users/catherine/Library/Developer/CoreSimulator/Devices/C2161038-1255-44C0-88EA-E61BEDD0EDE3/data/Containers/Data/Application/D6149CD2-A9F4-4051-AB2E-0314F26082B7/Library/Application\ Support/DataModel.sqlite
- Edit Data model like a pro
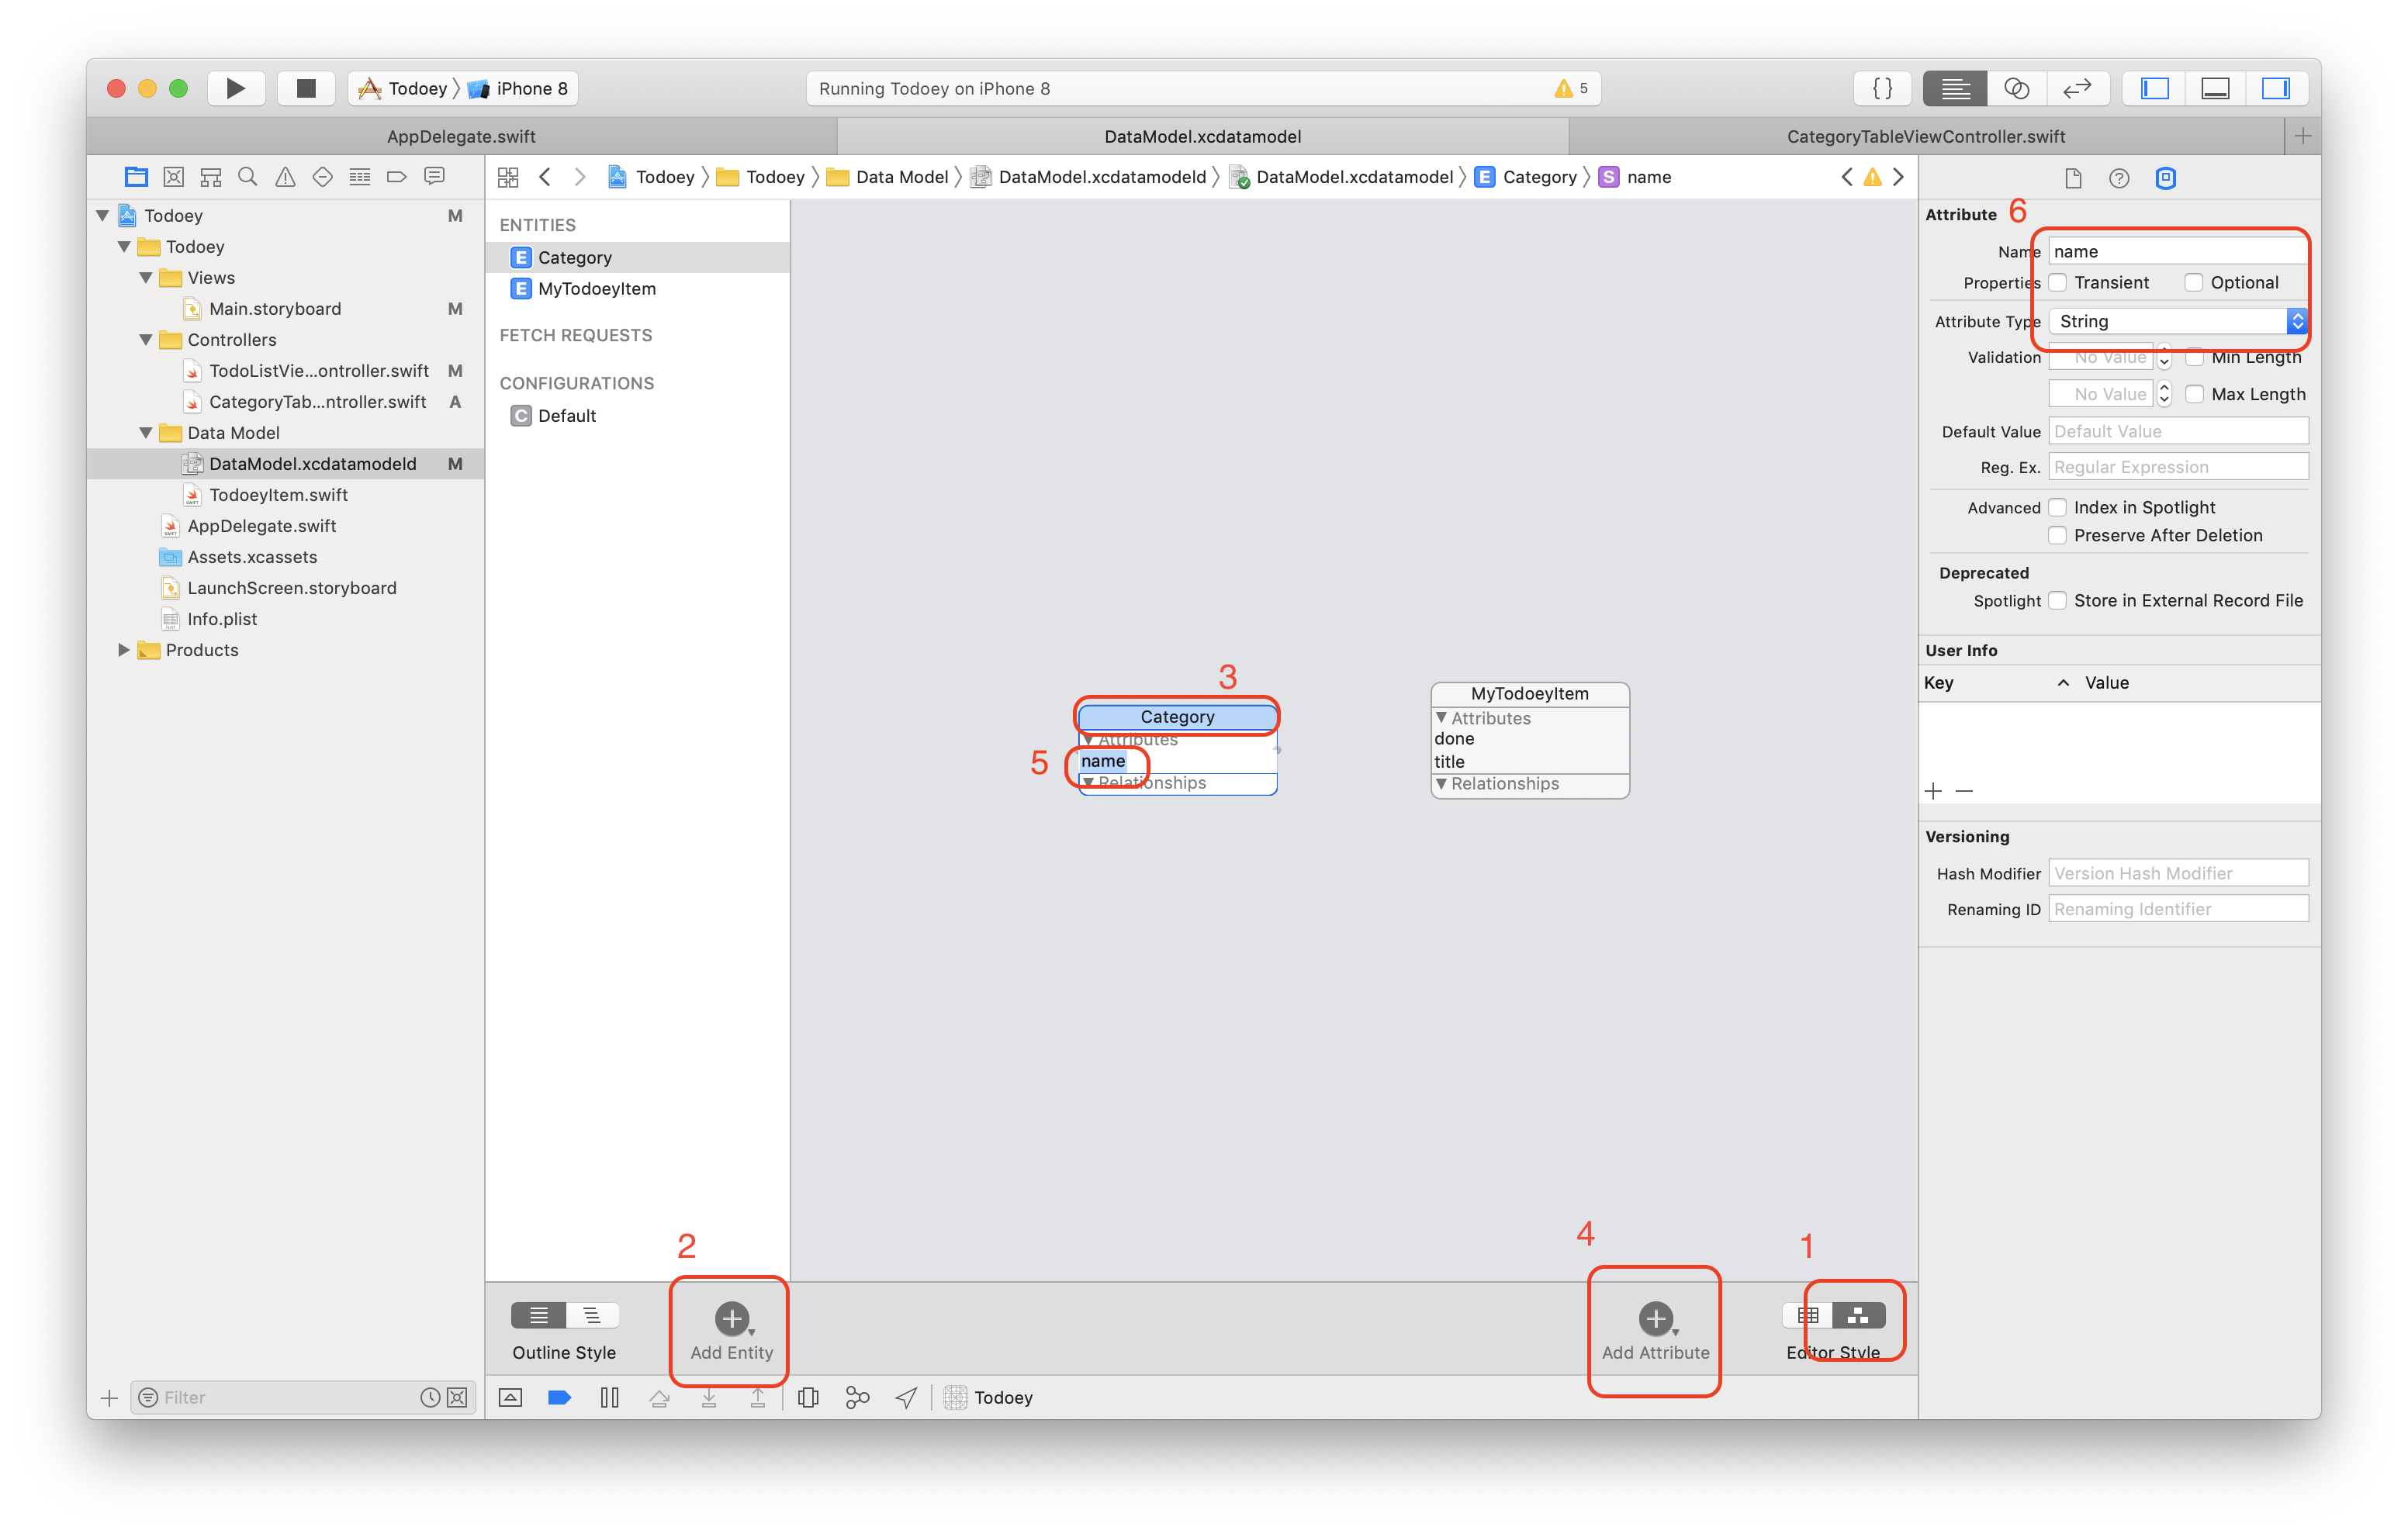
(1) Switch to Graph style
(2) Add a new entity
(3) Select the entity
(4) Add an attribute
(5) Select the attribute
(6) Update attribute's name and type. Check the optional box if you want
Build the relationship between Category and MyTodoeyItem
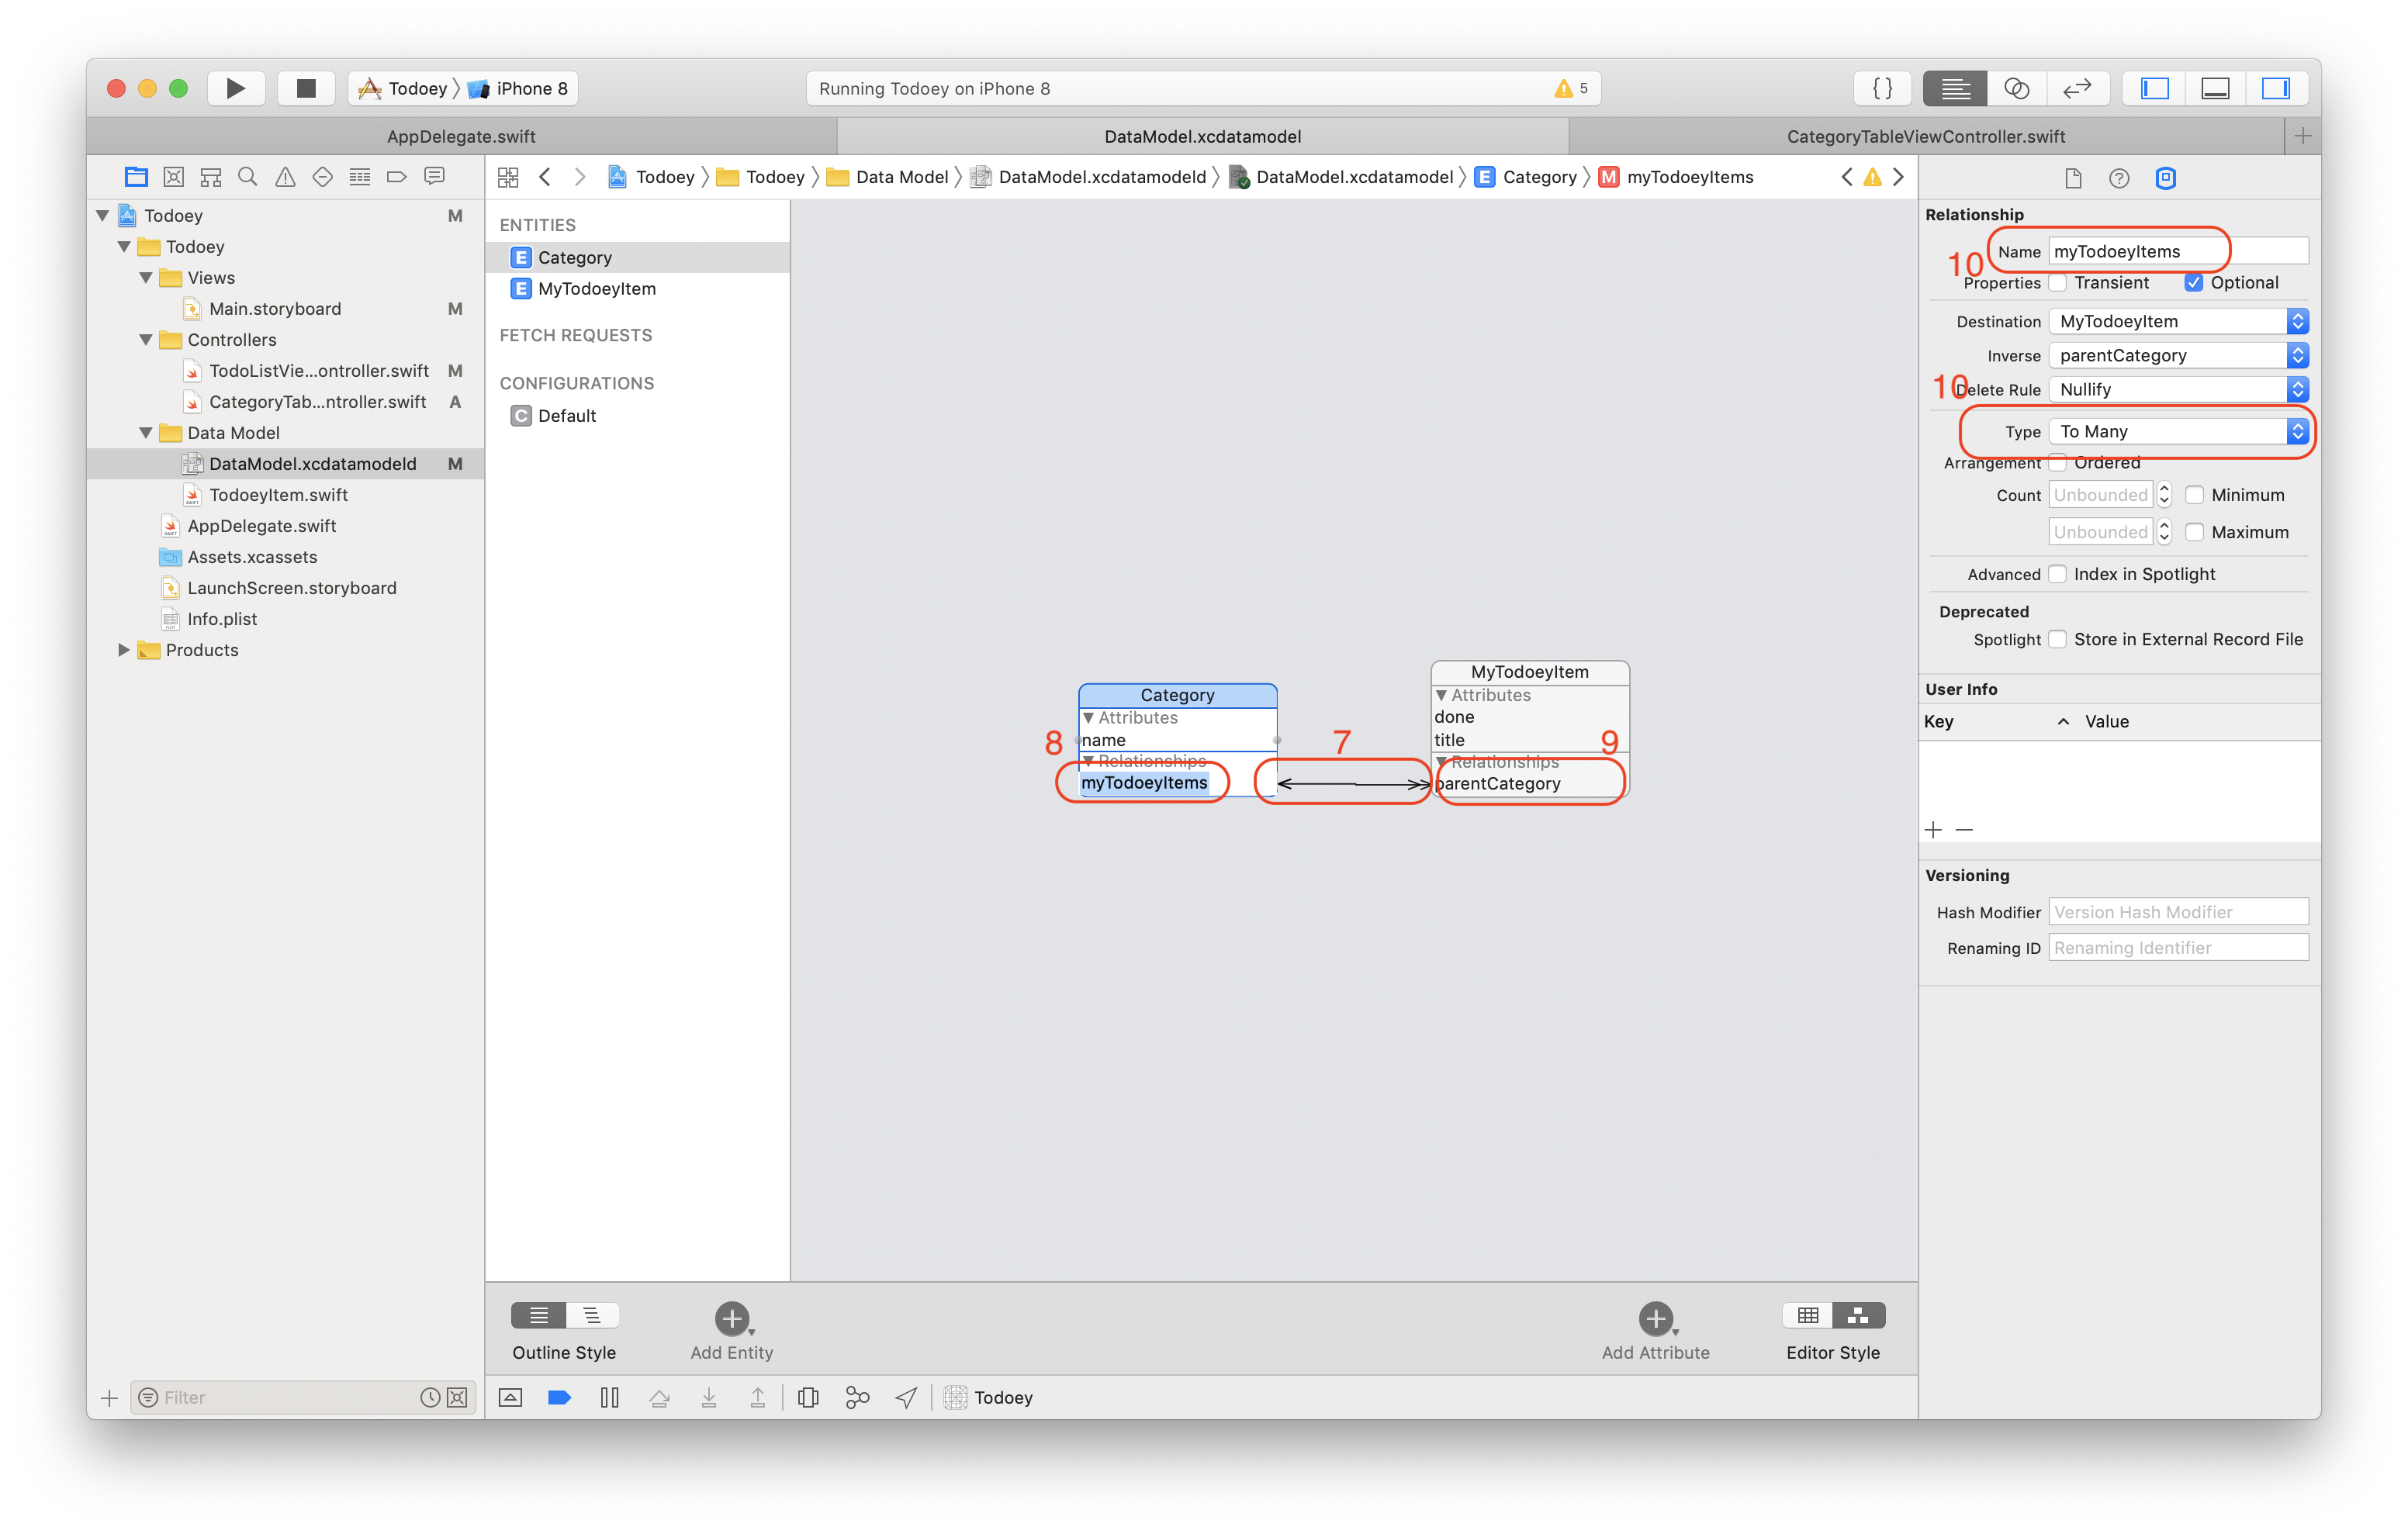
(7) Press Control and drag the Category to MyTodoeyItem
(8)(9)(10) Update relations. Each Category can have many MyTodoeyItems associated with it. Therefore, the type should be "To Many". On the contrary, each MyTodoeyItem belongs to one single Category, so we set "To one".
Realm example:
Todoey with Realm
- Install, setup and configure Realm
- Go to realm.io to download SDK (Dynamic framework / CocoaPods / Carthage).
- Download Realm browser to open .realm file. The realm would be saved in:
class ViewController: UIViewController {
    var realm: Realm? = nil

    override func viewDidLoad() {
        super.viewDidLoad()
        // Do any additional setup after loading the view, typically from a nib.

        // MARK: Realm - initialising
        do {
            realm = try Realm()
        } catch {
            NSLog("Error Initialising Realm: \(error)")
        }

        print(Realm.Configuration.defaultConfiguration.fileURL)
    }
}- Add a new piece of data
Let's say, we have some categories and items, each item belongs to one single category.
Create Category
import Foundation
import RealmSwift

class Category: Object {
    @objc dynamic var name: String = ""
    let items = List<Item>()
}
Create Item
import Foundation
import RealmSwift

class Item: Object {
    // dynamic is a declaration modifier, it basically tells the runtime to use dynamic dispatch over the standard which is a static dispatch.This allows the property "name" to be monitered for change at runtime.
    @objc dynamic var name: String = ""

    // If we just simpily wrote "Category", then this is just a class. In order to make it the type of "Category", we have to say ",self"
    // property: what the parent list named in Category
    var parentCategory = LinkingObjects(fromType: Category.self, property: "items")
}- Save data Save data in the database
do {
    try realm?.write {
        let category = Category()
        category.name = "any category"
        realm?.add(category)
    }
} catch {
    NSLog("Error writing Realm: \(error)")
}- Update data
do {
    try realm?.write {
        // do something here
    }
} catch {
    NSLog("Error writing Realm: \(error)")
}- Read data For example, in ViewController
var categories: Results<Category>?
class ViewController: UIViewController {
  override func viewDidLoad() {
        super.viewDidLoad()

        do {
            realm = try Realm()
            categories = realm?.objects(Category.self)
        } catch {
            NSLog("Error Initialising Realm: \(error)")
        }
  }
}- Delete data
Notice: no need to remove items from the Results list, Realm would automatically do it.
do {
  try realm?.write {
    realm?.delete(category)
    }
  } catch {
    NSLog("Error writing Realm: \(error)")
}You could either use URLSession or popular third-party SDK like Alamofire
The following features are included in
IO Operations
-
SSL certificate validation (Read the documentation: HTTPS Server Trust Evaluation)
- Using
openssl s_client -connect www.apple.com:443 - Get the full certificate by
openssl s_client -showcerts -host www.apple.com -port 443 - Copying the text (the -----BEGIN CERTIFICATE----- line through to the -----END CERTIFICATE----- line) into a text file with the .pem extension
- Using
-
Generic request/response types with associatedtype
Tools you might need:
- (Check SSL online)[https://www.ssllabs.com/ssltest/]
- Convert .pem file to .crt file via
openssl x509 -outform der -in xxxx.pem -out xxxx.crt
- Generic request/response types with
associatedtype
Check how exactly SSL pinning does on HttpClient.swift
Since iOS 9.0, app must follow App Transport Security:
- At least TLS 1.2
- HTTP is not allowed
- Apple will heavily censor when app infringes ATS settings (
NSAllowsArbitraryLoads).
<?xml version="1.0" encoding="UTF-8"?>
<!DOCTYPE plist PUBLIC "-//Apple//DTD PLIST 1.0//EN" "http://www.apple.com/DTDs/PropertyList-1.0.dtd">
<plist version="1.0">
<dict>

    <!-- network related constants -->
    <key>NSAppTransportSecurity</key>
    <dict>
        <!-- lift ATS restriction -->
        <key>NSAllowsArbitraryLoads</key>
        <true/>
        <!-- lift ATS restriction of AV Foundation -->
        <key>NSAllowsArbitraryLoadsInMedia</key>
        <true/>
        <!-- lift ATS restriction of WebView -->
        <key>NSAllowsArbitraryLoadsInWebContent</key>
        <true/>
        <!-- to support localhost -->
        <key>NSAllowsLocalNetworking</key>
        <true/>
        <!-- to support minimum TLS version, could be TLSv1.0、TLSv1.1、TLSv1.2. Default value = TLSv1.2 -->
        <key>NSExceptionMinimumTLSVersion</key>
        <string>TLSv1.0</string>


        <!-- define special cases -->
         <key>NSExceptionDomains</key>
         <dict>
            <key>sdk_domain.com</key>
            <dict>
                <!-- to support HTTP -->
                <key>NSExceptionAllowsInsecureHTTPLoads</key>
                <true/>
        </dict>
        <key>your_domain.com</key>
        <dict>
            <key>NSExceptionAllowsInsecureHTTPLoads</key>
            <true/>
            <!-- apply all of the domain exceptions to every subdomain of your domain -->
            <key>NSIncludesSubdomains</key>
            <true/>
        </dict>
    </dict>
    </dict>


</dict>
</plist>
Third Party keys NSThirdPartyExceptionAllowsInsecureHTTPLoads NSThirdPartyExceptionMinimumTLSVersion NSThirdPartyExceptionRequiresForwardSecrecy
Machine Learning is usual split into 2 broke categories - Supervised Machine Learning or Unsupervised Machine Learning.
- Load a pre-trained model, i.e., no training
- Make predictions
- Not encrypted
Get started from scratch Sample code
Example1 - Inceptionv3:
- Download pre-trained models from Apple website: https://developer.apple.com/machine-learning/build-run-models/
- Drag .mlmodel file into your project
- Check detection code here: Inceptionv3Model.swift
Example2 - Watson Visual Recognition:
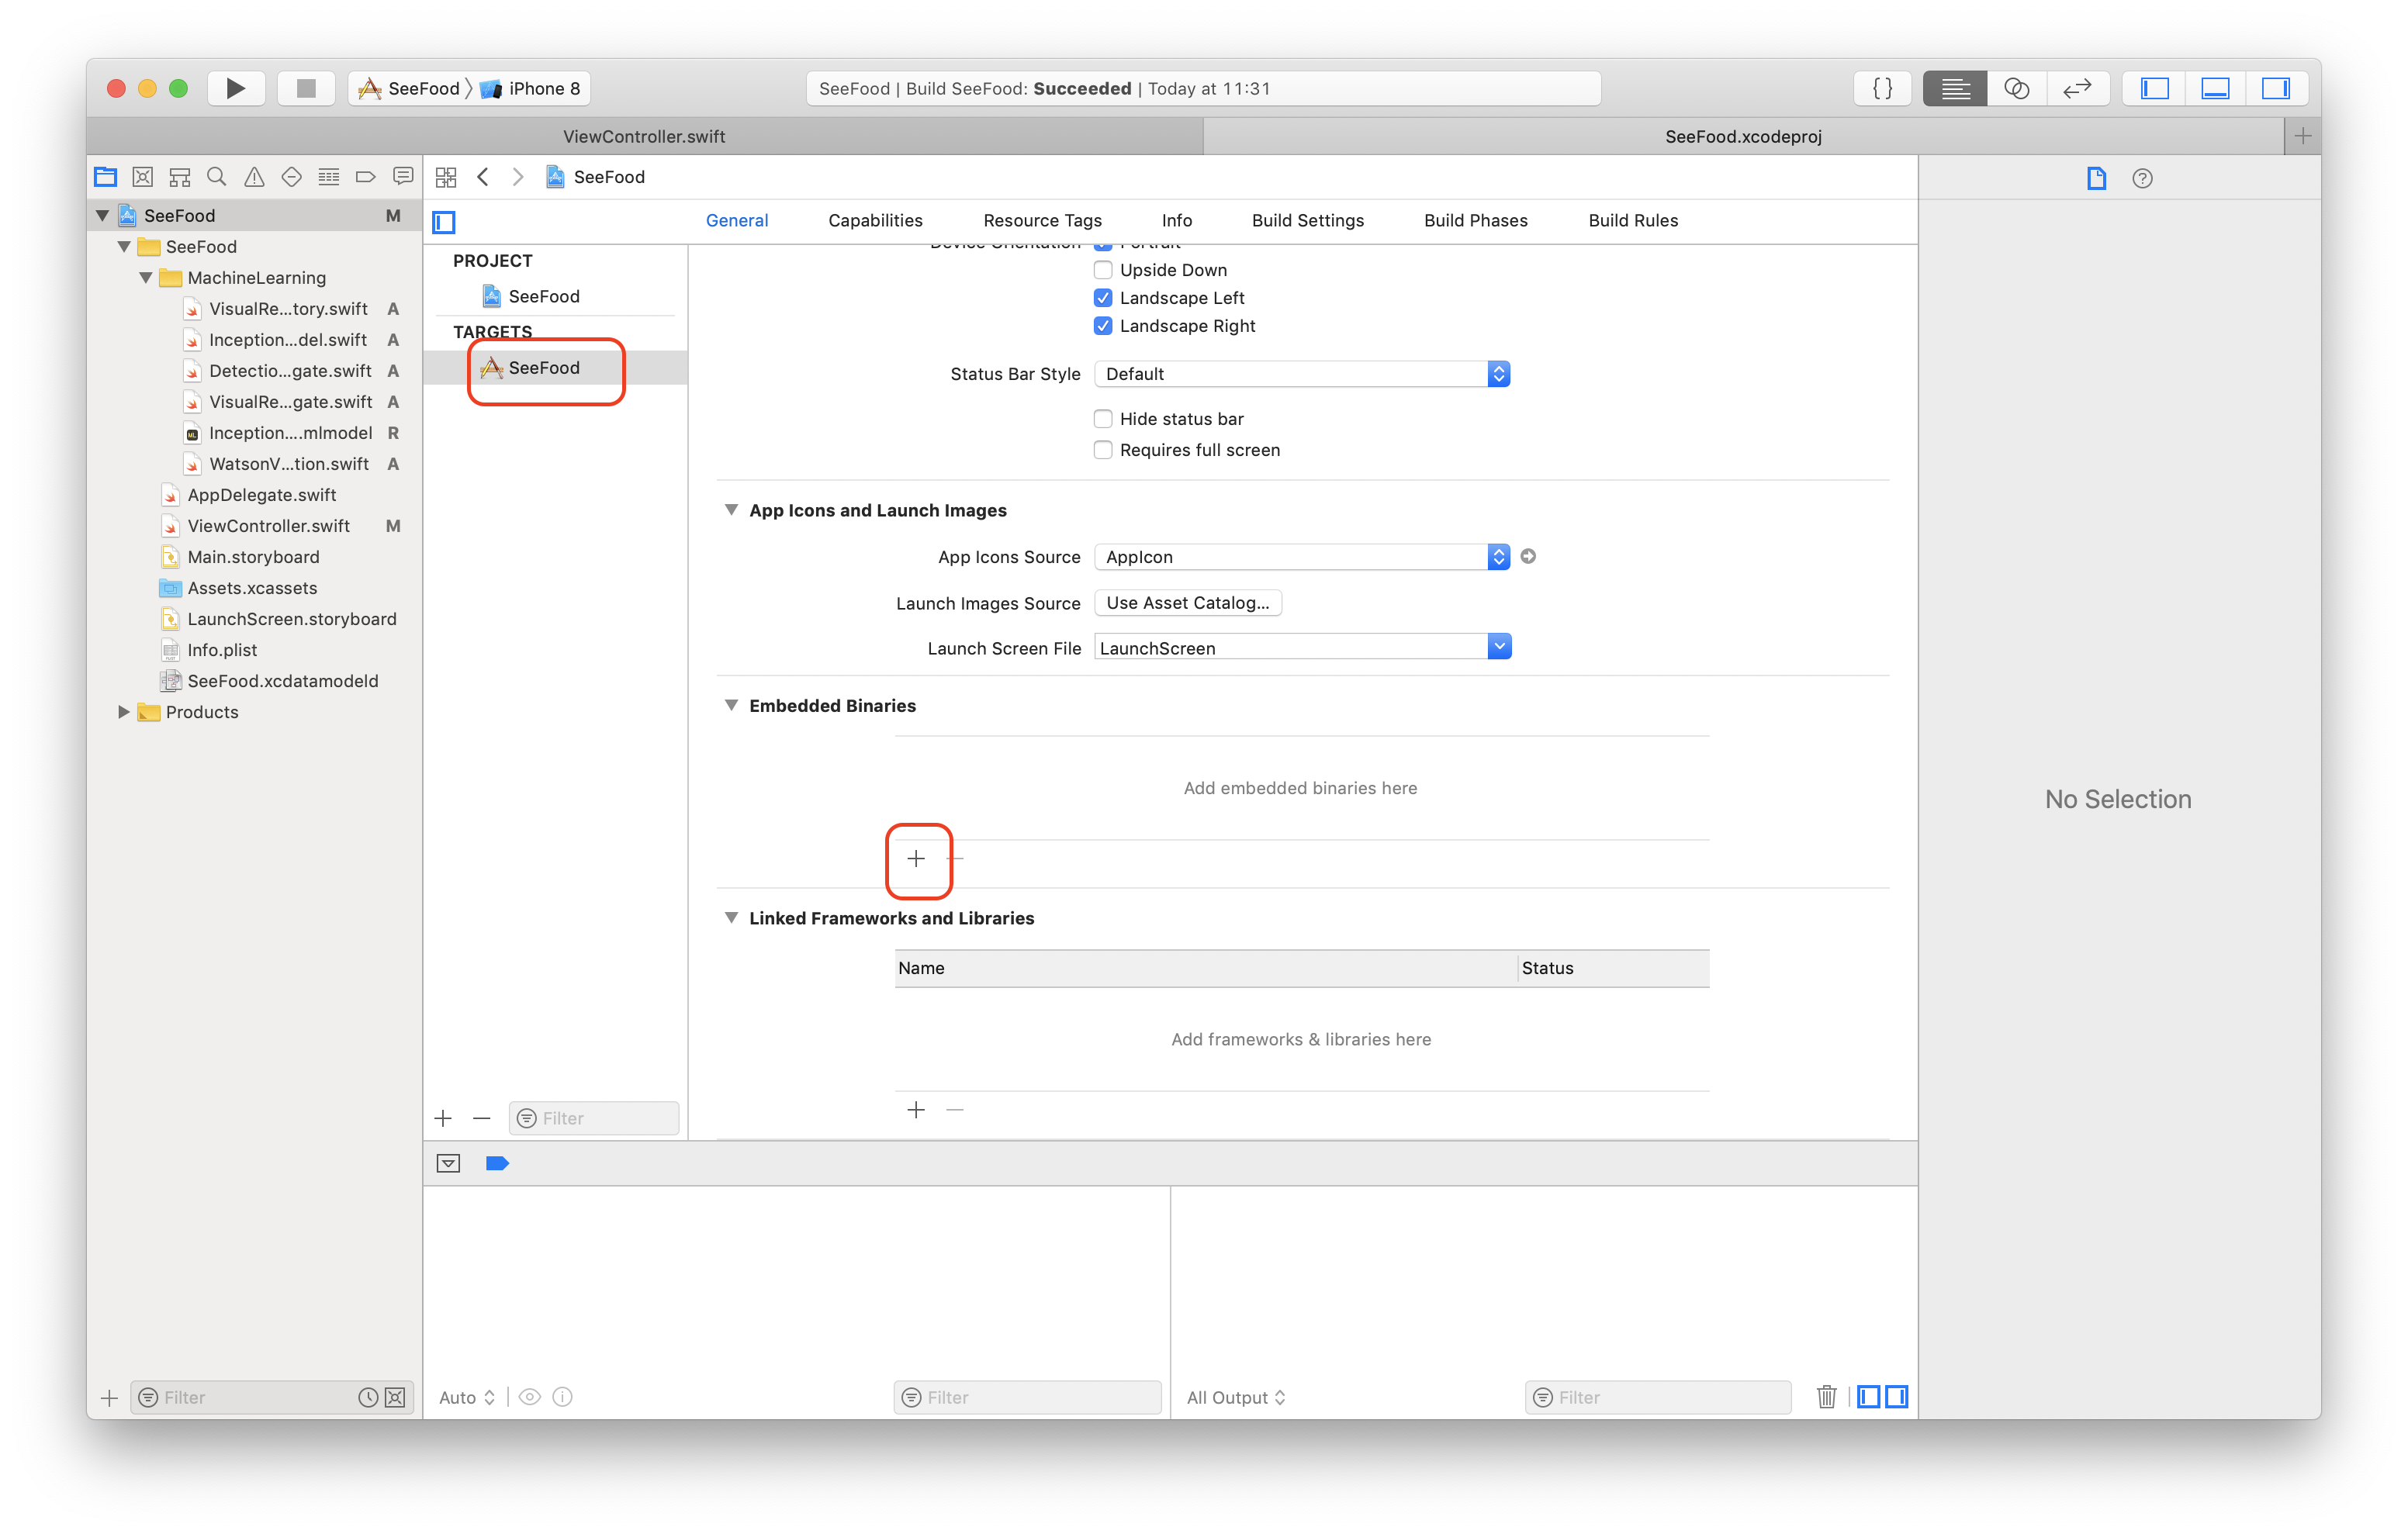
- Install Carthage and download SDK
Add the dependency in our Cartfile:
github "watson-developer-cloud/swift-sdk"
- Register IBM cloud account
- Add Visual Recognition to IBM console
- Import VisualRecognition3.framework and Restkit.framework
- Check detection code here: WatsonVisualRecognition.swift
- Install python, pip and virtualenv
$pip install virtualenv
- Create python2.7 environment in a specific directory
$mkdir Environments
$cd Environments
$virtualenv --python=/usr/bin/python2.7 python27
- Now we have a python27 directory in Environments, to activate our python
$source python27/bin/activate
You will see (python27) username Environments (git-branch-name) $
- Stop virtual environment if you want
$deactivate
- Install CoreML tools
$pip install -U coremltools
-U means install or update coremltools to the latest version
- Convert the caffe model to .mlmodel
- Download Oxford 102 category flower dataset caffe model
- Convert a Caffe model to Core ML format (doc)
convert-script.py
import coremltools

# Convert a caffe model to a classifier in Core ML
caffe_model = ('oxford102.caffemodel', 'deploy.prototxt')
labels = 'flower-labels.txt'

coreml_model = coremltools.converters.caffe.convert(
    caffe_model,
    class_labels = labels,
    image_input_names='data'
)

# Now save the model
coreml_model.save('FlowerClassifier.mlmodel')- Execute convert-script.py
python convert-script.py
You could train your own models since Xcode 10 and iOS 12. It allows us to take data such as texts, images or other types of files to fill in CreateML framework to create our very own CoreML models.
- Prepare for training and testing data (the classic ratio is 80:20) and divide them into different groups. Notice the folder name must be what category we are going to define.
In this case, I download 20 training images and 5 testing images per animals
TrainingData/
  Dog/a lot of dog images
  Cat/a lot of cat images
  Horse/a lot of horse images


TestingData/
  Dog/one quarter of dog training images
  Cat/one quarter of cat training images
  Horse/one quarter of horse training images
- Create macOS Blank playground, show the assistant editor
- Drag training and testing images sequentially into playground
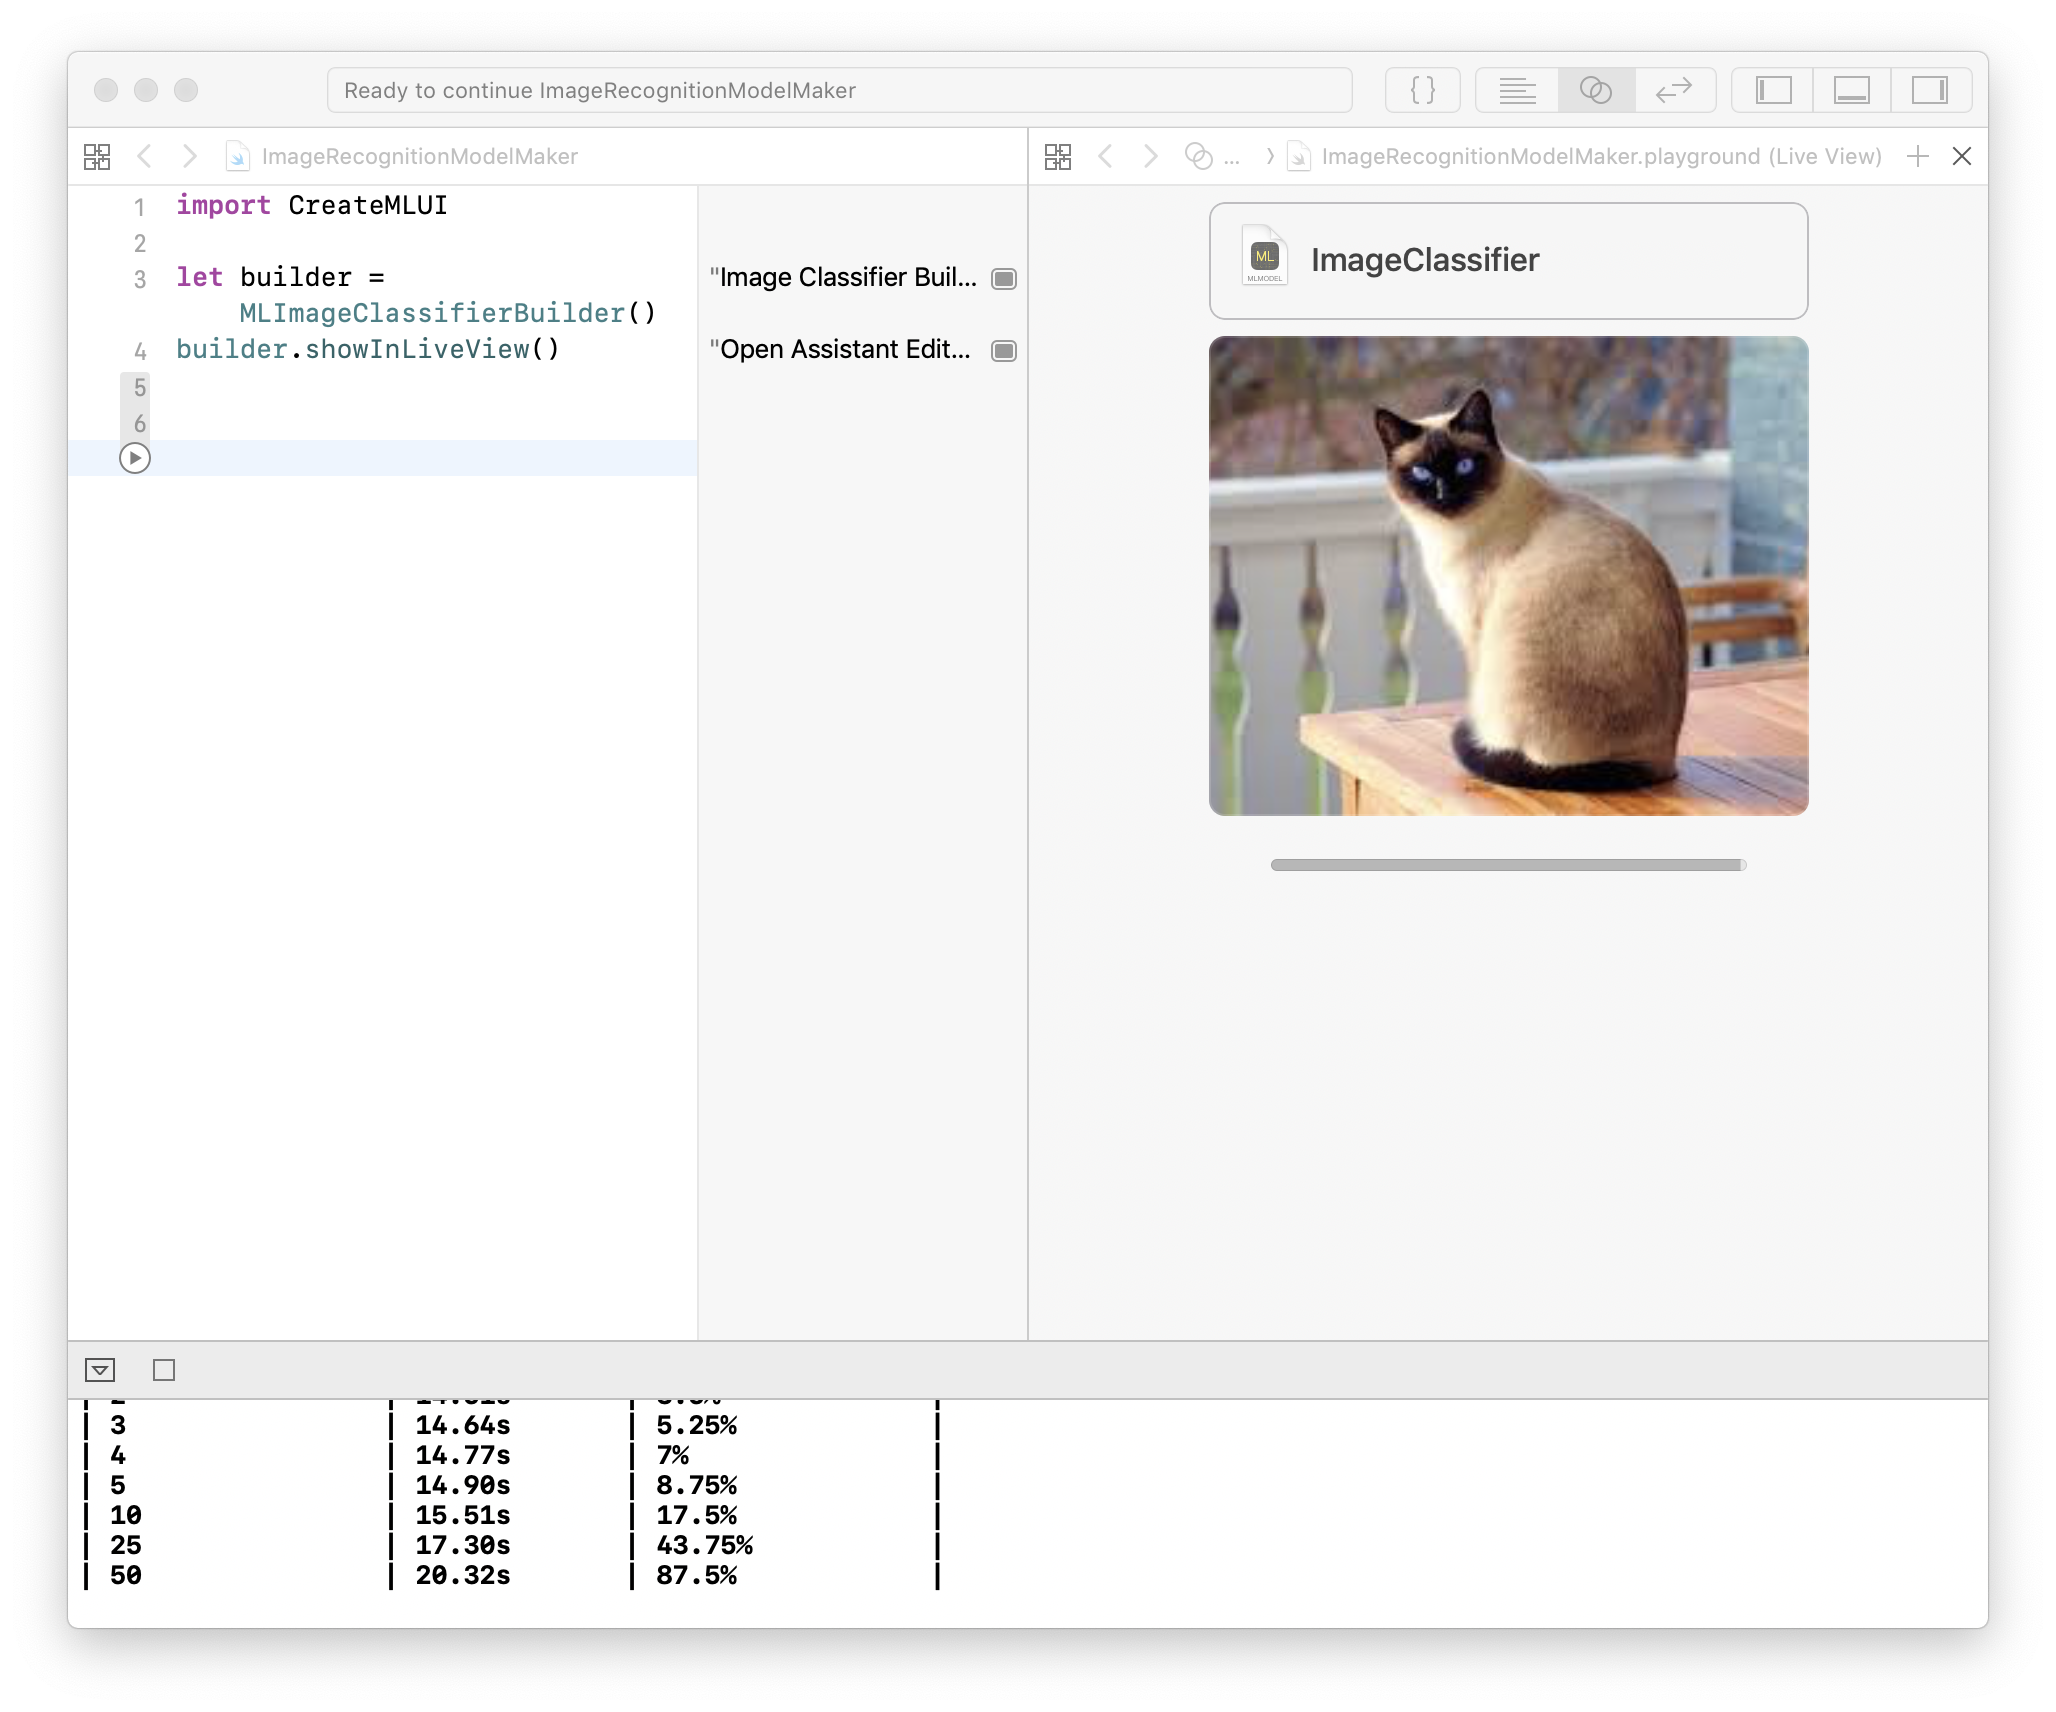
NOTICE, you should prepare images Xcode has never seen before to make sure the evaluation (success rate) is accurate. Besides, if your evaluation is low, that means you need more training data.
- Rename and save
- Download the Twitter Sentiment Dataset
- Train our own model by creating an macOS playground
import Cocoa
import CreateML

let data = try MLDataTable(contentsOf: URL(fileURLWithPath: "/Users/xxx/Workspace/iOS-tutorial/twitter-sanders-apple3.csv"))

// training data : testing data = 80 : 20
let (trainingData, testingData) = data.randomSplit(by: 0.8, seed: 5)

// textColumn and labelColumn depend on the .csv file
let sentimentClassfier = try MLTextClassifier(trainingData: trainingData, textColumn: "text", labelColumn: "class")

// test the model
let evaluationMetrics = sentimentClassfier.evaluation(on: testingData)
let evaluationAccuracy = (1 - evaluationMetrics.classificationError) * 100

// create our own mlmodel
let metadata = MLModelMetadata(author: "Catherine", shortDescription: "A model trained to classify sentiment on Tweets", license: "MIT", version: "0.1")
try sentimentClassfier.write(to: URL(fileURLWithPath: "/Users/xxx/Workspace/iOS-tutorial/tweetSentimentClassifer.mlmodel"), metadata: metadata)- Predict
try sentimentClassfier.prediction(from: "@Apple is a terrible company") //Neg
try sentimentClassfier.prediction(from: "I just found the best restaurant ever, and it's @Taco Bell") //Pos
try sentimentClassfier.prediction(from: "I think @CocaCola ads are just ok") //Neutral- Firebase
- crashlytics
- mapBox
- Sinch
| methods | developer | access | lifetimes | user | distribution |
|---|---|---|---|---|---|
| Ad Hoc | individuals | limited private | short, unscalable | Distribute your app to testers on registered devices (100 devices limits) | ipa installed by xCode, Apple configurator, OTA |
| App Store | individuals / organisations | public | 90 days | 25 internal testers; 10,000 testers via links | testFlight, email, links |
| In-House | organisations | limited private | distribution certificates expire every 3 years, provisioning profiles expire annually | Proprietary apps built by internal developers for their employees | MDM |
| Custom Apps | organisations | limited private | Apps won't expire | Proprietary apps built by internal developers for their employees | MDM or Redemption codes |
- Apps distributed via In-House distribution expires annually, developers have to resign and re-deploy apps.
- Custom Apps, on the other hand, is part of the Apple Developer Program. The apps won't expire and you can have TestFlight, additional App Store features and App Store Connect tools.
Examples:
-
App Store: Restaurant A wants to build their app with their apple developer account, they hire freelance app developer Micheal to help them.
-> Micheal has to join A's developer program to build the app for A to submit to app store. Role doc -
In-House / Custom App: Companies want to build an app for employees.
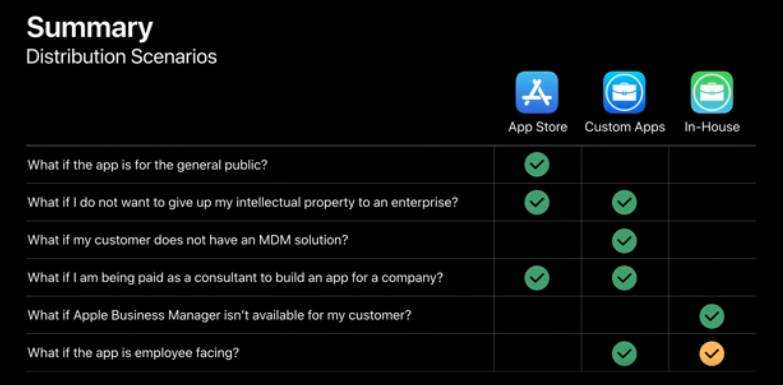
As an Apple Business Manager, you can buy apps, custom apps and books in bulk
- https://mobile-patterns.com/
- https://jgthms.com/web-design-in-4-minutes/#share
- colour palette websites such as https://coolors.co/
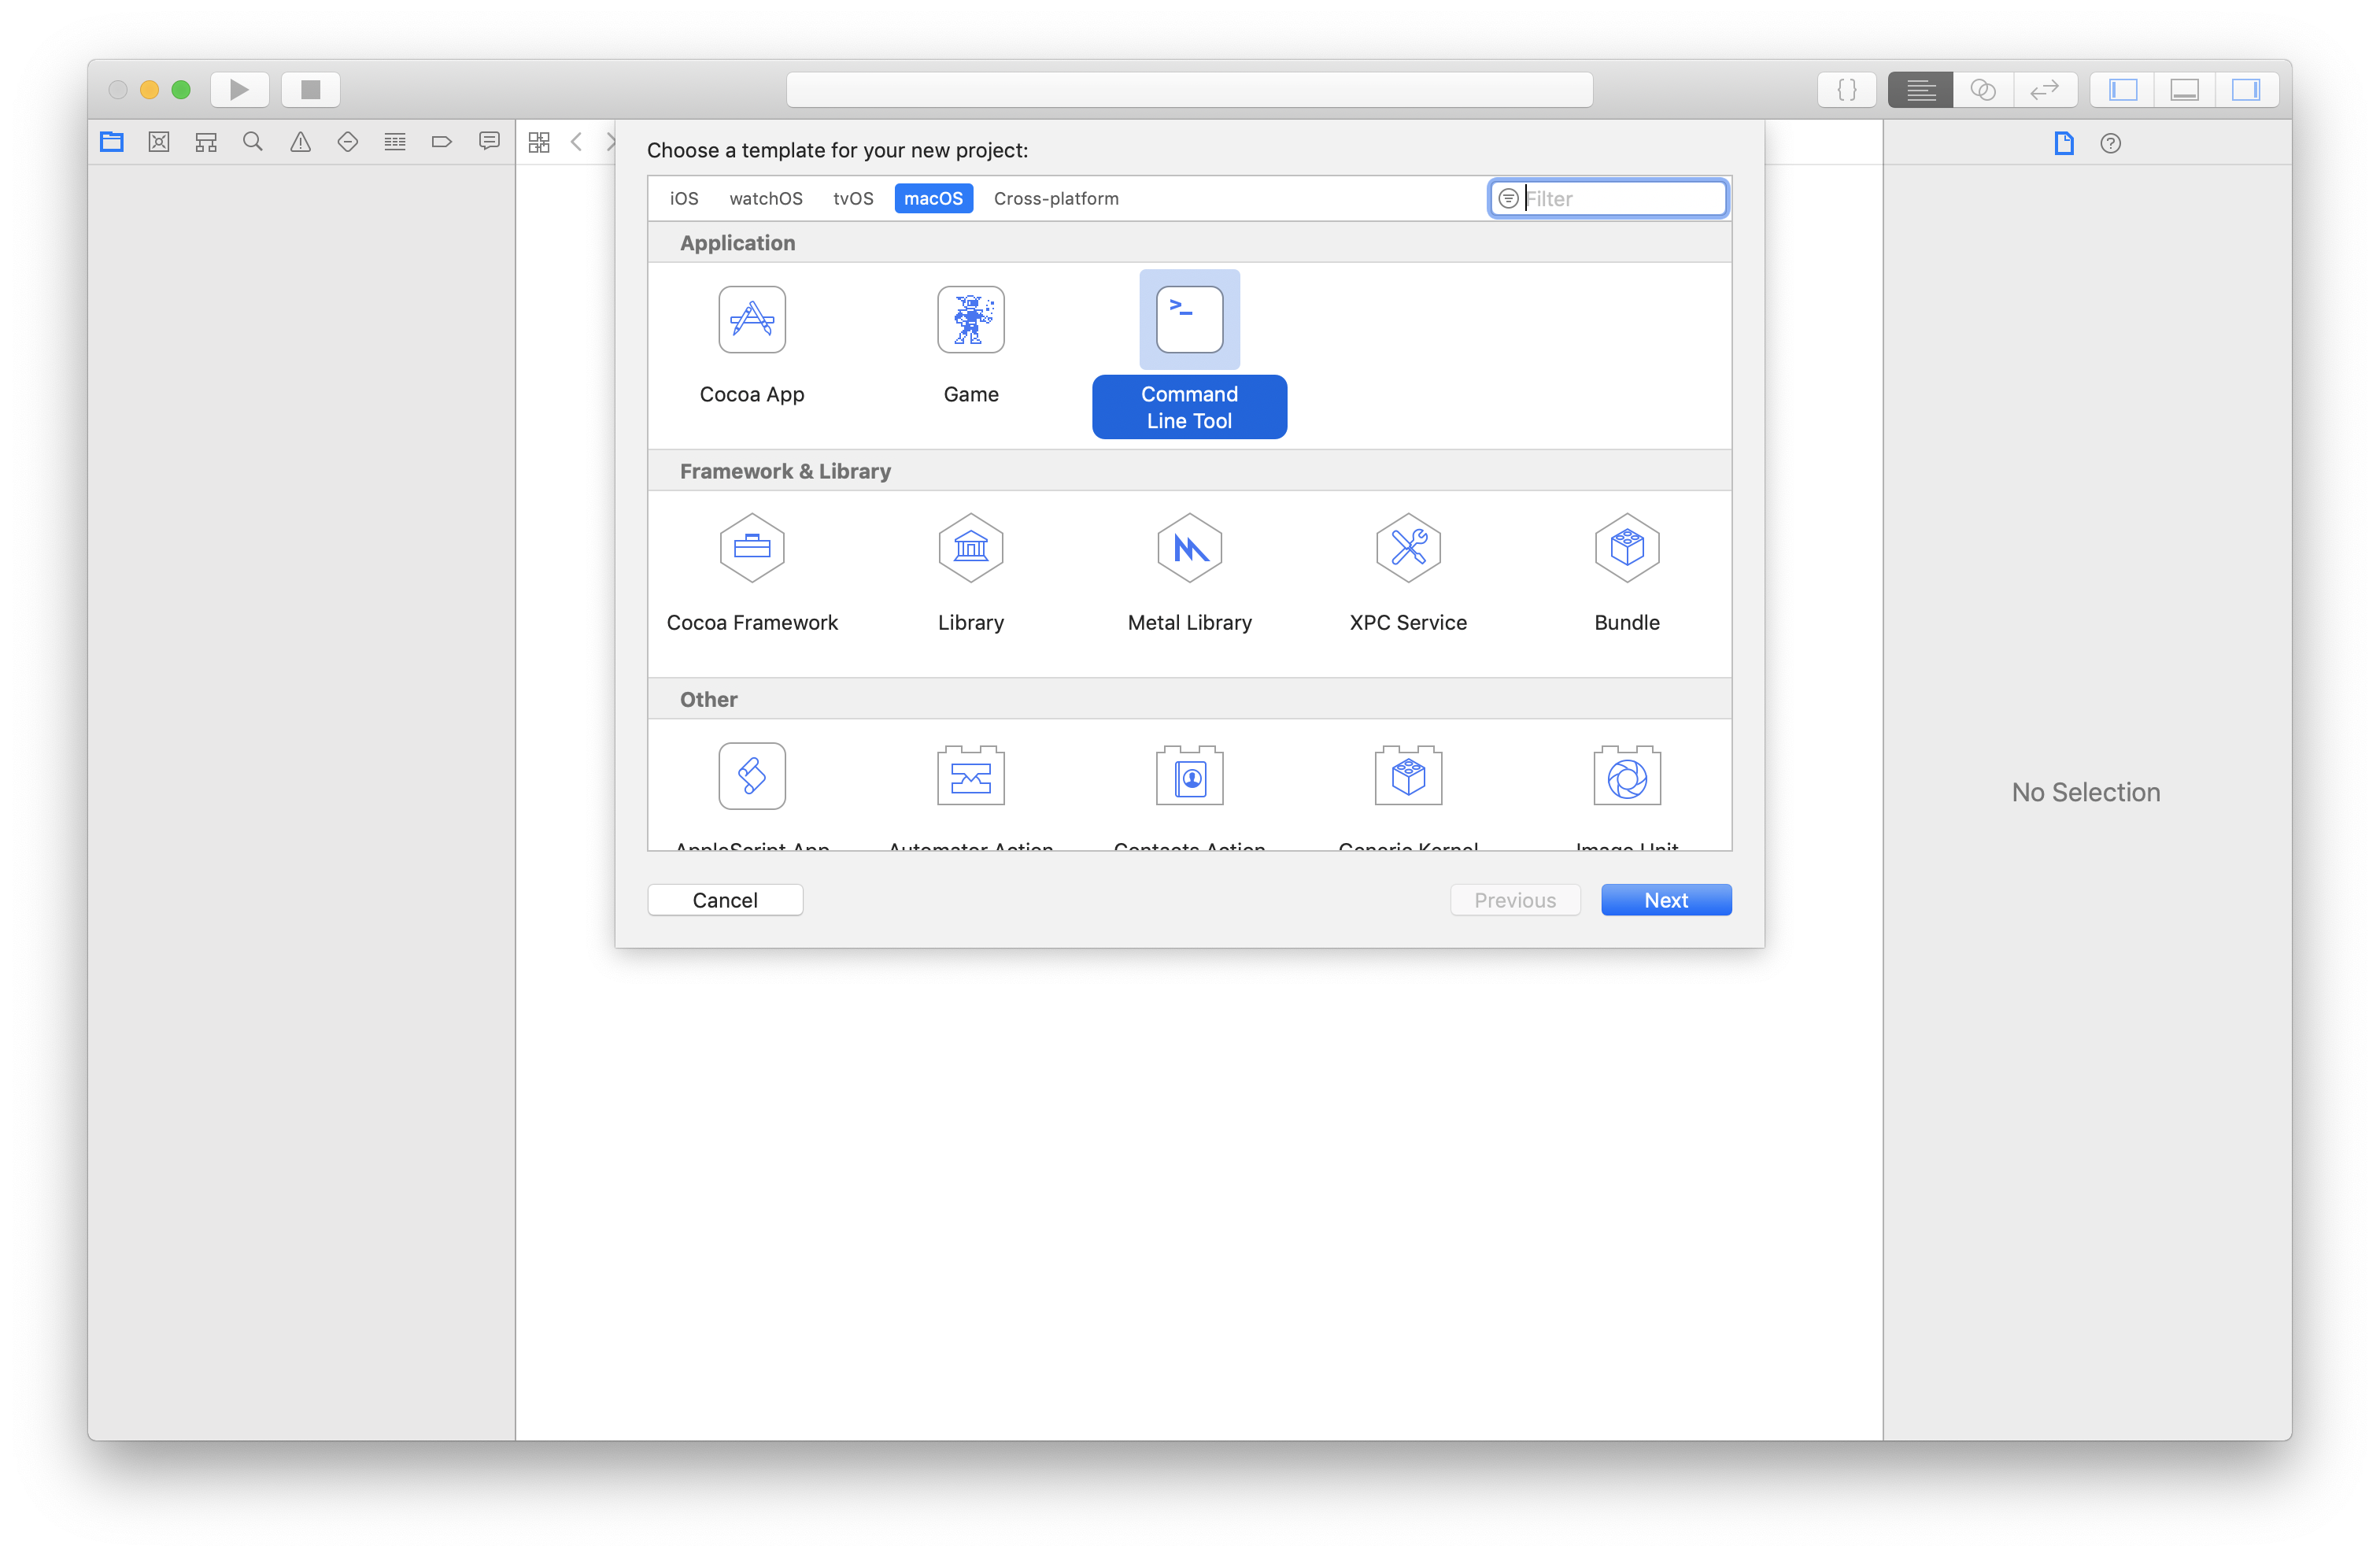
$emacs -batch -l dunnet
Swift.org
iOS 12 & Swift - The Complete iOS App Development Bootcamp
Apple human interface guidelines