Explore data from a WSN in a Hydroelectric using Machine Learning methods and Python.
A wireless sensor network (WSN) is a collaborative network that contains a collection of sensor nodes, each of which has a power source, and is able to individually and autonomously complete the function of discovering and maintaining routing to other sensors through wireless links.
The data comes from a Hydroelectric Power Plant. The extracted data and the CSV file with all but the RSSI combined is in this drive and the CSV with the extracted RSSI in here (Password protected).
It is important to note that the system has been live since 2017-09-20, with no reset. The link drops that occurred in this period were recovered by the Zigbee PRO stack. The most stable period was from July / 2018, before that we noticed many problems. The UG3 and UG5 routers are powered by AC from the dam, so each time they do maintenance, these nodes fall off and take some others along. And the router diagram can be seen in the coordinators page.
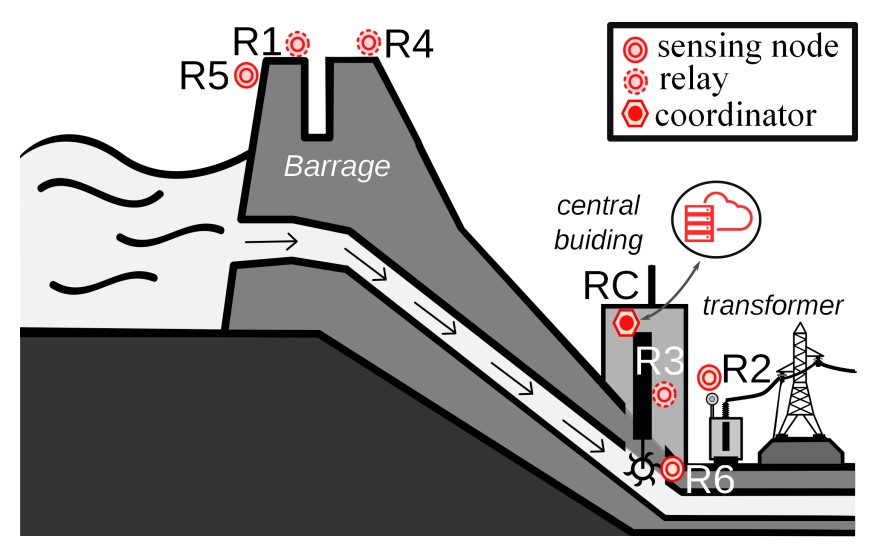
The systems consist in 7 Routers and 1 Coordinator, total of 8 Routers. The location of the radios can be seen in the image.
-
There are 8 locations and 1 Router for every location.
-
Each router gives information about it's temperature and bus voltage using channels 7 and 6 respectively and a timestamp.
-
Only 3 of the radios were used to gather information from sensors, the others were used for network routing.
In Montante UG5 location is Router 57.FE.0E, which communicates with Sensors: Acquisition - Temperature E5.5A.24 that extract info from (2) PT100 using channels 0 and 1, and it's temperature and VBus using channel 7 and 6. Acquisition - Current / Voltage CB.0A.C0 that extract info about the level in the dim using channel 1, and it's temperature and VBus using channel 7 and 6. Power - Solar Panel B2.9F.A9 that extract the MPPT voltage and the voltage from the solar panel using channels 0 and 1.In Poço de Drenagem A location is Router 57.FE.0F, which communicates with: Acquisition - Current / Voltage E9.39.32 which is a level probe , uses channel 1. Power - AC/DC Input 0D.82.38 that measures voltage from Battery and Supply voltage using channel 0 and 1, and it's temperature and VBus using channel 7 and 6.
In Transformador Elevador location is Router 57.FE.03, which communicates with: Acquisition - Temperature sensor 8D.AC.91 which gives 2 temperatures (Oil and Gabinetes) through channels 0 and 1. Power - Solar Panel sensor 39.E2.80 that extract the MPPT voltage and the voltage from the solar panel using channels 0 and 1.
-
The Montante UG5 and Transformador Elevador Routers are powered by Solar energy.
-
The Poço de Drenagem A Router is powered by AC energy from the Hydroelectric plant.
-
Radio RC is the Coordinator (00.57.FE.04).
Radio R1 is module 00.57.FE.09
Radio R4 is module 00.57.FE.01
Radio R5 is in Montante UG5 and module 00.57.FE.0E
Radio R2 is in Transformador Elevador and module 00.57.FE.03
Radio R6 is in Poço de Drenagem A and module 00.57.FE.0F
Radio R3 is also in Poço de Drenagem A but is a Radio, module 00.57.FE.05 or 00.57.FE.06.
The radios operated in the 2.4 GHz band under the Zigbee 3.0 protocol and in a mesh configuration. The theoretical receiver sensitivity of each node was −95 dBm. All the radios were set as routers (relays), so each one was able to establish different routes to communicate up to the coordinator. The coordinator uploaded the radios data to a local database.
The radios are able to automatically increase their transmission power to improve their link quality
- Keras 2.0.3
- TensorFlow 2.0.0
- Python3
- sickit-learn 0.18.2, numpy, pandas
Run conda env create to create an environment called MTS_WSN_Project, as defined in environment.yml.
This environment will provide us with the right Python version as well as the CUDA and CUDNN libraries. (conda env create -f environment.yml)
We will install Python libraries using pip-sync, however, which will let us do three nice things:
Or you can run
conda env create --prefix ./env --file environment.yml
To create the environment as sub-directory
So, after running conda env create, activate the new environment and install the requirements:
conda activate MTS_WSN_Project or conda activate ./env
pip install -r requirements.txt
If you add, remove, or need to update versions of some requirements, edit the .in files, then run
pip-compile requirements.in && pip-compile requirements-dev.in
- Antayhua RA, Pereira MD, Fernandes NC, Rangel de Sousa F. Exploiting the RSSI Long-Term Data of a WSN for the RF Channel Modeling in EPS Environments. Sensors. 2020 Jan;20(11):3076.
- https://machinelearningmastery.com/cnn-models-for-human-activity-recognition-time-series-classification/
- https://www.seanabu.com/2016/03/22/time-series-seasonal-ARIMA-model-in-python/
- https://www.machinelearningplus.com/time-series/arima-model-time-series-forecasting-python/
- https://machinelearningmastery.com/how-to-develop-lstm-models-for-time-series-forecasting/
- https://www.machinelearningplus.com/time-series/time-series-analysis-python/
- http://ataspinar.com/
- https://towardsdatascience.com/anomaly-detection-with-time-series-forecasting-c34c6d04b24a
