Zafar's Audio Functions in Python for audio signal analysis.
zaf.py: Python module with the audio functions.examples.ipynb: Jupyter module with some examples.audio_file.wav: audio file used for the examples.
This Python module implements a number of functions for audio signal analysis. Simply copy the file zaf.py in your working directory and you are good to go. Make sure you have Python 3, NumPy, and SciPy installed.
Functions:
stft- Short-time Fourier transform (STFT)istft- Inverse STFTcqtkernel- Constant-Q transform (CQT) kernelcqtspectrogram- CQT spectrogram using a CQT kernelcqtchromagram- CQT chromagram using a CQT kernelmfcc- Mel frequency cepstrum coefficients (MFCCs)dct- Discrete cosine transform (DCT) using the fast Fourier transform (FFT)dst- Discrete sine transform (DST) using the FFTmdct- Modified discrete cosine transform (MDCT) using the FFTimdct- Inverse MDCT using the FFT
Other:
wavread- Read a WAVE file (using Scipy)wavwrite- Write a WAVE file (using SciPy)sigplot- Plot an audio signal in secondsspecshow- Display an audio spectrogram in dB, seconds, and Hzcqtspecshow- Display a CQT audio spectrogram in dB, seconds, and Hzcqtchromshow- Display a CQT audio chromagram in seconds
audio_stft = zaf.stft(audio_signal, window_function, step_length)

Inputs:
    audio_signal: audio signal [number_samples,]
    window_function: window function [window_length,]
    step_length: step length in samples
Output:
    audio_stft: audio STFT [window_length, number_frames]
# Import the modules
import numpy as np
import scipy.signal
import zaf
import matplotlib.pyplot as plt

# Read the audio signal (normalized) with its sampling frequency in Hz, and average it over its channels
audio_signal, sampling_frequency = zaf.wavread("audio_file.wav")
audio_signal = np.mean(audio_signal, 1)

# Set the window duration in seconds (audio is stationary around 40 milliseconds)
window_duration = 0.04

# Derive the window length in samples (use powers of 2 for faster FFT and constant overlap-add (COLA))
window_length = pow(2, int(np.ceil(np.log2(window_duration * sampling_frequency))))

# Compute the window function (use SciPy's periodic Hamming window for COLA as NumPy's Hamming window is symmetric)
window_function = scipy.signal.hamming(window_length, False)

# Set the step length in samples (half of the window length for COLA)
step_length = int(window_length/2)

# Compute the STFT
audio_stft = zaf.stft(audio_signal, window_function, step_length)

# Derive the magnitude spectrogram (without the DC component and the mirrored frequencies)
audio_spectrogram = np.absolute(audio_stft[1:int(window_length/2+1), :])

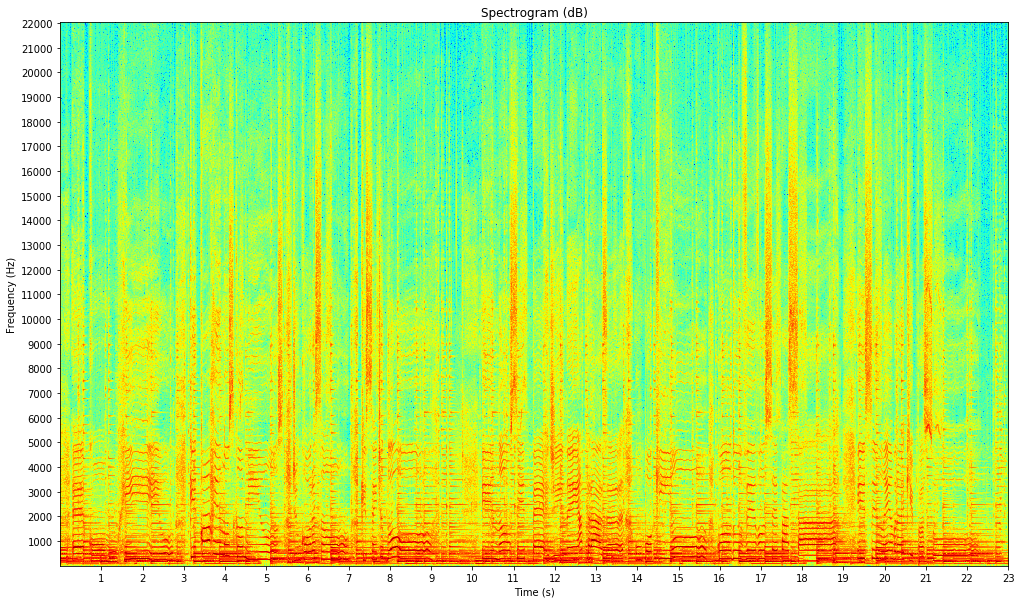
# Display the spectrogram in dB, seconds, and Hz
plt.figure(figsize=(17, 10))
zaf.specshow(audio_spectrogram, len(audio_signal), sampling_frequency, xtick_step=1, ytick_step=1000)
plt.title("Spectrogram (dB)")
plt.show()
audio_signal = zaf.istft(audio_stft, window_function, step_length)

Inputs:
    audio_stft: audio STFT [window_length, number_frames]
    window_function: window function [window_length,]
    step_length: step length in samples
Output:
    audio_signal: audio signal [number_samples,]
# Import the modules
import numpy as np
import scipy.signal
import zaf
import matplotlib.pyplot as plt

# Read the (stereo) audio signal with its sampling frequency in Hz
audio_signal, sampling_frequency = zaf.wavread("audio_file.wav")

# Set the parameters for the STFT
window_length = pow(2, int(np.ceil(np.log2(0.04 * sampling_frequency))))
window_function = scipy.signal.hamming(window_length, False)
step_length = int(window_length/2)

# Compute the STFTs for the left and right channels
audio_stft1 = zaf.stft(audio_signal[:, 0], window_function, step_length)
audio_stft2 = zaf.stft(audio_signal[:, 1], window_function, step_length)

# Derive the magnitude spectrograms (with DC component) for the left and right channels
audio_spectrogram1 = abs(audio_stft1[0:int(window_length/2)+1, :])
audio_spectrogram2 = abs(audio_stft2[0:int(window_length/2)+1, :])

# Estimate the time-frequency masks for the left and right channels for the center
center_mask1 = np.minimum(audio_spectrogram1, audio_spectrogram2)/audio_spectrogram1
center_mask2 = np.minimum(audio_spectrogram1, audio_spectrogram2)/audio_spectrogram2

# Derive the STFTs for the left and right channels for the center (with mirrored frequencies)
center_stft1 = np.multiply(np.concatenate((center_mask1, center_mask1[int(window_length/2)-1:0:-1, :])), audio_stft1)
center_stft2 = np.multiply(np.concatenate((center_mask2, center_mask2[int(window_length/2)-1:0:-1, :])), audio_stft2)

# Synthesize the signals for the left and right channels for the center
center_signal1 = zaf.istft(center_stft1, window_function, step_length)
center_signal2 = zaf.istft(center_stft2, window_function, step_length)

# Derive the final stereo center and sides signals
center_signal = np.stack((center_signal1, center_signal2), axis=1)
center_signal = center_signal[0:len(audio_signal), :]
sides_signal = audio_signal-center_signal

# Write the center and sides signals
zaf.wavwrite(center_signal, sampling_frequency, "center_file.wav")
zaf.wavwrite(sides_signal, sampling_frequency, "sides_file.wav")

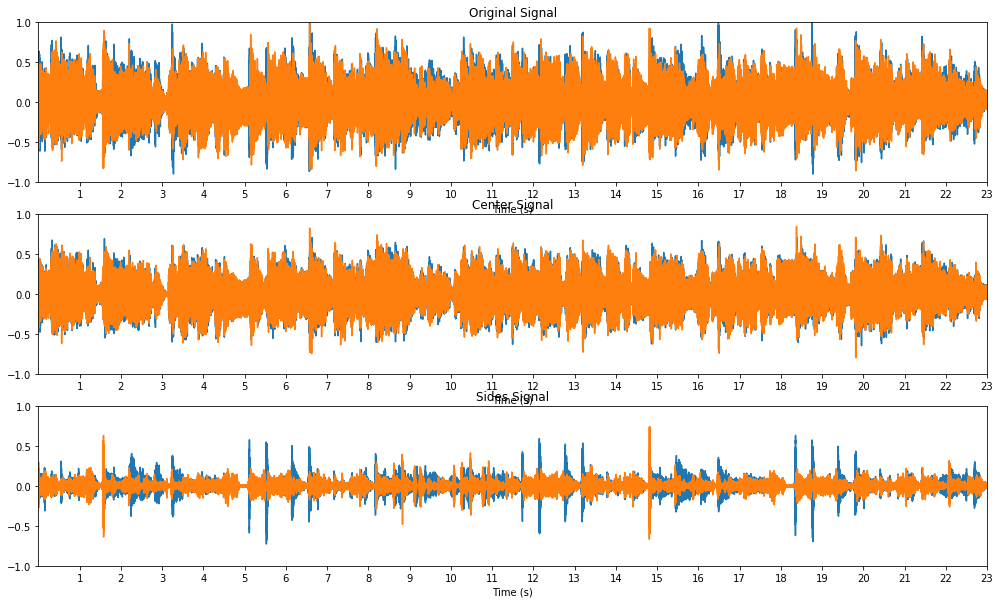
# Display the original, center, and sides signals in seconds
plt.figure(figsize=(17, 10))
plt.subplot(311),
zaf.sigplot(audio_signal, sampling_frequency, xtick_step=1), plt.ylim(-1, 1), plt.title("Original Signal")
plt.subplot(312)
zaf.sigplot(center_signal, sampling_frequency, xtick_step=1), plt.ylim(-1, 1), plt.title("Center Signal")
plt.subplot(313)
zaf.sigplot(sides_signal, sampling_frequency, xtick_step=1), plt.ylim(-1, 1), plt.title("Sides Signal")
plt.show()
cqt_kernel = zaf.cqtkernel(sampling_frequency, frequency_resolution, minimum_frequency, maximum_frequency)

Inputs:
    sampling_frequency: sampling frequency in Hz
    frequency_resolution: frequency resolution in number of frequency channels per semitone
    minimum_frequency: minimum frequency in Hz
    maximum_frequency: maximum frequency in Hz
Output:
    cqt_kernel: CQT kernel [number_frequencies, fft_length]
# Import the modules
import numpy as np
import zaf
import matplotlib.pyplot as plt

# Set the parameters for the CQT kernel
sampling_frequency = 44100
frequency_resolution = 2
minimum_frequency = 55
maximum_frequency = sampling_frequency/2

# Compute the CQT kernel
cqt_kernel = zaf.cqtkernel(sampling_frequency, frequency_resolution, minimum_frequency, maximum_frequency)

# Display the magnitude CQT kernel
plt.figure(figsize=(17, 5))
plt.imshow(np.absolute(cqt_kernel).toarray(), aspect="auto", cmap="jet", origin="lower")
plt.title("Magnitude CQT kernel")
plt.xlabel("FFT length")
plt.ylabel("CQT frequency")
plt.show()
audio_spectrogram = zaf.cqtspectrogram(audio_signal, sample_rate, time_resolution, cqt_kernel)

Inputs:
    audio_signal: audio signal [number_samples,]
    sampling_frequency: sampling frequency in Hz
    time_resolution: time resolution in number of time frames per second
    cqt_kernel: CQT kernel [number_frequencies, fft_length]
Output:
    audio_spectrogram: audio spectrogram in magnitude [number_frequencies, number_times]
# Import the modules
import numpy as np
import zaf
import matplotlib.pyplot as plt

# Read the audio signal (normalized) with its sampling frequency in Hz, and average it over its channels
audio_signal, sampling_frequency = zaf.wavread("audio_file.wav")
audio_signal = np.mean(audio_signal, 1)

# Compute the CQT kernel using some parameters
frequency_resolution = 2
minimum_frequency = 55
maximum_frequency = 3520
cqt_kernel = zaf.cqtkernel(sampling_frequency, frequency_resolution, minimum_frequency, maximum_frequency)

# Compute the (magnitude) CQT spectrogram using the kernel
time_resolution = 25
audio_spectrogram = zaf.cqtspectrogram(audio_signal, sampling_frequency, time_resolution, cqt_kernel)

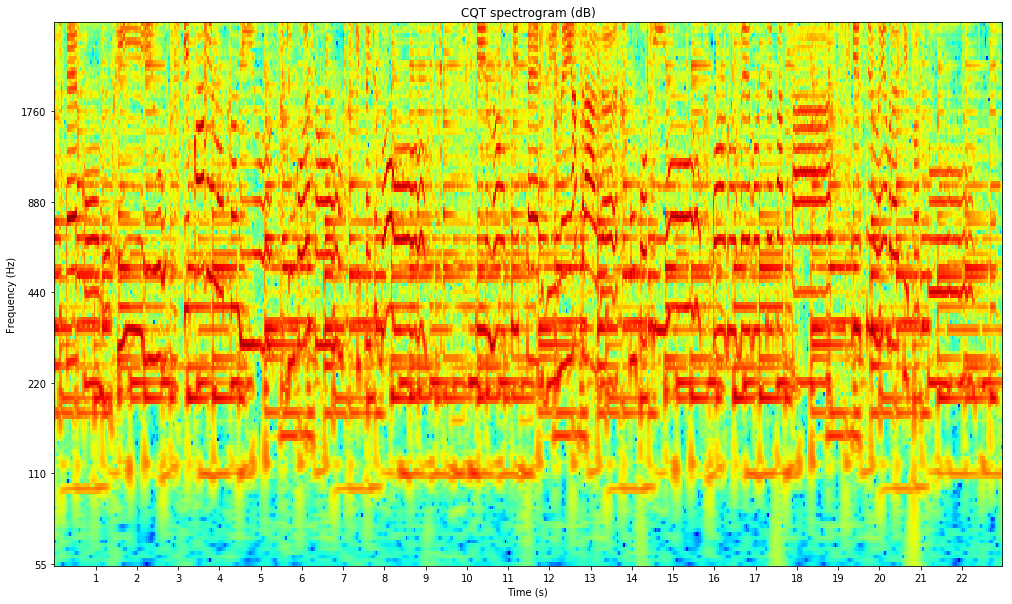
# Display the CQT spectrogram in dB, seconds, and Hz
plt.figure(figsize=(17, 10))
zaf.cqtspecshow(audio_spectrogram, time_resolution, frequency_resolution, minimum_frequency, maximum_frequency, xtick_step=1)
plt.title("CQT spectrogram (dB)")
plt.show()
audio_chromagram = zaf.cqtchromagram(audio_signal, sampling_frequency, time_resolution, frequency_resolution, cqt_kernel)

Inputs:
    audio_signal: audio signal [number_samples,]
    sampling_frequency: sampling frequency in Hz
    time_resolution: time resolution in number of time frames per second
    frequency_resolution: frequency resolution in number of frequency channels per semitones
    cqt_kernel: CQT kernel [number_frequencies, fft_length]
Output:
    audio_chromagram: audio chromagram [number_chromas, number_times]
# Import the modules
# Import the modules
import numpy as np
import zaf
import matplotlib.pyplot as plt

# Read the audio signal (normalized) with its sampling frequency in Hz, and average it over its channels
audio_signal, sampling_frequency = zaf.wavread("audio_file.wav")
audio_signal = np.mean(audio_signal, 1)

# Compute the CQT kernel using some parameters
frequency_resolution = 2
minimum_frequency = 55
maximum_frequency = 3520
cqt_kernel = zaf.cqtkernel(sampling_frequency, frequency_resolution, minimum_frequency, maximum_frequency)

# Compute the CQT chromagram
time_resolution = 25
audio_chromagram = zaf.cqtchromagram(audio_signal, sampling_frequency, time_resolution, frequency_resolution, cqt_kernel)

# Display the CQT chromagram in seconds
plt.figure(figsize=(17, 5))
zaf.cqtchromshow(audio_chromagram, time_resolution, xtick_step=1)
plt.title("CQT chromagram")
plt.show()
audio_mfcc = zaf.mfcc(audio_signal, sample_rate, number_filters, number_coefficients)

Inputs:
    audio_signal: audio signal [number_samples,]
    sampling_frequency: sampling frequency in Hz
    number_filters: number of filters
    number_coefficients: number of coefficients (without the 0th coefficient)
Output:
    audio_mfcc: audio MFCCs [number_times, number_coefficients]
# Import the modules
import numpy as np
import zaf
import matplotlib.pyplot as plt

# Read the audio signal (normalized) with its sampling frequency in Hz, and average it over its channels
audio_signal, sampling_frequency = zaf.wavread("audio_file.wav")
audio_signal = np.mean(audio_signal, 1)

# Compute the MFCCs with a given number of filters and coefficients
number_filters = 40
number_coefficients = 20
audio_mfcc = zaf.mfcc(audio_signal, sampling_frequency, number_filters, number_coefficients)

# Compute the delta and delta-delta MFCCs
audio_dmfcc = np.diff(audio_mfcc, n=1, axis=1)
audio_ddmfcc = np.diff(audio_dmfcc, n=1, axis=1)

# Compute the time resolution for the MFCCs in number of time frames per second (~ sampling frequency for the MFCCs)
time_resolution = sampling_frequency * np.shape(audio_mfcc)[1] / len(audio_signal)

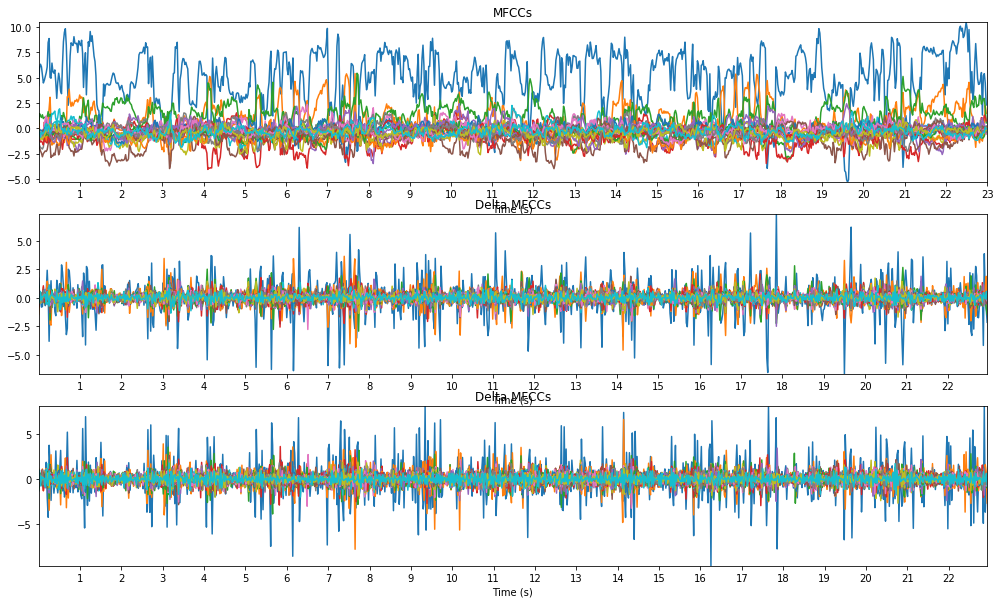
# Display the MFCCs, delta MFCCs, and delta-delta MFCCs in seconds
plt.figure(figsize=(17, 10))
plt.subplot(311),
zaf.sigplot(np.transpose(audio_mfcc), time_resolution, xtick_step=1), plt.title("MFCCs")
plt.subplot(312)
zaf.sigplot(np.transpose(audio_dmfcc), time_resolution, xtick_step=1), plt.title("Delta MFCCs")
plt.subplot(313)
zaf.sigplot(np.transpose(audio_ddmfcc), time_resolution, xtick_step=1), plt.title("Delta-delta MFCCs")
plt.show()
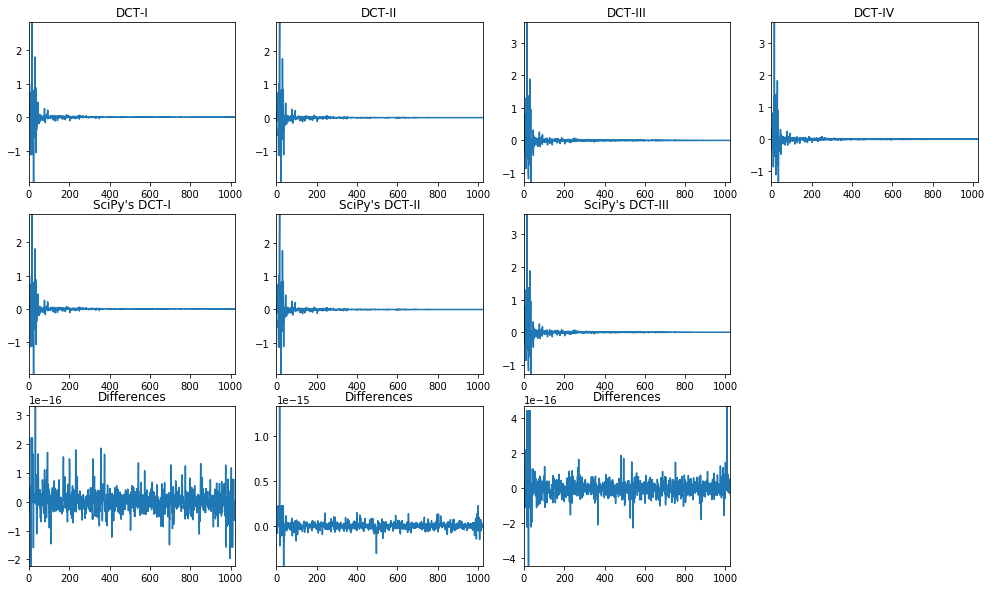
audio_dct = zaf.dct(audio_signal, dct_type)

Inputs:
    audio_signal: audio signal [number_samples, number_frames] (number_frames >= 0)
    dct_type: dct type (1, 2, 3, or 4)
Output:
    audio_dct: audio DCT [number_frequencies, number_frames]
# Import the modules
import numpy as np
import zaf
import scipy.fftpack
import matplotlib.pyplot as plt

# Read the audio signal (normalized) with its sampling frequency in Hz, and average it over its channels
audio_signal, sampling_frequency = zaf.wavread("audio_file.wav")
audio_signal = np.mean(audio_signal, 1)

# Get an audio segment for a given window length
window_length = 1024
audio_segment = audio_signal[0:window_length]

# Compute the DCT-I, II, III, and IV
audio_dct1 = zaf.dct(audio_segment, 1)
audio_dct2 = zaf.dct(audio_segment, 2)
audio_dct3 = zaf.dct(audio_segment, 3)
audio_dct4 = zaf.dct(audio_segment, 4)

# Comput SciPy's DCT-I (properly orthogonalized), II, and III (SciPy does not have a DCT-IV!)
audio_segment1 = audio_segment.copy()
audio_segment1[[0, -1]] = audio_segment1[[0, -1]]*np.sqrt(2)
scipy_dct1 = scipy.fftpack.dct(audio_segment1, axis=0, type=1, norm=None)
scipy_dct1[[0, -1]] = scipy_dct1[[0, -1]]/np.sqrt(2)
scipy_dct1 = scipy_dct1*np.sqrt(2/(window_length-1)) / 2
scipy_dct2 = scipy.fftpack.dct(audio_segment, axis=0, type=2, norm="ortho")
scipy_dct3 = scipy.fftpack.dct(audio_segment, axis=0, type=3, norm="ortho")

# Plot the DCT-I, II, III, and IV, SciPy's versions, and their differences
plt.figure(figsize=(17,10))
plt.subplot(3, 4, 1), plt.plot(audio_dct1), plt.autoscale(tight=True), plt.title("DCT-I")
plt.subplot(3, 4, 2), plt.plot(audio_dct2), plt.autoscale(tight=True), plt.title("DCT-II")
plt.subplot(3, 4, 3), plt.plot(audio_dct3), plt.autoscale(tight=True), plt.title("DCT-III")
plt.subplot(3, 4, 4), plt.plot(audio_dct4), plt.autoscale(tight=True), plt.title("DCT-IV")
plt.subplot(3, 4, 5), plt.plot(scipy_dct1), plt.autoscale(tight=True), plt.title("SciPy's DCT-I")
plt.subplot(3, 4, 6), plt.plot(scipy_dct2), plt.autoscale(tight=True), plt.title("SciPy's DCT-II")
plt.subplot(3, 4, 7), plt.plot(scipy_dct3), plt.autoscale(tight=True), plt.title("SciPy's DCT-III")
plt.subplot(3, 4, 9), plt.plot(audio_dct1-scipy_dct1), plt.autoscale(tight=True), plt.title("Differences")
plt.subplot(3, 4, 10), plt.plot(audio_dct2-scipy_dct2), plt.autoscale(tight=True), plt.title("Differences")
plt.subplot(3, 4, 11), plt.plot(audio_dct3-scipy_dct3), plt.autoscale(tight=True), plt.title("Differences")
plt.show()
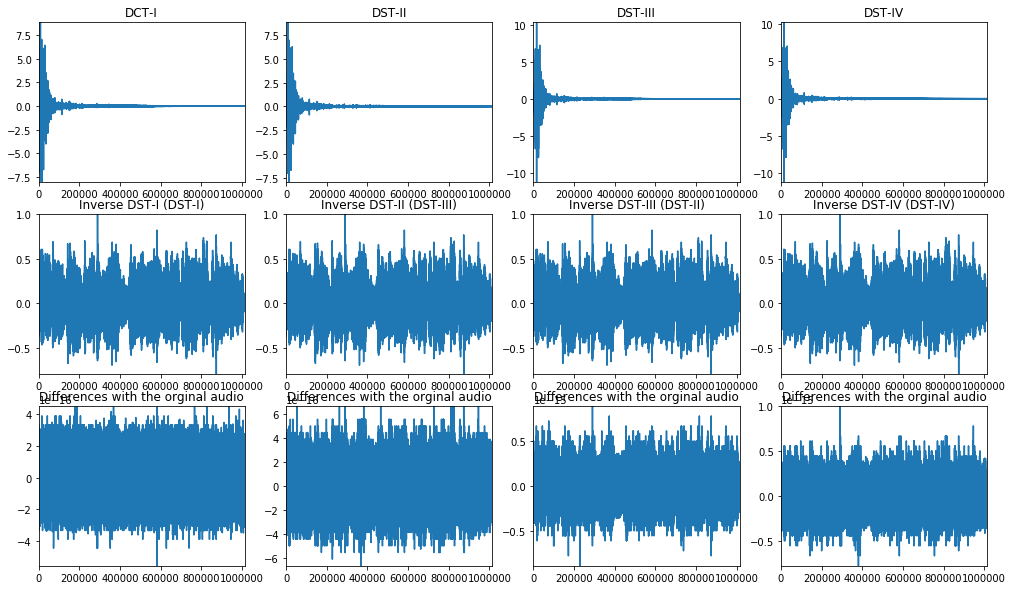
audio_dst = zaf.dst(audio_signal, dst_type)

Inputs:
    audio_signal: audio signal [number_samples, number_frames] (number_frames >= 0)
    dst_type: DST type (1, 2, 3, or 4)
Output:
    audio_dst: audio DST [number_frequencies, number_frames]
# Import modules
import numpy as np
import zaf
import matplotlib.pyplot as plt

# Read the audio signal (normalized) with its sampling frequency in Hz, and average it over its channels
audio_signal, sampling_frequency = zaf.wavread("audio_file.wav")
audio_signal = np.mean(audio_signal, 1)

# Get an audio segment for a given window length
window_length = 1024
audio_segment = audio_signal[0:window_length]

# Compute the DST-I, II, III, and IV
audio_dst1 = zaf.dst(audio_signal, 1)
audio_dst2 = zaf.dst(audio_signal, 2)
audio_dst3 = zaf.dst(audio_signal, 3)
audio_dst4 = zaf.dst(audio_signal, 4)

# Compute their respective inverses, i.e., DST-I, II, III, and IV
audio_idst1 = zaf.dst(audio_dst1, 1)
audio_idst2 = zaf.dst(audio_dst2, 3)
audio_idst3 = zaf.dst(audio_dst3, 2)
audio_idst4 = zaf.dst(audio_dst4, 4)

# Plot the DST-I, II, III, and IV, their respective inverses, and their differences with the original audio segment
plt.figure(figsize=(17,10))
plt.subplot(3, 4, 1), plt.plot(audio_dst1), plt.autoscale(tight=True), plt.title("DCT-I")
plt.subplot(3, 4, 2), plt.plot(audio_dst2), plt.autoscale(tight=True), plt.title("DST-II")
plt.subplot(3, 4, 3), plt.plot(audio_dst3), plt.autoscale(tight=True), plt.title("DST-III")
plt.subplot(3, 4, 4), plt.plot(audio_dst4), plt.autoscale(tight=True), plt.title("DST-IV")
plt.subplot(3, 4, 5), plt.plot(audio_idst1), plt.autoscale(tight=True), plt.title("Inverse DST-I (DST-I)")
plt.subplot(3, 4, 6), plt.plot(audio_idst2), plt.autoscale(tight=True), plt.title("Inverse DST-II (DST-III)")
plt.subplot(3, 4, 7), plt.plot(audio_idst3), plt.autoscale(tight=True), plt.title("Inverse DST-III (DST-II)")
plt.subplot(3, 4, 8), plt.plot(audio_idst4), plt.autoscale(tight=True), plt.title("Inverse DST-IV (DST-IV)")
plt.subplot(3, 4, 9), plt.plot(audio_signal-audio_idst1), plt.autoscale(tight=True), plt.title("Differences with the orginal audio")
plt.subplot(3, 4, 10), plt.plot(audio_signal-audio_idst2), plt.autoscale(tight=True), plt.title("Differences with the orginal audio")
plt.subplot(3, 4, 11), plt.plot(audio_signal-audio_idst3), plt.autoscale(tight=True), plt.title("Differences with the orginal audio")
plt.subplot(3, 4, 12), plt.plot(audio_signal-audio_idst4), plt.autoscale(tight=True), plt.title("Differences with the orginal audio")
plt.show()
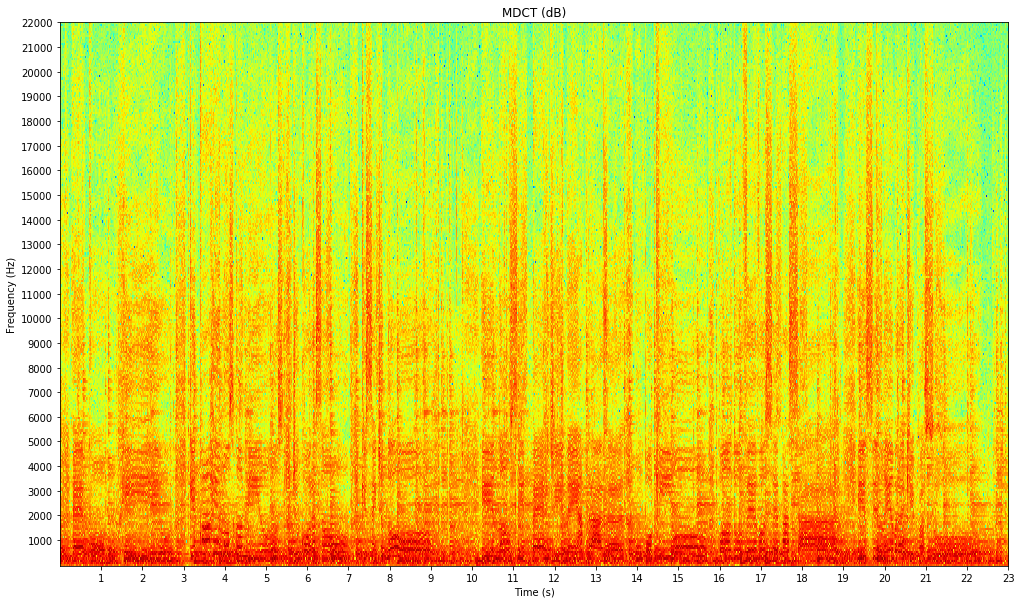
audio_mdct = zaf.mdct(audio_signal, window_function)

Inputs:
    audio_signal: audio signal [number_samples,]
    window_function: window function [window_length,]
Output:
    audio_mdct: audio MDCT [number_frequencies, number_times]
# Import the modules
import numpy as np
import zaf
import matplotlib.pyplot as plt

# Read the audio signal (normalized) with its sampling frequency in Hz, and average it over its channels
audio_signal, sampling_frequency = zaf.wavread("audio_file.wav")
audio_signal = np.mean(audio_signal, 1)

# Compute the Kaiser-Bessel-derived (KBD) window as used in the AC-3 audio coding format
window_length = 512
alpha_value = 5
window_function = np.kaiser(int(window_length/2)+1, alpha_value*np.pi)
window_function2 = np.cumsum(window_function[1:int(window_length/2)])
window_function = np.sqrt(np.concatenate((window_function2, window_function2[int(window_length/2)::-1]))
                          / np.sum(window_function))

# Compute the MDCT
audio_mdct = zaf.mdct(audio_signal, window_function)

# Display the MDCT in dB, seconds, and Hz
plt.figure(figsize=(17, 10))
zaf.specshow(np.absolute(audio_mdct), len(audio_signal), sampling_frequency, xtick_step=1, ytick_step=1000)
plt.title("MDCT (dB)")
plt.show()
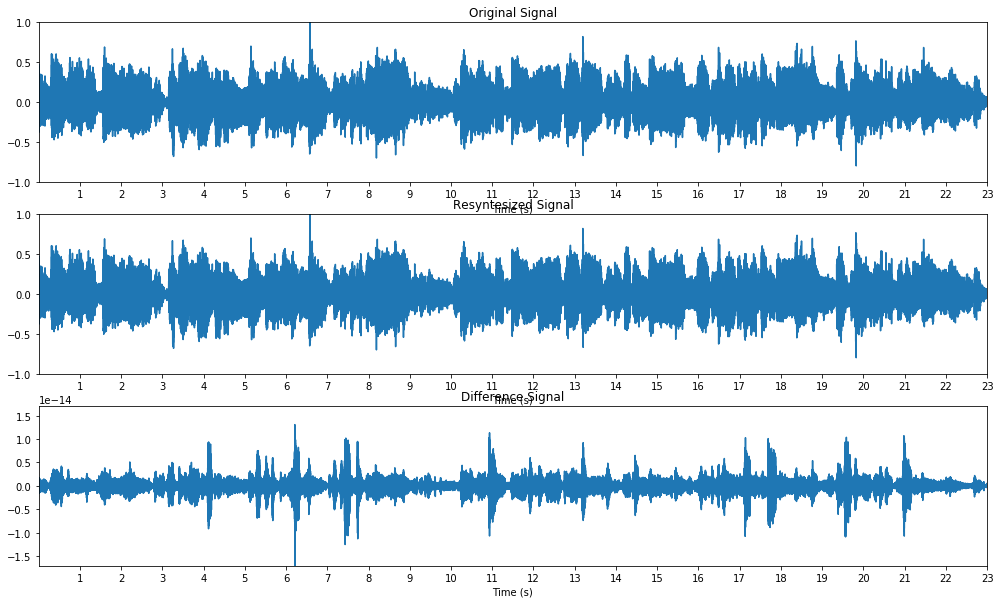
audio_signal = zaf.imdct(audio_mdct, window_function)

Inputs:
    audio_mdct: audio MDCT [number_frequencies, number_times]
    window_function: window function [window_length,]
Output:
    audio_signal: audio signal [number_samples,]
# Import the modules
import numpy as np
import zaf
import matplotlib.pyplot as plt

# Read the audio signal (normalized) with its sampling frequency in Hz, and average it over its channels
audio_signal, sampling_frequency = zaf.wavread("audio_file.wav")
audio_signal = np.mean(audio_signal, 1)

# Compute the MDCT with a slope function as used in the Vorbis audio coding format
window_length = 2048
window_function = np.sin(np.pi / 2*pow(np.sin(np.pi / window_length * np.arange(0.5, window_length + 0.5)), 2))
audio_mdct = zaf.mdct(audio_signal, window_function)

# Compute the inverse MDCT
audio_signal2 = zaf.imdct(audio_mdct, window_function)
audio_signal2 = audio_signal2[0:len(audio_signal)]

# Compute the differences between the original signal and the resynthesized one
audio_differences = audio_signal-audio_signal2
y_max = np.max(np.absolute(audio_differences))

# Display the original and resynthesized signals, and their differences in seconds
plt.figure(figsize=(17, 10))
plt.subplot(311),
zaf.sigplot(audio_signal, sampling_frequency, xtick_step=1), plt.ylim(-1, 1), plt.title("Original Signal")
plt.subplot(312)
zaf.sigplot(audio_signal2, sampling_frequency, xtick_step=1), plt.ylim(-1, 1), plt.title("Resyntesized Signal")
plt.subplot(313)
zaf.sigplot(audio_differences, sampling_frequency, xtick_step=1), plt.ylim(-y_max, y_max), plt.title("Difference Signal")
plt.show()
This Jupyter notebook shows some examples for the different functions of the Python module zaf.
23 second audio excerpt from the song Que Pena Tanto Faz performed by Tamy.
