This is a custom Login Page based on JWT tokens, which works without any external authorization authority like Local Windows Accounts etc. Use it for testing. Special thanks to Thomas Haenig, Akquinet, for sharing this https://github.com/q2g/q2g-web-jwtproxyredirect which leading the direction of this solution.
-
Create two virtual proxies
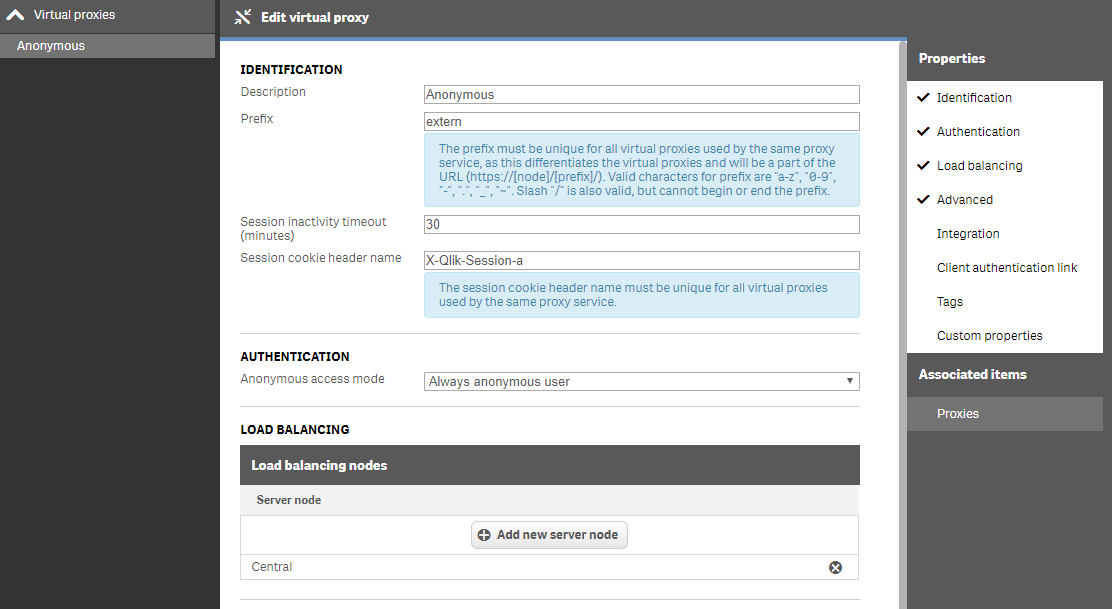
- Setup a Virtual Proxy with authentication "Always anonymous user" (I called this virtual proxy "extern" below)

- don't forget to set the load-balancing to the Central node (or others if you've got rim nodes)
- don't forget to link this virtual proxies with the Central Proxy under "Associated Items"
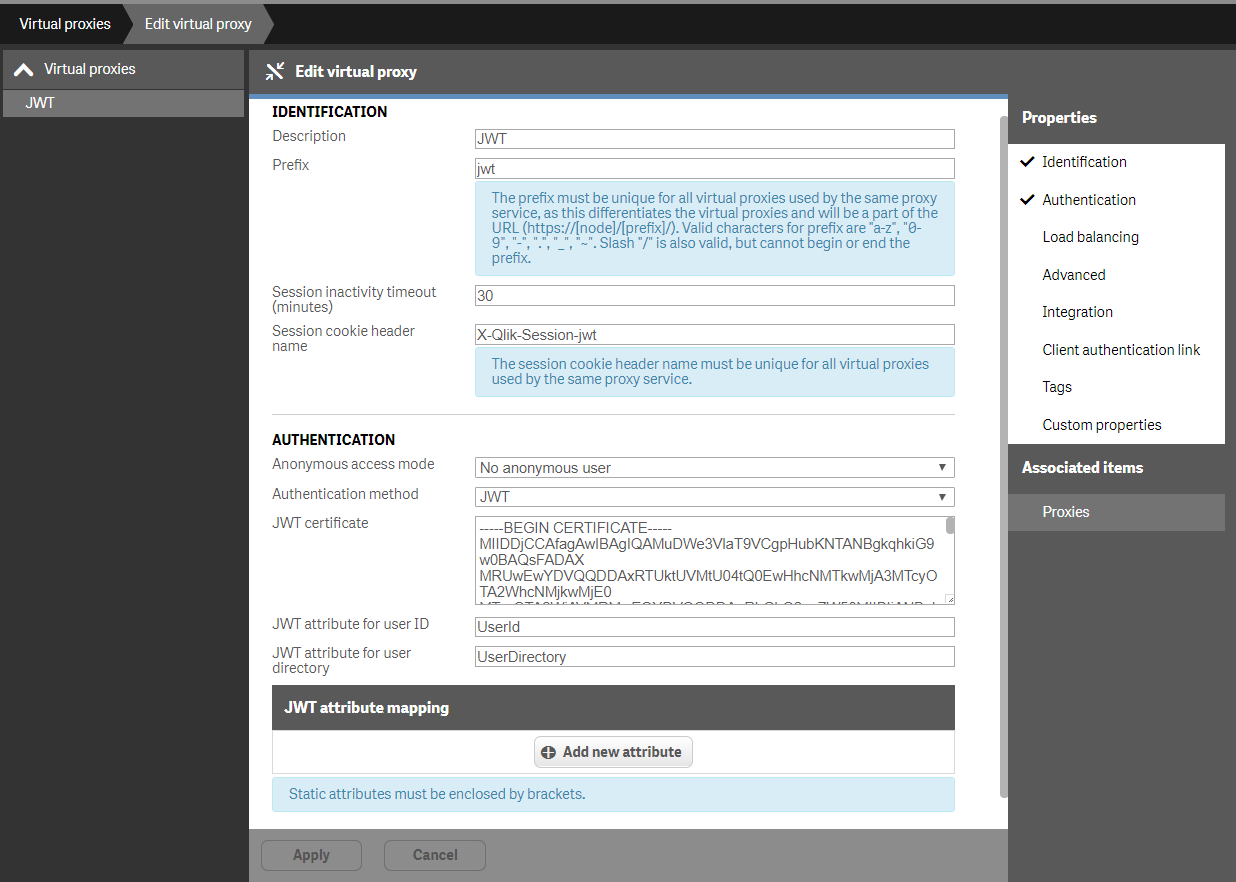
- Setup a Virtual Proxy with authentication "JWT". To set it up, you will need the certificate (if you have no own, then use this one
C:\ProgramData\Qlik\Sense\Repository\Exported Certificates\.Local Certificates\client.pemand copy/paste the content into the certificate field of the Virtual Proxy)

- add the base url of the server to the White-List under "Advanced" settings
- don't forget to set the load-balancing to the Central node (or others if you've got rim nodes)
- don't forget to link this virtual proxies with the Central Proxy under "Associated Items"
- Setup a Virtual Proxy with authentication "Always anonymous user" (I called this virtual proxy "extern" below)
-
Install Extension
- Download this git as .zip
- if needed replace logo.png (Qlik Sense) with your own in the .zip
- Import the .zip as a new extension using /qmc on your server
-
Open and edit the "Login" mashup with /dev-hub and edit the config.json page
-
edit the setting for "jwt_vproxy": this is the name of the 2nd virtual proxy you setup above (the one with JWT authentication)
-
edit the setting for "redir_targets": this is an array of allowed destinations and the sequence id (counting from 0 .. 1 .. n) is used below
-
Issue tokens for the users
- Follow instructions found in subfolder node_createtokens, you'll need node, npm and to install 3 modules
- Copy the matching client_key into the same folder (node_createtokens) as file "client_key.pem"
- tokens can be issued on another computer, it doesn't need to happen on the Sense server's remote-console (you edit the mashup via browser and that's where you add new users)
-
copy/paste the screen output to the config.json at the end (dont change "jwt_vproxy" and "redir_targets"). Each row looks like this
,"5d9e68c6c50ed3d02a2fcf54f63993b6": [0, "U2FsdGVkX1+0GqoqLpMd+0UyMlxyt636nMXTJKKANekjFescZVG2eFTvxPOqAixplmjhGQyWXRRFtVrf3Qm4ObXqlMisYe44PQhNAGa+Q7K3eviwFgfENJH/ej1pIQFGlACRy1eniEqpw/d93XLaPlpOOrHfEFr2cjt5kRPTdbTikJvVnBhO0inyd+WIpPeCXgKS3R3aTXBpGLouVPwd6JGlJtPxwiSXVc8Gdp8lz6vp++8VPtUGIJIqCejOfvAQIStKAyVNqZUyZO7tp8JAJyKI25Du1k4bwutPRRivWzx34hTNS6Ul+I3qVMPk+YjD6Qbd+GxoDav8tnybua0AECIbRxjjVXIttWELXdWNpMZKlQQ+jVKOea7RdNmZvX7MYATNmVYacpvfUEw41UbXN/+hZe/8mL+Re7cbZe4ahO5ZIMLJImns8wQVhcMX3l1aPPptyqdlL6svtbsI766ZYfVal4aMunEp2zEqY/s4rDWU3y5S9Ufhj7ehGUtjcXu5Op1qjGSgtUmoNLO2uOkFuB6rqrFgU7+s1QIfLl7Pyx8AdIuI6Yj2+n7npGrjcvRgSA9nC0bwn/88sH+Eyn73KWr0fbsl/FOAGpTnAUwWzu0tNH+DzAQRvrZuS057//Ao8f57lPbSWo9TAXrh8lhx5Q=="]
- navigate to this login.html page via the anonymous-only virtual proxy, e.g. if that proxy was "extern" then this would be the url: https://senseserver.com/extern/extensions/login/login.html
- there is also a page /extensions/login/testtoken.html, which allows you to paste the token itself (printed on the screen by executing createtoken.js). It doesn't ask for username/password, since the token itself contains the "payload" of who the user claims to be. But don't give the token to the user since it is not possible to revoke access with future consumptions of that token (only by reconfiguring the jwt virtual proxy)
If you know the bearer token already you can use it in the querystring like: https://senseserver.com/extern/extensions/login/login.html?bearer=abcdefg This shortcuts the interpretation users defined in config.json and directly redirects the browser to the target url provided in config.json and presenting the same bearer as given in the query string as Authentication http-header (needs the jwt-configured virtual proxy)
This solution is based on Json Web Tokens which have been issued without a ValidTo-date and will be presented in the http-header as bearer token. The bearer token is stored encrypted and only the user can decrypt the token with his password. There is no server authority checking the validity of the "local users", it works due to the fact that the issuer of the token has the private key of the same certificate used at the virtual proxy (bearer authentication). Everything hereby is client-side logic and this "mashup" could even be hosted outside the Qlik Sense server. That's why we needed to set up another virtual proxy ("extern" in above example) which accepts anonymous users, so everyone can least get to the /extern/extensions/login/login.html page. (In theory he/she could also go to /extern/hub or /extern/qmc but would not have any further rights there being anonymous).
- userid names are one-way hashed
- the JWT tokens were encrpyted with the choosen password during creation of the token
- the token can only be decrypted with the same password entered by that user (It is like a password-protected .zip where the token is in the zip)
- Everyone theoretically can get access to the mapping table found in config.json (userid hashes and encrpyted bearer tokens) but noone can reuse it, leaving minimum chance for attacks.
A user cannot change his password himself. This would require a replacement of the previous mapping made in config.json (login object). The token would remain the same, but the en/decryption is new.
I am using CryptoJS for hashing, encrypting and decrypting. So it is quite hard to break in, but yet I don't recommend this as a production solution, just for setting up test users without any other dependency. If you can, use ticketing solutions, SAML or JWT with an external IDP instead.
