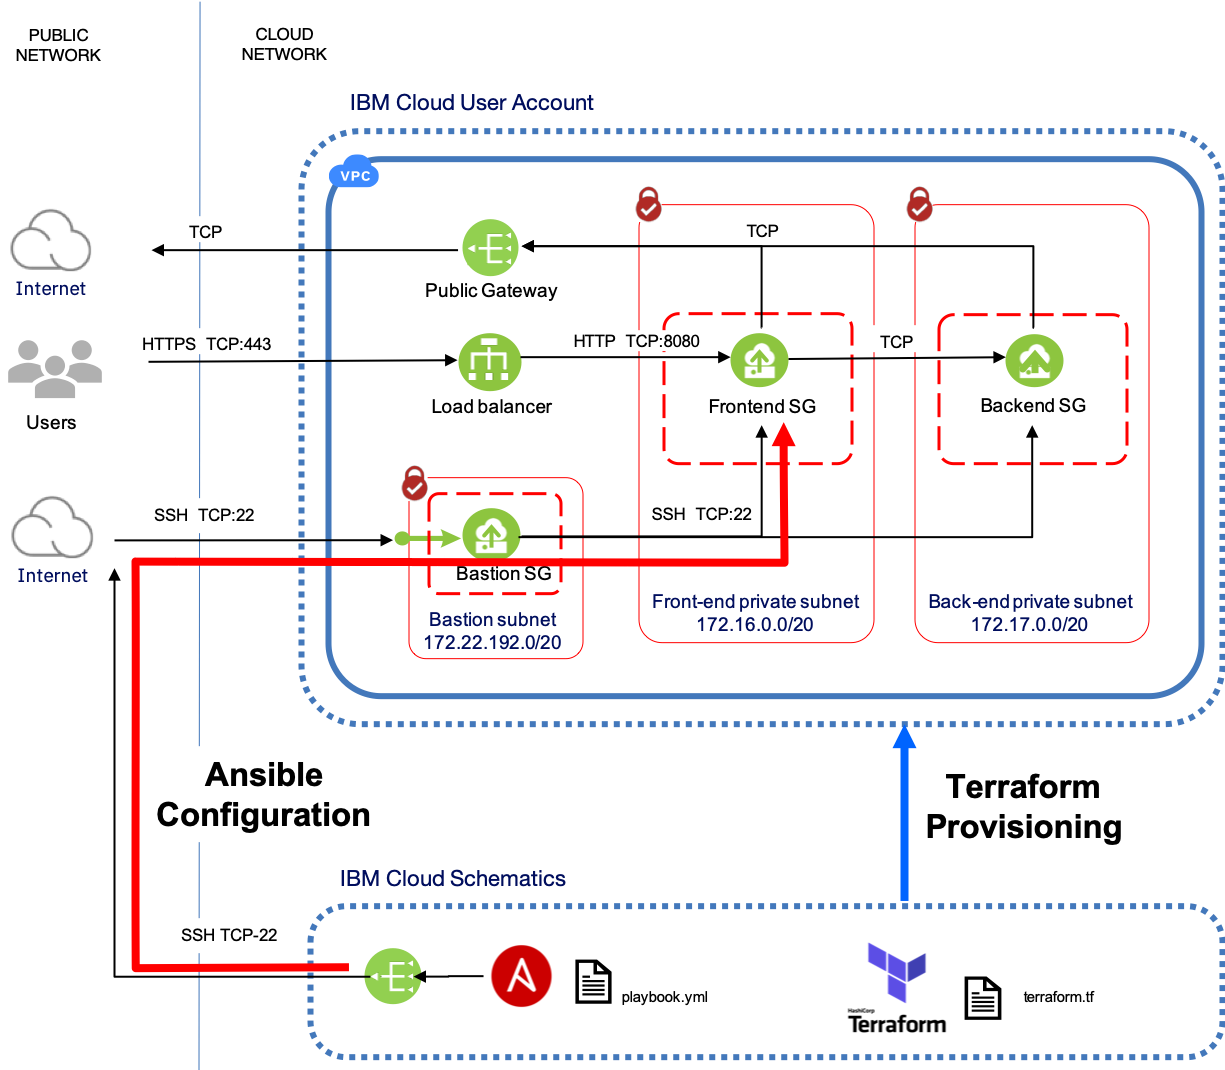
This Terraform example for IBM Cloud Schematics illustrates how to use Redhat Ansible with Terraform and IBM Cloud Schematics to deploy multi-tier applications in an IBM Cloud Gen2 VPC environment.
The example makes use of out of the box Ansible roles to install the open-source ‘Hackathon Starter’ application. It deploys the application onto a pair of ‘frontend’ nginx app servers and deploys mongodb as a ‘backend’ database server. It assumes that a suitable target VPC environment has been deployed using the example VPC with SSH access and Bastion Host for Redhat Ansible.
The Ansible provisioner template described in this tutorial requires only two inputs. The private SSH key for the bastion host and VSIs and the workspace_id of the Workspace used to deploy the VPC environment. The private key required is from the key pair generated (or reused) from VPC with SSH access and Bastion Host for Redhat Ansible example.
Upon successful execution, which will take around 15 minutes, the Hackathon Starter website will be accessible at the DNS address of the VPC load balancer. This is available in the output of the Schematics Apply operation
This example was written for use with IBM Cloud Schematics and assumes that the target VPC environment created by the VPC with SSH access and Bastion Host for Redhat Ansible was also deployed using Schematics. This example has a dependency on executing the VPC example within Schematics as it uses the ibm_schematics_state data source to read the VPC state file. This file is used as input to the Ansible dynamic inventory script terraform_inv.py.
For a detailed explanation of how to use and configure the Terraform Ansible provisioner, please see the IBM Developer article Application deployment with Redhat Ansible and IBM Cloud Schematics.
Support for software installation and configuration with Redhat Ansible is enabled by the addition
of tags on all target VSIs. The Ansible group assignment of VSIs is determined by the setting of IBM Cloud resource
tags on the ibm_is_instance resource statements. Tags are prefixed with "schematics:group:" followed by the group name. '
tags = ["schematics:group:backend"]. A VSI can be assigned to multiple groups, by the addition of multiple schematics:group:
prefixed tags.
In this example VSI's are grouped by the Terraform module (frontend, backend) used for deployment. This ensures the match between the VPC network configuration of a VSI and the Ansible role deployed on the VSI.
Correct specification of tags is essential for operation of the Ansible dynamic inventory script used by Ansible to retrieve host information from the Terraform State file. The tags here should match the roles defined in the site.yml playbook file.
| Name | Version |
|---|---|
| terraform | ~> 1.0 |
| terraform_provisioner_ansible | ~> 2.3.3 |
| terraform_provider_ibm | ~> 1.33 |
| name | description | type | required | default | sensitive |
|---|---|---|---|---|---|
| workspace_id | Id of the source Schematics Workspace for target VSIs | string | ✓ | ---- | |
| ssh_private_key | Optional private key from key pair. Only required if it desired to validate remote SSH access to the bastion host and VSIs. | string | ✓ | ---- |
| name | description |
|---|---|
| app_dns_hostname | Fully qualified DNS name for application access |
-
Deploy the VPC application environment as described in the example VPC with SSH access and Bastion Host for Redhat Ansible via IBM Cloud Schematics.
-
Copy and save the workspace_id of the workspace you created to deploy the VPC environment. The workspace_id can be located under the heading Workspace ID on the Settings page of the VPC workspace (middle of the screen). It will be of the same format as
us-south.workspace.Ansible-VPC.224e1e0c. -
Make sure that you are assigned the correct permissions to create workspaces and deploy resources.
-
Create the Schematics Ansible workspace:
- From the IBM Cloud menu select Schematics.
- Click Create workspace.
- Enter the URL of this example from the Schematics examples Github repository.
- Select the Terraform version: Terraform 1.0 or higher
- Click Next.
- Enter a name for your workspace.
- Select a Resource Group you have IAM permissions for (Default)
- Select location
North America. - Click Create to create your draft workspace.
- In the Input variables section, The only two parameters to configure are:
- workspace_id of the VPC workspace
- Open new browser tab, navigate to VPC workspace, open Settings tab, copy
Workspace_IDfield contents - In the Ansible workspace, paste value into the
workspace_idvariable .
- Open new browser tab, navigate to VPC workspace, open Settings tab, copy
- Private SSH key generated for the VPC workspace
- In a terminal session print to the screen the private key from the key pair
<ssh_key_name>used when the VSIs were created.- Run the command
cat ~/.ssh/<ssh_key_name>to print the private key. - Copy the entire text including the lines,
-----BEGIN OPENSSH PRIVATE KEY-----and-----END OPENSSH PRIVATE KEY-----.
- Run the command
- Paste ssh key output into the Ansible workspace
ssh_private_keyvariable and set the sensitive flag.
- In a terminal session print to the screen the private key from the key pair
- workspace_id of the VPC workspace
- Click Save changes.
-
From the workspace Settings page, click Generate plan
-
Click View log to review the log files of your Terraform execution plan.
-
Apply your Terraform template by clicking Apply plan.
-
Review the log file to ensure that no errors occurred during the provisioning process.
The output of the Schematics Apply Plan will list the fully qualified DNS name of the hosted instance of the Hackathon Starter application.
Outputs:

app_dns_hostname = 2989c099-us-south.lb.appdomain.cloud
Open a web browser, copy the app_dns_hostname URL from the Schematics output and paste into the browser. The splash screen of the Hackathon Starter application should be displayed.
