
![]()
An awesome repository of Lab Guides for ServiceNow Creator Workflows!
Explore the docs »
View Demo
·
Report Bug
·
Request Feature
- Table of Contents
- About The Project
- Getting Started
- Examples
- FAQs
- How are the new changes published?
- Who do I talk to?
- Maintainers
A lab guide website for ServiceNow Creator Workflow Workshops. The lab guides are designed to be used with a pre-configured ServiceNow instance provided to you at a live Workshop event. Results may vary trying on your own instance.
| Lab Guide | ServiceNow Version | Status | Content Owner | Last Updated | Project |
|---|---|---|---|---|---|
| Telework Case Management 101 | Vancouver | Live | Marc Mouries | 04-10-2024 | |
| Telework Case Management 101 | Washington | Planning | Marc Mouries | N/A | Link |
| Telework Case Management 201 | Vancouver | Live | Marc Mouries | 03-21-2024 | |
| Collaborate to Accelerate | Vancouver | Live | Dale Stubblefield | 02-22-2024 | |
| iHub: Spoke Generator | Vancouver | Live | Dale Stubblefield | 01-30-2024 | |
| EWF + CrWF | Utah | Live | Dale Stubblefield | 02-22-2024 | |
| Travel Request | Utah | Live | Shao Wei Tan | 02-22-2024 | |
| Complaints Management | Utah | Live | Kristy Merriam | 02-28-2024 |
Retired Lab Guides
- Collaborate to Accelerate (Utah)
- Telework Case Management 101 (Utah)

This is of how to list things you need to know to contribute to the lab guides.
- Knowledge of Markdown
- New to Markdown? Try the Communicate using Markdown GitHub Skills course
- In this course you will work with pull requests as well as edit files. If these things aren't familiar to you, we recommend you take the Introduction to GitHub course, first!
- Code editor (Visual Studio Code is recommended)
- GitHub Desktop
- Node.js
Below is an example of how setup your local system to edit the lab guides and contribute back to this project .
-
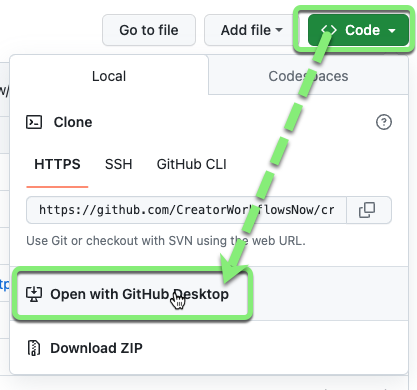
Clone this repo by clicking the green code button above, then click Open with GitHub Desktop.
-
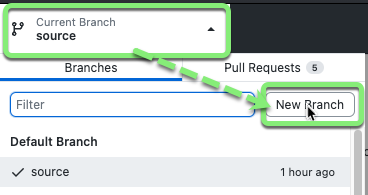
In GitHub Desktop, Create a new Branch.
-
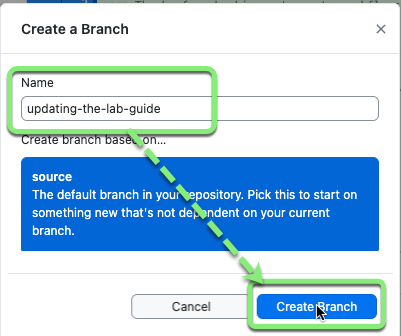
Pick a unique name for your branch, then click Create Branch.
 ;
; -
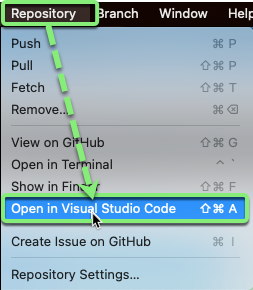
In GitHub Desktop, go to Repository >> Open in Visual Studio Code
-
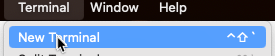
Open a terminal in VS Code.
-
Install NPM packages with this command:
npm install
-
Run a local server to see your changes locally before you publish back to the repo:
npm run start
-
Your desktop should open a new browser tab to the URL: http://localhost:3000/
-
Edit the markdown files in the labs/ folder as needed. Pay close attention to the frontmatter at the top of the file. Refer to to existing lab files for guidance or the Docusuarus documentation.
-
When you are done editing and ready to commit back to the repo, go back to GitHub Desktop.
-
Check the blue box next to each file and add a cool commit message like this:
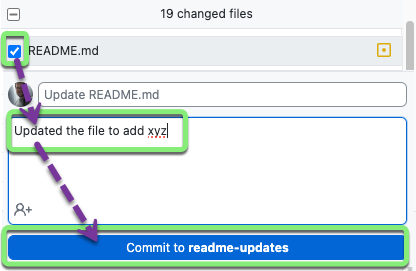
-
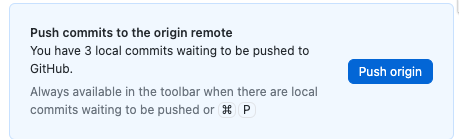
Push your commits back to the GitHub repo.
-
Create a Pull Request. This pulls your code to the target branch when it gets approved.
 ;
; -
Patiently wait for the lab's content owner to approve your Pull Request.


Check out this Example Lab Guide for how to lay out the files in your lab and basic styling guidelines.
This is an example of a TIP admonition.

How to add Admonitions to your lab guide
Front matter is the metadata at the top of a markdown file that tells the Docusuarus framework what to do with it. Here is an example:
---
id: front-matter
title: "Front Matter"
pagination_label: "Amazing Front Matter Examples"
hide_table_of_contents: true
draft: false
---
The information at the top of your markdown file is important for helping the site understand how to present your page.
-
Markdown All in One - All you need to write Markdown (keyboard shortcuts, table of contents, auto preview and more)
-
Paste Image - Paste image from clipboard directly into your markdown file.
Here are the steps to install Node.js and NPM on macOS:
-
Install Homebrew: Homebrew is a package manager for macOS that simplifies the installation of software. You can install it by visiting the Homebrew's official website and following the instructions.
-
Install Node.js and NPM: Once you have Homebrew installed, you can install Node.js and NPM by typing the following command in your terminal:
brew install node. This command will download and install the dependencies. -
Verify Installation: After the installation finishes, you can confirm that you successfully installed Node.js by checking its version with the command:
node -v. Similarly, you can check the installed version of NPM by typing:npm -v.
Please note that Node.js has a PKG installer for macOS available on its website. However, installing with Homebrew is the recommended approach.
-
Download the installer: Download the Windows Installer from the Node.js official website. https://nodejs.org/en/download
-
Run the installer: Double-click the .msi binary files to initiate the installation process.
-
Verify Installation: After the installation finishes, you can confirm that you successfully installed Node.js by checking its version with the command:
node -v. Similarly, you can check the installed version of NPM by typing:npm -v.
When new the pull request to 'source' is approved and code gets merged, this kicks off a series of GitHub Actions.
![]()
- Uses a GitHub runner to build a new npm site and then deploy to the branch 'gh-pages'
![]()
- Built-in GitHub Action. When changes are pushed to the branch 'gh-pages', then GitHub will publish these changes to the site https://creatorworkflowsnow.github.io/.
If you have any questions or problems, please open an issue on GitHub and we will do our best to give you a timely answer.
The lab guides are maintained by:
- Dale Stubblefield - https://github.com/dalestubblefield
- Kristy Merriam - https://github.com/KristyS96
- Marc Mouries - https://github.com/marcmouries
- Sarah Yao - https://github.com/syaosnow
- quentincloudsnow - https://github.com/quentincloudsnow