
The Best-in-Class Live Chat for your mobile apps. Integrate painlessly the Live Chat for your customer support inside any Android App with Customerly Live Chat SDK
Kotlin oriented (Java fully supported)
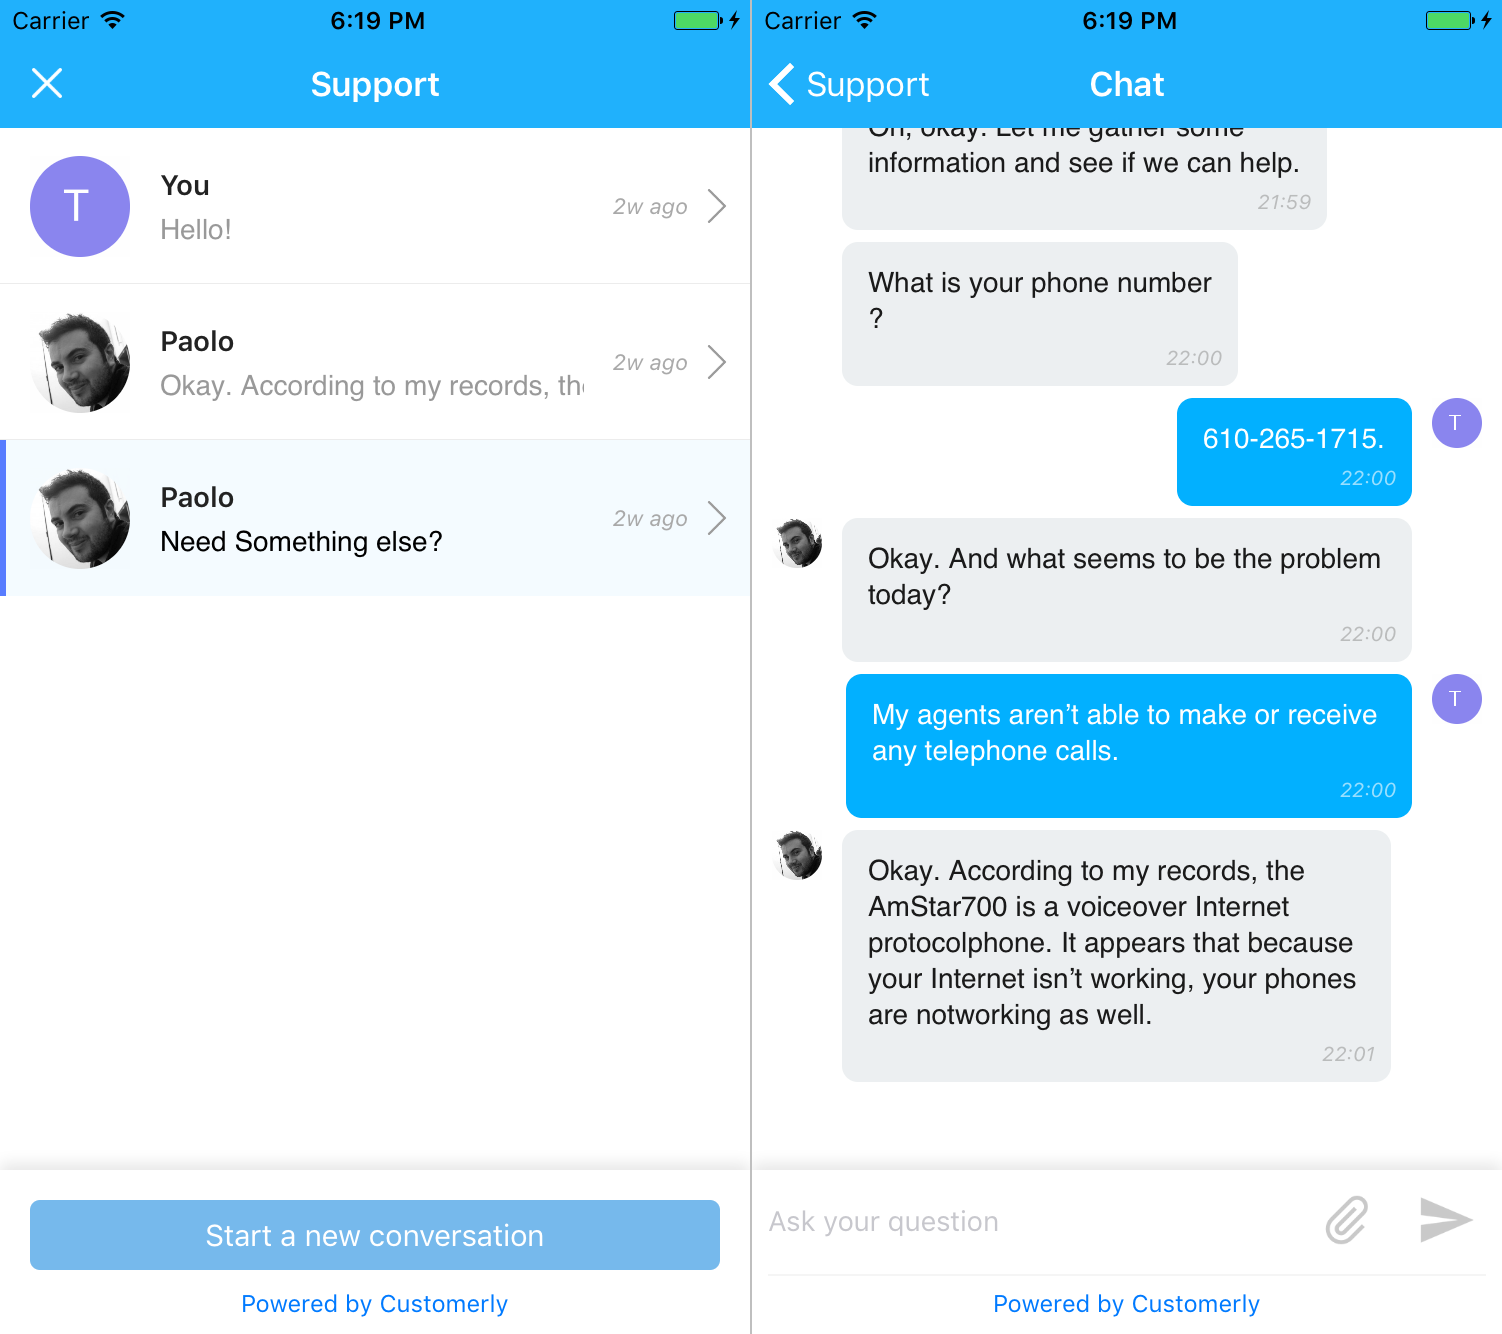
Customerly is the most complete Live Chat solution with Help Desk for your mobile apps. Help them where they are with the customer support widget. Easy to integrate Live Chat, once integrated you can track user data and gather user feedback.
Run Surveys directly into your mobile apps and get the responses in one place.
The Customerly Live Chat Android SDK is really simple to integrate in your apps, and allow your users to contact you via chat.
- Register your users
- Set attributes
- Track events
- Support via chat in real time
- Surveys
- English & Italian localizations
- Many more is coming....
- Android 4.0.1+ (API level 14+)
- Android Studio 2.0+
- Java 6+ (Customerly SDK is now optimized for Kotlin, and it works also with pure Java projects)
Are you migrating from a previous version of this SDK (v1.x.x) to the newest version (v2.x.x) and need help for the transition?
I have changed a little the structure, making it more Kotlin-oriented but don't worry: Java it is still and totally supported!!
Check the Migration Guide for a rapid (10 seconds) and a complete(2-10 minutes) transition.
To integrate the Customerly SDK we recommend to use Gradle or Maven dependency
Instead of VERSION_NAME use the latest version name.

Add it in your root build.gradle at the end of repositories:
allprojects {
    repositories {
        ...
        maven { url 'https://jitpack.io' }
    }
}
Add the dependency to your app build.gradle
dependencies {
    implementation 'io.customerly:Android-SDK:<VERSION_NAME>'
}
You can find also maven, sbt and leiningen instruction in the sdk JitPack page
In your module build.gradle add:
buildscript {
    repositories {
        jcenter()
    }
}

dependencies {
    compile 'io.customerly:customerly-android-sdk:VERSION_NAME'
}<dependency>
<groupId>io.customerly</groupId>
<artifactId>customerly-android-sdk</artifactId>
<version>VERSION_NAME</version>
<type>pom</type>
</dependency>We suggest to avoid manually integration of the SDK in your project, by the way it is still possible:
- Download the
/customerly-android-sdkfolder and add it as module in your project. - Congratulations!
We recommend to use only the public methods of the class Customerly.
Since version 2.2.0 the customerly sdk has replaced its support libraries dependencies with the androidx corresponding ones.
If your project is still using support libraries dependencies i suggest to migrate to androidx as suggested by google (Check here for infos: https://developer.android.com/jetpack/androidx/).
A project using support libraries can't depend from libraries with androidx dependencies.
But if you can't or don't want or don't have time now, please don't worry:
A variant version of customerly sdk with support libraries dependencies is available, just use customerly-android-sdk-supportlibraries instead of customerly-android-sdk as the artifact name.
UPDATE: Sorry to annunce that the 3.0.4 is the last version of Customerly SDK distributed for support libraries too. Since next version only AndroidX libraries are supported.
1) Create a new AndroidStudio project or open an existing one
2) If you already have defined a custom Application class in your project you can skip to step 3). Create a class that extends the default android Application class
Kotlin
class CustomApplication: Application {
    override fun onCreate() {
        super.onCreate()
        //See step 3)
    }
}
Java
public class CustomApplication extends Application {
    @Override
    public void onCreate() {
        super.onCreate();
        //See step 3)
    }
}
Don't forget to declare this class in your AndroidManifest.xml file:
<?xml version="1.0" encoding="utf-8"?>
<manifest xmlns:android="http://schemas.android.com/apk/res/android"
    package="YOUR.PACKAGE">
    <application
        android:name=".CustomApplication" >
        //...
    </application>
</manifest>
3) Now you need to configure the Customerly SDK in your custom Application class onCreate method:
Kotlin
class CustomApplication: Application {
    override fun onCreate() {
        super.onCreate()
        Customerly.configure(application = this, customerlyAppId = "YOUR_CUSTOMERLY_APP_ID")
    }
}
Java
public class CustomApplication extends Application {
    @Override
    public void onCreate() {
        super.onCreate();
        Customerly.configure(this, "YOUR_CUSTOMERLY_APP_ID");
    }
}OPTIONALLY, if you want to specify a custom widget_color for the application ignoring the server-defined one you have to specify it in the configure method:
Kotlin
Customerly.configure(application = this, customerlyAppId = "YOUR_CUSTOMERLY_APP_ID", widgetColorInt = Color.RED)Java
Customerly.configure(this, "YOUR_CUSTOMERLY_APP_ID", Color.RED);OPTIONALLY, after the configure, if you want to enable the logging in console you have to call the following method. Our suggest is to call it soon after the configure:
Kotlin
Customerly.setVerboseLogging(enabled = BuildConfig.DEBUG)
//Passing BuildConfig.DEBUG, logging will be automatically disabled for the release apk
Java
Customerly.setVerboseLogging(BuildConfig.DEBUG);
//Passing BuildConfig.DEBUG, logging will be automatically disabled for the release apkDon't forget to show a button or something to your user for opening the Support Activity. Just call the method openSupport:
Kotlin
Customerly.openSupport(activity = this@Activity)Java
Customerly.openSupport(Activity.this);
You can hide the attachment button to the user to deny the sending of them by calling setAttachmentsAvailable(false):
Kotlin
Customerly.setAttachmentsAvailable(enabled = false)Java
Customerly.setAttachmentsAvailable(false);With the Customerly SDK you can deliver surveys directly into your app without any lines of code.
They will be automatically displayed to your user as soon as possible.
If you don't have a login method inside your apps don't worry, users can use the chat inserting their emails.
By the way, if users login in your application please register them into Customerly calling the method registerUser:.
Example:
Kotlin
Customerly.registerUser(email = "axlrose@example.com")Java
Customerly.registerUser("axlrose@example.com");As seen above, you only need an email address to register the user BUT, OPTIONALLY, you can set one or more other stuff to the registerUser task:
Kotlin
Customerly.registerUser(
    email = "axlrose@example.com",
    userId = "12345",           //OPTIONALLY you can pass the user ID
    name = "Gianni",            //OPTIONALLY you can pass the user name
    attributes = attributesMap, //OPTIONALLY you can pass some custom attributes (See the *Attributes* section below for the map building)
    company = companyMap,       //OPTIONALLY you can pass the user company informations (See the *Companies* section below for the map building)
    success = {                 //OPTIONALLY you can pass a callback to be notified of the success of the task
        //Called if the task completes successfully
    },
    failure = {                 //OPTIONALLY you can pass a callback to be notified of the failure of the task
        //Called if the task fails
    })
Java
Customerly.registerUser(
    "axlrose@example.com",
    "12345",                //OPTIONALLY you can pass the user ID or null
    "Gianni",               //OPTIONALLY you can pass the user name or null
    attributesMap,          //OPTIONALLY you can pass some custom attributes or null (See the *Attributes* section below for the map building)
    companyMap,             //OPTIONALLY you can pass the user company informations or null (See the *Companies* section below for the map building)
    new Callback() {        //OPTIONALLY you can pass a callback to be notified of the success of the task or null
        @Override
        public Unit invoke() {
            //Called if the task completes successfully
            return null;
        }
    },
    new Callback() {        //OPTIONALLY you can pass a callback to be notified of the failure of the task or null
        @Override
        public Unit invoke() {
            //Called if the task fails
            return null;
        }
    });
So user_id, name, attributes, company, success and failure are totally optional.
Please remember to logout users from customerly when they logout in your application:
Kotlin
Customerly.logoutUser()Java
Customerly.logoutUser();OPTIONALLY, you can pass a callback that will be executed when the logout task is completed:
Kotlin
Customerly.logoutUser {
    // Do something
}
Java
Customerly.logoutUser(
    new Callback() {        //OPTIONALLY you can pass a callback to be notified of the success of the task or null
        @Override
        public Unit invoke() {
            // Do something
            return null;
        }
    }
);
Please mind that the logoutUser task is not runned synchronously, so if you try to do something like this in your code:
Customerly.logoutUser()
Customerly.registerUser(email)
the two task will conflict and the result won't be garanteed Try something like this instead:
Customerly.logoutUser {
    Customerly.registerUser(email)
}Inside attributes you can add every custom data you prefer to track for user segmentation. Attributes can be only String, char, int, long, float, double and boolean. Eg. This is an attribute map that contains the experience in year and the job of the current user
Kotlin
val attributesMap = HashMap<String, Any>()
attributesMap.put("experience", 3)
attributesMap.put("job", "Employee")
Java
HashMap<String, Object> attributesMap = new HashMap<String, Object>();
attributesMap.put("experience", 3);
attributesMap.put("job", "Employee");
The map above can be passed as parameter of the registerUser or passed in a second time for already registered user:
Kotlin
Customerly.setAttributes(
    attributes = attributesMap,
    success = {     //OPTIONALLY you can pass a callback to be notified of the success of the task or null
        //Called if the task completes successfully
    },
    failure = {     //OPTIONALLY you can pass a callback to be notified of the failure of the task or null
        //Called if the task fails
    })
Java
Customerly.setAttributes(
    attributesMap,
    new Callback() {        //OPTIONALLY you can pass a callback to be notified of the success of the task or null
        @Override
        public Unit invoke() {
            //Called if the task completes successfully
            return null;
        }
    },
    new Callback() {        //OPTIONALLY you can pass a callback to be notified of the failure of the task or null
        @Override
        public Unit invoke() {
            //Called if the task fails
            return null;
        }
}; //Don't forget to call the start method. It starts the task!If in your application the user can handle two or more companies maybe you would like to add some attributes related to them The Company map MUST contain the following two key/values:
"company_id" -> containing the id of the company
"name" -> containing the name of the company
Then you can add as many company attributes as you want, but remember: they can be only String, char, int, long, float, double and boolean. Eg. This is a company map that contains the company mandatory fields (company_id and name) and a custom
Kotlin
val companyMap = Customerly.company("foundation year" to 2017, companyId = "123abc", companyName = "Customerly")Java
HashMap<String, Object> companyAttributesMap = new HashMap<String, Object>();
companyAttributesMap.put("foundation year", 2017);//Optionally any other values
The map above can be passed as parameter of the registerUser or passed in a second time for already registered user:
Kotlin
Customerly.setCompany(
    company = companyMap,
    success = {     //OPTIONALLY you can pass a callback to be notified of the success of the task or null
        //Called if the task completes successfully
    },
    failure = {     //OPTIONALLY you can pass a callback to be notified of the failure of the task or null
        //Called if the task fails
    })
Java
Customerly.setCompany(
    companyMap,
    new Callback() {        //OPTIONALLY you can pass a callback to be notified of the success of the task or null
        @Override
        public Unit invoke() {
            //Called if the task completes successfully
            return null;
        }
    },
    new Callback() {        //OPTIONALLY you can pass a callback to be notified of the failure of the task or null
        @Override
        public Unit invoke() {
            //Called if the task fails
            return null;
        }
}; //Don't forget to call the start method. It starts the task!Send to Customerly every event you want to segment users better Eg. This send an event that track a potential purchase
Kotlin
Customerly.trackEvent(eventName = "added_to_cart")Java
Customerly.trackEvent("added_to_cart");You can specify some Activities that will never display messages popup and/or surveys
This feature is commonly used for SplashScreen that should never display nothing more than their self
The best place for using it is in the Application onCreate after the Customerly configuration but you can call this from wherever you want
Every Activity is enabled as default. Once disabled, you can re-enable it by calling the enableOn function
Kotlin
Customerly.disableOn(activityClass = SplashActivity::class)
Customerly.enableOn(activityClass = SplashActivity::class)
Java
Customerly.disableOn(SplashActivity.class);
Customerly.enableOn(SplashActivity.class);The following permission will be AUTOMATICALLY added to the merged AndroidManifest of your application:
<manifest xmlns:android="http://schemas.android.com/apk/res/android"
    package="YOUR.PACKAGE">
    <uses-permission android:name="android.permission.ACCESS_NETWORK_STATE" />
    <uses-permission android:name="android.permission.INTERNET" />
    <uses-permission android:name="android.permission.READ_EXTERNAL_STORAGE" />
    <uses-permission android:name="android.permission.WRITE_EXTERNAL_STORAGE" />
    //...
</manifest>
ACCESS_NETWORK_STATE is used to verify if an internet connection is available
INTERNET is used to perform https requests
READ_EXTERNAL_STORAGE is used to upload file attachments
WRITE_EXTERNAL_STORAGE is used to save file attachments
The library needs the following rules to work with proguard enabled
-dontwarn java.lang.invoke.*
-dontwarn okio.**
-dontwarn io.customerly.**
-keepclasseswithmembers class android.animation.ValueAnimator {
    public static void setDurationScale(float);
}
-keepclassmembernames class kotlinx.** {
    volatile <fields>;
}
By the way should not be necessary to explicitly add them in your proguard file because they should be automatically inherited.
- If you need help or you'd like to ask a general question, open an issue or contact our support on Customerly.io
- If you found a bug, open an issue.
- If you have a feature request, open an issue.
- If you want to contribute, submit a pull request.
Made with ❤️ by Gianni Genovesi for Customerly.
Customerly Android SDK is available under the Apache License 2.0. See the Customerly_LICENSE.txt file for more info.