Trunks-core is the view part of trunks, its goal is only to add/modify or destroy components according to the JSON Component Declaration it receives. It also exposes a global object wich is used to receive components specifications and also send the events to the client application.
This package is not enough on its own, the resulting build of trunks core aims to be packaged on the clients that will use the rendering API.
If your goal is to write GUI using Trunks, refer to your clientside package documentation.
If your goal is to write an adapter for anything not supported yet, follow this documentation.
- Input
- Text
- Button
- Box
- CheckBoxes
- Radio
- ProgressBar
- FontAwesome4 Icons
- Notification
- ColorPicker
- [] Image (supported only via URL)
- Tabs
- Custom Stylesheet (string and like image)
- Custom JS (string and like image)
- Custom fonts (like image)
- Absolute position
- Bulma Responsive
- Bulma colors
- RGB colors
- onClick
- onChange
- onEnter
- AddComponent
- EditComponent
- DestroyComponent
- sendEvent
Install all npm packages with npm install and run the UI with npm run start.
When you run the Application you will only have a blank page. This is normal. You can either access the hook via the Dev Tools console to populate a UI but we recommend you use the UI Test.
Launch npm run uitests, you will then have a lot of cypress scenarios you can add your own tests.
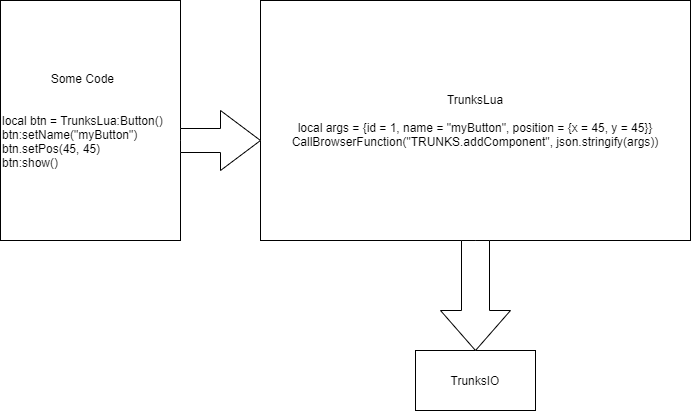
Here is a simple schematics of how Trunks work until the final rendering
- Some code: represents user code written in Lua
- TrunksLua: represents a client that will interface the user code and translate it in the JSON component syntax for Trunks to render
- Trunks: Trunks core, this repository
[ ]
]
Events on go on the opposite direction, they will be sent from TrunksIO to TrunksLua and then sent to SomeCode
To communicate with Trunks you need to first find it, we export a TRUNKS or window.TRUNKS global for interacting with Trunks.
You can either call it from JS or from your language of choice if you can send JS commands to the WebUI currently running Trunks.
To add a component you must use function TRUNKS.addComponent, it takes only one parameter with the Component JSON.
Please note that the only actual mandatory field is the id. But be carefull, if you do not provide a component value, an error might show until you specify it!
You can always specify all orther fields during execution with the update method.
For example:
const firstButton =
    {
        id: "Cypress1",
        component: "Button",
        text: "Hello world !",
        position: {
            positionType: "absolute",
            posX: 0,
            posY: 0
        }
    };

    TRUNKS.addComponent(JSON.stringify(firstButton))
Note that the Id is already specified, the id must always be specified before adding the component it is your responsability to set the component id.
Will render a simple button on the top left of the screen: [Insert button image here]
To update a component, the only mandatory field is the id.
Every orther field will be merged with the orther fields of the component, this allows simple and atomic updates to fit your API.
For example to update the text displayed on the button:
const updatePatch = {
    id: "Cypress1",
    text: "This is my new text !"
}


TRUNKS.updateComponent(JSON.stringify(updatePatch));
Or to change its position:
const updatePatch2 = {
    id: "Cypress1",
    position: {
        posX: 90
    }
}

TRUNKS.updateComponent(JSON.stringify(updatePatch2));
As you can see, you don't need to provide all the values while updating the UI.
In order to catch all component events you need to subscribe a function hook, this hook is the function that will always be called when a even happends on an element (onClick, onEnter, etc etc).
TRUNKS.setEventHook((event) => {
    console.log(event);
});
After clicking the button created in the previous chapter it will call the hook with:
{
  "eventType": "onClick",
  "eventPayload": {
    "id": "Cypress1"
  }
}
It will always return an id and may return the name if user has specified it alongisde the value if the component has one for this event.
The next step for you is to accuratly redirect the event to the corresponding component and update its representation.