This is a new method of installing an FDS Stick into a Sharp Twin Famicom Rather than having to cut the plastic card cover or have an ugly wire hanging around, this mod gives you a nice professional looking install!
- Start by printing the modded cover and snap cover
-
While that prints (roughly 3 hours) gather materials from the BOM
-
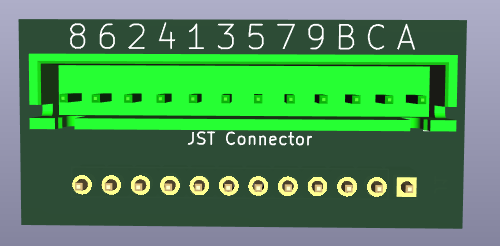
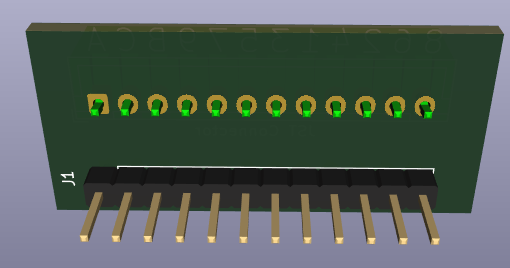
Refer to screenshots for proper installation of the JST connector and header pins
- Use sandpaper, a dremel, or a hot knife to remove the bump from the connector. Note if using a hot knife - pay attention! That's how mine came out so marred.
- Remove locking back for SNES AV and insert the SNES connector into the snap cover (orientation is not important)
- Assemble the XHP-12 connector cable as shown in pictures - do not insert a jumper into pin 12 of the white connector!
- Remove the jumper ends and use wire strippers to remove the sheath
-
Run the wires throught the opening in the modded Twin Famicom cover
-
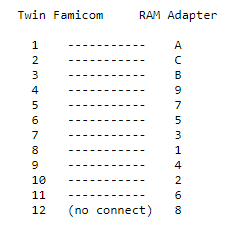
Install the wires according to this diagram from 3DS Captures site:
Note: It is crucial that you double check your work as one wrong connection can make your FDS Stick short circuit
Note: See how I put my SNES connector upside down? Not only does it hide the ugly parts, it is also my guide so that I know which pins are being soldered to
The goal is to have the FDS Stick facing up so you can easily press the button for flipping disks


- Insert the ram adapter into the top row of holes in the Twin Famicom - Please see photos 10 & 11
-
Carefully snap in the snap cover if you haven't already. If the snap cover isn't tight enough, a small dab of superglue will do the trick. Remember orientation is important! You dont want to fry your FDS Stick
-
Connect the white connector
- Carefully install the modded Famicom cover
- Plug in your FDS Stick and enjoy!


