This is the source code for PVN3D: A Deep Point-wise 3D Keypoints Voting Network for 6DoF Pose Estimation, CVPR 2020. (PDF, Video_bilibili, Video_youtube).
-
Remove Old NVIDIA installation.
sudo apt-get purge nvidia*
sudo apt-get autoremove
sudo apt-get autoclean
sudo rm -rf /usr/local/cuda*
sudo rm /etc/apt/sources.list.d/cuda*
-
Install the NVIDIA driver version 440.
sudo add-apt-repository ppa:graphics-drivers/ppa sudo apt update sudo apt install nvidia-driver-440 # reboot shutdown -r now -
Install CUDA10.2 from the NIVIDA website. Remove other versions as explained in the NVIDIA installation guide. For Ubuntu 18.04 & 20.04 the instruction for "deb (network)" work well:
wget https://developer.download.nvidia.com/compute/cuda/repos/ubuntu1804/x86_64/cuda-ubuntu1804.pin sudo mv cuda-ubuntu1804.pin /etc/apt/preferences.d/cuda-repository-pin-600 sudo apt-key adv --fetch-keys https://developer.download.nvidia.com/compute/cuda/repos/ubuntu1804/x86_64/7fa2af80.pub sudo add-apt-repository "deb http://developer.download.nvidia.com/compute/cuda/repos/ubuntu1804/x86_64/ /" sudo apt-get update sudo apt-get -y install cuda-10-2 sudo apt install libcudnn7 -
Create and activate a python3 virtual environment and install the requirements (python 3.6 required).
python3 -m venv venv
source venv/bin/activate
# Cython an numpy must be installed before requirements.txt
pip3 install Cython numpy --user
pip3 install -r requirements.txt
-
Install tkinter through
sudo apt install python3-tk -
Install python-pcl.
# install dependencies
sudo apt install libpcl-dev libvtk6-dev
# pip install works for python3.6 on Ubuntu 18.04 & 20.04
pip install python-pcl
-
Install PointNet++ (refer from Pointnet2_PyTorch):
git clone https://github.com/erikwijmans/Pointnet2_PyTorch
cd Pointnet2_PyTorch
pip3 install -r requirements.txt
cd ..
python3 setup.py build_ext
-
LineMOD: Download the preprocessed LineMOD dataset from here (refer from DenseFusion). Unzip it and link the unzipped
Linemod_preprocessed/topvn3d/datasets/linemod/Linemod_preprocessed:ln -s path_to_unzipped_Linemod_preprocessed pvn3d/dataset/linemod/
-
YCB-Video: Download the YCB-Video Dataset from PoseCNN. Unzip it and link the unzipped
YCB_Video_Datasettopvn3d/datasets/ycb/YCB_Video_Dataset:ln -s path_to_unzipped_YCB_Video_Dataset pvn3d/datasets/ycb/
- First, generate synthesis data for each object using scripts from raster triangle.
- Train the model for the target object. Take object ape for example:
The trained checkpoints are stored in
cd pvn3d python3 -m train.train_linemod_pvn3d --cls apetrain_log/linemod/checkpoints/{cls}/,train_log/linemod/checkpoints/ape/in this example.
- Start evaluation by:
You can evaluate different checkpoint by revising
# commands in eval_linemod.sh
cls='ape'
tst_mdl=train_log/linemod/checkpoints/${cls}/${cls}_pvn3d_best.pth.tar
python3 -m train.train_linemod_pvn3d -checkpoint $tst_mdl -eval_net --test --cls $cls
tst_mdlto the path of your target model. - We provide our pre-trained models for each object at onedrive link, baiduyun link (access code(提取码): 8kmp). Download them and move them to their according folders. For example, move the
ape_pvn3d_best.pth.tartotrain_log/linemod/checkpoints/ape/. Then revisetst_mdl=train_log/linemod/checkpoints/ape/ape_pvn3d_best.path.tarfor testing.
- After training your models or downloading the pre-trained models, you can start the demo by:
The visualization results will be stored in
# commands in demo_linemod.sh
cls='ape'
tst_mdl=train_log/linemod/checkpoints/${cls}/${cls}_pvn3d_best.pth.tar
python3 -m demo -dataset linemod -checkpoint $tst_mdl -cls $cls
train_log/linemod/eval_results/{cls}/pose_vis
- Preprocess the validation set to speed up training:
cd pvn3d python3 -m datasets.ycb.preprocess_testset - Start training on the YCB-Video Dataset by:
The trained model checkpoints are stored in
python3 -m train.train_ycb_pvn3d
train_log/ycb/checkpoints/
- Start evaluating by:
You can evaluate different checkpoint by revising the
# commands in eval_ycb.sh
tst_mdl=train_log/ycb/checkpoints/pvn3d_best.pth.tar
python3 -m train.train_ycb_pvn3d -checkpoint $tst_mdl -eval_net --test
tst_mdlto the path of your target model. - We provide our pre-trained models at onedrive link, baiduyun link (access code(提取码): h2i5). Download the ycb pre-trained model, move it to
train_log/ycb/checkpoints/and modifytst_mdlfor testing.
- After training your model or downloading the pre-trained model, you can start the demo by:
The visualization results will be stored in
# commands in demo_ycb.sh
tst_mdl=train_log/ycb/checkpoints/pvn3d_best.pth.tar
python3 -m demo -checkpoint $tst_mdl -dataset ycb
train_log/ycb/eval_results/pose_vis
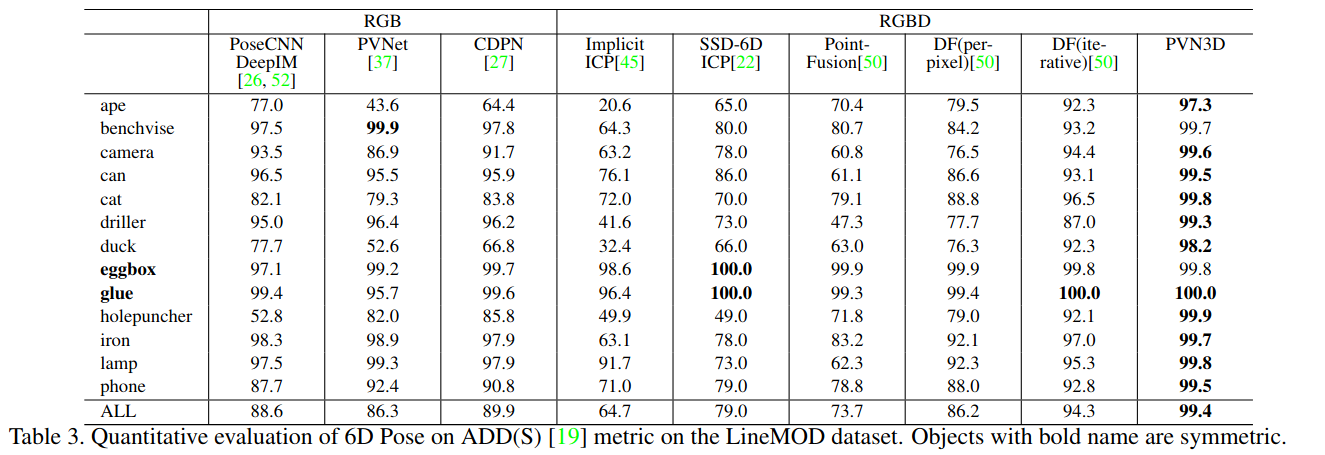
- Evaluation result on the LineMOD dataset:

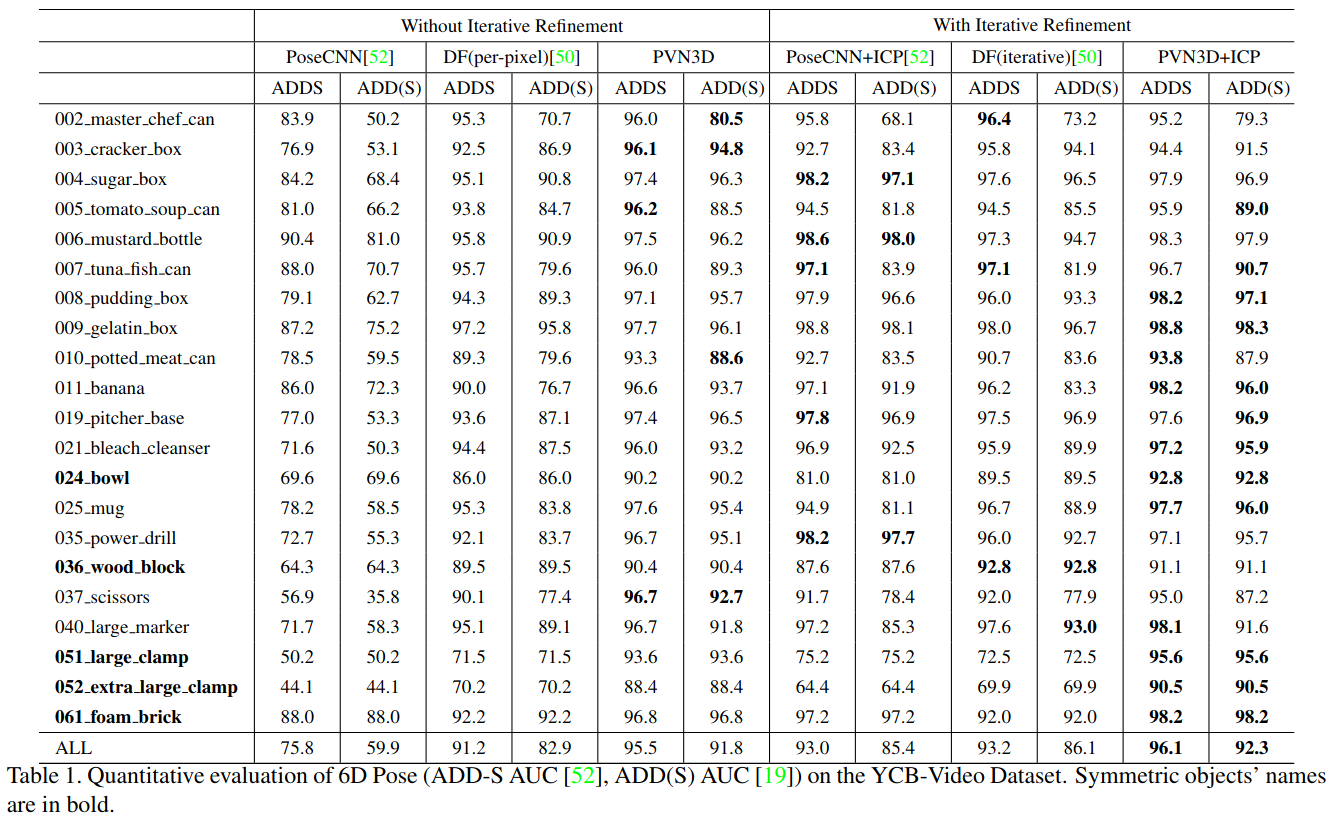
- Evaluation result on the YCB-Video dataset:

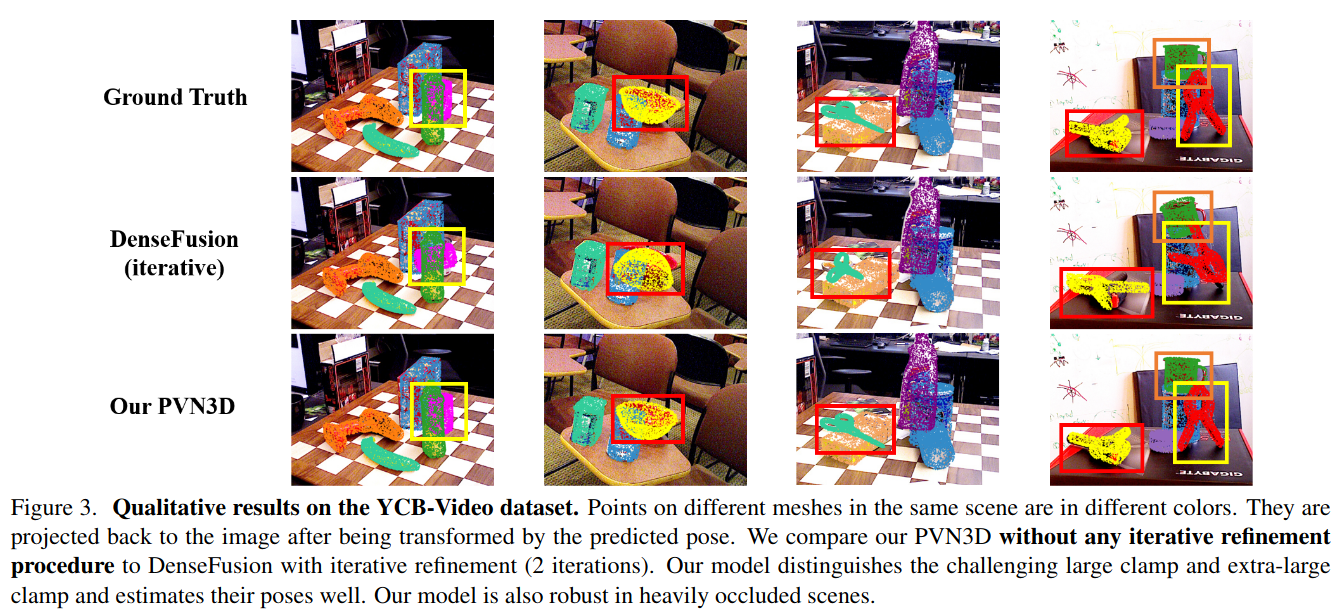
- Visualization of some predicted poses on YCB-Video dataset:

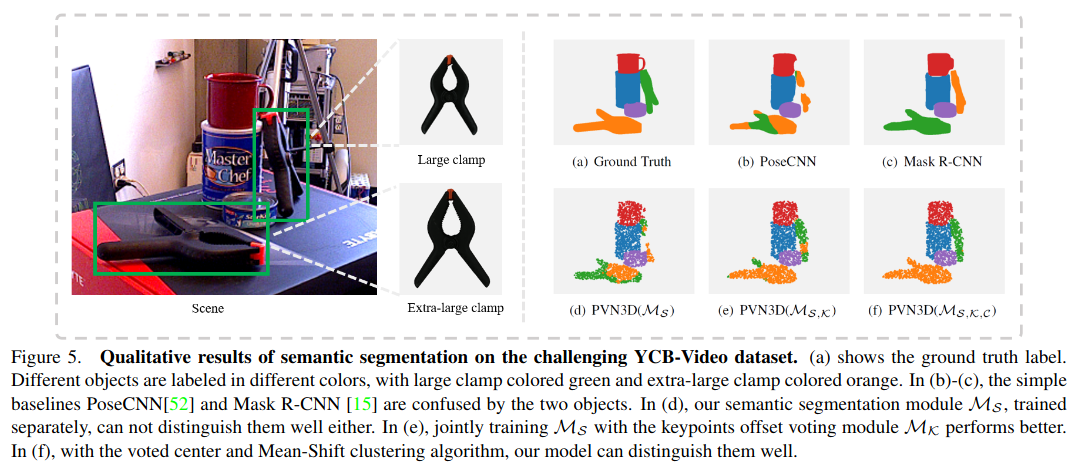
- Joint training for distinguishing objects with similar appearance but different in size:

Please cite PVN3D if you use this repository in your publications:
@InProceedings{He_2020_CVPR,
author = {He, Yisheng and Sun, Wei and Huang, Haibin and Liu, Jianran and Fan, Haoqiang and Sun, Jian},
title = {PVN3D: A Deep Point-Wise 3D Keypoints Voting Network for 6DoF Pose Estimation},
booktitle = {IEEE/CVF Conference on Computer Vision and Pattern Recognition (CVPR)},
month = {June},
year = {2020}
}
