WhoIsHomeUI
A webapp that scans your network and allows you to track hosts, give email & discord updates and now also curfew notifications to check if your kids are online at night!
Report Bug
·
Request Feature
Table of Contents
About The Project
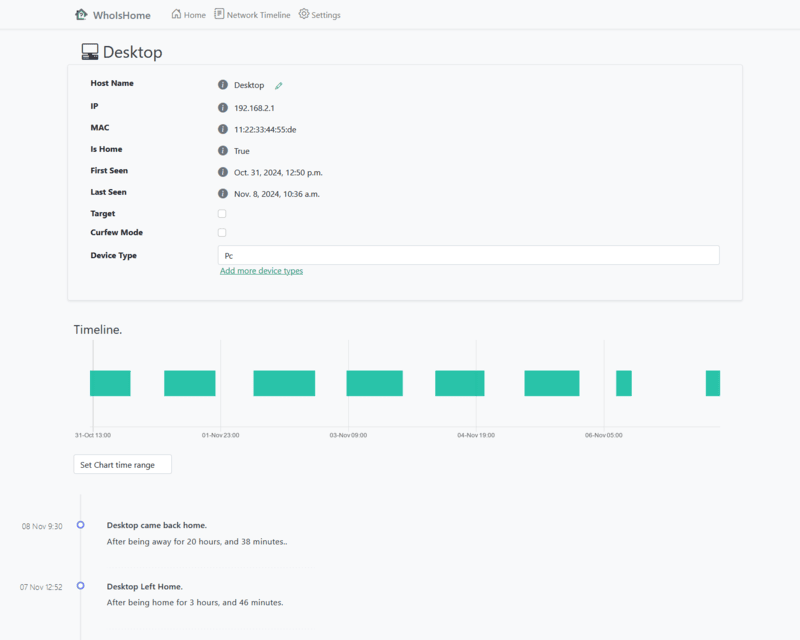
WhoIsHomeUI is a webapp that scans your network and allows you to track hosts, give email and discord updates, see new MAC addresses who connect to your network and check if your kids access the internet at night with the new curfew monitoring!
The webapp runs on Django and the network scanning is done by the linux tool arp-scan. (for the cli email alert version check: https://github.com/DartLazer/WhoIsHome) This project started as a way for me to learn Python and Django a while back. After a few friends liked my tool I decided to put it on here for everyone to use. If you have any comments, tips on my coding, or feature requests. Please open an issue and I will see to it.
WhoIsHomeUI scans devices on your network using ARP-Scan. It keeps track of all hosts, based on MAC Addresses in a database. The system registers a device "away from home" when it misses a certain amount of scans. The "not home threshold". I would recommend leaving this at around 20, since Apple devices tend to disconnect from the network a lot to save battery power. Lowering this value will cause a lot of false departures from Apple devices.
At the tool's current state the Django server is ran in Debug mode with the development webserver. I do therefore *** NOT*** recommend running this on an open port to the Internet. In a future update I will probably ship this with a proper webserver, depending on how much people will actually use the service.
Built With
Getting Started
These are the steps to setup the project on your system
Prerequisites
- First install Docker and Docker Compose on your Raspberry Pi (or other similar device, hereafter referenced to as raspberry pi) following the link upto and including step 6: https://dev.to/elalemanyo/how-to-install-docker-and-docker-compose-on-raspberry-pi-1mo
- Next install git on your raspberry Pi (or other similar device, hereafter referenced to as raspberry pi) https://www.geeksforgeeks.org/how-to-install-git-on-raspberry-pi/
Installation
-
Git clone this repo to your raspberry pi
git clone https://github.com/DartLazer/WhoIsHomeUI
-
To start the application on a different port than the default port 8000 edit the file
.envusing nano or any other editor and change the value for WHOIH_PORTWHOIH_PORT=8000
WHOIH_TZ=Europe/Amsterdam -
To change the timezone edit the file
.envusing nano or any other editor and change the value for WHOIH_TZWHOIH_PORT=8000
WHOIH_TZ=Europe/AmsterdamTimezone format from table TZ database name from https://en.m.wikipedia.org/wiki/List_of_tz_database_time_zones
-
In the cloned folder execute the following command to start
docker-compose up -d
-
The container should now be up and running on your
your_raspberrypi_ip_address:8000
-
In your webbrowser go to
http://your_rasppberrypi_ip_address:8000/
Update
Unless otherwise stated in the changelog section Update Instructions
- In the folder containing whoishomeui:
git pull - Then the following command
docker-compose up -d --build(if this does not work try adding sudo in front) - That should be it!
For migrating from v0.23 to v0.3 use the below steps
- Migration of the database file will lead to having to manually restore the database.
- Open a terminal in the root folder of your WhoIsHomeUI installation.
- Backup the current db just to be sure
cp mysite/db.sqlite3 db_backup.sqlite3 - Run:
docker-compose down && git pull && docker-compose build- Run:
docker container create --name dummy -v whoishomeui_dbstore:/mnt/test hello-world
docker cp WhoIsHomeUIDjango/db.sqlite3 dummy:/mnt/test/db.sqlite3
docker rm dummy
(this will create the docker volume required, put your old database in it, and remove the dummy container)
- Run:
docker-compose up -d- Upgrade to version 0.3 is now complete.
Backing up the database after the 0.3 upgrade
- Get the container name using
docker ps - run the following command
docker cp <container_name>:/dbstore/db.sqlite3 /local_pc_path/db_backup.sqlite3Enabling on system boot
To enable WhoIsHomeUI to run on system boot we'll add a command to crontab to execute the docker-compose up -d command at system boot.
- Note the installation of your WhoIsHomeUI installation (use
pwdcommand in the installation directory) - On your raspberry pi enter the following command (If it asks you which editor to use just use your preffered one)
sudo crontab -e- Hold the down arrow key until you reach the end of the comments block and enter the following code
@reboot docker-compose -f directory_from_first_step/docker-compose.yml up -dThat's it!
Usage
-
Go to the settings page and go to the Scanner Settings section:
-
Not Home Threshold (The amount of scans a device has to miss, to be considered to have left home). I would recommend leaving this to around 20. iPhones tend to disconnect sometimes. Leaving this on a lower value will register a lot of disconnects from Apple devices.
-
Internet interface should be: "eth0" for a wired ethernet connection. If your raspberry pi is using wifi use "wlp2s0" or type "ifconfig" in command line to get the active interface name.
-
IP Subnet: change this to the net your router uses. for me it uses
192.168.2.1 - 192.168.2.198so set here ONLY 192.168.2. (dont forget last dot) -
IP range start (first IP to scan within earlier specified range)
-
IP range end (last IP to scan within earlier specified range).
-
Press SAVE. Let the page reload and now enable the scanner
-
Now supports Discord Notifications as well. Setup at the settings page! (Click here for instructions on how to setup the discord webhook)
-
Now Supports Telegram Notifications (How to get your telegram bot token and chat ID )
-
If you want email notifications set up email settings as well.
-
In the email body and subject you can access the following variables by putting them in curly brackets {}
-
target (gives target name), arrival_time, departure_time , time_away, time_home.
-
Go to
your_raspberrypi_ip_addres:8000/settings/ -
Enable scanner status and you should be up and running!
Curfew Mode
To enable curfew mode to i.e. check if your kids are online during certain times do the following:
- Select the hosts from the front page which you want tracked during curfew times, and enable curfew mode.
- Go to the settings page
- Press app settings
- Enable curfew mode
- Enter the curfew times
- (Maybe also lock the app with a password)
- Setup e-mail notifications and/or discord notifications. (Click here for instructions on how to setup the discord webhook)
Roadmap
- Build an awesome project
- DockerHub Publish
See the open issues for a full list of proposed features (and known issues).
Contributing
Contributions are what make the open source community such an amazing place to learn, inspire, and create. Any contributions you make are greatly appreciated.
If you have a suggestion that would make this better, please fork the repo and create a pull request. You can also simply open an issue with the tag "enhancement". Don't forget to give the project a star! Thanks again!
- Fork the Project
- Create your Feature Branch (
git checkout -b feature/AmazingFeature) - Commit your Changes (
git commit -m 'Add some AmazingFeature') - Push to the Branch (
git push origin feature/AmazingFeature) - Open a Pull Request
License
Distributed under the GPL-3.0 License. See LICENSE for more information.
Contact
Rik - Github
Project Link: https://github.com/DartLazer/WhoIsHomeUI