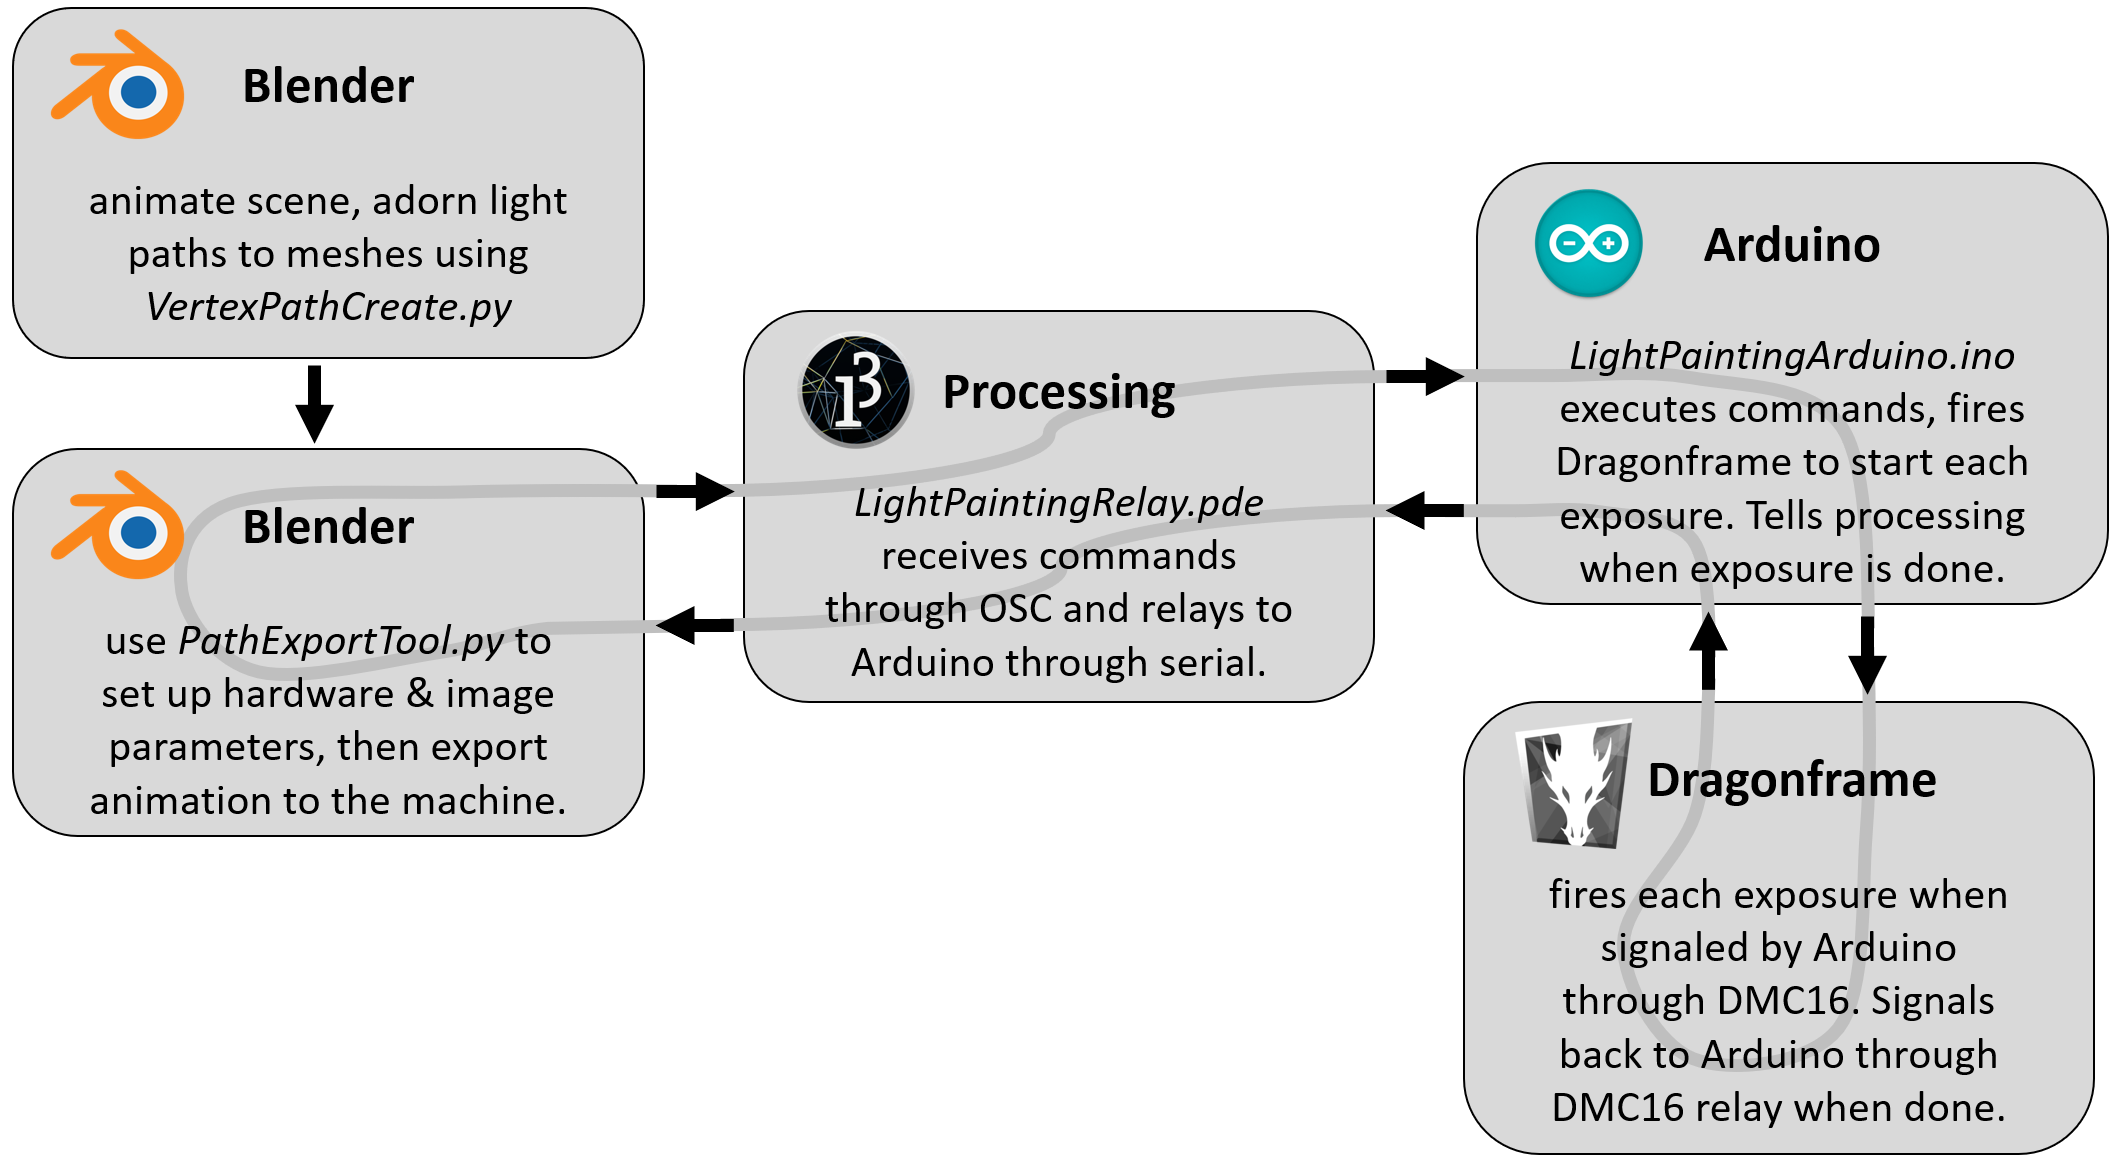
This is the Blender, Processing, and Arduino code that enable use of a CNC light painting machine to make pretty pictures and animations. A basic outline of how this works is as follows:
- Light paths are defined and animated in Blender. VertexPathCreate.py is a Blender addon that makes adorning path objects to animated meshes easy.
- PathExportTool.py is another Blender addon that iterates through each frame of animation and converts the light paths into a command sequence that can be followed by the Arduino
- The commands are sent through OSC and received by LightPaintingRelay.pde, a Processing sketch which relays the commands through serial to the Arduino.
- The serial commands are received by the Arduino, running LightPaintingArduino.ino. The Arduino executes the command sequence.
- When finished, the Arduino indicates it is finished by sending a serial command to Processing, which relays it back to Blender through OSC.
- When PathExportTool.py in Blender receives the finished command, it sends the command sequence for the next exposure. This loop continues until all exposures are complete.
Using VertexPathCreate.py to adorn light path objects to animated meshes
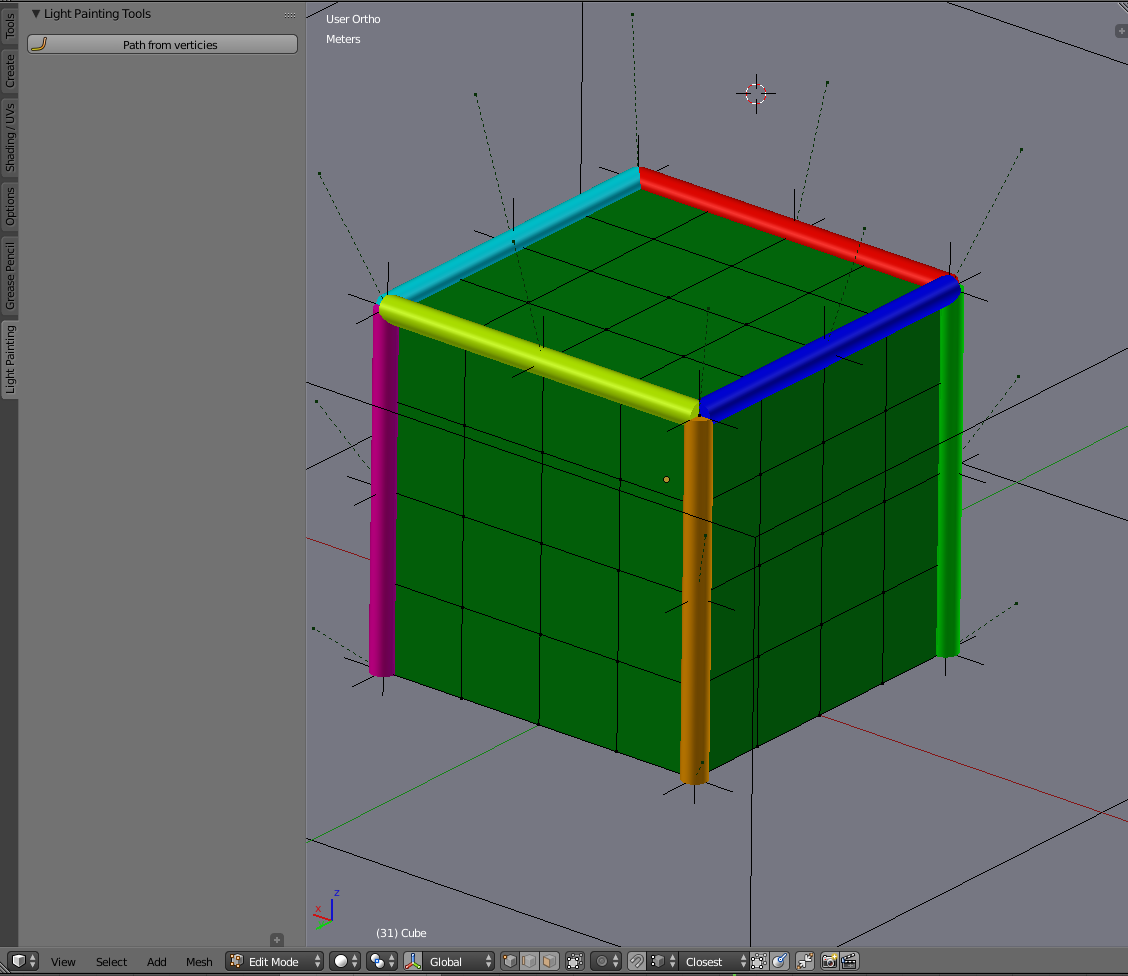
Run VertexPathCreate.py and enter edit mode to view the light path creation tool panel.
Click the button to enter the path creation state.
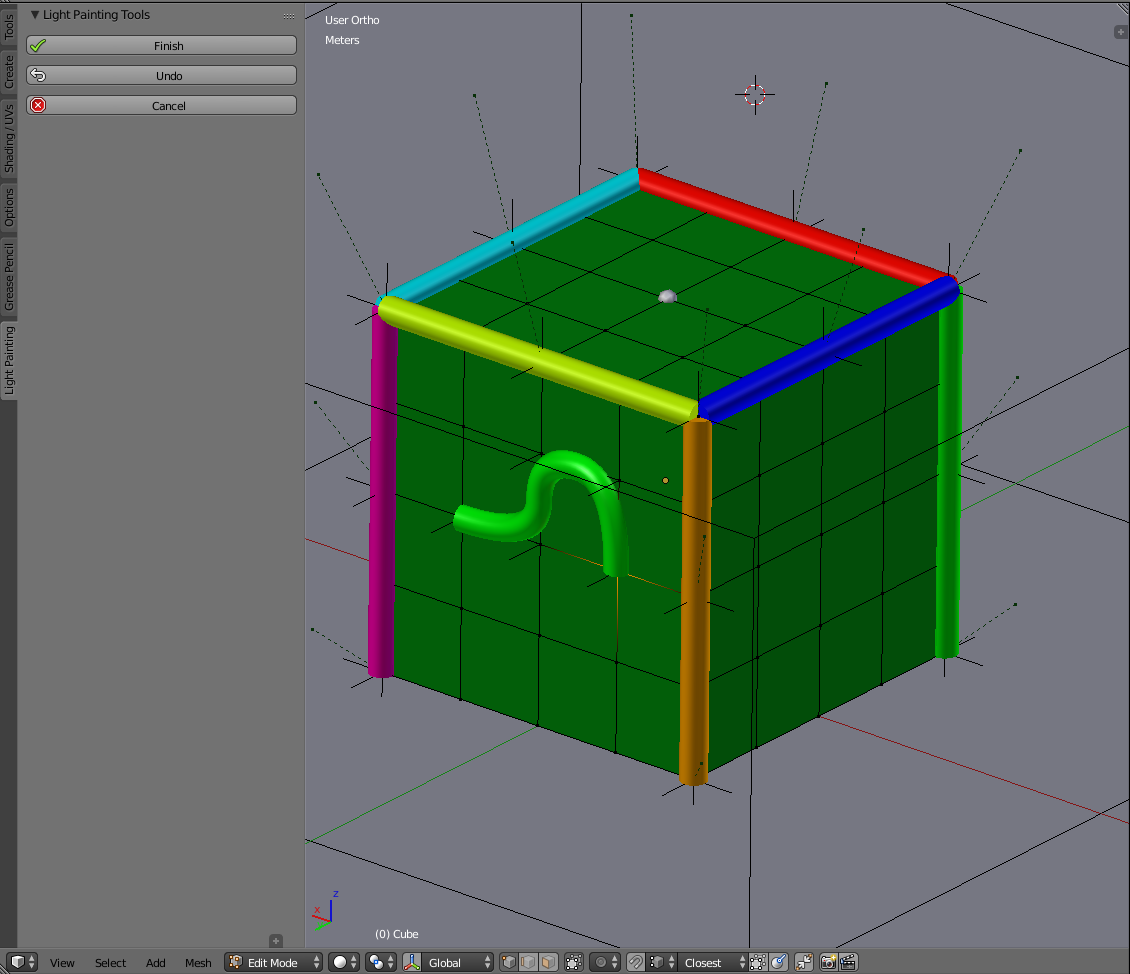
Select a series of verticies on the mesh and a path object will be generated, following the sequence of verticies you selected. Press finish or the enter key when you're done.
On the backend, this is automating the usually tedious process of creating empty objects attached to each vertex, creating a path that connects the verticies, and connecting the path to the empty objects using hook modifiers so that the path translates and deforms with the mesh.
VertexPathCreate.py will automatically create a circle called LightCircle, which will be used as the bevel object for the light paths. You can change the size of this circle to change the diameter of the light paths. For accurate visual results, this should be set to the diameter of the light emitter on your machine.
VertexPathCreate.py will also automatically create a material called LightPathMaterial and assign the material of all created light paths to this material. Set up this material with no surface shader and an emission volume shader with a color of your choice. You can use different materials for each path, but it is important that each uses an emission shader because the color of this shader is used by PathExportTool.py to send color commands to the machine.
Operation Setup
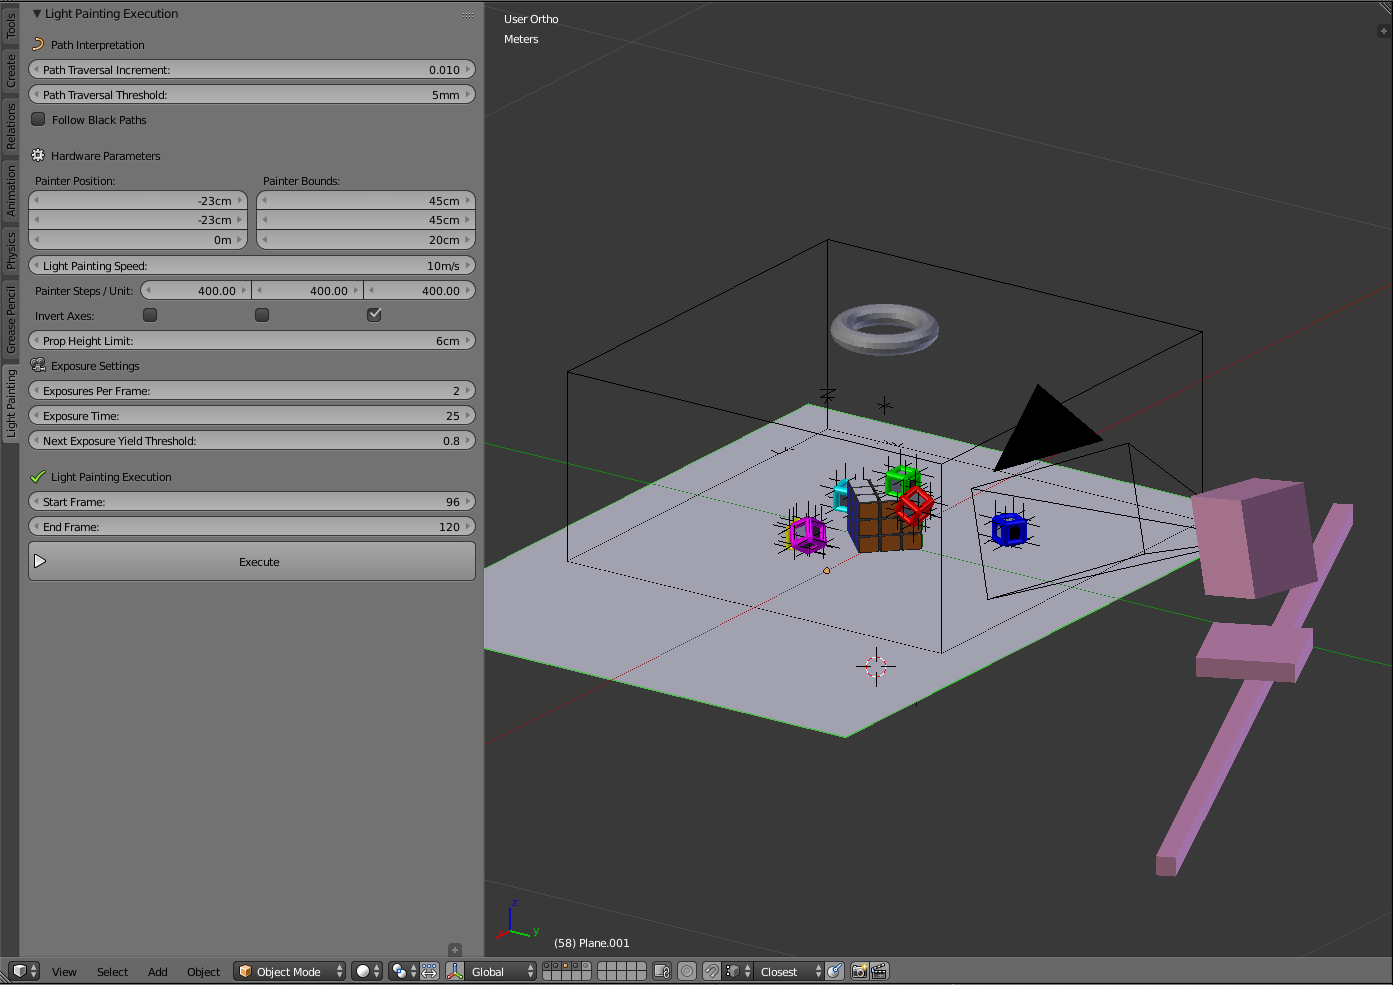
When you run PathExportTool.py, the light painting execution panel will appear in the tools pane when in object mode.
Before setting any paremeters, ensure that the unit of length in your Blender scene is set to your preference (use metric).
Path Traversal Increment is the step increment used when converting light paths into a sequence of position commands. Each path will be traversed from 0 to 1 in steps of this paremeter. Generally the default value should be fine, for especially long paths a smaller value might be better.
Path Traversal Threshold is the minimum distance from the current point on the path to the last recorded point for a new point to be recorded. As the path is traversed, a new point will be recorded when the distance to the last point is greater than this threshold. This is effectively a value of fidelity.
Follow Black Paths will force the machine to follow paths that are black (invisible). These paths are normally ignored, but there are cases when you may want to force the machine to follow a black path to do manual obstacle avoidance where automatic obstacle avoidance does not suffice (more on this later).
An origin marker and bounding box that indicate the workspace of the machine will be created. Use the Painter Bounds paremeter to match the size of the bounding box to the size of the physical machine, and use the Painter Position paremeter to specify from where in the blender workspace the machine should operate.
Light Painting Speed is how fast the machine will move. Generally this is a tradeoff between shoot time and machine vibration. Fast movement will often cause oscillation in the light, causing uneven, beady paths. Slower movement produces smoother paths.
Invert Axes allows inversion of the X Y and Z axes. For my machine, the Z stage is operating upside down, so the Z axis is inverted.
Prop Height Limit represents the Y position of the top of the tallest props in your scene. If you are not operating with the Z axis inverted, this would be the height of the bottom of your lowest props. This value is used in obstacle avoidance. If there is a prop in the way between the light position and the start of the next path, the light will retract to this height, move in the XY plane, and then drop down to the final position.
Exposures Per Frame specifies how many exposures you want to divide each frame of animation into. This should be matched with the same number of exposures in Dragonframe.
Exposure Time specifies the time of each exposure. This should be matched with the shutter speed in Dragonframe.
Next Exposure Yield Threshold is a time value threshold. If the Arduino is not on the last exposure, it is about to move on to the next light path, and the time difference between the frame exposure time and the amount of time elapsed so far is less than this threshold, the Arduino will hold and wait to execute this path on the next exposure. In a scene with only short paths that can be drawn quickly, this value can be low. If there are long paths that take longer to draw, it is safer to keep this value higher. If the value is too low, a light path can get cut off by the end of the exposure and not be fully captured.
Start Frame specifies the frame to start on.
End Frame specifies the frame to end on.
Blender communicates with Processing through Open Sound Control (OSC).
Using OSC in Blender requires this Python library: https://github.com/sergeLabo/blenderOSC
Using OSC in Processing requires the oscP5 library by Andreas Schlegel. You can find it in Processing by searching for "oscP5" in the library manager, or here: http://www.sojamo.de/libraries/oscP5/
Start by running the LightPaintingRelay.pde Processing sketch and checking the console.
Ensure that the IP adress and the port printed in the Processing console match the ip_out and port_out variables in the header of PathExportTool.py.
Set the PORT_NUM variable in the header of the Processing sketch to match the serial port number that the Arduino is connected to. This might take some trial and error, it's usually been 0 for me.
I recommend using a Dragonframe DMC16 or DDMX-512 to easily interface between Arduino and Dragonframe. If this is not an option, you may be able to hack together some other way to trigger Dragonframe, perhaps by hacking the enter key of a number pad. It would be harder to find a way to figure out communication from Dragonframe back to Arduino, so you might loose this functionality. You'd have to run Dragonframe open loop and just have the Arduino wait a set safe exposure time between each frame.
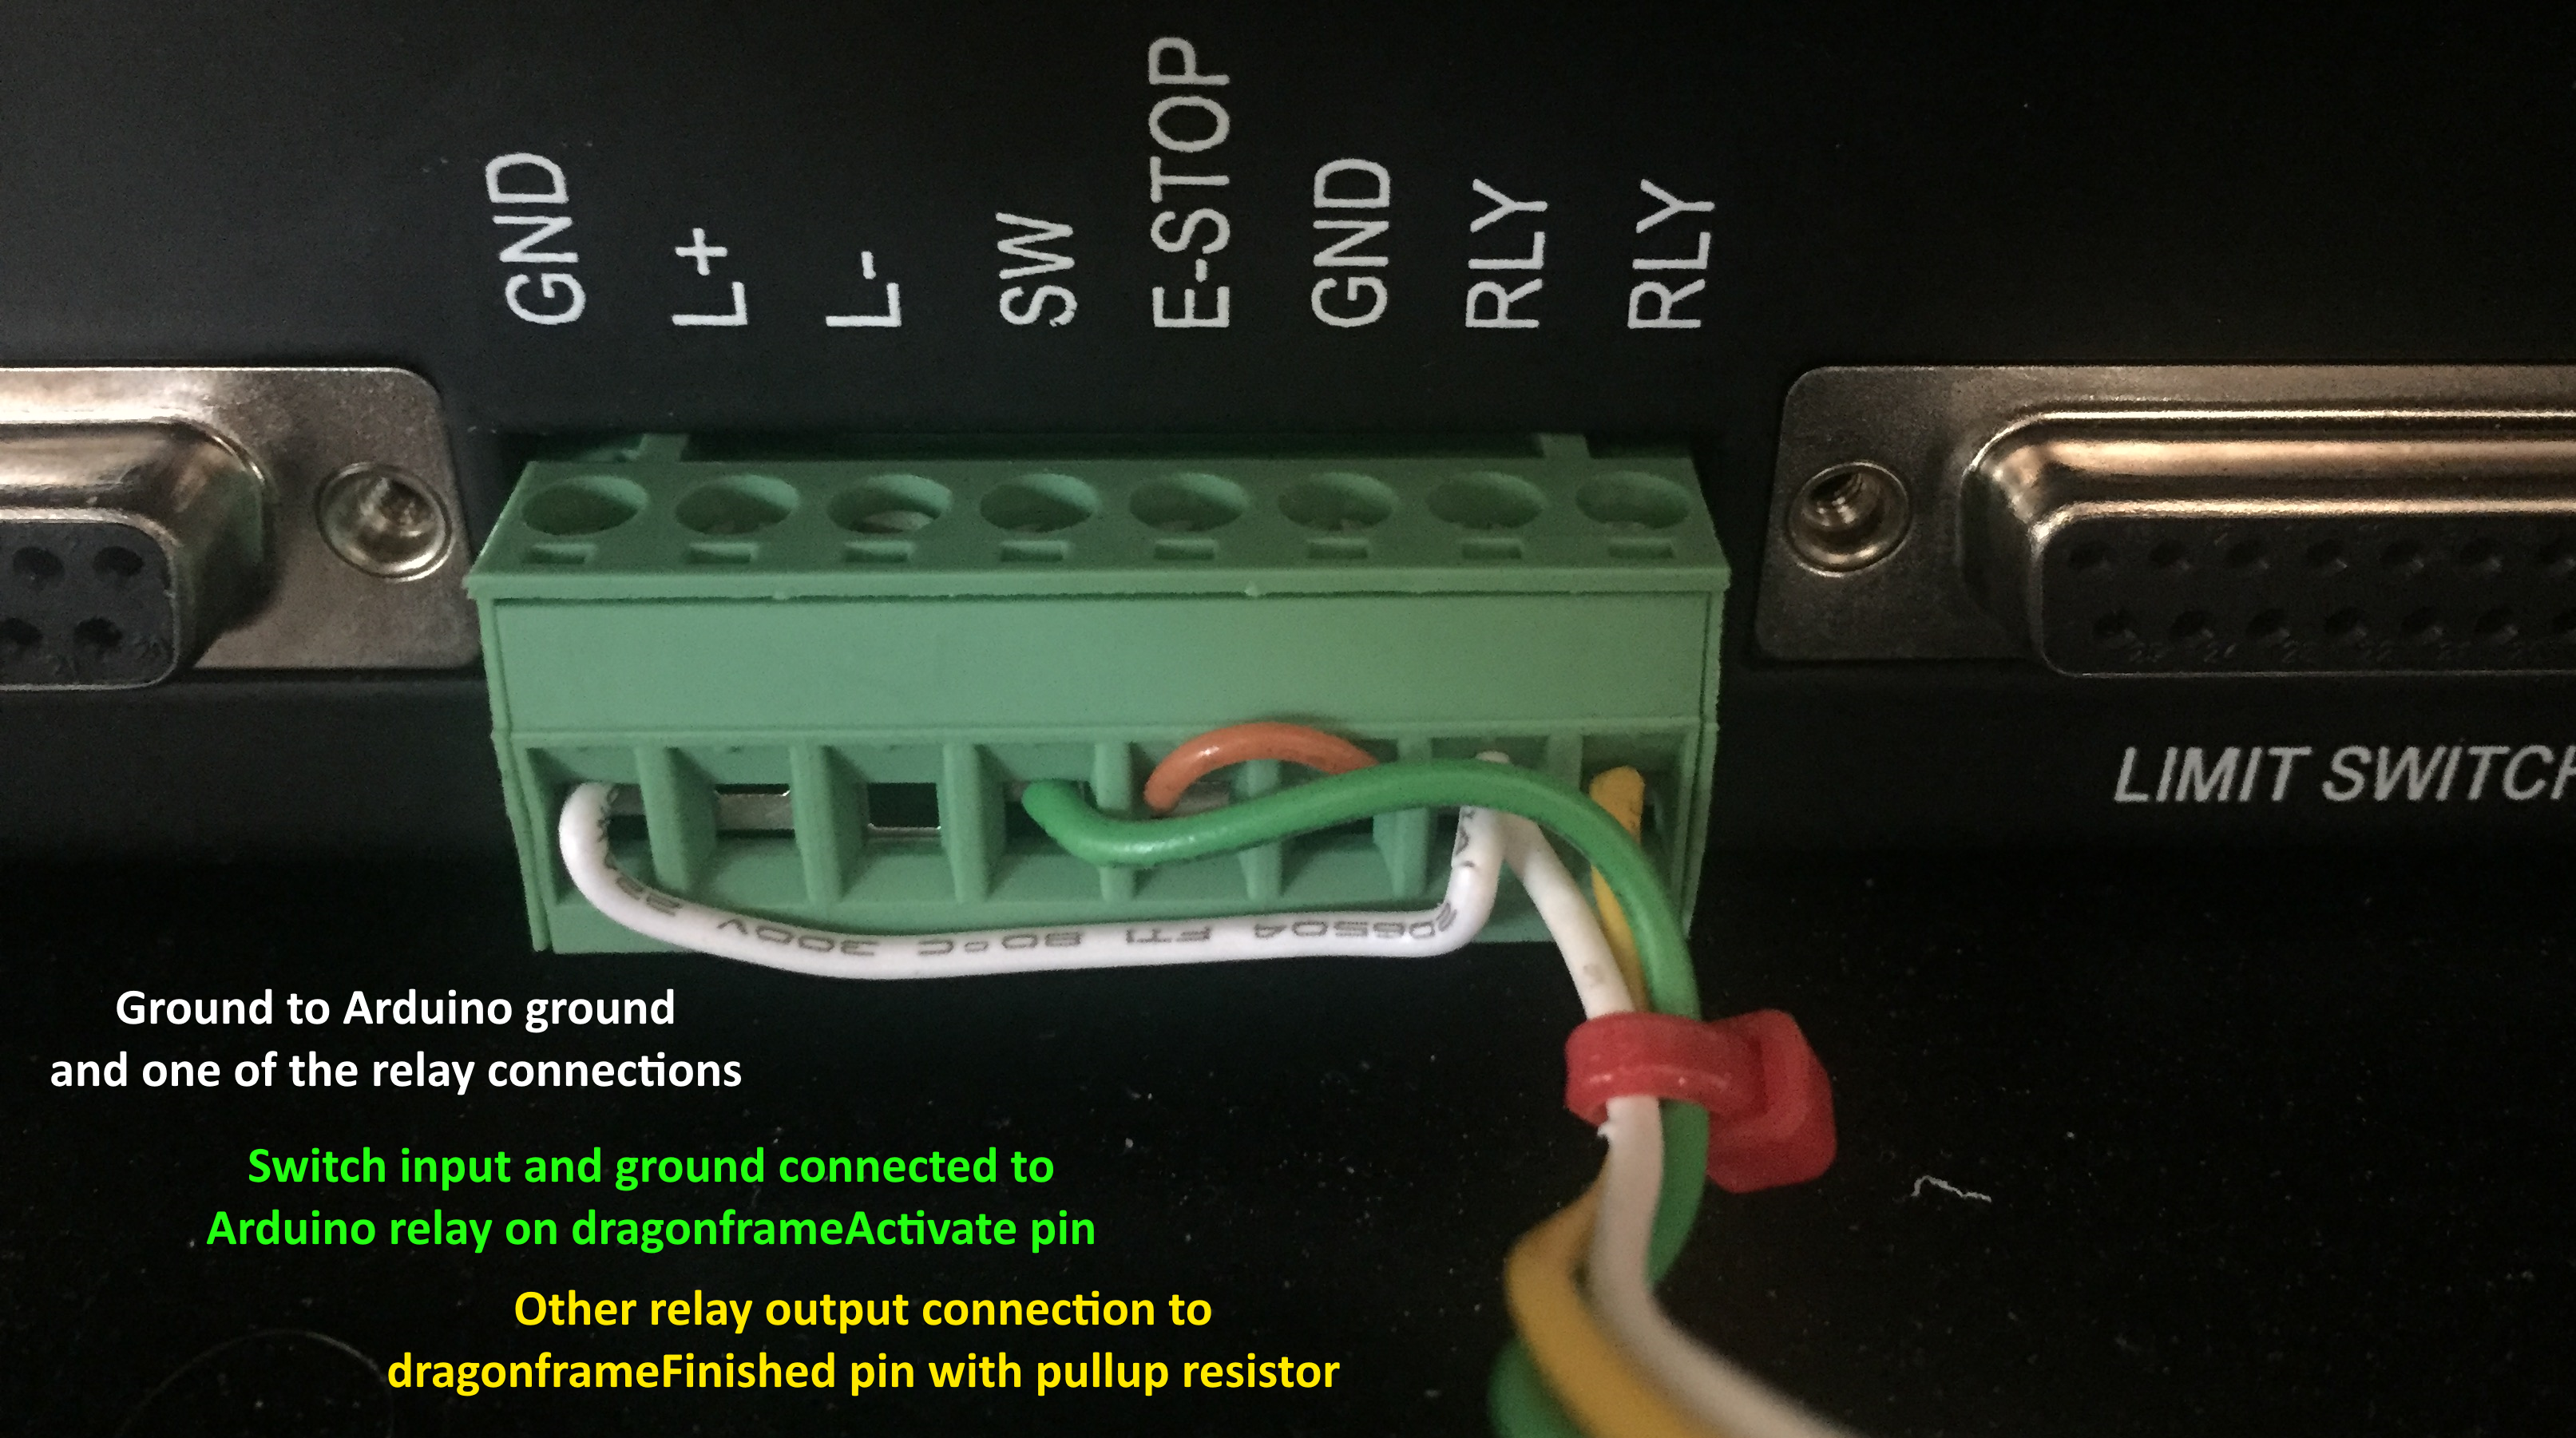
If using a DMC16 or DDMX-512, connect a relay to the dragonframeActivate pin in the Arduino sketch, and connect this relay between SW and GND on the DMC16 or IN and GND on the DDMX-512. Connect the dragonframeFinished pin to one of the two relay connections on either the DMC16 or DDMX-512, and connect the other relay connection to ground. Connect a pullup resistor to the dragonframeFinished pin or use the INPUT_PULLUP pinmode if available.
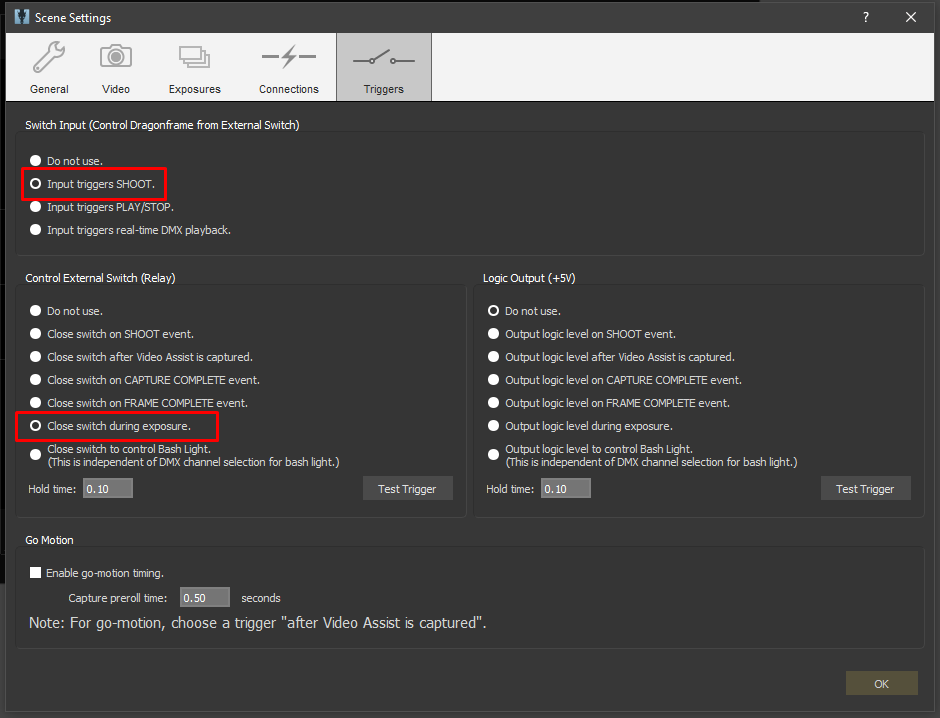
In Dragonframe, set the input trigger to shoot, and set the relay to close during exposure.
Hardware
Depending on who you are, building the machine and the control box is either the most or the least intimidating part of this. Since the hardware isn't too dissimilar to other CNC machines like 3D printers, I'm not going to go into too much detail. If you want to follow my design, consult the pictures.
The overall rigidity of your machine and how susceptible the end effector is to vibrations will determine how fast you'll be able to drive it while keeping light vibration down to an acceptable level. My machine was less rigid than I would have liked, but it worked. Make sure you mount it solidly to something secure that will take up all the vibration and keep the machine from moving.
The components to the control box are the following:
- Arduino. I used a small form factor Arduino mega equivalent.
- 3 stepper drivers. I used the DM320T.
- Power supply to match stepper drivers and stepper current. I used a 24v 4a power supply. Since the Arduino can't run directly on 24v, I opted just to let it be powered over USB.
- SD card and SD card reader. I used a micro SD card reader. These Arduino modules are widely available on Amazon/eBay.
- Relay module. Also widely available.
- RGB LED driver. I made a simple transistor circuit to do this, you can find diagrams online. You might also be able to find premade modules to do this.
- Voltage stepdown unit to step 24v down to 3v for the RGB LED. Also widely available, search for "voltage stepdown module".
Hook everything together, set the pin assignments in the Arduino sketch, and if you're lucky it might work. If not, take it apart and debug one system at a time until you get everything working. I believe in you!
Usage Tips and Misc Info
When PathExportTool.py is exporting movement commands, it optimizes the order of paths by choosing the next path endpoint that is the closest to the path endpoint of the most recently completed path. This ensures each exposure is drawn as quickly as possible.
Each light path object must have a material assigned with an emission shader node. The color of this shader is sent to the machine and used to draw the path. If the color is black, the path will be ignored unless the Follow Black Paths setting is checked. By ignoring black paths, the machine saves time in cases where you might be animating path colors to fade in or out.
Paths that are outside the bounds of the machine will be ignored, obviously.
PathExportTool.py automatically creates a "SceneProps" object group. If there are any physical props in your scene, replicate them in Blender and add them to this group. When exporting movement commands, if there is an object in this group that is between the current light position and the start of the next path, the light will avoid the obstical by retracting to a Z position of Prop Height Limit, moving to the next position in the XY plane, and then finally move to the Z position of the start of the next path. Keep in mind that this raycast check only checks for obstacles along a thin line, and does not consider the thickness of the light emitter. Avoiding collisions is also dependent on exactly lining up the physical props on your scene to their respective virtual locations. There's always a risk of collision when using props in your scene; do so at your own risk.
If using a bash light, in DMX settings, set the Power up Time, Lights up Settle Time, and Bash off Settle Time all to 0 to minimize time between frames.
If you're having any touble at all getting this to work, please contact me! There's a lot involved here and I'm sure I've left stuff out. josh@jshel.co
Incorporating motion control
Motion control (or moco) will let you add camera movements and prop movements into your animations. For more info on how to create moco movements in Blender and export those movement to Dragonframe, check out this Blender addon: https://github.com/Defaultio/BlenderMoco/
